When you click on links to various merchants on this site and make a purchase, this can result in this site earning a commission. Affiliate programs and affiliations include, but are not limited to, the eBay Partner Network.
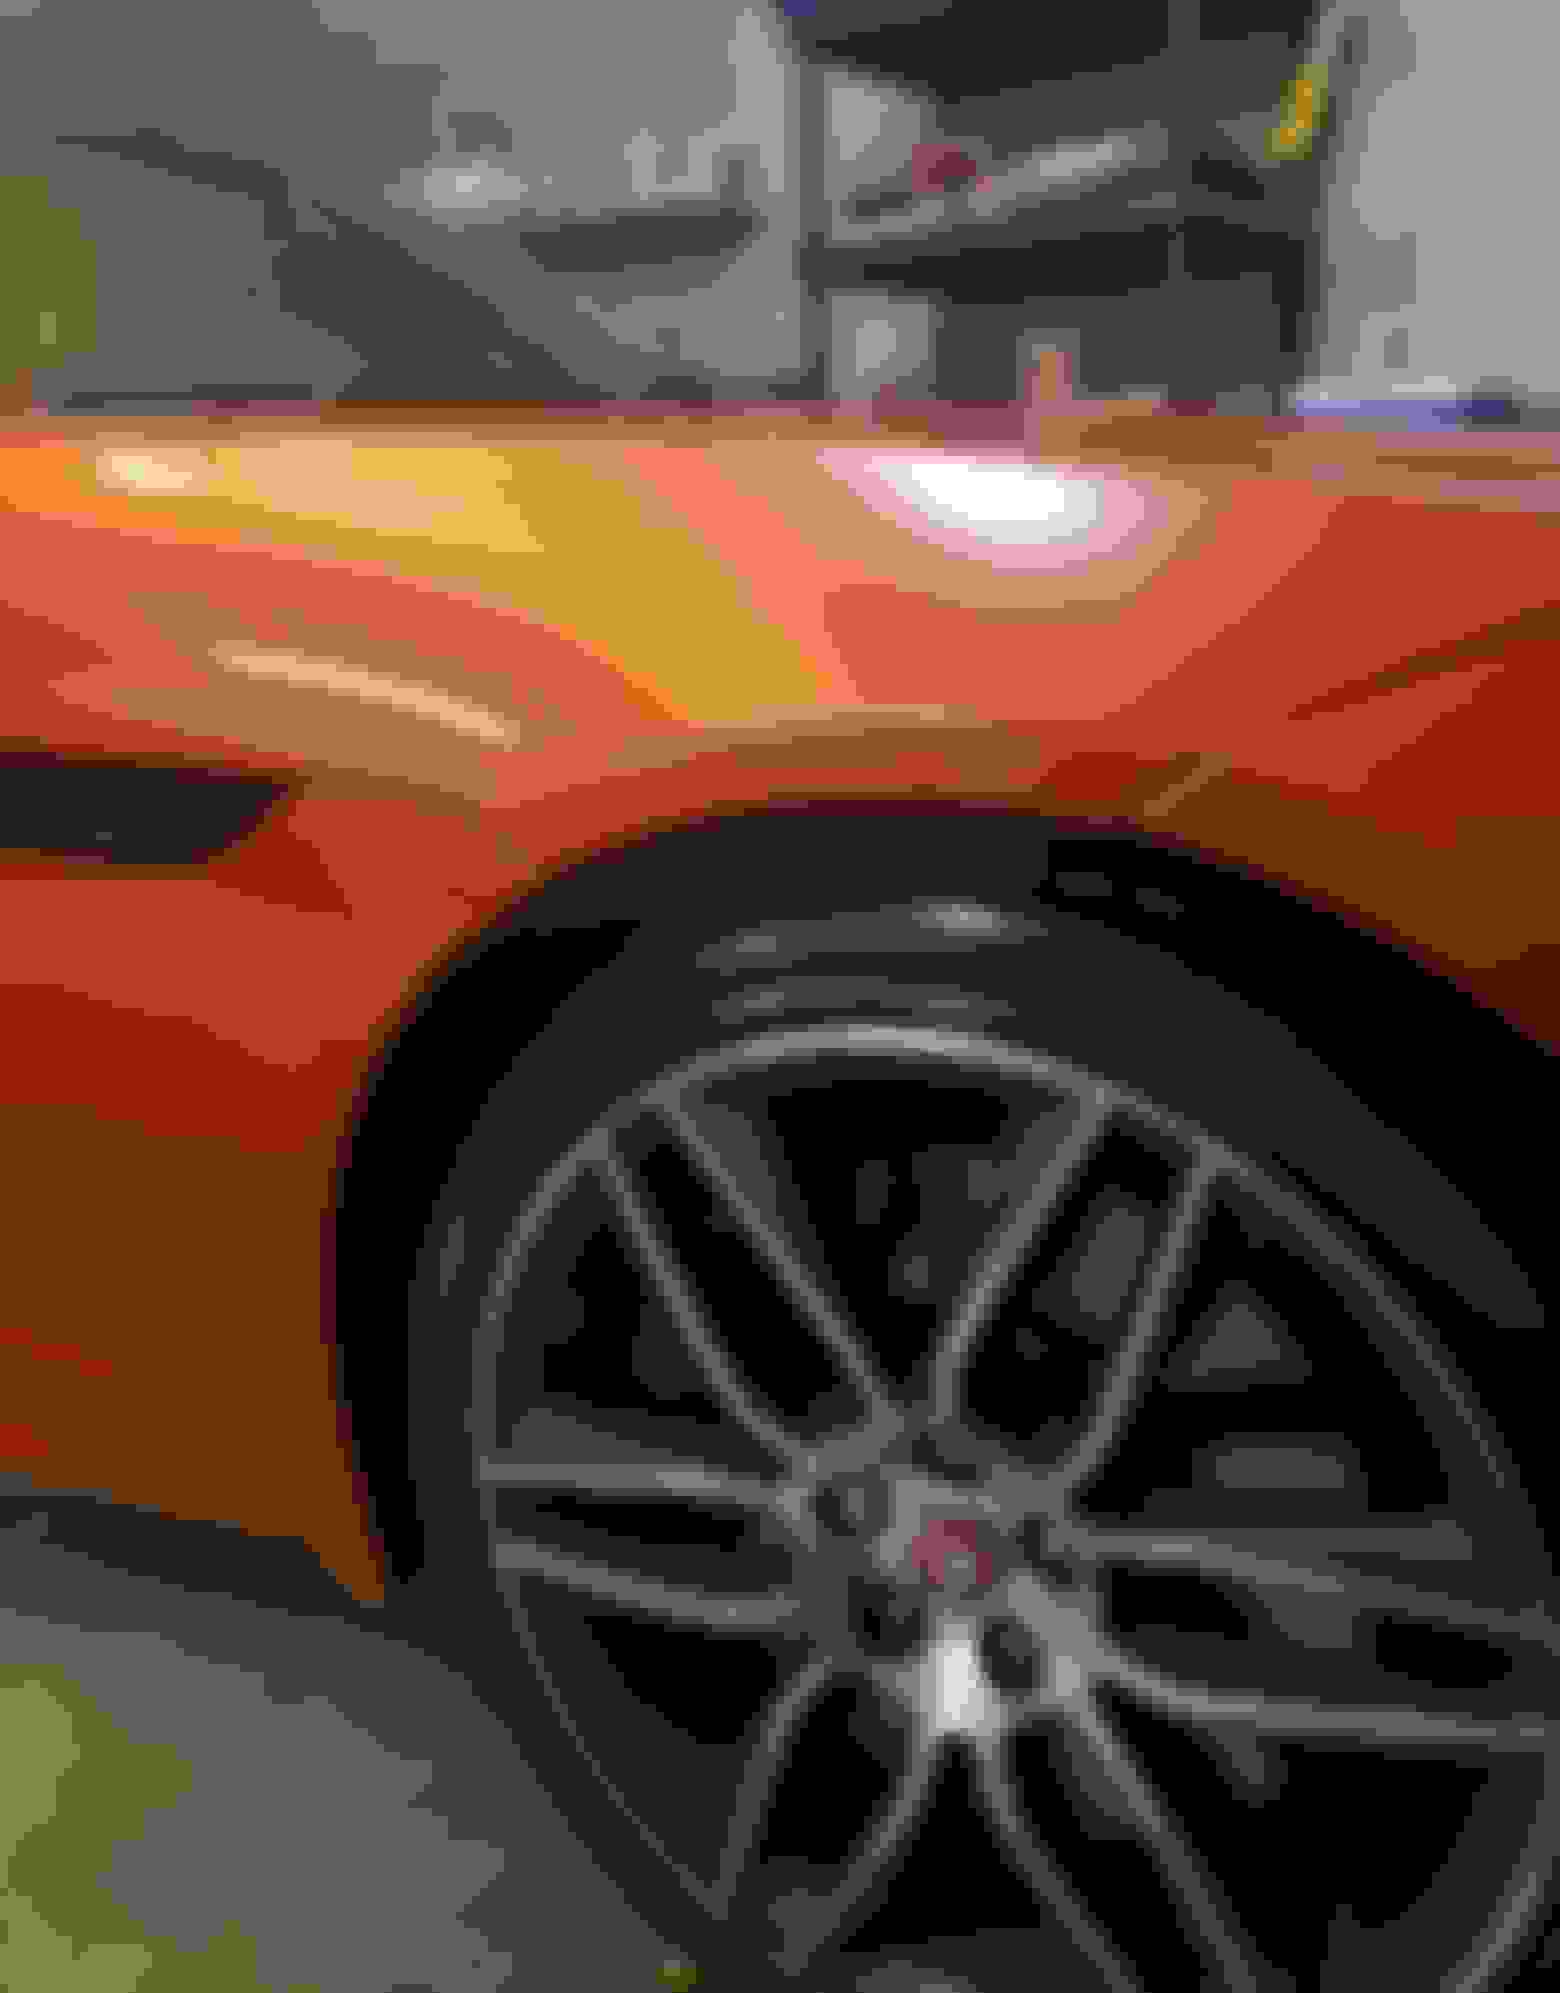
Hey everyone! My first thread here and new to the forums as of today. Just bought a 2016 F-Type R coupe. Car is super clean, clean car fax one owner 4900 miles. For me being the second owner and super OCD I can't believe how clean she is. Easily 10 out of 10. Anyways I'm in love with the car, my first Jag. Now with that said I am having an issue where the bottom of the hood, so down near the front bumper outwards to the side wheel wells the alignment is off. It comes out to much and is not flush. Looking for help here with suggestions on how to correct this. Anyone who could offer help I would really appreciate it !!!!! Pictures show passenger side at front wheel well, but both sides are like this. Rest of the hood alignment and car gapping is perfect. Hope this can be fixed and I'm not just cursed with bad body gaps.
I do see the other thread a few below this one on the same topic and posted there as well with my issue. I love this car and its driving me nuts so trying to get help where ever.
Thanks ...
From the pictures it looks like all you need to do is unscrew the front hood stops a bit. There are four stops underneath the hood, two in the front and two in the back on the left and the right. Looks like you need to unscrew the front right to raise the hood a touch. When you lift the hood, you will see it about 3 inches behind the headlight harness plug at the back of the black headlight housing. The stop is a black hexagonal rubber topped bolt thst you adjust by hand.
The sides of the bumper itself can be adjusted too, by loosening the two bolt heads directly above the tire that are revealed when the hood is raised and go into the bumper. Put a microfiber towel between the socket and the bolt to keep from scratching the bolt heads, which could look like you had bumper work done.
You will never get those gaps between the bonnet/hood and the front bumper in the wheel arch to align perfectly, simply due to the fact that the width of the bonnet/hood in that spot is a couple of mm wider than the width of the bumper. It will always look like the hood is sitting low and/or the bumper is sitting high.
But you can fiddle around with some easy adjustments to get it looking a bit better.
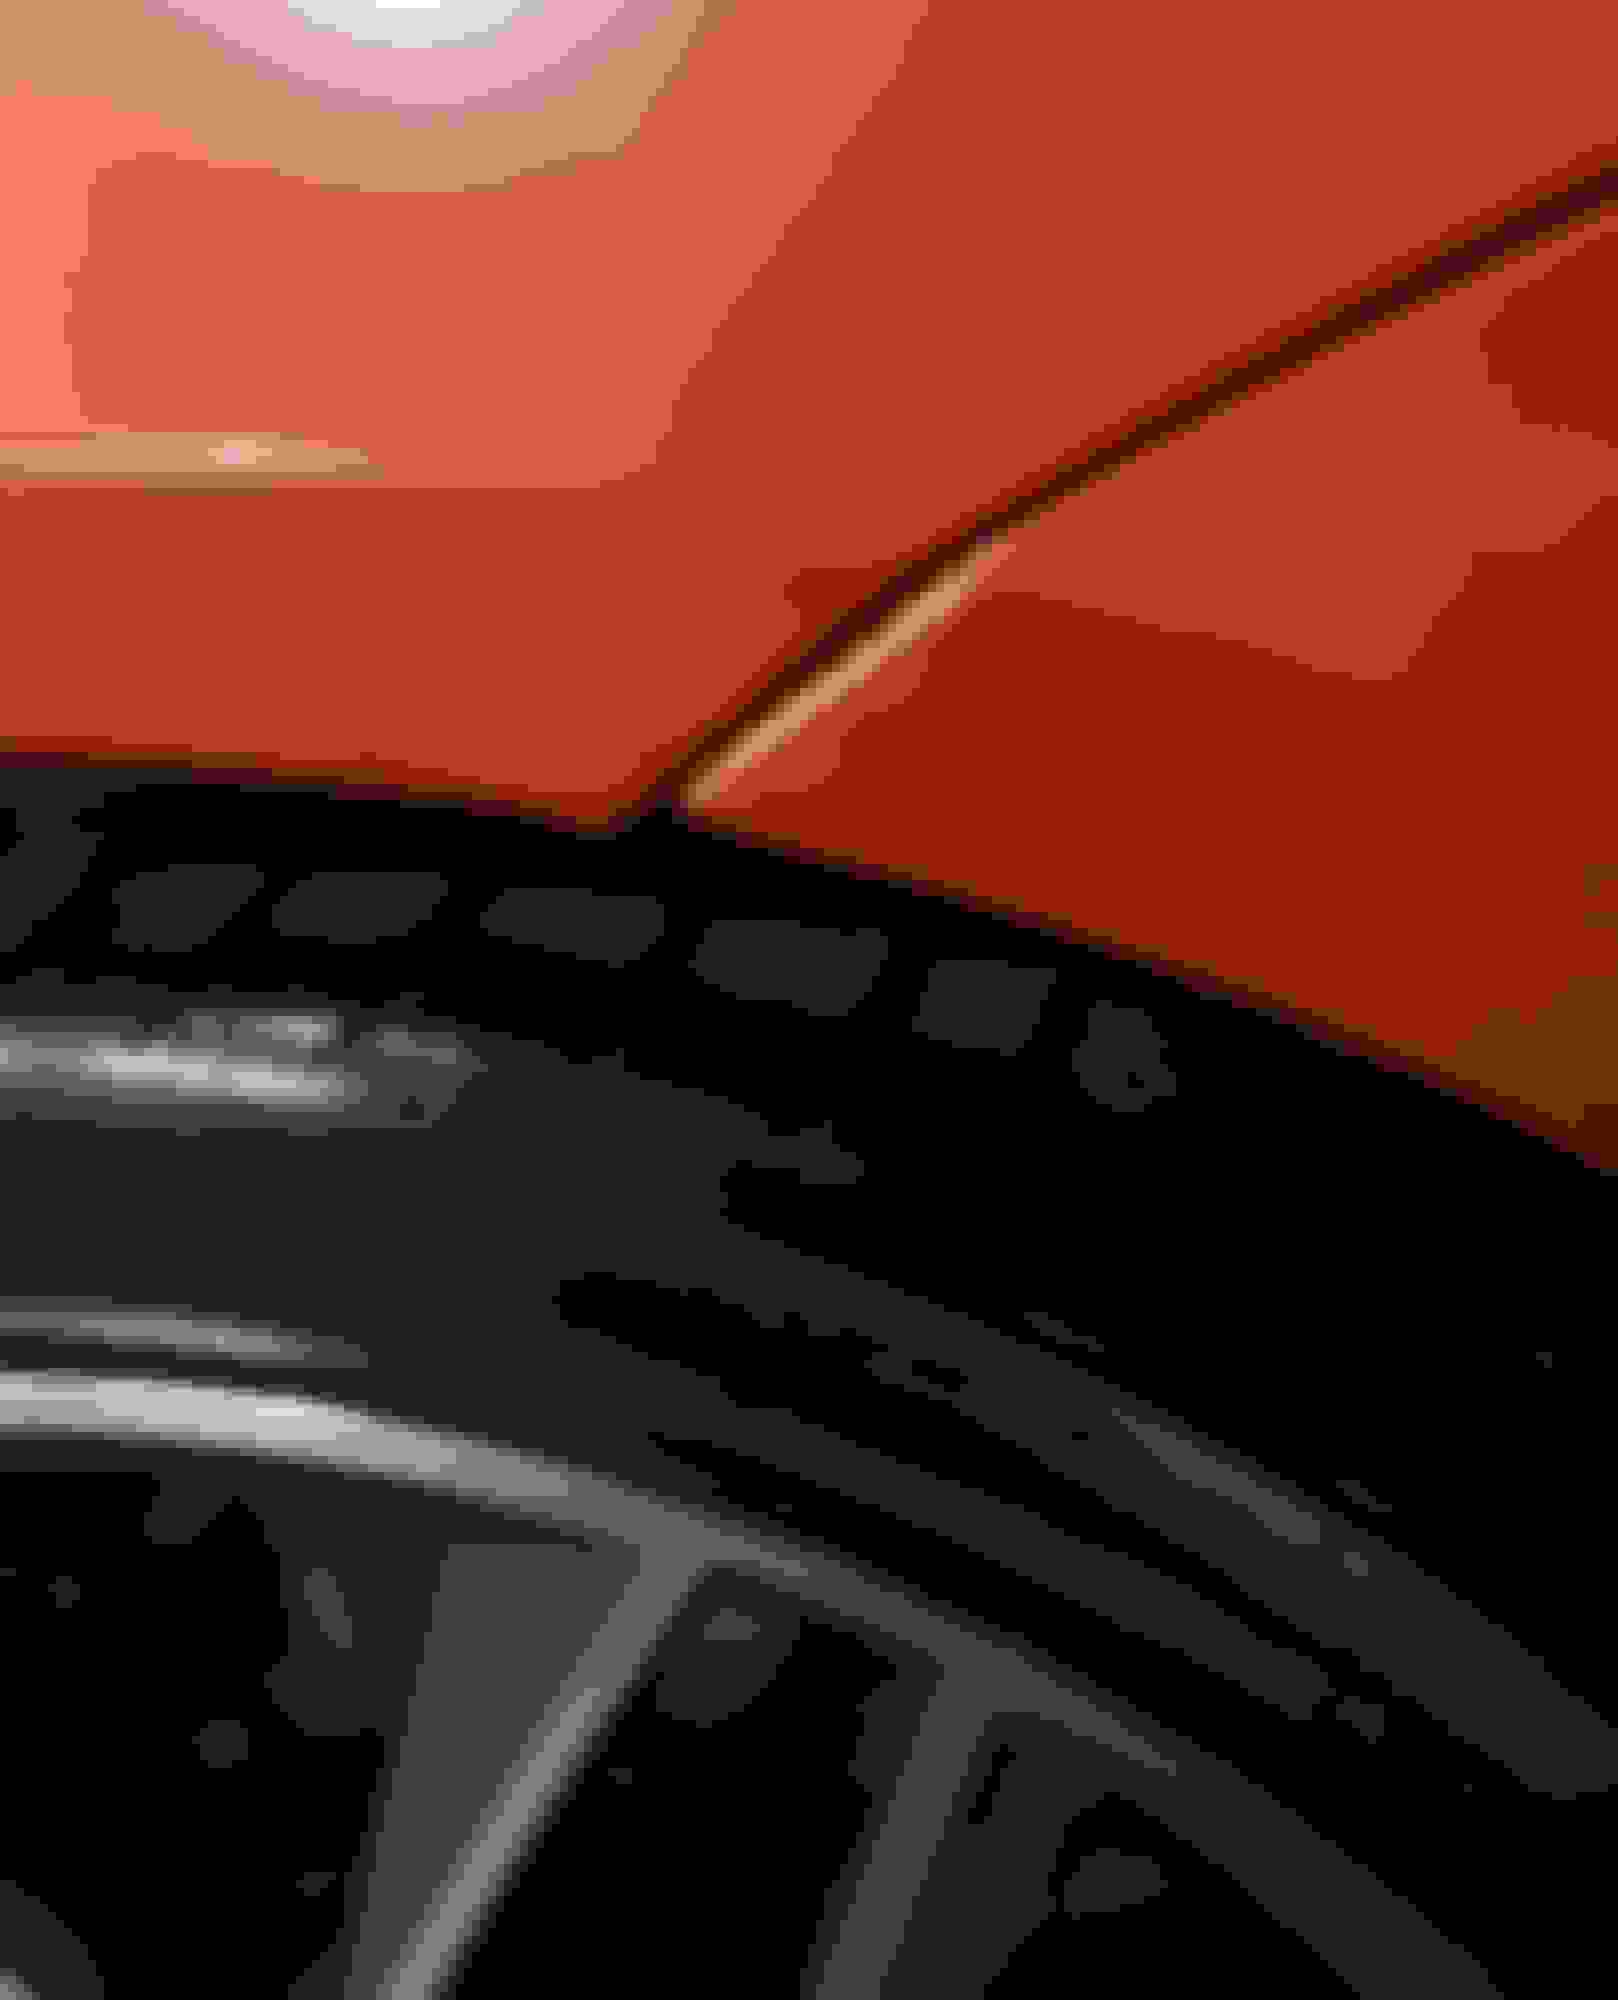
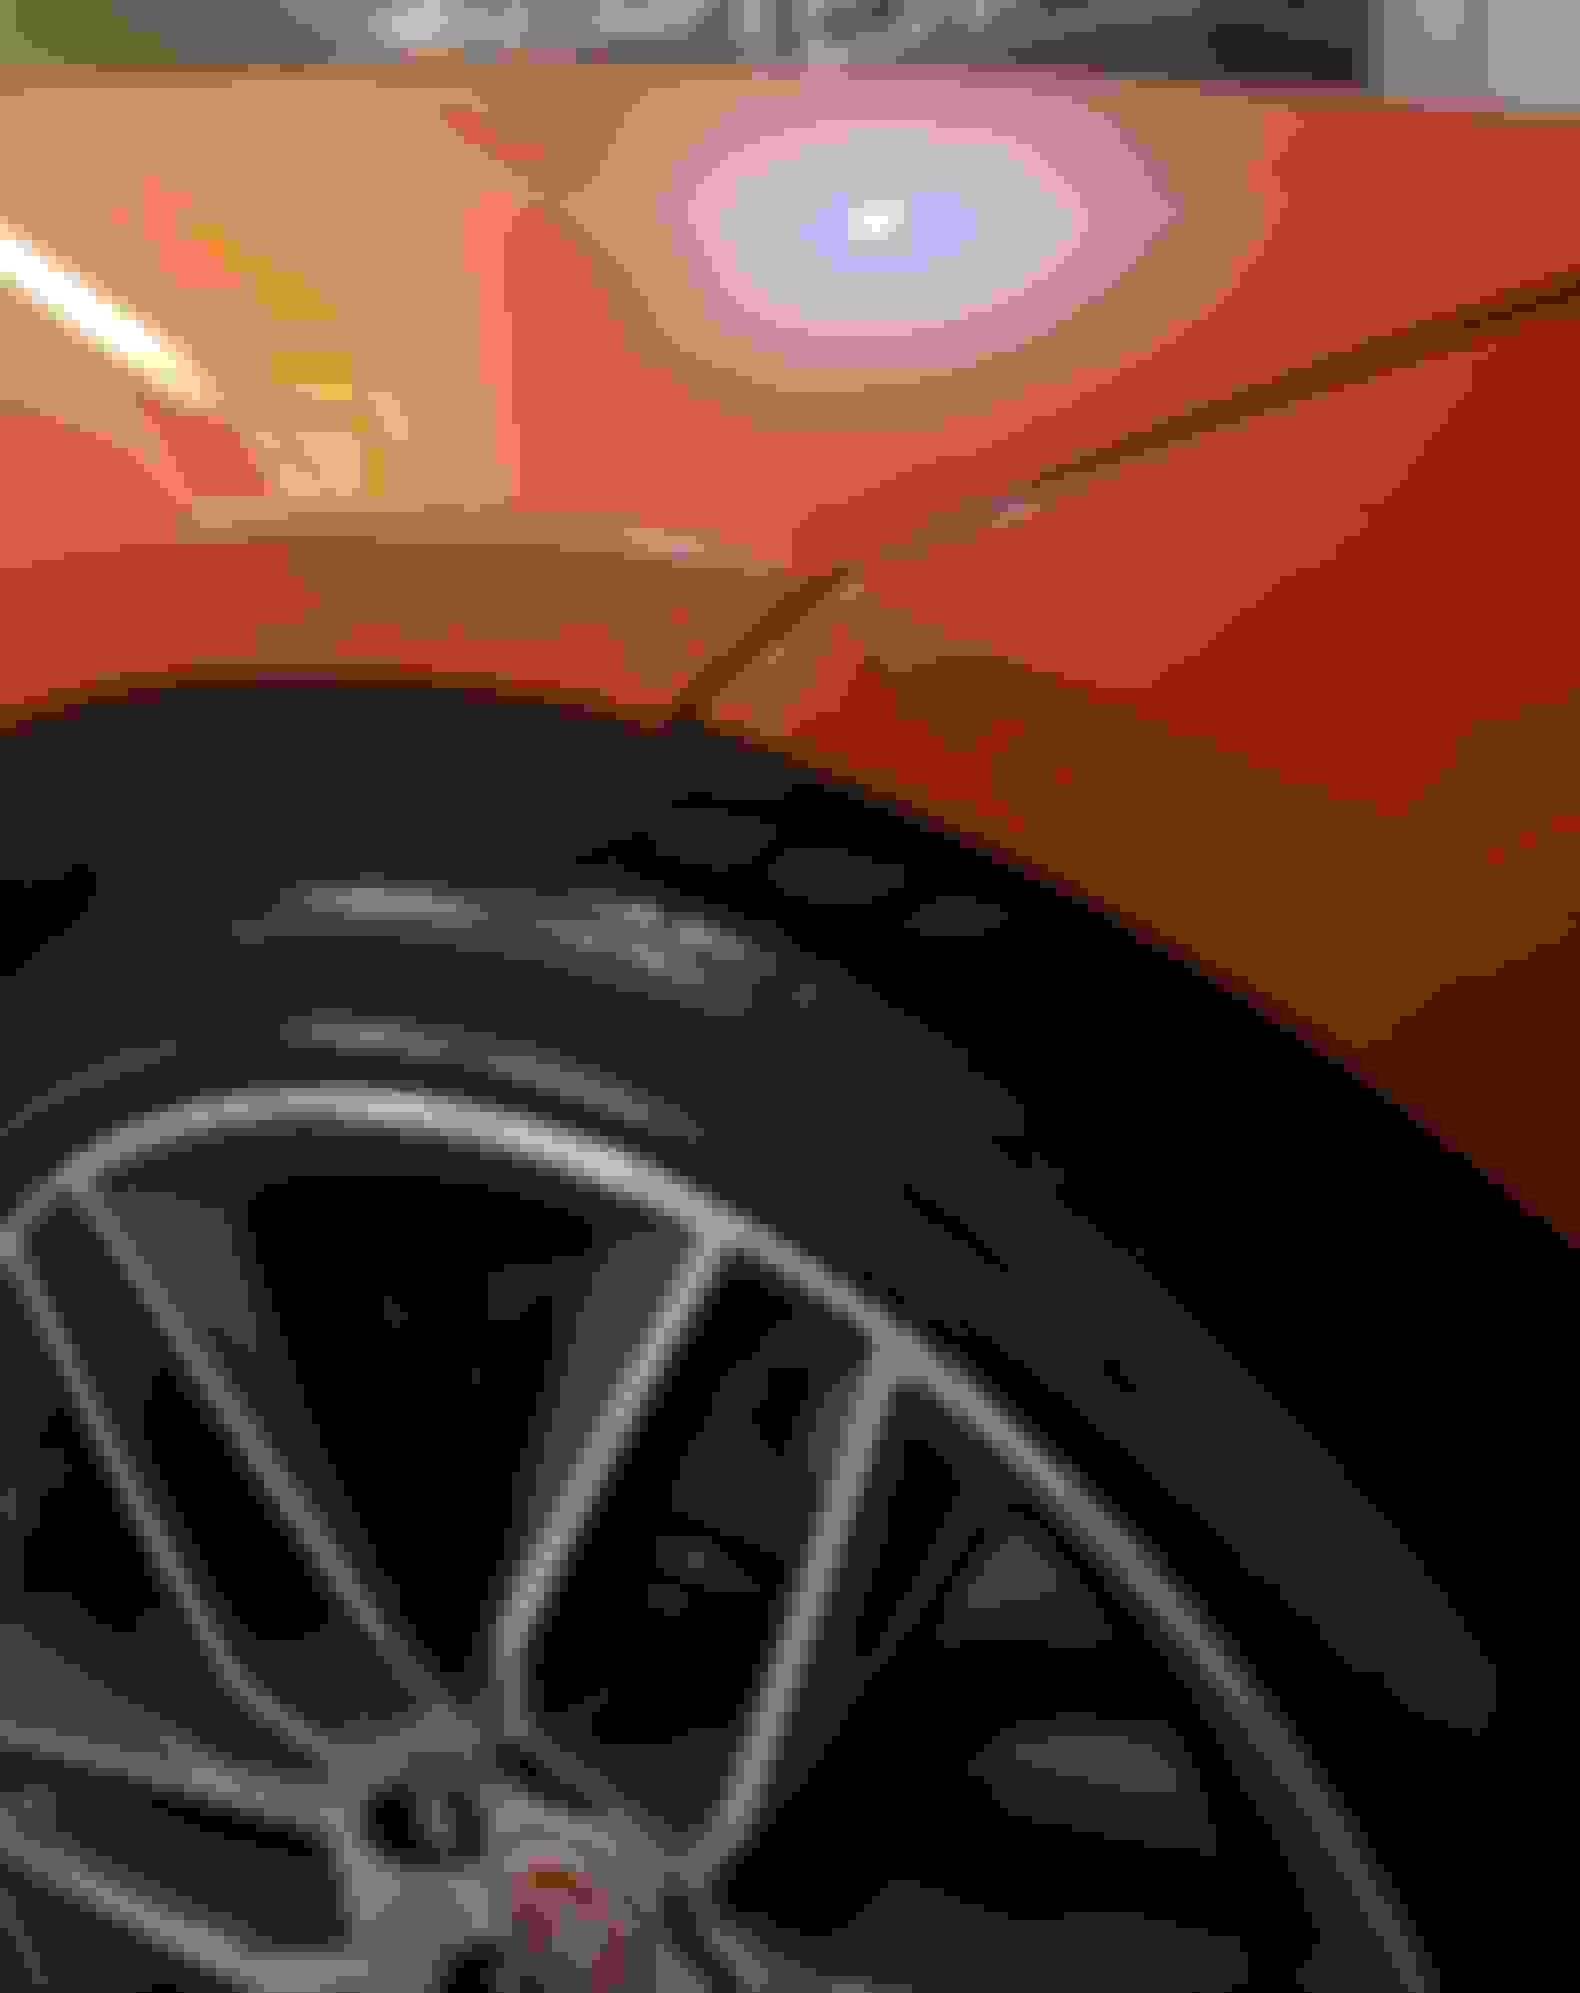
There are four stoppers, two each side, which determine the hood/bonnet height when it is closed. Black rubber hex shaped about 2 cm across. You can screw them in/out (down/up) to adjust the height. Two of the four are right where the hood closes next to the bumper, so you should be able to screw those up a little to reduce the gap.
There are also four bolts, two each side, on the back edges of the bumper (ie the spot where the offending gaps are) that mount that end of the bumper.
You can loosen off those bolts, push the bumper down a little, then do them up again.
Here is a pic of one side showing the stopper and the two bolts circled in red:
Just fiddle around with these adjustments a bit and you should be able to improve the alignment quite a bit.
One tip - easy does it, little adjustments at a time, test close the bonnet, check then readjust, rinse and repeat.
Guys thank you SO MUCH for your replies as detailed replies. I really appreciate it. Going to mess with it with your guys awesome detail instruction. Hopefully I can improve it a lot.
I was beginning to think maybe the car was in an accident and never reported to car fax. However upon surfing the net I see its pretty common. THANK GOD!
I will post back my results tomorrow after work when I can get to it.
Thank you again guys/gals so much !!!
You will never get those gaps between the bonnet/hood and the front bumper in the wheel arch to align perfectly, simply due to the fact that the width of the bonnet/hood in that spot is a couple of mm wider than the width of the bumper. It will always look like the hood is sitting low and/or the bumper is sitting high.
But you can fiddle around with some easy adjustments to get it looking a bit better.
There are four stoppers, two each side, which determine the hood/bonnet height when it is closed. Black rubber hex shaped about 2 cm across. You can screw them in/out (down/up) to adjust the height. Two of the four are right where the hood closes next to the bumper, so you should be able to screw those up a little to reduce the gap.
There are also four bolts, two each side, on the back edges of the bumper (ie the spot where the offending gaps are) that mount that end of the bumper.
You can loosen off those bolts, push the bumper down a little, then do them up again.
Here is a pic of one side showing the stopper and the two bolts circled in red:
Just fiddle around with these adjustments a bit and you should be able to improve the alignment quite a bit.
One tip - easy does it, little adjustments at a time, test close the bonnet, check then readjust, rinse and repeat.
Anyway you can tell me or anybody else for that matter. How much your two front black hexagon adjustment bolts are either up or down? Meaning are they fully tightened down or they screwed up some , half way , all the way, etc?? Particularly only interested in the ones at the rear of the hood , towards the bumper.
Thank you !
The hood looks fine everywhere else and you also note no other issues. For example, it looks perfect on the side panel with the faux vent. If that is the case, focus on the bumper, not the hood.
The hood looks fine everywhere else and you also note no other issues. For example, it looks perfect on the side panel with the faux vent. If that is the case, focus on the bumper, not the hood.
yea makes sense for sure. So your saying hood needs to be brought up like an inch, right? (** or actually down an inch when looking at it again **)
I think your correct here - hmmm---
Is there a adjustment for just the hood to bring it up or down ? Is that the two bolts the one guy circled in the picture above?
Thank you
The front of your hood needs to go up 2 or 3 mm and/or the bumper needs to go down by 2 or 3 mm. From memory my front hood "stoppers" are screwed about half way up and from memory the total range between lowest and highest points (screwed right down or screwed right up) is around 2 cm (a bit less than 1"). Again from memory turn the stopper clockwise to raise it.
With the gaps you have I suspect your stoppers are all the way down so I would screw them up about 1/2 a cm both sides to start with and test.
Then consider dropping the bumper a little as well by loosening off the two bolts each side I circled in red (the bottom/lower and smaller circles) then pushing the bumper down, then hold it down while you tighten those two bolts up again.
yea makes sense for sure. So your saying hood needs to be brought up like an inch, right? (** or actually down an inch when looking at it again **)
I think your correct here - hmmm---
Is there a adjustment for just the hood to bring it up or down ? Is that the two bolts the one guy circled in the picture above?
Thank you
I am saying don�t touch the hood and adjust only the bumper. See where that wets you and go from there. If the hood is fine everywhere else, any adjustments you make will effect that. The front bumper needs to move rearward and slightly down at that corner. There should be enough adjustment in the bumper to do what you need, but it�s been 2.5 years since I last had nine off.
I am saying don�t touch the hood and adjust only the bumper. See where that wets you and go from there. If the hood is fine everywhere else, any adjustments you make will effect that. The front bumper needs to move rearward and slightly down at that corner. There should be enough adjustment in the bumper to do what you need, but it�s been 2.5 years since I last had nine off.
Agreed.
But I need to revise my advice above.
I just went out to the car and loosened off the two bumper bolts in question, and I (re) discovered that no way no how was that enough to drop the bumper at all, not even a micron. In and out yes but up and down no go.
I suspect (but didn't test just now) that the bumper won't drop unless or until you also loosen the six bolts across the top edge (where it meets the front edge of the hood).
A couple of years ago I loosened off the three bolts on the LHS and pushed the bumper in about 2 mm on that side to even up the obviously out of whack panel gap across the front, so I know that loosening those bolts gives you some "play" in the bumper.
Yes, there are a borderline comical amount of bolts to remove the front bumper. I would start loosening at that corner and work your way towards front center until you get enough movement.
Thank you all for the detailed replies, I very much appreciate it!
Unfortunately I was unable to mess with it today due to my extremely busy day and now I'm exhausted. After reading all your awesome replies I decided I'm going to just raise the two back hexagon stoppers first. I know for fact they are screwed all the way down. I'm thinking that's a lot of the problem. If I don't have luck with that fix then rather playing with the bumper adjustments I will bring it to the dealer and have there F type guy get it right. I really don't want to be messing with loosening bolts and what not. Don't trust myself to much with that. Mechanically inclined indeed but body man I am not, not to mention I'm just way to ocd to be playing with gaps. It could trigger all kinds of crazy. LOL
Thank you all again and I'm confident I will get this corrected. I will for sure post back my results and what needed to be done for people who may have issues down the road upon buying a f type.
IMO, best to take it to the dealer/Jag guy. My own experience is if I fix something myself, something will go haywire somewhere else. I’m thinking if you raised the hexagon stoppers, the bonnet might sit higher and the front edge would sit higher than the bumper cover.
The analogy is like trying to clear a clogged pipe with a pressure hose: only moves the clog elsewhere. Also this is something I equate to a “Pink Cat Ring.” [The Cat in the Hat Comes Back]
At the car show in SF, they had an SVR with gap and panel fitment so bad, I’m surprised they displayed it. Uneven gaps, bottoms and corners of doors not flush with body, rubber sticking out between the panels......
I'm very interested to know how it turns out for you. The missus and I are in the hunt for an F-Type and have most definitely noticed that issue on many cars. Seems to be more obvious on white models (which for some stooopid reason are maybe 50% of all F-Types in Australia).
IMO, best to take it to the dealer/Jag guy. My own experience is if I fix something myself, something will go haywire somewhere else. I�m thinking if you raised the hexagon stoppers, the bonnet might sit higher and the front edge would sit higher than the bumper cover.
The analogy is like trying to clear a clogged pipe with a pressure hose: only moves the clog elsewhere. Also this is something I equate to a �Pink Cat Ring.� [The Cat in the Hat Comes Back]
At the car show in SF, they had an SVR with gap and panel fitment so bad, I�m surprised they displayed it. Uneven gaps, bottoms and corners of doors not flush with body, rubber sticking out between the panels......
Keep us posted.
Hey man thanks - appreciate it and truly love this car. What a machine!! Haven't driven it much unfortunately because snow time and salt crap.
This thread has turned out to be wonderful and I can tell what a great bunch of people this forum has to offer. Very excited about this.
Unfortunately I have not messed with adjustments on my car since posting this thread. I want to but it has been 25 degrees or less everyday and I do not have a heated garage. So yea since she is parked for the winter I've been putting it off. I will try the hexagon adjustments some but I agree with you. If I can't get it right by simple tightening or loosening of the black hex bolts - then off to the dealer in spring, to have them do it. I will post back eventually though on my results - however it may be a bit.
Thanks again pal ----
Thank you all for the detailed replies, I very much appreciate it!
Unfortunately I was unable to mess with it today due to my extremely busy day and now I'm exhausted. After reading all your awesome replies I decided I'm going to just raise the two back hexagon stoppers first. I know for fact they are screwed all the way down. I'm thinking that's a lot of the problem. If I don't have luck with that fix then rather playing with the bumper adjustments I will bring it to the dealer and have there F type guy get it right. I really don't want to be messing with loosening bolts and what not. Don't trust myself to much with that. Mechanically inclined indeed but body man I am not, not to mention I'm just way to ocd to be playing with gaps. It could trigger all kinds of crazy. LOL
Thank you all again and I'm confident I will get this corrected. I will for sure post back my results and what needed to be done for people who may have issues down the road upon buying a f type.
Focusing on the hood is probably the best approach; however, you really cannot
max out the rubber stoppers one way or the other. They will end up too loose and the hood will rattle or too tight and the hood wont close. There is a sweet spot where they are just right and it may take a few tries to dial it in.
All of that aside, I looked at f-types for almost 2 years before I bought one and that mis-alignment was one of the first things I noticed and it was similar on every car I looked at. Not trying to dissuade you from improving it; just trying to manage expectations. Good luck and Merry Christmas.
If your hood latches become too tight or too loose as result of the stopper adjustment, the latch loops can be adjusted accordingly.
Hey guys just wanted to update all that have participated in this thread. So I went out to my cold *** garage tonight and fooled with it. Unfortunately I was unsuccessful. I had some improvement with the hex screws adjustment but not enough to where I'm satisfied. I must of opened and closed my hood twenty times. I feel the main adjustment that's going to fix the problem 95 percent of the way or better is the hood adjustment. That's not something I'm willing to mess with myself.
So what I will be doing is bringing it to my good buddy who owns a body shop. He has owned his own shop and been doing body work 30 plus years, he is thee best I myself have ever known. He is also very meticulous and **** (no pun intended) like me. I called him shortly after I was done messing with it myself and explained the situation. He says he will get it as perfect as humanly possible. Told me to be realistic about it though and that perfect is something that might not be obtainable. Nevertheless he said it will look 10x better then it does now and I will be happy.
He knows how I am so with what he told me I feel good about it now. If I can catch a day that's decent I may take it up , otherwise it will be on hold till spring.
Upstate New York Winters Suck! All the dam salt!
I will post back here again in time with my results. Thank you all so much.
 12-17-2019, 09:05 PM