When you click on links to various merchants on this site and make a purchase, this can result in this site earning a commission. Affiliate programs and affiliations include, but are not limited to, the eBay Partner Network.
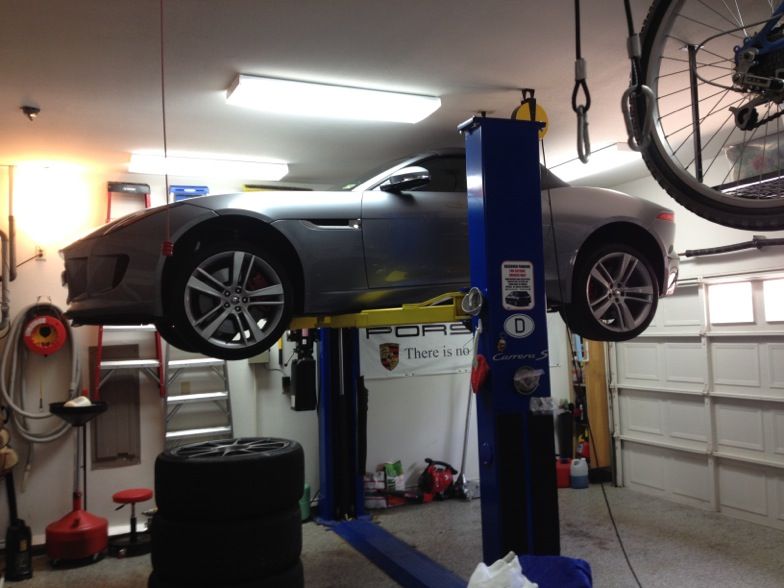
I purchased a second set of slightly-used OEM wheels and tires (Gyrodynes), which I'll be mounting when they arrive in a couple of days. I'm very familiar now with the section of the manual which depicts the jacking points, which are also linked in the "how to" section of this forum.
I've studied the manual guidance multiple times and located the front and rear arrows on the side sill, but the diagram is very crude with regard to exact location, and there is no written detail that sheds any more light.
My question is, which of the following is the correct location?
a) fully on the bottom flat portion of the side sill, just inside the arrows;
b) jack centered on the metal ridge, straddling where the side sill ends and the frame is exposed, in other words half on sill, half on frame, or;
c) inside of the metal ridge fully on the frame parts.
"A" makes me uncomfortable, since that sill is very thin and flexible, particularly on the rear, and it could crack. "B" makes the most sense to me because that ridge seems to be the best load-bearing location, and "C" would put the rear jack points on the mount for a frame cross brace.
I'll be using a low-profile floor jack. Thanks in advance for any insights,
The sill is plastic so any load on it would crack it. So, definitely not A. I can't picture in my mind what option B is
I don't have a picture and the car is not with me at present. What I'm talking about in "option B" is that there is a metal ridge running the length of the frame, front to back. The bottom side sill ends there, and the ridge extends below the level of the sill.
P.S. I'm speculating that the OEM jack (which I didn't get not having a temp donut) may have a groove that this ridge fits into. That seems to be what the manual sketch is trying (poorly) to depict.
So the issue for me, is where is the best lifting point if using a floor jack? Has anyone ever seen your car lifted at a tire shop or the dealer?
I just talked to the service manager at the JLR dealer where I purchased the car. He spoke to several of their techs, who confirmed that "B" is the correct answer. The jack should go on the ridge just behind the end of the side sill behind each arrow.
To keep from cracking the sill with a typical floor jack which has a cup on the lifting head as opposed to a flat surface that would stay entirely on that frame ridge, they recommended that I use a block of wood to keep the weight off the sill.
I'm thinking a hockey puck would be the perfect solution, and less likely to slip.
Having asked the same question (and having fitted the new wheels), I was advised to put the rubber cup of my trolley jack in the middle of the bolted on steel plate that's near the rear jacking point arrow, and use the thick alloy plate with the circular hole in it near the front jacking point arrow. That latter appears to be the mounting point for the body used on the assembly line.
Thanks, makes sense, but it also serves as an interesting lesson that even the JLR dealers are lifting these cars differently. Perhaps it makes no difference, and I'll just flip a coin.
"Having asked the same question (and having fitted the new wheels), I was advised to put the rubber cup of my trolley jack in the middle of the bolted on steel plate that's near the rear jacking point arrow, and use the thick alloy plate with the circular hole in it near the front jacking point arrow. That latter appears to be the mounting point for the body used on the assembly line. "
"Having asked the same question (and having fitted the new wheels), I was advised to put the rubber cup of my trolley jack in the middle of the bolted on steel plate that's near the rear jacking point arrow, and use the thick alloy plate with the circular hole in it near the front jacking point arrow. That latter appears to be the mounting point for the body used on the assembly line. "
I am planning to do a modified take on your Option (B). All info refers to using a low-profile jack and hard rubber jack pad.
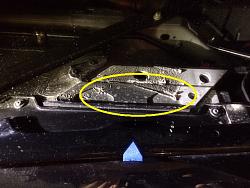
Front Lift: My jack fits on the front part of the frame with roughly 1/4 of the 5" jack pad overlapping onto the ridge support. Lifting will come from the frame, not the ridge. Option (C) would likely work as well if you have a jack pad that fits. I'll stay away from Option (A) for reasons pointed out. The pics are for a front-lift only. The blue arrow points to the factory lift reference point embedded in the sill.
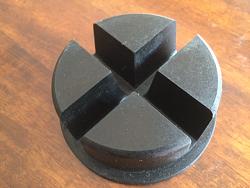
Rear Lift: Not the same layout as the front. Laying adjacent to the rear sill reference point is another metal ridge. On the other side of the ridge is what appears to be a differential support plate which fastens to the rail. (No pic-sorry.) This support has three 18mm fasteners, all of which sit about 3/8" higher than the ridge itself. There is no room for my jack pad without it sitting on top of two of the bolts. Ideally, a lift using the ridge alone would be the best option in the rear to avoid centering your lift on the bolts themselves. I plan to modify a 2-3" hard rubber donut to allow the jack to use the ridge by inserting itself into the pad for better lift alignment and weight distribution. (The below pic shows a donut I used for another vehicle.)
Last edited by deltagroup; 09-30-2014 at 05:01 PM.
Reason: Note to self: I wish my garage ceiling was higher!
"...I'm thinking a hockey puck would be the perfect solution, and less likely to slip."
I'm betting it is a solution, Foosh. The puck I have in my hand measures 3" diam and 1" high. I tried a trial fitment in the rear (the front is no issue). The puck snugs right up against the two support fasteners, but appears to leave sufficient room to support the ridge on both sides. I expect the ridge-protecting cut on the puck to be just off-center, the depth of which I need to measure more closely. I also plan to rough up the smooth surface a tad. In the end, going with a frame-only support in the front (jack pad on frame only) or a ridge-only support in the back (hockey pock on jack pad on ridge only) seems to work. Perhaps leaving the jack centered on that rear support plate alone is sufficient as well.
Last edited by deltagroup; 09-30-2014 at 05:06 PM.
Reason: Clarification
Your two posts, pictures, and descriptions are extremely helpful. You obviously understood my feeble attempt to describe what I was seeing by looking underneath the car and my thought process.
Walt,
I have the hockey puck and low profile jack in hand awaiting the wheels, and thanks to the help from you two and F-Typical, am confident of where to use them.
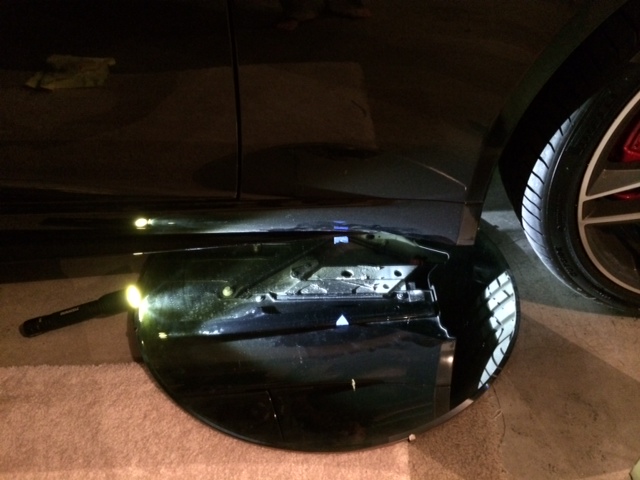
Sorry to resurrect such an old post, but my status as a complete muppet means I must face the gauntlet of ridicule by asking a question that is clearly answered above, and yet still I doubt myself (as my 2016 looks slightly different underneath).
I know that the front jacking point is the ridge highlighted in black, but my trolley jack will split 50/50 across that ridge between sill and frame.
I'm assuming I'm safe to go directly for the area highlighted in blue (using a rubber pad/piece of wood to spread the load evenly across the top of the jack)?
Sorry for such a filthy car and even more sorry for my status as an idiot; you may now ridicule.
 09-30-2014, 07:40 AM