Group buy: 2pc wortec rotors for steel super brakes on f-type
#421
Put the car in brake maintenance mode. Ignition on, push the hand brake button down and hold for 2 secs, press accelerator to the floor and hold 2 secs turn ignition off/on and release accelerator and hand brake button. Dash should now read Brake Maintenance Mode. This retracts the EPS motors to allow you to push the piston back in. No tools needed.
Take the car out of brake maintenance mode. Ignition on, pull the hand brake button up and hold for 2 secs, press accelerator to the floor and hold 2 secs turn ignition off/on and release accelerator and hand brake button. Dash should now clear Brake Maintenance Mode.
Take the car out of brake maintenance mode. Ignition on, pull the hand brake button up and hold for 2 secs, press accelerator to the floor and hold 2 secs turn ignition off/on and release accelerator and hand brake button. Dash should now clear Brake Maintenance Mode.
Could have saved a number of peeps a lot of heartache...
#422
It gets posted anytime someone asks for it, i.e. many times.
Second to last page of this document...
https://www.dropbox.com/s/uajlxghl1a...brake.pdf?dl=0
Second to last page of this document...
https://www.dropbox.com/s/uajlxghl1a...brake.pdf?dl=0
The following users liked this post:
Unhingd (06-06-2018)
#423
#424
1. This procedure requires the vehicle in the Park or Neutral position, with the ignition turned ON (the engine must be OFF) and the parking brake system released (Parking brake button pushed down for a second while clutch or brake pedal is depressed).
2. Press (down) and hold the parking brake switch in the release position.(do not release until told to do so)
3. Wait 2 seconds, then press and hold the accelerator pedal in the wide open throttle position.(do not release until told to do so)
4. Wait 2 seconds, then turn the ignition Off and back On immediately.
NOTE: An audible noise will be heard to confirm that the parking brake has been released in Service Mode.
5.ONLY NOW, Release the accelerator pedal and release the parking brake switch.
Somebody needs to teach these guys how to write a shop manual. If I think it's needed, I'll edit the redeployment instructions as well.
#425
Ok...1st rear rotor took 3 hours. 2nd one took about 30 minutes. It appears this phenomenon will carry through on the front. Can't for the life of me figure out how to remove the pads without unbolting the whole caliper. Any guesses? There appear to be a bunch of spring clipped gizmos resembling a puzzle box on the front side of the caliper.
#426
#427
#428
Join Date: Feb 2014
Location: Adelaide, South Australia
Posts: 8,449
Received 3,216 Likes
on
2,371 Posts
C'mon Lance, you can do better than that!
There are heaps of threads and posts on here about changing rotors, calipers and pads for both the front and rear.
Having done all of that I could probably write the complete instruction manual off the top of my head but I can't be arsed doing that for now (it would take a few pages of text), so pull your finger out and do some searching!
OK, I relent, here are some hints:
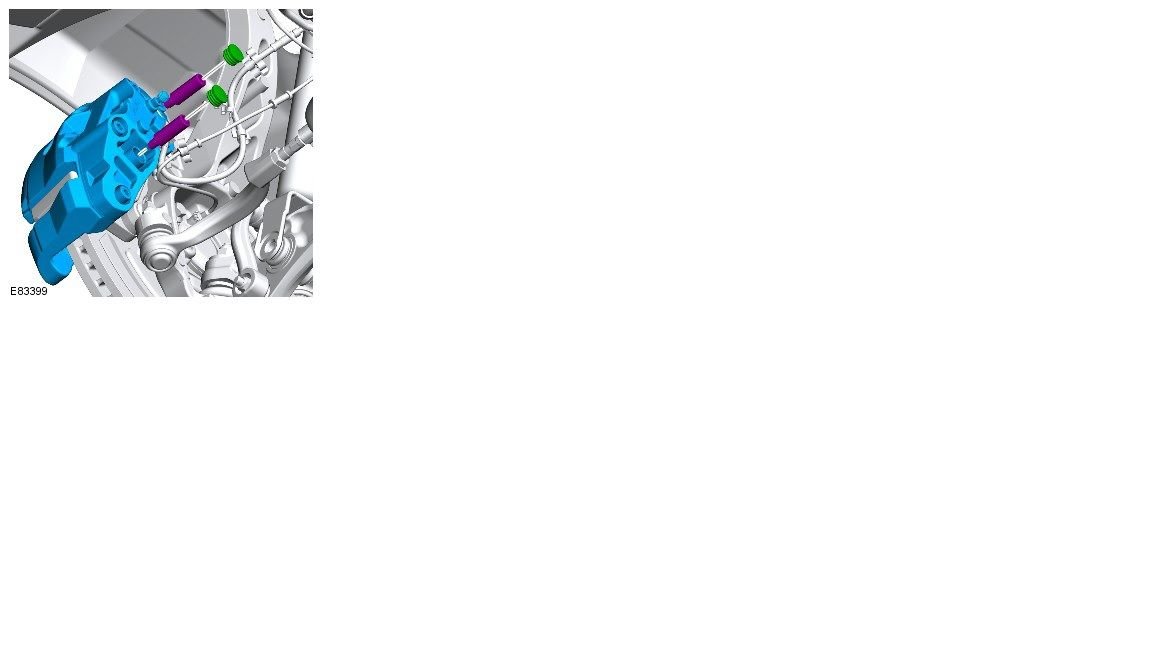
Hint 1 - to replace the front rotors you absolutely need to remove both the calipers and the caliper brackets. This can be done "in one hit" by simply undoing the 15 mm bracket bolts leaving the calipers bolted to the brackets by the caliper slide pins, but see Hint 2.
Hint 2 - it is infinitely easier to remove the old pads and insert the new pads by removing the caliper slide pins (2 x 9 mm hex) to separate the caliper from the bracket, so do that first then remove the caliper bracket bolts.
Hint 3 - the "spring clip gizmos" are simply anti-rattle clips, flip them off with a screwdriver by levering out the "thin" part (but watch they don't fly across the garage!).
The hard part is getting those suckers back on, but I will leave that for you to figure out (see Hint 4).
Hint 4 - I have detailed the "technique" for getting the anti-rattle clips back on on here somewhere!
#429
C'mon Lance, you can do better than that!
There are heaps of threads and posts on here about changing rotors, calipers and pads for both the front and rear.
Having done all of that I could probably write the complete instruction manual off the top of my head but I can't be arsed doing that for now (it would take a few pages of text), so pull your finger out and do some searching!
#430
Join Date: Feb 2014
Location: Adelaide, South Australia
Posts: 8,449
Received 3,216 Likes
on
2,371 Posts

The green things in the drawing are black plastic covers, just pull 'em out with your fingernails.
The following users liked this post:
Unhingd (06-07-2018)
#431
#433
Join Date: Feb 2014
Location: Adelaide, South Australia
Posts: 8,449
Received 3,216 Likes
on
2,371 Posts
#434
#435
OK, WHO ARE YOU AND WHAT HAVE YOU DONE WITH UNHINGD*? I’m quite sure the members of this Forum can pool together their resources and pay whatever ransom is needed to get him back.
We would, of course, need proof of life.
*Unhingd is a friend of mine and if any harm is done to him I WILL FIND YOU!
The following users liked this post:
death1ord (06-08-2018)
#436
The following users liked this post:
death1ord (06-08-2018)
#437
That would explain it, wouldn’t it? I get it!
P.S. Note how many times I’ve been “thanked.” Now just have to make sure NOBODY thanks me....for anything! EDIT: Too late as our friend death1ord not only thanked me once, but twice. Oh well, it was nice while it lasted.
P.S. Note how many times I’ve been “thanked.” Now just have to make sure NOBODY thanks me....for anything! EDIT: Too late as our friend death1ord not only thanked me once, but twice. Oh well, it was nice while it lasted.
Last edited by RickyJay52; 06-08-2018 at 01:52 PM.
The following users liked this post:
death1ord (06-08-2018)
#438
#439
#440
Pulled from the shelf of my personal library. There are some other fine pictures inside that I'll save for another time: the cover was sufficient to convey the evil. I mean, look at those shoes. And the suit. Can't tell much from the tie, since the tie itself is a serpent-like symbol of evil.


