When you click on links to various merchants on this site and make a purchase, this can result in this site earning a commission. Affiliate programs and affiliations include, but are not limited to, the eBay Partner Network.
I'd like to install a rear dashcam camera at the top of the interior glass of the rear hatch and need to find out how to disassemble the rear hatch panel components, too -- can anyone help?
Thanks
I appreciate the file. After reviewing the .pdf, it doesn't look like removing the outer LED panel will allow me the access I was looking for to run a cable through the interior rubber conduit from the headliner area into the rear hatch. I was hoping that the interior hatch was comprised of parts/panels that could be disassembled enough to allow me access to fish the cable from the rubber conduit boot in the hatch and then route through a small hole made at the opposing edge of the interior hatch where it meets the glass.
After looking at the situation a bit more, I suspect that the interior hatch is made of a solid piece of composite material that would make my plan more difficult than initally anticipated.....am I right or am I failing to see things correctly?
yes, you were seeing things incorrectly. I believe if you remove that panel you can get to everything that you want in order to install the module you�re trying to.
yes, you were seeing things incorrectly. I believe if you remove that panel you can get to everything that you want in order to install the module you�re trying to.
It isn't the first time I've failed to see things correctly! Thanks, ski -- I'll dive into it this weekend. I appreciate the help
It isn't the first time I've failed to see things correctly! Thanks, ski -- I'll dive into it this weekend. I appreciate the help
Yes, I think that if you look at the directions, they are saying there are 6 small nuts on the underside of the hatch that attach the top piece of the hatch, that once removed, will allow access to the wiring harness that goes directly to the 3rd stop lamp. I would assume (depending on the thickness of the strobe module) you'd be able to wire that directly to the lamp there and secure in place, possibly underneath the cover. I would assume it would make more sense, once you took that panel off and see what is underneath. See screen shot below what I am referring too.
I just realized I never looked at the date, thought this was about the 3rd brake light, but just realized my mistake. @Dillweed see attached for more help for what you are trying to do.
Thanks again, skizot -- your additional files will help, too. I'm sorry if my question was confusing because it was attached to the "3rd brakelight" thread. I had googled "rear hatch disassembly f type" (or something like that), and this thread came up so I jumped in --- maybe I should've started a new thread. In either case, thanks again
Update: the files that Skizot sent provided me the information I needed to almost get the job done. The only hiccup I had was when I removed the (6) nuts for the third brake light cover on the outer hatch and still couldn't get the cover off. With the nuts removed, I was able to easily slide the cover from front to back freely, but I still couldn't lift the cover to remove it. It seemed as if there was another clip holding it in the center of the panel (around the antenna area). I tried many different times, but didn't want to get too forceful and break anything. Can anyone offer any advice to help me remove this 3rd brakelight cover? 2018 FTR.
Update: the files that Skizot sent provided me the information I needed to almost get the job done. The only hiccup I had was when I removed the (6) nuts for the third brake light cover on the outer hatch and still couldn't get the cover off. With the nuts removed, I was able to easily slide the cover from front to back freely, but I still couldn't lift the cover to remove it. It seemed as if there was another clip holding it in the center of the panel (around the antenna area). I tried many different times, but didn't want to get too forceful and break anything. Can anyone offer any advice to help me remove this 3rd brakelight cover? 2018 FTR.
Thanks!!
I won't be able to try this until later in the week, but I am happy to try and do the same modification you are trying to do. I believe that these components can be tricky at times, but if I had to take an educated guess, you might have one of the cables caught on the underside off the stop lamp, especially considering the XM antenna pod is right there. I would take a plastic trim tool and perhaps a micro fiber to go around the edge of the stop lamp and gently pry upward to get it to release. It should just pop up and come off.
I won't be able to try this until later in the week, but I am happy to try and do the same modification you are trying to do. I believe that these components can be tricky at times, but if I had to take an educated guess, you might have one of the cables caught on the underside off the stop lamp, especially considering the XM antenna pod is right there. I would take a plastic trim tool and perhaps a micro fiber to go around the edge of the stop lamp and gently pry upward to get it to release. It should just pop up and come off.
Thanks, Skizot!
I'll try your suggestion sometime this week ..... your belief regarding the XM antenna sounds like that may just be the problem I am having with the panel removal. I'll give it a try in the days ahead and will report back
Thanks, Skizot!
I'll try your suggestion sometime this week ..... your belief regarding the XM antenna sounds like that may just be the problem I am having with the panel removal. I'll give it a try in the days ahead and will report back
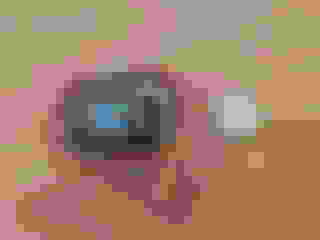
@Dillweed I had a chance to pull the cover off this morning. There are 4 clips that are also holding it down, a little pressure and it pops right up. See picture of the 4 pink clip locations and my own picture, they are yellow. The cable to access the 3rd stop lamp is on the drivers side somewhere. I broke one of the retaining clip holder when popping mine up, so I decided to just use some RTV to hold it back in place and put the cover back on and not attempt to do this myself.
Thanks, Skizot -- I am very grateful for your assistance with my project. You have gone "above and beyond" to help me --- THANK YOU. Your picture has provided me a very accurate idea of what I am working with, and now I understand exactly what needs to be done. You da man!

 05-03-2017 | 05:22 PM