
Rear Differential Fluid Change DIY
#81
 04-28-2023, 10:29 PM

Join Date: Nov 2019
Location: (Illinois) - Led by Gov. PRICKster
Posts: 1,498
Received 985 Likes
on
565 Posts
Hi DC, thank you for the detailed write up, great work as always.
Planning to get this done plus changing the pinion seal while at it, do you know what is involved with the pinion seal change? Can't find any info online and not sure if the pinion seal part# C2C41650 is the only part needed?
I'm gonna visit the dealership in the next few days to take off the wheel locks, I will ask them for a written quote, not sure if that will list all parts required though.
 Good luck.
DC
#82
04-29-2023, 01:09 AM

Thanks! It�s probably as light as British aluminum 😂
a quick glance suggest the drive shaft needs to be disconnected(and some other parts removed to allow that) and the pinion seal should be the only part needed, aside from the drain and fill plug, and the fluid. Plus a bunch of special tools, not sure if my go to mechanic is able or willing to tackle it..
JLR Manhattan quoted $370 parts + $1700 labor before tax for the procedure including a fluid change. No break down of parts and labor, just a line manually typed by the service advisor, i guess i had to pay them a diagnosis fee before i can get a real quote with break downs.
i might send it back down to huntsvalley euro cars as they left me a really positive feeling during the pre purchase inspection, and they are specialized in JLR, the shop foreman(can�t believe i forgot his name already) also mentioned he loves the f type.
Last edited by Ray Ray; 04-29-2023 at 01:15 AM.
#83
05-12-2023, 09:27 PM
Got the pinion seal replaced today by Martin at jagpro in long island, definitely not a diy job, aside from all the special tools mentioned in the manual, Martin also asked me to go back and retorque one of the nuts in 500 miles, all for 995 including parts, now I can drive without fearing the differential blowing up.
He also mentioned the fluid was clean, I guess the previous owners never drove the car hard?
The visit also included a steering fluid and coolant flush, and replacement of the 9 years old original battery 😂
Driving home I honestly can't feel any difference, maybe I didn't need all that but it's good to know I have done the due difference!
#84
05-18-2024, 12:08 PM

My 2017 F-Type S hit 60k miles, so I decided to change the rear differential oil again. I jacked it up and found that the differential is wet towards the front of the car.
Here's a view from below:
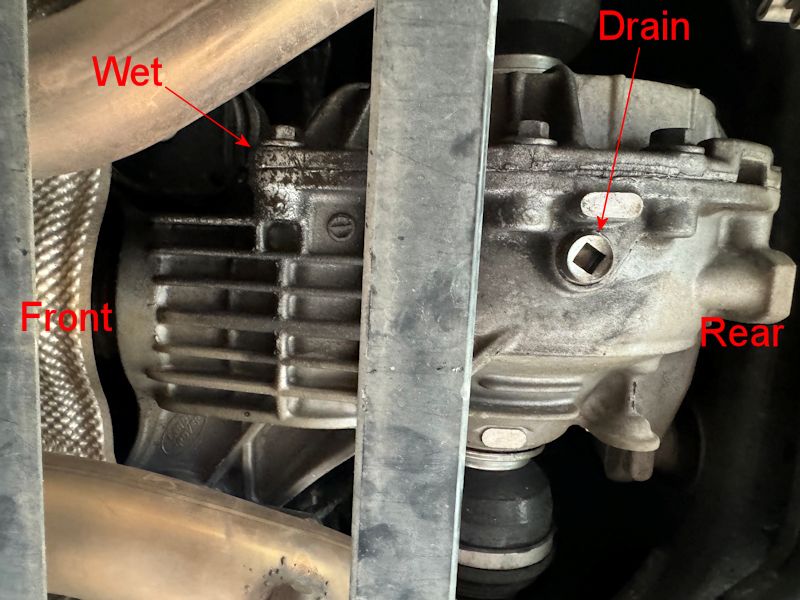
Here's a view of the differential from the left side (driver's side in US):

Here's a view of the differential from the left side again, just a bit more towards the front of the car:
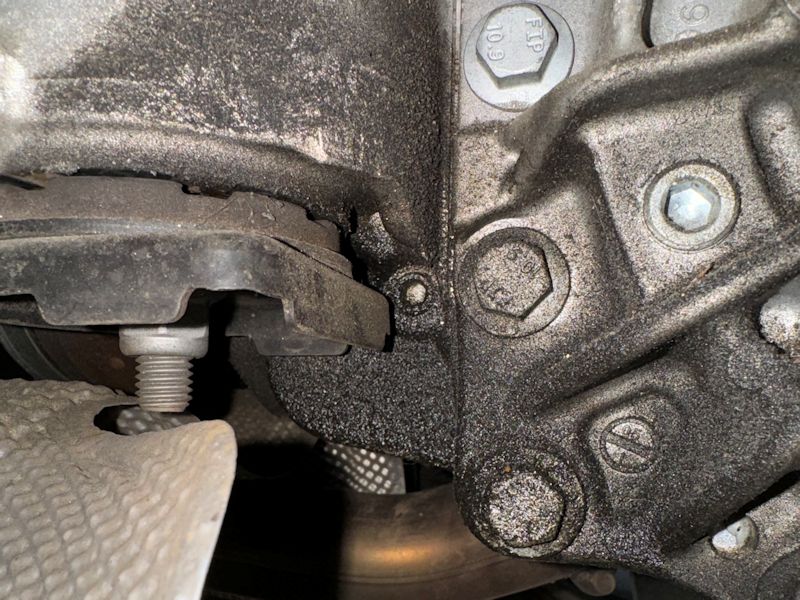
What are your thoughts on what's happening here? I have not noticed any issues while driving.
Do you think an overfill could be this issue? If so, would it damage the seals and breathers?
Here's a view from below:
Here's a view of the differential from the left side (driver's side in US):
Here's a view of the differential from the left side again, just a bit more towards the front of the car:
What are your thoughts on what's happening here? I have not noticed any issues while driving.
Do you think an overfill could be this issue? If so, would it damage the seals and breathers?
Last edited by Bret_T; 05-18-2024 at 02:56 PM.
#85
05-18-2024, 07:45 PM
To determine if it's the pinion shaft you'll need to look a bit more. Look at where the shaft comes goes into the diff housing. Is there a little trail coming from there? Look forward of that. Is there oil residue forward of the diff? The oil will blow back when driving, so find the forwardmost signs. Transmission? Rear main seal?

#87
05-19-2024, 10:00 AM
To determine if it's the pinion shaft you'll need to look a bit more. Look at where the shaft comes goes into the diff housing. Is there a little trail coming from there? Look forward of that. Is there oil residue forward of the diff? The oil will blow back when driving, so find the forwardmost signs.
The following users liked this post:
Carbuff2 (05-19-2024)
#88
05-19-2024, 07:26 PM
I couldn't see the vent, but I was able to reach up there and feel it. The way the cover works is odd. It feels like it's loosely on there, but it won't come off without pulling it. I pulled it off and the inside was only a little dirty, certainly nothing indicating a clog. I then used the zip tie trick shown in the video above to see if it was plugged. It wasn't. The zip tie came out perfectly clean.
At this point, the rear of my F-Type was jacked up as high as I could get it on the stands. I decided to go ahead and change the differential oil because I was going to have to drive it regardless. When I took out the fill plug, a decent amount of oil came out. I then drained the rest of the oil out via the drain plug. It was dark and definitely needed to be changed but wasn't as bad as the first time that I changed it. Next, I put thread sealer on the drain plug, reinstalled it and torqued it to 20ft-lbs. I then had to figure out a way to get as close to 0.83L of the Ravenol MDL in as I could. I found a brand-new hand pump that threads onto plastic oil bottles, but it would not work with the Ravenol container. I poured the Ravenol MDL in an empty and clean Mobile 1 gear oil bottle. The pump threaded on it perfectly. I spilled a bit at first but was able to pump as close to 0.83L into the differential's fill hole as I think is humanly possible. I am highly confident that I got closer than most technicians at the dealerships would get. Interestingly, no oil came out the fill hole when I stopped pumping. This tells me that I definitely overfilled it the last time that I changed it. The picture below shows how much I had left out of the original 1L of Ravenol MDL. I then finished by reinstalling the fill plug.
I got to thinking about it and then came to the realization that it's possible that excess oil was simply blowing out the vent. Perhaps it's just wishful thinking, but I decided to spray everything off with brake cleaner to see if the oil residue comes back now that the proper amount of oil is in the differential.
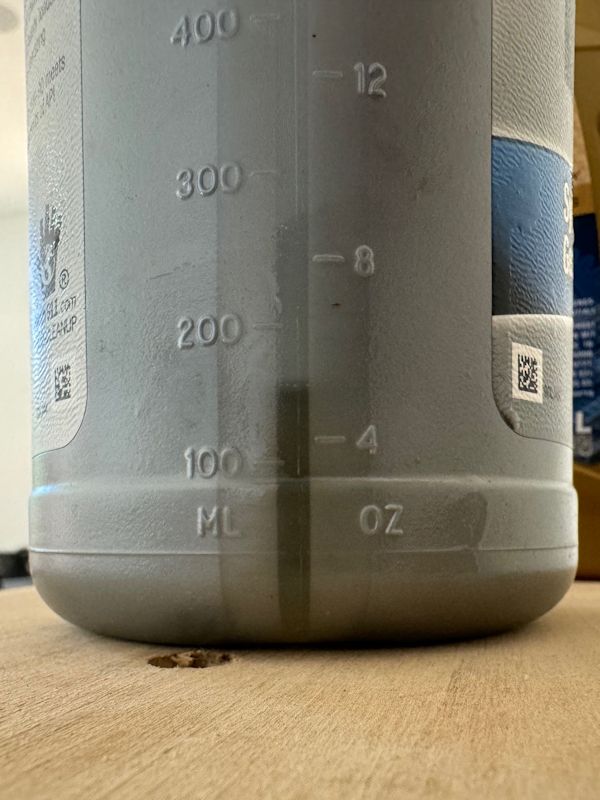
The following users liked this post:
Carbuff2 (05-19-2024)
#89
05-20-2024, 12:55 PM
Senior Member
Thank you and all others that go to this trouble. Altruism is not as common anymore and we really appreciate it!
#90
05-22-2024, 07:41 PM
The following users liked this post:
Carbuff2 (05-23-2024)
#91
06-18-2024, 12:12 PM

Junior Member
Join Date: May 2021
Location: Kingsbere
Posts: 3
Likes: 0
Received 0 Likes
on
0 Posts
Trying to source oil in the UK is virtually impossible. The only oil specified is Castrol BOT 750B (for the open diff). No other oil manufacturer provides an alternative for the F-type differential.
Contacting Castrol for the specification sheet got me nowhere (hoping to cross reference on the spec).
Castrol BOT oils are manufacturer specific and BOT 750B is only obtained from your local (!) Jaguar *********** at an extortionate price.
#92
06-19-2024, 12:19 AM


Senior Member
I cut an access hole in the trunk to easily reach the diff vent plug. I posted details in another thread, I'll repeat them here FYI.
Success. After a bit of prodding and looking around to convince myself nothing important would be cut into, I used a hole saw to cut a 3.5" access panel, and had easy access to the vent plug. To locate the hole, I first marked the position of the rear axle (with tape), then translated that measurement to the floor of the trunk with a bubble level. I looked carefully at both the floor and the diagram of the vent location, and decided to drill the hole slightly to the right and in front of the axle. Note: 2 pieces of sheet metal join in this region. I tried to drill out the forward portion only, but still caught some of the lip of the rear piece. If you're doing this, I'd drill 2" closer to the front from my location, but it's not a big deal.
The vent was nearly perfectly in the middle of my hole. 3.5" was the smallest hole I could get my hand through, and from there, it was just a matter of cleaning up around the vent, then cleaning out the vent. I used a nylon tie wrap. I found no gunk at all in my vent, it looked really, really clean. Now, peace-of-mind in knowing I won't have vent issues.
To button it up, I used a couple of pieces of sound deading, and captured the piece I had drilled out in-between. Easy peasy.
To help you in locating the proper place to cut out the access hole, note the 2 pieces of tape in the photos below are centered on the centerline of the car and the rear axle. Center of tape in each case. Note again, I'm cutting just to the right of the centerline (2" to be specific) and placing the lower edge of the 3.5" hole at the seam for the 2 pieces of sheet metal. If I did it again, I'd cut the hole 2" closer to the front of the car to avoid the sheet metal seam all-together.
Here's a few pics.

Thread
Thread Starter
Forum
Replies
Last Post
Silver Panthera
X-Type ( X400 )
14
09-09-2021 10:48 PM
weisberg
XK8 / XKR ( X100 )
6
03-22-2014 05:20 PM
Jagmansstype
S-Type / S type R Supercharged V8 ( X200 )
18
09-16-2012 10:32 AM
Currently Active Users Viewing This Thread: 3 (0 members and 3 guests)