When you click on links to various merchants on this site and make a purchase, this can result in this site earning a commission. Affiliate programs and affiliations include, but are not limited to, the eBay Partner Network.
I'd call it worse than useless, but I may be in the minority with my level of distaste for it. It's easy to defeat, but difficult to remove. I'll definitely strip it out if I'm doing any mechanical work in that area.
That's exactly the block-off plate I had in mind to fabricate. With the current sale price I can't not get this to have for when I finally get to the removal project. I was looking to fabricate something, but without machine shop access I'm sure it would be "cosmetically challenged."
I ordered one of these delete kits and it does not fit my 2017 F-Type S. The bolt holes in the diamond shaped block off plate do not come close to matching the bolt holes in the Jag. I spoke to Agency Power and they do not make a version of this that they think fits the F-Type.
What we are going to try is drilling new holes in the block off plate. Looks like there is enough room. If that does not work we'll have to make our own plate.
Thanks for posting back as I was ready to buy!
I will watch your results as I also want to delete the whole mess and $21 is cheap!
I wonder if the problem is you have a 6 cylinder? Maybe this kit will fit the V-8's?
Note these are all over EBay for around the same price. Some of them look like they have fewer parts?
I guess it's not just us Jag guys that don't like that fake engine sound stuff! I figured the Focus crowd would want as much noise as possible.
.
.
.
Just a quick update as I have found the factory blanking plate for the symposer. It's only used on LR.
A bit expensive at around $45-$60 so a home made blanking plate would probably be the way to go. It's a very simple part but I guess LR wanted to adapt what they had on the existing symposer instead of just making a flat plate?
.
.
.
Great find on the part number. $45-$60 definitely seems expensive for a piece of plastic/nylon/whatever, but it also seems like a bargain for those who aren't DIY-inclined.
Thanks for the very informative thread, Therock88! I just pulled my supercharger to replace leaky coolant pipes, and straight up didn't enjoy untangling the symposer mess to access everything in the back, so I think I'll just remove the remaining bits and throw the symposer away.
Originally Posted by Therock88
Out of curiosity, what did you folks do with the vacuum hose in the picture above that has a T-connector going to the symposer's "intake tuning valve?" Just plug the part that goes to the symposer, or remove the T-connector entirely?
Edit: I ended up just removing the T-connector as it could be easily done without destroying the hose.
The Symposer actually offends my sensibilities. It annoys me that it's there. I'm not really concerned about my SC oil.. but tempted to do the operation just to remove. I had thought about doing so before reading this post.. but will be much better armed and prepared with your good info and pics here. Thx!
I think the LR part would be nice, but lot of $$. Personally, I might trim out a thin piece of aluminum shaped of connector plug, coat edges with gasket sealer, and bolt on between engine and connector.
The Symposer actually offends my sensibilities. It annoys me that it's there.
Me too, but I've been content so far that the defeat operation puts it out of my sight (hearing) and was only two minutes work. I want it gone, but cleanly. Also, I'm not that inclined to do the removal just for the sake of removal. It's currently (effectively) dead but entombed in the engine compartment. Disinterment is going to be a pain.
Also was interested to see if I got any CEL's or other issues from the removal of that Symposer...All good... No CELs and nothing weird...
Just a note: I'm seeing code P0657 after deleting the symposer, which according to the workshop manual means "Sound symposer failure." I suspect leaving the symposer control module plugged in would fix this, but since everything seems to be working great despite the code, I think I'll just leave it out.
Just a note: I'm seeing code P0657 after deleting the symposer, which according to the workshop manual means "Sound symposer failure." I suspect leaving the symposer control module plugged in would fix this, but since everything seems to be working great despite the code, I think I'll just leave it out.
So you get a code if you scan for it, but no CEL, is that right?
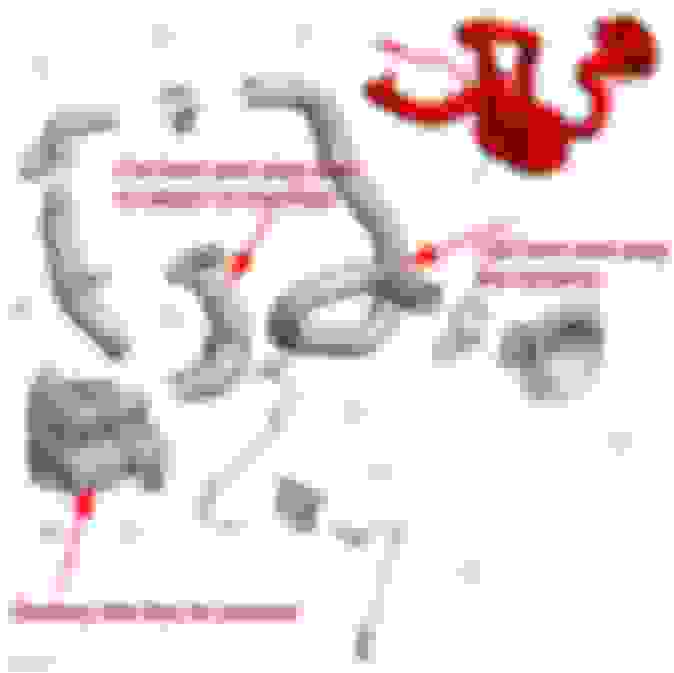
I did not take a lot of photos of the destruction/fabrication. I will pull some off of my phone if I have any that may be helpful and add them here later. It really does not do much, so anything to plug will work...Especially the piece on the firewall.
Once the pieces and brackets are all out (PIA)....You just plug the tube from the intake and the one on the firewall. All the middle parts are now gone.
I had a black plastic cap/cover, that fit over the intake tube (Cut it down to the nub at the fitting) and used E6000 sealant, and a hose clamp and prayed it all black, just to be clean looking.
On the firewall piece, I used the same hose clamp and cut the hose off about 1 - 1 1/2 inches long, and had another hard plastic cap that I wedged into the end of the hose and uses a plastic repair tool (like a soldering iron essentially) o seal/melt it together.
I am not even sure you need to plug that one....I just did, because it was there.
I will say, to get it all out, I used destructive methods. I drilled holes in the box portion, then used large cutters and just broke away material until it would slide out. The bolts on the Intake hose and bottom bracket take some patience and are difficult to reach also. It is apparent JLR did not foresee or want this to ever come out!
Will see what other pics I have, and/or if I can snap a shot now/later.
DC
EDIT / ADD:
Here are two images for the plugging.
Planning to do this to my XF. Did you use a regular silicone cap and did you have any issues with it any coming off under boost ?
Planning to do this to my XF. Did you use a regular silicone cap and did you have any issues with it any coming off under boost ?
Hi....
It should not have a great deal of stress or pressure here. I had a hard rubber/plastic cap in my shop that fit, and I used E6000 on it and a good clamp. No issues to date.

 05-13-2021, 11:42 AM