When you click on links to various merchants on this site and make a purchase, this can result in this site earning a commission. Affiliate programs and affiliations include, but are not limited to, the eBay Partner Network.
I got all my rubbers from https://www.mandcwilkinson.com/ Apart from sending me the wrong rear screen rubber at first I did not have a problem with them and they corrected the error quickly. They sent me the none electric heated screen rubber first. The electric heated rear screen is thicker so it would not fit in the rubber seal. Only thing was I had to pay for a new rear screen to be sent to me and they then refunded me the cost when I returned the incorrect one even though it was their fault. Can't fault the quality of the rubber seals though.
Didn't you have trouble with front quarterlight/NDV rubbers Rob? Or were those from somebody else.
Yes in the original batch but they have changed suppliers for that section and the new ones are very good. They gave me the new ones for free once I had sent them photos of how the old ones had split.
looks like the cowl fresh air vent Drain hose. It should connect to a tube located under the heater fan and the tube sticks out from the firewall.
It should not have a bolt on one end, hose should be open to atmosphere.
As the hose goes down there are two or three bendable clips which keep the hose in place. These clips would be on the right side of the firewall standing in front of the car looking at it. Following the transmission tunnel.
But normally this Cowl Drain hose would have a 90 degree formed bend at one end.
Another possibility is at the Radiator Neck nipple. Some mechanics insert a bolt on one end of a hose and connect the other end to the nipple to prevent coolant from draining to the ground when coolant expands.
the answer is in the inside diameter of the hose. The cowl drain tube is 3/4" inches outside diameter and the radiator neck nipple is 1/4" inch O.D.
Correct Scuttle Air Vent drain tube. Pushes onto a large metal tube/nipple sticking out of the firewall & is held in place by bend over tabs down the LHS tunnel perimeter.
Sorry Glyn and Jose but I think you are both wrong. The clue to this little hose is in the background of the second photo and that which cannot be seen.
There is no heater vacuum valve on the water hoses so this hose is actually the vacuum pipe that should go to the valve. The other clue is that someone had put a bolt in the end to seal the hose so the system does not loose vacuum.
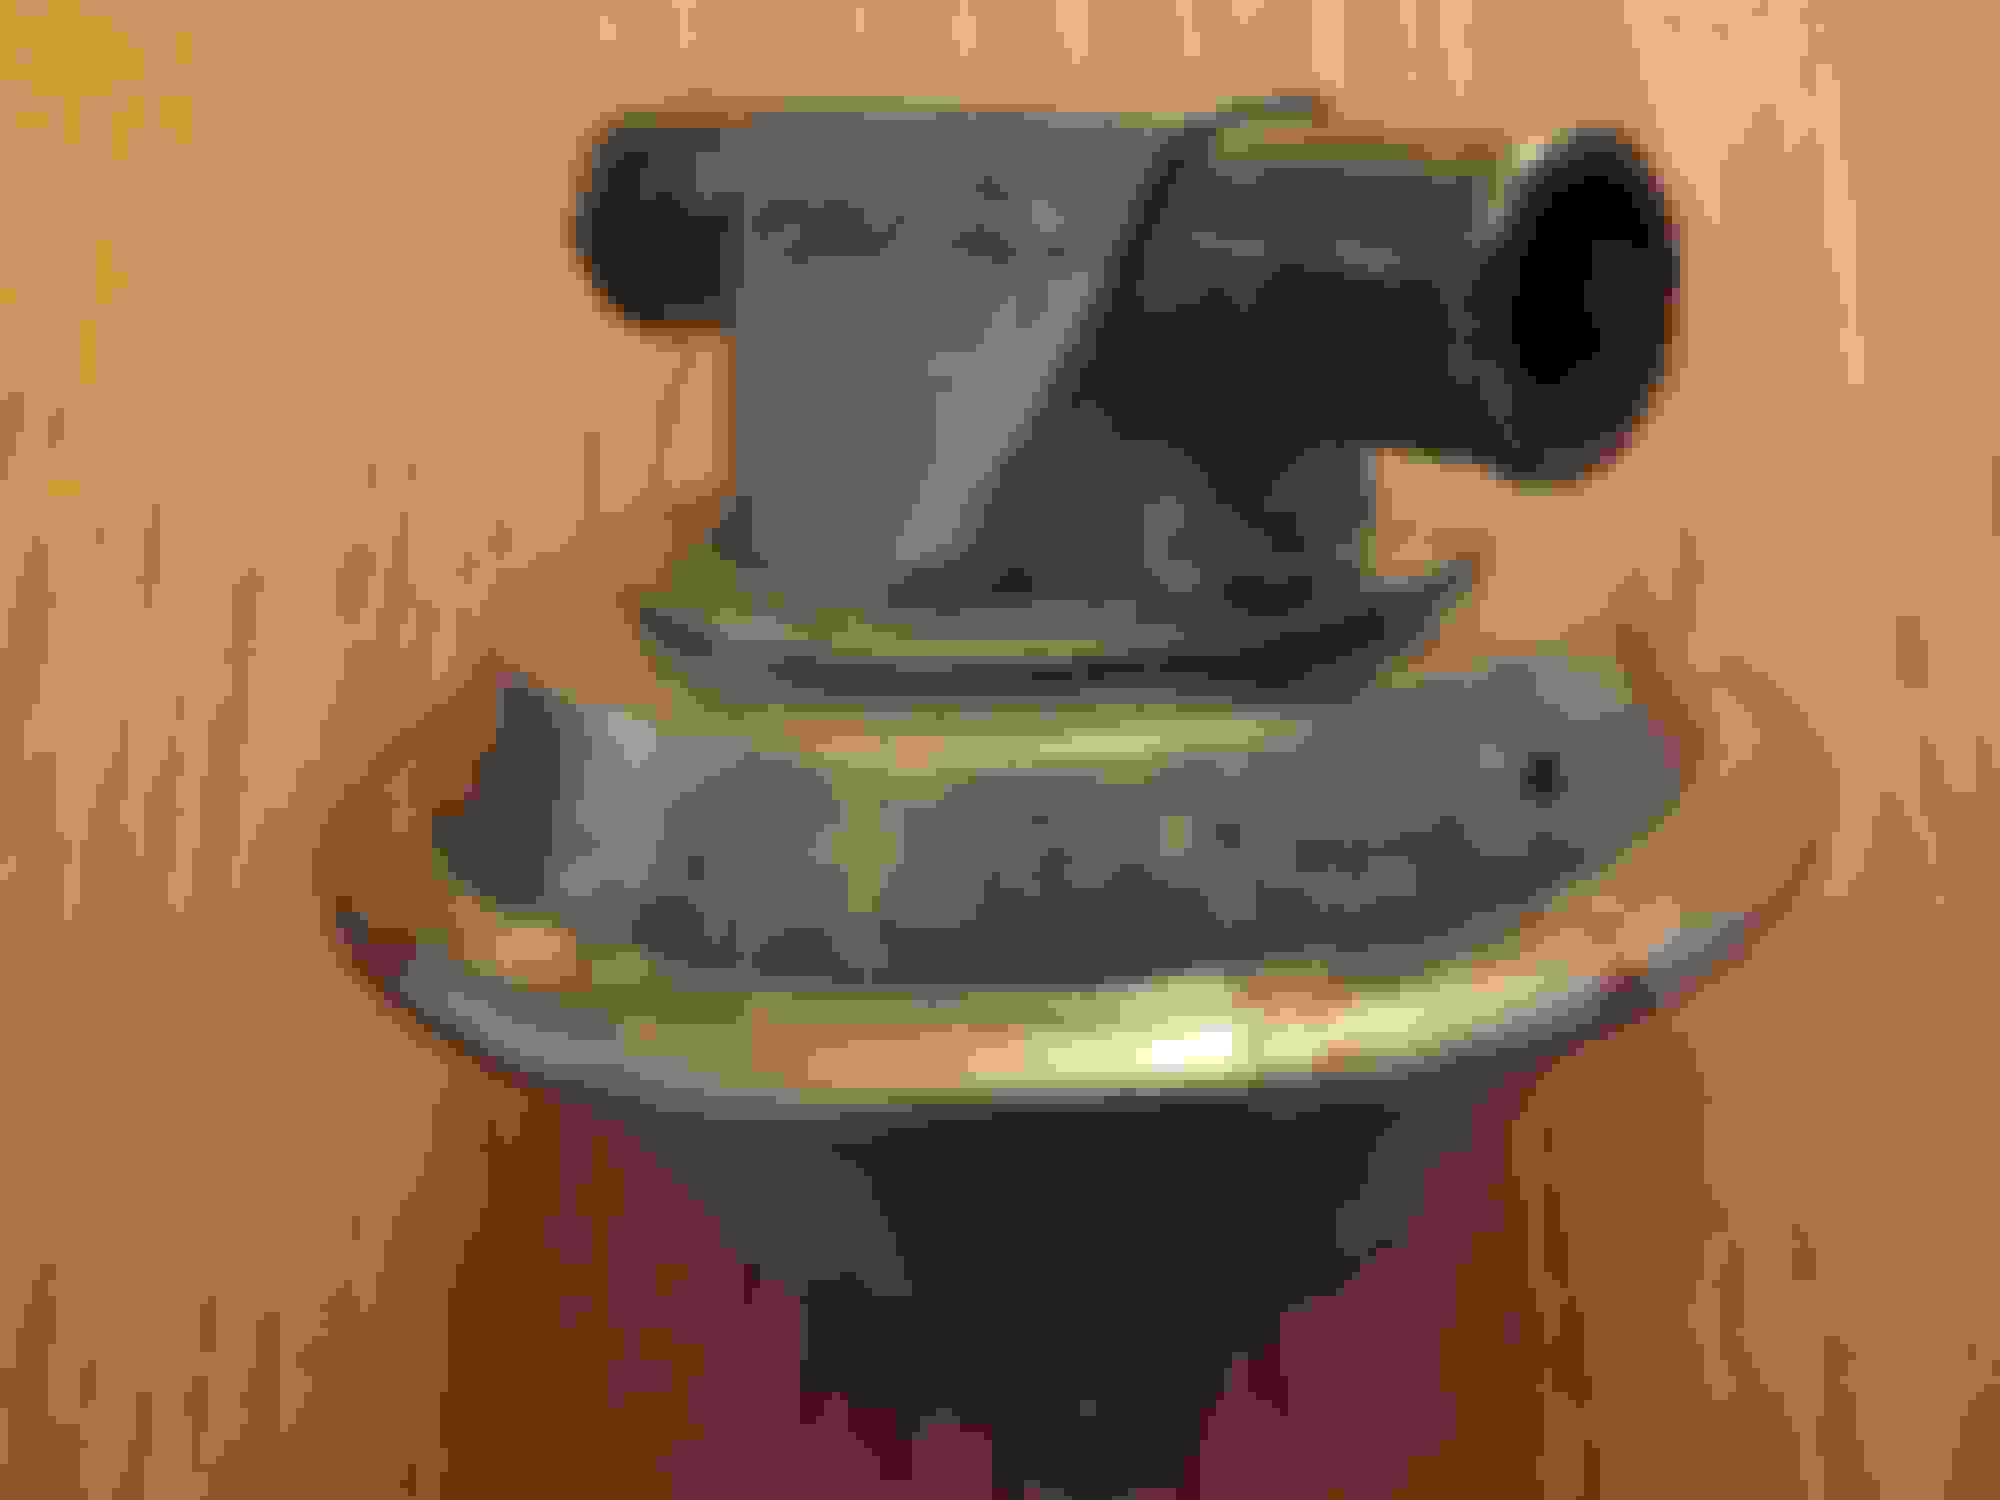
What you should have Phil below the heater box and inserted inline on the top hose is a vacuum heater valve. This is as the title suggests is operated via a vacuum and is switched on and off using the three buttons marked AIR HEAT and OFF below the radio. They are no longer available to buy and either rust out or the diaphragms crack allowing water to seep out of a small air hole seen on the right of the one in the photo. As they leak owners remove them and put either a straight hose in as in your case so the heater is permanently on or they change them to the newer design that you can purchase at SNG. The new one works on a vacuum but is a modified XJ6 vacuum valve. Attached is a photo of what the valve should look like and one of the replacement valve. Only S type Jaguars and Daimler DS420s were fitted with this valve. I purchased a new old stock spare just last week for a song so when you see one you just have to buy it because as I have already said they no longer make them and you cannot get them repaired.
Original Heater vacuum valve Replacement XJ6 vacuum heater valve.
the hose looks too big to be a vacuum hose which to the heater valve is 1/4" o.d.
But who knows.
On the subject of Heater valves, you don't have to use the Series 1 XJ valve exclusively. any heater valve that is NORMALLY CLOSED and OPENS with vacuum, and that has 5/8" o.d. nipples nd 1/4" vacuum nipple will work..
Example: I use one for a 1965 Ford Galaxy and it works just as the original. Plastic, made in china. Cheap, available in any auto parts store from California to Maine. Sure it is not working now because the dammed engine is getting rebuilt.
But the point is that the heater system in the S type is very simple and it does not take mucho dinero to fix it.
Air Conditioning:
go to www.retroair.com and you will see a complete ready to install system for the S type for $2,600.00 USD.
Sorry Glyn and Jose but I think you are both wrong. .
Sorry. I should have been more clear. What I was pointing out was that the scuttle vent drain tube was far larger diameter than that shown. So we are in agreement Rob.
Vacuum tube.
Last edited by Glyn M Ruck; 10-08-2021 at 03:00 PM.
This is the difference in the Scuttle drain outlet and the Vacuum hose outlet. You can see the Vacuum hose is a lot smaller and it is more likely that the Scuttle drain hose is missing rather than the hanging up into the engine bay than the Vacuum hose missing as it goes through the bulkhead to the dash buttons. But what do I know Jose? My Vacuum hose as it was when I bought my car with a nail in the end to stop the vacuum from leaking.
Thanks heaps guys you certainly solve the problem, it was the vacuum hose for the original heater tap which as you pointed out is not existing anymore. I've since disconnected the heater for now, as I'm having some problems with oily fumey smells getting into the cabin and noticed the heater hoses had been resting on the exhaust manifold and we're burnt quite badly. I've also changed the copper washers on the camshaft oil feed lines with the banjo bolts, not a lot of fun but I got them on. As you'll see in these two pictures the first one with only one red arrow is pointing to an open hose that has just been hanging down under the carbies. The other end of that hose is where the red arrow is pointing on the second photograph. The blue arrow is pointing to part of the brake booster I'm assuming. Should the open end of that hose be plugged into something? The brakes seem to work just fine. Cheers in advance and thanks heaps for all your comments and input 😀
Phil if I am not mistaken and I am sure Jose will correct me if I am wrong that is your brake servo vacuum hose but it is all wrongly laid out and plumbed in.
Screwed into the top left the carb manifold there is a metal pipe which loops up and then down the left side of the carbs to a position underneath them. Indicated by the yellow arrow and numbered 76 in the diagram below. This pipes then joins the flexible hose you have indicated and it runs through the inner wing to the vacuum tank which is situated under the right hand wing behind the front lights. This holds the vacuum for the brakes and transfers some vacuum across to the second vacuum tank under the left hand wing which operates the heater and scuttle vent. From the first tank under the right hand wing there should be a second hose that runs back through the inner wing to the brake servo. If the hose is connected direct to the servo you will still have brakes but the brakes will not be as good as soon as the vacuum is lost when you switch the engine off. This is why you have the vacuum tank under the wing. It might be that your tank, which can happen with badly maintained cars, has rusted out and the hoses have been rerouted to compensate. Not having the hose fitted to the vacuum will not stop the brakes from working but you feel the difference once the hose has been reconnected.
This is what I believe you have indicated but it is very difficult to be accurate without actually being hands on in person. I am sorry I do not have any photos of this but it is the sort of thing you connect up after the engine is all in place and then there is not room to get a camera in there to take a photo.
Someone has jury rigged a piece of fuel hose from what should be the booster/servo filter connector to a midnight train going anywhere. (credit Steve Perry/Journey "Don't stop believin")
Old 6" booster set up with remote filter attached to the Air Valve. Fitted to approx Oct 1964
The later 8" booster/servo had the filter integral with the air valve. Fitted to post Oct '64 cars.
Re copper washers on cam oil feed lines. Take off the oil filler cap and observe oil flow.
I think you are right Glyn. Mine being a 1968 has the small filter with no pipe which is what confused me but now you have pointed it out I think you are correct and the hose is connected to the air filter on the servo. No idea why it would need to be so long or not have a filter attached to the open end..
Hi again guys, just a quick one.
What has anyone done for a overflow bottle on the radiator?
I don't like topping the Old Girl up..
And then pulling up somewhere after a short drive and the poor thing looking like it's got a bad bladder. 😉

 10-01-2021, 12:47 PM