

2005 front bumper skin removal w/pics FAQ
#1
 11-07-2009, 06:41 PM

Difficulty level: novice
Tools needed: T30 torx bit, 10mm wrench, 10mm socket, rachet with atleast a 12" extension, some type of tape.
Time: less than a half hour
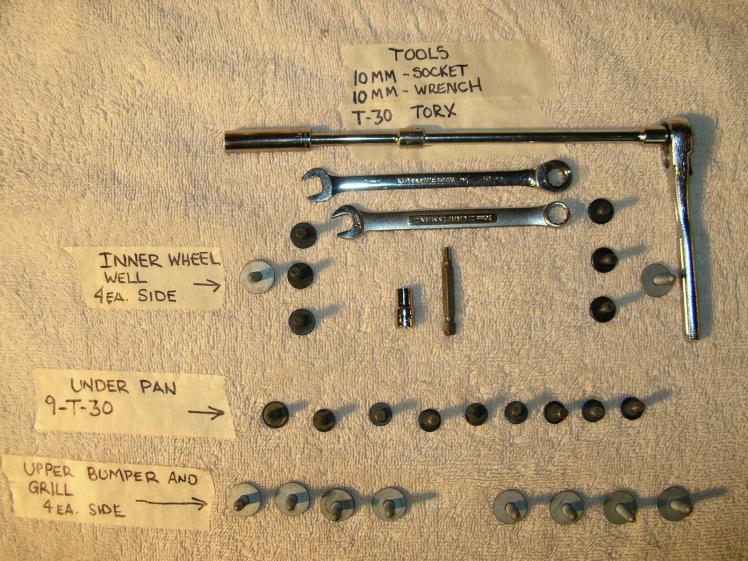
-Remove 9-T30 torx screws from front bellypan (no need to remove the whole belly pan, as some would direct).
(sorry no pic)
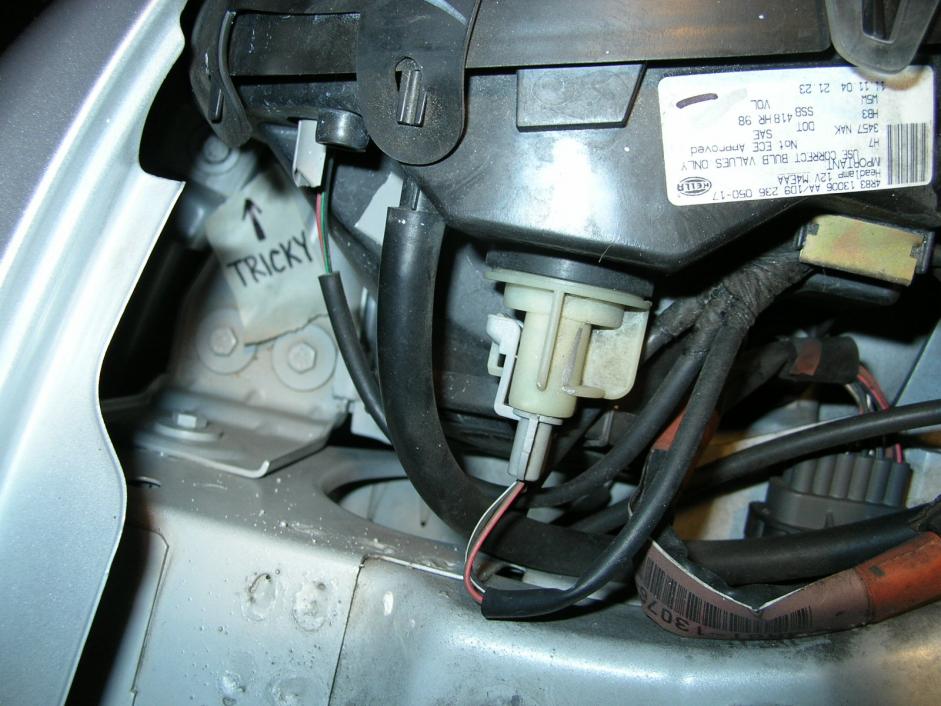
-Remove 3-T30 torx screws from inner wheel well, each side. GENTLY pull inner well out around fender lip (note in photo "tricky" there is a 6m (10mm wrench) bolt inside, very tight area).

-Disconnect blinker, fog lamp (if equipped) harness, location is inside drivers side bumper skin behind blinker (US model)
-Remove radiator splash shield
-Remove 4-6m (10mm socket) bolts from upper headlamp assembly including grill bolt (note upper right corner photo "down there" yet another "tricky" bolt, removal is quite easy), No "man hands" are going to fit to put bolt(s) back in. Use tape to secure bolt to socket for installation.

-Grasp lower grill opening and gently pull out then up, mine I had to wiggle a bit.
-Installation reverse procedure
*If you are removing headlamp assembly there are another 4-6m (10mm socket) bolts located underneath the headlamp assembly, visable after the bumper skin is removed. Disconnect lamp wiring harness.
Tools needed: T30 torx bit, 10mm wrench, 10mm socket, rachet with atleast a 12" extension, some type of tape.
Time: less than a half hour
-Remove 9-T30 torx screws from front bellypan (no need to remove the whole belly pan, as some would direct).
(sorry no pic)
-Remove 3-T30 torx screws from inner wheel well, each side. GENTLY pull inner well out around fender lip (note in photo "tricky" there is a 6m (10mm wrench) bolt inside, very tight area).
-Disconnect blinker, fog lamp (if equipped) harness, location is inside drivers side bumper skin behind blinker (US model)
-Remove radiator splash shield
-Remove 4-6m (10mm socket) bolts from upper headlamp assembly including grill bolt (note upper right corner photo "down there" yet another "tricky" bolt, removal is quite easy), No "man hands" are going to fit to put bolt(s) back in. Use tape to secure bolt to socket for installation.
-Grasp lower grill opening and gently pull out then up, mine I had to wiggle a bit.
-Installation reverse procedure
*If you are removing headlamp assembly there are another 4-6m (10mm socket) bolts located underneath the headlamp assembly, visable after the bumper skin is removed. Disconnect lamp wiring harness.
Last edited by joycesjag; 06-26-2011 at 08:00 PM.
The following 25 users liked this post by joycesjag:
2KXJ (12-15-2012),
abonano (09-28-2013),
aholbro1 (04-07-2015),
amicus (03-11-2015),
baldeagle15 (12-05-2012),
and 20 others liked this post.

#3
11-09-2009, 08:53 AM

Veteran Member
#4
11-09-2009, 08:58 AM
#5
11-09-2009, 09:29 AM
Veteran Member
"...and it was a typical case of blind justice and I knew that the judge wasn't gonna look at the twenty-seven eight-by-ten color glossies with the circles and arrows and a paragraph on the back of each one explaining what each one was...."
With Thanksgiving approaching, it's time to break out my "Best of Arlo Guthrie" CD again. Thanks for reminding me....
With Thanksgiving approaching, it's time to break out my "Best of Arlo Guthrie" CD again. Thanks for reminding me....
#7
11-09-2009, 05:05 PM
Trending Topics
#8
07-06-2010, 08:28 PM

Junior Member
Join Date: Jul 2010
Location: Atlanta, GA
Posts: 3
Likes: 0
Received 0 Likes
on
0 Posts
#9
11-23-2010, 04:45 PM

I have a 03 STR as well. Had to pull the car off the motor to get the supercharger off. Supercharger was making noise so I'm replacing the rear bearings. Hopefully it works. That bumper is a mess, by the way.
#10
11-23-2010, 05:44 PM

Veteran Member
I think you really need to do a video version of this with a David Rose "The Stripper" soundtrack ...
Difficulty level: novice
Tools needed: T30 torx bit, 10mm wrench, 10mm socket, rachet with atleast a 12" extension, some type of tape.
Time: less than a half hour
-Remove 9-T30 torx screws from front bellypan (no need to remove the whole belly pan, as some would direct).
-Remove 3-T30 torx screws from inner wheel well, each side. GENTLY pull inner well out around fender lip (note in photo "tricky" there is a 6m (10mm wrench) bolt inside, very tight area).
-Disconnect blinker, fog lamp (if equipped) harness, location is inside drivers side bumper skin behind blinker (US model)
-Remove radiator splash shield
-Remove 4-6m (10mm socket) bolts from upper headlamp assembly including grill bolt (note upper right corner photo "down there" yet another "tricky" bolt, removal is quite easy), No "man hands" are going to fit to put bolt(s) back in. Use tape to secure bolt to socket for installation.
-Grasp lower grill opening and gently pull out then up, mine I had to wiggle a bit.
-Installation reverse procedure
*If you are removing headlamp assembly there are another 4-6m (10mm socket) bolts located underneath the headlamp assembly, visable after the bumper skin is removed. Disconnect lamp wiring harness.
#11
04-16-2011, 09:00 AM

I'm actually in the middle of doing this operation to switch my HIDs.
However, this does not explain how do I remove the headlight washer covers without breaking them. I already started by breaking one of them, and would like to avoid breaking the second one.
Can anybody advise?
Many thanks
However, this does not explain how do I remove the headlight washer covers without breaking them. I already started by breaking one of them, and would like to avoid breaking the second one.
Can anybody advise?
Many thanks
Last edited by agp22; 04-16-2011 at 09:21 AM. Reason: add photos
#12
04-16-2011, 04:26 PM
#13
04-16-2011, 05:06 PM
#14
04-16-2011, 06:09 PM
#15
04-16-2011, 08:58 PM
#16
04-17-2011, 08:45 AM

Veteran Member

#17
04-17-2011, 08:54 AM
Well you can grind the heads of the bolts off to get things apart. You have to be careful and stop when the heat builds up or the plastic gets melted. A wet rag is good. Of course you will need new j-nuts and bolts.
As for the damaged plasic, sometimes there is still enough tab left for the j-nut to get ahold of. If not they can be repaired with special adhesives. I use a product called Fusor #143. Only thing is it takes a special gun to dispence it and an adhesion promotor. So it's kinda pricey for a DIYer only fixing one bumper cover.
I'll be sure to use some anti-sieze when this one goes back together.
The following users liked this post:
JagV8 (06-26-2011)
#18
06-26-2011, 12:55 PM
Veteran Member
#20
06-27-2011, 04:39 AM
Veteran Member