
Broken Coolant Bleeder Valve Solved
#1
 12-18-2013, 06:46 PM


Even with my limited experience with the Jag S-type, it has become painfully obvious that the coolant system bleeder valve located on the upper radiator hose is a real problem. Yes, I broke off the valve core on my Jag too! It seems that everyone does this eventually, but I have a possible solution. There are two basic steps.
Step One - Replace the broken valve core. I just paid $56 for a new upper radiator hose just so I could remove the bleeder valve core and use it to replace the one I broke. My existing upper radiator hose is fine. Only the valve core was damaged. I now have an extra upper radiator hose.
Step Two - Never open the bleeder valve again! That's a nice idea, but how do you bleed the air out of the coolant system after a repair? That's easy. You install a new bleeder valve that actually works without breaking. Here's how:
1. You will need some parts that you should be able to find at any hardware store, a big box building supply store and/or an auto parts store.
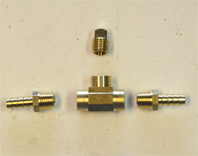
1 ea. 1/4 inch MIP Brass Plug
2 ea. 5/16 inch ID x 1/4 inch MIP Brass Hose Barb
1 ea. 1/4 inch FIP Brass T-Connector
2 ea. Small Hose Clamps - suitable for a 5/16 inch fuel line
2 ea. Zip Ties about 4 to 6 inches long
1 ea. Small felt pad like you put under legs of furniture to prevent scratches on the floor
1 ea. Roll of Teflon tape - the type used by plumbers
2. Assemble the brass parts as shown in the following photo. Don't forget to apply Teflon tape to the threads. It will help keep the threads from binding and help prevent leaks. Do not screw the plug on too tightly. It is designed to work with natural gas at pressures many time greater than the Jag cooling system, so it really does not need to be very tight in this application. Make it good and snug. Then about 1/4 to 1/2 turn more should do the trick.
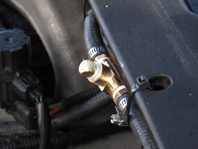
2. There is a 5/16 ID hose that runs from the back side of the upper radiator hose, along the RH side of the intake manifold, and over to the coolant reservoir. This allows air and coolant to vent up into the reservoir. Cut this hose at a point just to the left of the third hole that attaches the windshield cowling to the underlying support member. (See the following photo.) I know; its an expensive hose! If you don't like the modification, you can always use a 5/16 inch barbed connector to repair it.

3. Insert the brass fittings assembled in Step 1 and secure them with the hose clamps. Insert the felt pad between the fittings and the support beam to prevent rattling and scratching. Secure the rubber hose to the support beam using the zip ties. Pull the zip ties snug but not too tight. Do not crush the hose.
4. When you need to vent the coolant system, simply remove the brass plug. DO NOT REMOVE THE PLUG WHEN THE ENGINE IS HOT AND UNDER PRESSURE! Also, do not screw the plug down too tight. It will not break, but it will only make it more difficult to remove.
I have been running with this modification for a couple of days now, and it seems to work just fine.
Step One - Replace the broken valve core. I just paid $56 for a new upper radiator hose just so I could remove the bleeder valve core and use it to replace the one I broke. My existing upper radiator hose is fine. Only the valve core was damaged. I now have an extra upper radiator hose.
Step Two - Never open the bleeder valve again! That's a nice idea, but how do you bleed the air out of the coolant system after a repair? That's easy. You install a new bleeder valve that actually works without breaking. Here's how:
1. You will need some parts that you should be able to find at any hardware store, a big box building supply store and/or an auto parts store.
1 ea. 1/4 inch MIP Brass Plug
2 ea. 5/16 inch ID x 1/4 inch MIP Brass Hose Barb
1 ea. 1/4 inch FIP Brass T-Connector
2 ea. Small Hose Clamps - suitable for a 5/16 inch fuel line
2 ea. Zip Ties about 4 to 6 inches long
1 ea. Small felt pad like you put under legs of furniture to prevent scratches on the floor
1 ea. Roll of Teflon tape - the type used by plumbers
2. Assemble the brass parts as shown in the following photo. Don't forget to apply Teflon tape to the threads. It will help keep the threads from binding and help prevent leaks. Do not screw the plug on too tightly. It is designed to work with natural gas at pressures many time greater than the Jag cooling system, so it really does not need to be very tight in this application. Make it good and snug. Then about 1/4 to 1/2 turn more should do the trick.
2. There is a 5/16 ID hose that runs from the back side of the upper radiator hose, along the RH side of the intake manifold, and over to the coolant reservoir. This allows air and coolant to vent up into the reservoir. Cut this hose at a point just to the left of the third hole that attaches the windshield cowling to the underlying support member. (See the following photo.) I know; its an expensive hose! If you don't like the modification, you can always use a 5/16 inch barbed connector to repair it.
3. Insert the brass fittings assembled in Step 1 and secure them with the hose clamps. Insert the felt pad between the fittings and the support beam to prevent rattling and scratching. Secure the rubber hose to the support beam using the zip ties. Pull the zip ties snug but not too tight. Do not crush the hose.
4. When you need to vent the coolant system, simply remove the brass plug. DO NOT REMOVE THE PLUG WHEN THE ENGINE IS HOT AND UNDER PRESSURE! Also, do not screw the plug down too tight. It will not break, but it will only make it more difficult to remove.
I have been running with this modification for a couple of days now, and it seems to work just fine.
Last edited by Jim89; 12-18-2013 at 06:50 PM.
The following 2 users liked this post by Jim89:
Jumpin' Jag Flash (12-19-2013),
Simon Pickering (12-15-2019)

#3
12-18-2013, 09:20 PM
#4
12-18-2013, 09:41 PM


Good one Jim. Excellent fix for a stupid design.
Looked at both our S types, interest got the better of me in the 45c temps outside, and the RHD has the dumb nipple in the top hose, I did break that on "hers", and there is NO valve core or anything in that plastic thingy.
Our header tank is on the RH side at the rear, and the feed hose runs up the LH camcover, across the rear of the engine, and straight to the tank. My assumption is the air simply bubbles direct into the tank as this hose attaches to the tank quite high up, not far below the filler cap opening.
The parts book also lists a different set up for LHD, and does mention a valve in that bleeder hose??.
Its these times I LUV my RHD vehicles. Simple as they come.
The mighty V8's, different obviously.
#5
12-19-2013, 06:18 AM
Veteran Member
#6
12-19-2013, 07:33 AM
#7
12-19-2013, 09:13 AM
Veteran Member
Trending Topics
#9
12-19-2013, 11:36 AM

Veteran Member
#10
12-19-2013, 01:38 PM

This place carries the cowl push pins (99-8265) and the headlight cover screw down pins (99-8266). Note the price shown is for 10 so very good prices!
http://www.car-pak.com/advanced_sear...x=0&search.y=0
.
.
.
http://www.car-pak.com/advanced_sear...x=0&search.y=0
.
.
.
The following users liked this post:
joycesjag (12-19-2013)
#11
12-20-2013, 07:55 AM
This place carries the cowl push pins (99-8265) and the headlight cover screw down pins (99-8266). Note the price shown is for 10 so very good prices!
Car-Pak.com, Complete Automotive Supply and Equipment
.
.
.
Car-Pak.com, Complete Automotive Supply and Equipment
.
.
.
I knew I was going to like this forum.
Jim
#13
12-20-2013, 06:39 PM
#14
12-21-2013, 10:30 PM

Senior Member
Still not working - every time I click the button to make the payment, it just sends me back to the cart. Oh well, their loss - I'll find them somewhere else.
#15
12-22-2013, 10:00 AM
When I purchased, the payment key took me to my PayPal account. It took longer than I expected, but it worked. I did not create an account. Maybe you could try that.
Jim
#16
12-22-2013, 11:15 AM

Veteran Member
#17
12-23-2013, 02:18 AM
Senior Member
#18
12-23-2013, 05:24 PM
Veteran Member
These systems normally have a first level check based on ip address.


Thread
Thread Starter
Forum
Replies
Last Post
OkieTim
S-Type / S type R Supercharged V8 ( X200 )
3
09-08-2015 04:48 PM
Currently Active Users Viewing This Thread: 1 (0 members and 1 guests)