
How To Charge AC System c/w pics FAQ
#1
 05-25-2011, 02:57 PM

Difficulty: easy
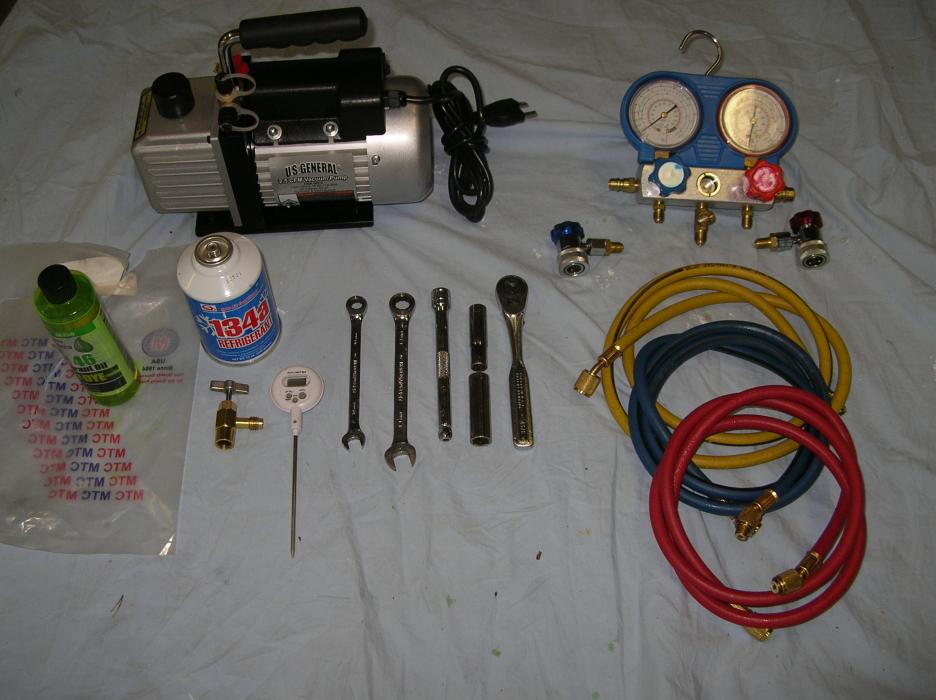
Tools Needed: AC Block Gauge (with quick connects and hoses) and Vacuum Pump (available inexpensively @ Harbor Freight Tools), R134a brass shut off, Green Dye (checking leaks, optional), Meat Probe, Kitchen Scale (not pictured). **Disreguard rachet, sockets and wrenches in below picture).
Time: (relaxing) 2 hours
**This procedure was done to a 2005, 3.0 litre, S Type with a complete evacuation of R134a Refriderant.** The following instructions will give you basic knowledge on how to recharge a repaired HVAC system.
It has been brought to my attention that people are worried about confusing HIGH Preasure and Low Preasure Lines. There are only 1 of each on this model. The quick connects on vehicle are different sizes, there will be NO confusing the smaller of the 2 which is the LOW Preasure Line. Red = HIGH preasure line, BLUE = LOW preasure line.
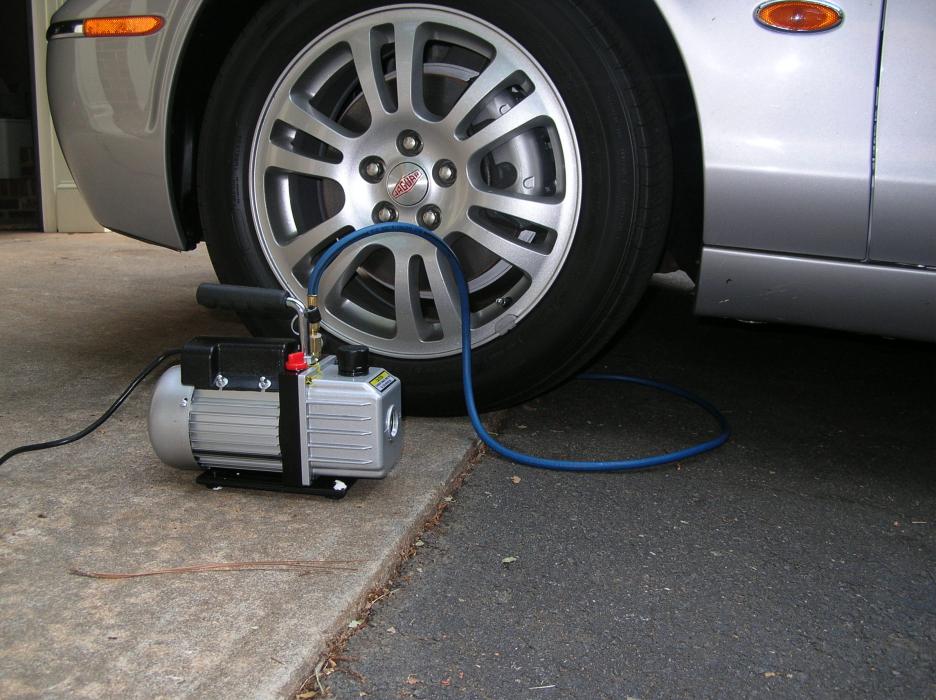
Locate the "low preasure side" (smaller of the 2) AC line quick connect. In my case behind drivers side (US) front tire. Connect the vacuum pump to the low side line. Vehicle does NOT have to be running. Turn pump on and let run approx. 45 minutes. There isn't a guage for letting you know when the air is sucked out on the pump I used. Good time to enjoy a few cold beverages.
Locate the AC System Sticker under hood which will tell you how many grams or ounces to fill your system, (ours is located on radiator splash shield). I needed 2-15 oz cans of R134a.

Moving on. Close Blue quick connect valve or disconnect vacuum line from AC system BEFORE turning off vacuum pump.
Heres where it gets tricky. Using the kitchen scale weigh the can of R134a WITH the brass shut off valve fitting secured to the can and hose attached. Connect to low preasure side quick connect, again an acurrate scale reading here is important!

(In the above picture, note the short blue dial gauge connected to the R134a can, I borrowed the AC Block gauges from a fellow member and it was missing a fitting to use with the long blue hose. I had the short line laying around (cheapie) from a big box store, that I ended up using)
Start vehicle, turn on AC, full fan at coldest setting. Following the R134a can directions I tilted the first can back and forth, approx. 10 minutes until empty. Close shut off on brass can fitting. WEIGH empty can and write down or remember figure. Attach second can of R134a, open shut off and let fill again keeping watch on the weight. About midway through can #2 the compressor kicked on, continue filling.
Using meat probe in a vent monitor temperature reading, until a temp between 39 and 44 degrees is displayed.

Close brass shut off. Add up total weight of refriderant added to system. If the total weight meets your AC System label, Congrats your finished!
AC Block Gauge reading after buttoned up

A BIG thank you goes out to fellow member Androulakis (George) for taking the time for explaining and holding my hand through this procedure!!
Also a BIG thank you to fellow member 01stype30 (Nick) for loaning me his AC tools!!
Tools Needed: AC Block Gauge (with quick connects and hoses) and Vacuum Pump (available inexpensively @ Harbor Freight Tools), R134a brass shut off, Green Dye (checking leaks, optional), Meat Probe, Kitchen Scale (not pictured). **Disreguard rachet, sockets and wrenches in below picture).
Time: (relaxing) 2 hours
**This procedure was done to a 2005, 3.0 litre, S Type with a complete evacuation of R134a Refriderant.** The following instructions will give you basic knowledge on how to recharge a repaired HVAC system.
It has been brought to my attention that people are worried about confusing HIGH Preasure and Low Preasure Lines. There are only 1 of each on this model. The quick connects on vehicle are different sizes, there will be NO confusing the smaller of the 2 which is the LOW Preasure Line. Red = HIGH preasure line, BLUE = LOW preasure line.
Locate the "low preasure side" (smaller of the 2) AC line quick connect. In my case behind drivers side (US) front tire. Connect the vacuum pump to the low side line. Vehicle does NOT have to be running. Turn pump on and let run approx. 45 minutes. There isn't a guage for letting you know when the air is sucked out on the pump I used. Good time to enjoy a few cold beverages.
Locate the AC System Sticker under hood which will tell you how many grams or ounces to fill your system, (ours is located on radiator splash shield). I needed 2-15 oz cans of R134a.
Moving on. Close Blue quick connect valve or disconnect vacuum line from AC system BEFORE turning off vacuum pump.
Heres where it gets tricky. Using the kitchen scale weigh the can of R134a WITH the brass shut off valve fitting secured to the can and hose attached. Connect to low preasure side quick connect, again an acurrate scale reading here is important!
(In the above picture, note the short blue dial gauge connected to the R134a can, I borrowed the AC Block gauges from a fellow member and it was missing a fitting to use with the long blue hose. I had the short line laying around (cheapie) from a big box store, that I ended up using)
Start vehicle, turn on AC, full fan at coldest setting. Following the R134a can directions I tilted the first can back and forth, approx. 10 minutes until empty. Close shut off on brass can fitting. WEIGH empty can and write down or remember figure. Attach second can of R134a, open shut off and let fill again keeping watch on the weight. About midway through can #2 the compressor kicked on, continue filling.
you wont get below 50 degrees UNTIL you turn on the recirc button, BUT you don't want to do that until you are pretty much fully charged...
1) Shut OFF the car between can changes.
2) When the temp stablizes (stops dropping), pick up the can, move left to right. Finally invert the can to get the last bit out.
1) Shut OFF the car between can changes.
2) When the temp stablizes (stops dropping), pick up the can, move left to right. Finally invert the can to get the last bit out.
Close brass shut off. Add up total weight of refriderant added to system. If the total weight meets your AC System label, Congrats your finished!
AC Block Gauge reading after buttoned up
A BIG thank you goes out to fellow member Androulakis (George) for taking the time for explaining and holding my hand through this procedure!!
Also a BIG thank you to fellow member 01stype30 (Nick) for loaning me his AC tools!!
Last edited by joycesjag; 05-25-2011 at 09:09 PM. Reason: JimC64s advise
#2
05-25-2011, 03:57 PM
Veteran Member
Rick you wont get below 50 degrees UNTIL you turn on the recirc button, BUT you don't want to do that until you are pretty much fully charged... Remember 
When you hook up the first can, the A/C compressor will not be engaged. As it starts to take the charge, with approx 2/3 of the first can gone, the compressor will fire up, and you should see about 62-65 degree air out of the vents.
Two things to note.
1) Shut OFF the car between can changes.
2) When the temp stablizes (stops dropping), pick up the can, move left to right. Finally invert the can to get the last bit out.
Take care,
George
The following 3 users liked this post by androulakis:
#3
05-25-2011, 04:17 PM
Veteran Member
Join Date: Nov 2006
Location: Glasgow, Scotland UK
Posts: 47,302
Received 9,007 Likes
on
4,113 Posts

Another great write up / how to c/w pics Rick and it needs to be made FAQ.
I'll change the thread title to FAQ and I'm sure one of the mods will add it shortly to the FAQ base.
Note - perhaps George's add on comments should be edited into your thread, ie- notes 1 & 2
Its fantastic to see 3 forum members, yourself Rick, Androulakis (George) and 01stype30 (Nick) all working together on this....excellent!
The following 2 users liked this post by JimC64:
Jumpin' Jag Flash (06-14-2014),
Lcgi (08-08-2011)
#4
05-25-2011, 05:46 PM

Join Date: Oct 2007
Location: PHX some of the time
Posts: 117,265
Received 6,307 Likes
on
5,495 Posts
#5
05-25-2011, 06:32 PM
The following users liked this post:
Lcgi (08-08-2011)
#7
05-25-2011, 09:11 PM
Trending Topics
#9
08-17-2011, 12:11 PM
Hi Rick,
Excellent write-up and pictures. A couple of questions.
1. What is the psi on the low-side port? It looks to be 40 but I wasn't sure.
2. What was the ambient temperature when you did this?
There are some kits that have a psi limit for a given ambient temperature. As an example 55 psi at 90 degrees F.
Thanks in advance,
Mike
#10
08-17-2011, 02:41 PM
The following users liked this post:
Girl Friends S 3.0 (07-31-2012)
#11
08-17-2011, 06:17 PM
Thanks Rick,
It should help. One thing I noticed is that the R134 cans come in 11 oz cans (coincidence)? The kits I saw at Advanced Auto Parts were a hose kit with a pressure gauge. The directions indicated what the psi should be for a given temperature. I can use your 40 psi as a rough guide and adjust off that.
Mike
#12
08-17-2011, 07:20 PM
#13
08-17-2011, 09:14 PM
Veteran Member
#14
08-18-2011, 01:12 AM


Veteran Member
#15
09-19-2011, 08:42 PM

#17
09-23-2011, 09:24 AM
Veteran Member
#18
05-12-2012, 04:25 PM

Veteran Member
Just curious. Did you add any compressor oil? I just replaced the compressor on my F250 and it needed a total of 9oz of compressor oil?
The new compressor had 6oz in it. So I had to add 3 additional oz.
How much compressor oil does the S-type need? I'm about to replace mine TOO.
The new compressor had 6oz in it. So I had to add 3 additional oz.
How much compressor oil does the S-type need? I'm about to replace mine TOO.
** IF I take it to the A/c shop do those a/c machines have the compressor oil mixed in with the refrigerant?? or I have to manually have them install the Compressor oil before filling it up?
Thanks..
The following users liked this post:
Jhartz (07-05-2013)
#19
05-12-2012, 04:56 PM
Charging stations have the ability to add oil but it isn't in the bulk gas gas bottle. It really depends on what components are changed out. A replacement compressor will typically state if it is oiled or requires additional oil. Most of the oil in the system settles in the accumulator drier and compressor. When fixing wrecks, I frequently change out condensors without adding oil. Too much slogging about can be as bad as not enough. Unless you completely evacuate and flush the entire system, there is no way that I know of to tell exactly how much is in the system.
Hope that helps.
Hope that helps.
The following users liked this post:
jag79 (05-14-2012)
#20
05-12-2012, 07:54 PM
Join Date: Oct 2007
Location: PHX some of the time
Posts: 117,265
Received 6,307 Likes
on
5,495 Posts
The following 2 users liked this post by Norri:
jag79 (05-14-2012),
Starbucksjack (08-09-2014)