
Sat Nav touch screen retrofit completed - with pics.
#1
 07-20-2012, 03:22 PM

Hi everyone, just thought this may be of interest to some of you.
Here are some pics of the touch screen navigation retrofit I completed yesterday.
The car didn't have any pre-wiring, no cd changer, nothing at all in the boot. But this retrofit worked like a charm with the help of a custom plug and play wiring loom that can be made up at home!!
Instructions for the loom are over on the UK forum in the x-type section. (loom is identical) the loom was made up for me by jostaffs on the UK forum.
So for your viewing pleasure, here's my retrofit:
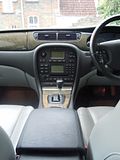
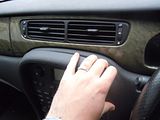
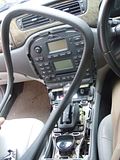
1. The standard climate control unit and stereo
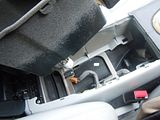
2. Start by removing the cup holder, one of the screws for the centre console is hidden under here:
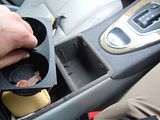
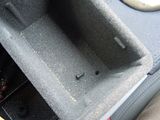
3. Remove the screw under the cup holder and the one located in the main compartment at the back left.
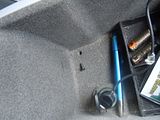
4. Lift out the centre console and unplug the 12v socket and set the console aside
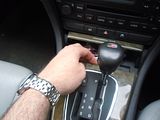
5. Now remove the trim from around the gear stick. It just pops up. I lifted the ashtray and pulled gently from the front to start with. Then work your way round.
You could also use a flat blade screw driver, protected with a cloth to prevent scratching. It's held in place with 4 clips. 2 front, 2 back.
You can see the 4 locations of the clips at each corner of the gear selector in the second picture for your reference.
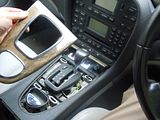
6. Start to pull the main surround away. This just unclips from several locatons. A couple at the top, a couple on the sides and a couple near to the park brake lever.
7. Unbolt the four 7mm bolts holding the unit in place and slide out. Disconnect all the wires.
You will also need to unscrew the bottom switch pack that houses the hazzards. This will need to be screwed on to the bottom of the the nav screen unit. just 2 torx screws for this, no need to unlug it from anywhere.
SORRY - No pics for this part :-(
8. After you've routed the loom, plugged in the DVD, plugged all the cables into the nav screen and then plugged in the RCCM, give it a go, to make sure it works before bolting it all back together!
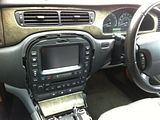
9. Secure the Nav screen in place
10. Do the reverse of the above to put everything back.......
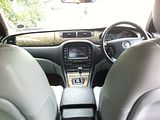
11. Sit back and enjoy!!!!!!!!!!
Tris
Here are some pics of the touch screen navigation retrofit I completed yesterday.
The car didn't have any pre-wiring, no cd changer, nothing at all in the boot. But this retrofit worked like a charm with the help of a custom plug and play wiring loom that can be made up at home!!
Instructions for the loom are over on the UK forum in the x-type section. (loom is identical) the loom was made up for me by jostaffs on the UK forum.
So for your viewing pleasure, here's my retrofit:
1. The standard climate control unit and stereo

2. Start by removing the cup holder, one of the screws for the centre console is hidden under here:

3. Remove the screw under the cup holder and the one located in the main compartment at the back left.


4. Lift out the centre console and unplug the 12v socket and set the console aside

5. Now remove the trim from around the gear stick. It just pops up. I lifted the ashtray and pulled gently from the front to start with. Then work your way round.
You could also use a flat blade screw driver, protected with a cloth to prevent scratching. It's held in place with 4 clips. 2 front, 2 back.
You can see the 4 locations of the clips at each corner of the gear selector in the second picture for your reference.


6. Start to pull the main surround away. This just unclips from several locatons. A couple at the top, a couple on the sides and a couple near to the park brake lever.


7. Unbolt the four 7mm bolts holding the unit in place and slide out. Disconnect all the wires.
You will also need to unscrew the bottom switch pack that houses the hazzards. This will need to be screwed on to the bottom of the the nav screen unit. just 2 torx screws for this, no need to unlug it from anywhere.
SORRY - No pics for this part :-(
8. After you've routed the loom, plugged in the DVD, plugged all the cables into the nav screen and then plugged in the RCCM, give it a go, to make sure it works before bolting it all back together!
9. Secure the Nav screen in place

10. Do the reverse of the above to put everything back.......
11. Sit back and enjoy!!!!!!!!!!

Tris
The following 7 users liked this post by TristanC:
Axle (08-11-2015),
Datsports (06-17-2016),
julialaue (03-11-2019),
Jumpin' Jag Flash (09-11-2016),
OxfordTheCat (07-23-2012),
and 2 others liked this post.
#2
07-22-2012, 12:10 PM

#3
07-22-2012, 12:51 PM

Veteran Member


#5
07-23-2012, 12:25 PM

Let us know how you get on - jostaffs is the "go to" man for a loom if you don't fancy tackling it yourself.
Tris
#6
07-23-2012, 12:33 PM
#7
07-23-2012, 12:36 PM
If I knew the answer I would have briefly explained it here for you, but JagV8 gave an answer above.......
Trending Topics
#8
07-23-2012, 01:08 PM
Veteran Member
#9
07-23-2012, 01:22 PM

Nobody answers because;
1. They don't have the answer.
2. It's probably not been done before
3. It makes no sense...
All I can tell you, is that i'm not aware of anyone who's done it that way, hence nobody "left any schematic" sorry but that's the situation...
Thanks for dragging Tristan's thread off topic...
The following users liked this post:
Jumpin' Jag Flash (08-16-2015)
#10
07-23-2012, 01:41 PM

Join Date: Oct 2007
Location: PHX some of the time
Posts: 117,457
Received 6,325 Likes
on
5,511 Posts
#12
07-24-2012, 03:34 PM
sat nav from jaguar is so crap.Its not even the graphic which is really poor but the way of finding the route leaves a lot to say...and I got the newest one 2011/2012 cd and this not gives me changes what have been made 3 years ago...
I bought kenwood unit with garmin, and it lets me to add the side camera what is the really good function for overtaking in Europe (I live in the UK and drive left side).
What Im trying to say this is the equipment from 2003 and probably in that year it was really tool, but this was 9 years ago...
I bought kenwood unit with garmin, and it lets me to add the side camera what is the really good function for overtaking in Europe (I live in the UK and drive left side).
What Im trying to say this is the equipment from 2003 and probably in that year it was really tool, but this was 9 years ago...
#13
07-24-2012, 03:53 PM
sat nav from jaguar is so crap.Its not even the graphic which is really poor but the way of finding the route leaves a lot to say...and I got the newest one 2011/2012 cd and this not gives me changes what have been made 3 years ago...
I bought kenwood unit with garmin, and it lets me to add the side camera what is the really good function for overtaking in Europe (I live in the UK and drive left side).
What Im trying to say this is the equipment from 2003 and probably in that year it was really tool, but this was 9 years ago...
I bought kenwood unit with garmin, and it lets me to add the side camera what is the really good function for overtaking in Europe (I live in the UK and drive left side).
What Im trying to say this is the equipment from 2003 and probably in that year it was really tool, but this was 9 years ago...
It's each to their own I suppose, but I find it very good thus far. Certainly comparable to my experiences with the TomTom. At the end of the day, it's there as a guide to help you along, not as a gospel to follow to the tee.
#15
07-25-2012, 08:43 AM
#16
07-28-2012, 04:36 PM
Because I could not find any info at this forum I try to answer myself and other members having the same problem.
I checked the technical info about my model and it looks like it has the rccm module fitted above the glove box. The pin are exactly the same like on my separate climate control unit, what I bought from the different model( without sat-nav fitted). There is a plenty of cable as well.It only needs to be removed and you can connect those cables straight into your separate climate unit.Wolla! it works. The only other things is the harness for stereo.Because the plug is different from the harness supllied for s-type. I have done the search and I found the adapter for x-type what is looking just fine. Im not quite sure regarding the pins, but I will check it out and let you know, if you are interested.
This is the link for the harness:
Buy PC2-81-4 Jaguar S Type X Type Radio ISO Harness adaptor
This is what I bought before( was supplied with the steering wheel adapter)
Autoleads PC99-X07 Jaguar S-Type Stalk Steering Wheel Control Adaptor
On the picture below is the audio connection from my car to the sat-nav unit
#17
07-28-2012, 05:00 PM
Join Date: Oct 2007
Location: PHX some of the time
Posts: 117,457
Received 6,325 Likes
on
5,511 Posts
#18
07-28-2012, 08:40 PM
Veteran Member
Join Date: Nov 2006
Location: Glasgow, Scotland UK
Posts: 47,302
Received 9,010 Likes
on
4,113 Posts

The following users liked this post:
Lagold (07-28-2016)
#20
08-17-2012, 09:42 PM

Well I have the Nav unit, but it's very convenient to use the Garmin since I can take it with me in other vehicles. The Jag unit doesn't interface to a laptop etc. maybe later units can interface via USB to your phone etc.. The main advantage of the Nav screen is the phone book/blue tooth which works with my droid phone. Pity I can't play music via the blue tooth. Will have to get te ACM for that!