
2005 aluminum window trim removal w/pics FAQ
#1
 12-09-2009, 09:18 PM

Difficulty level: moderate
Tools needed: flexible putty knife for upper, stiff putty knife lowers, 1 roll 3M molding tape 1/2" x 180"
Time: 20 minutes per window
-Remove 1-9mm (socket) nut per upper window trim location near "B" pillar (on open door)
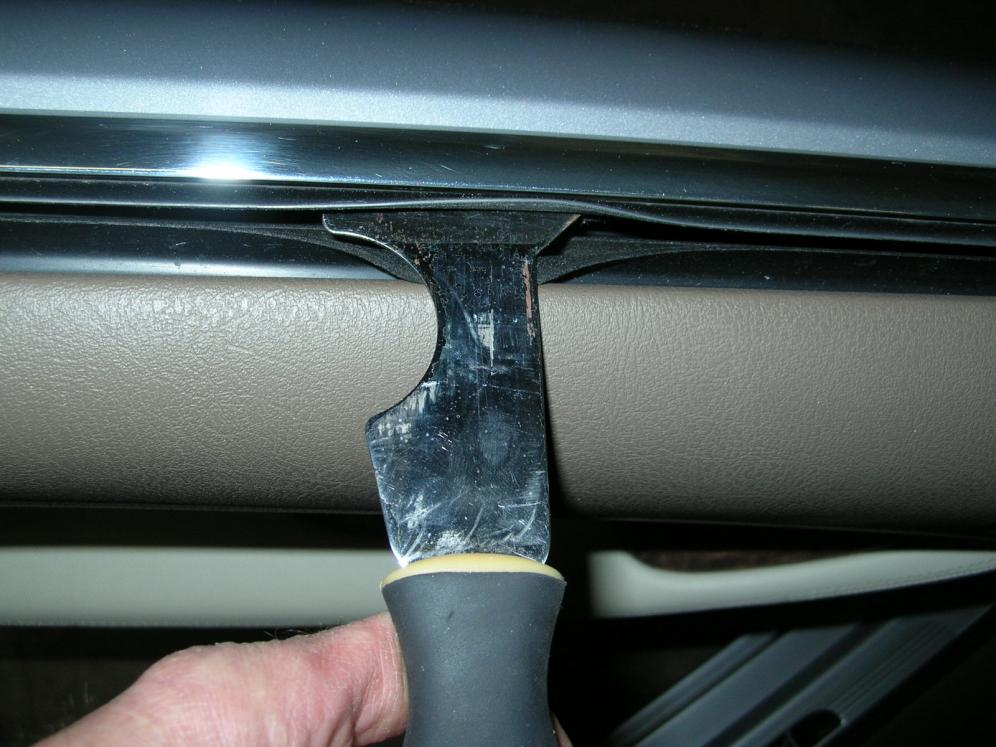
-Using flexible putty knife, work it between upper door frame and trim starting from the 9mm nut working opposite. The putty knife will stop at trim fastners (8 rear window, 9 front window). Gently pull/push putty knife, follow through to next until all trim fastners have "popped". There are also 2 very thin pieces of body/trim tape holding trim on as well. The aluminum trim will pull off. Careful not to bend or twist!
-Using stiff putty knife (I used a painters 6 in 1 tool) lower windows, working from inside of door. Insert tool between window rubber(s) feel for the edge to catch the inside rubber piece attached to aluminum trim, gently pry up working in about 2" sections. The aluminum trim will gradually "pop up". No fastners or tape on lowers.
-Installation replace 3M tape on uppers, using a utility knife (have sharp blades) cut inside and outside trim rails. align 9mm stud in hole and "pop" trim into X fastners with palm of your hand. Tighten 9mm nuts.
If you are asking yourself why should I remove these. I will tell you, to replace the 8 anodized trim with new will cost over $1,200.00 (US). To take to a local metal polisher (1 day turn around ALL 8 pieces) $70.00 (US), I gave the nice polisher a $100.00 bill. Be advised these are anodized, I choose to have anodizing removed and have polished aluminum look (mirror finish)!
So gentlemen when you are throughly disgusted with the white spots/dull finish trim, 1 day and less than a hundred dollars makes ALL the difference. Part number for the little X shaped trim fastners XR826786 just under $3.00 ea. Try not to break any. I did not (but someone else did).
I will be posting finished product in the "exterior detail" section as we are only allowed to upload 5 pics per thread. Don't hesitate to ask questions if you are planning on doing this job, it really isn't that hard!
Tools needed: flexible putty knife for upper, stiff putty knife lowers, 1 roll 3M molding tape 1/2" x 180"
Time: 20 minutes per window
-Remove 1-9mm (socket) nut per upper window trim location near "B" pillar (on open door)
-Using flexible putty knife, work it between upper door frame and trim starting from the 9mm nut working opposite. The putty knife will stop at trim fastners (8 rear window, 9 front window). Gently pull/push putty knife, follow through to next until all trim fastners have "popped". There are also 2 very thin pieces of body/trim tape holding trim on as well. The aluminum trim will pull off. Careful not to bend or twist!
-Using stiff putty knife (I used a painters 6 in 1 tool) lower windows, working from inside of door. Insert tool between window rubber(s) feel for the edge to catch the inside rubber piece attached to aluminum trim, gently pry up working in about 2" sections. The aluminum trim will gradually "pop up". No fastners or tape on lowers.
-Installation replace 3M tape on uppers, using a utility knife (have sharp blades) cut inside and outside trim rails. align 9mm stud in hole and "pop" trim into X fastners with palm of your hand. Tighten 9mm nuts.
If you are asking yourself why should I remove these. I will tell you, to replace the 8 anodized trim with new will cost over $1,200.00 (US). To take to a local metal polisher (1 day turn around ALL 8 pieces) $70.00 (US), I gave the nice polisher a $100.00 bill. Be advised these are anodized, I choose to have anodizing removed and have polished aluminum look (mirror finish)!
So gentlemen when you are throughly disgusted with the white spots/dull finish trim, 1 day and less than a hundred dollars makes ALL the difference. Part number for the little X shaped trim fastners XR826786 just under $3.00 ea. Try not to break any. I did not (but someone else did).
I will be posting finished product in the "exterior detail" section as we are only allowed to upload 5 pics per thread. Don't hesitate to ask questions if you are planning on doing this job, it really isn't that hard!
#2
12-09-2009, 09:25 PM
The following 2 users liked this post by joycesjag:
Gatorman67 (06-26-2023),
Panthro (01-19-2016)
#3
12-09-2009, 09:40 PM
Veteran Member
Join Date: Nov 2006
Location: Glasgow, Scotland UK
Posts: 47,302
Received 9,007 Likes
on
4,113 Posts

 .....FAQ'd
The following users liked this post:
yo_odie (12-15-2012)
#4
12-10-2009, 07:03 AM


Veteran Member
#5
12-10-2009, 12:00 PM
The nice polisher said hit them with Mothers Aluminum Cleaner or Never Dull as needed. In our weather conditions he said maybe once per season. No flaws Jon, there was even a "deep" scratch in one that he buffed right out. They are beautiful and match the polished stainless steel pillars all most purrrrrfectly!!! EXTREMELY happy with the outcome. --Insert $1,100.00 worth of smileys--
In a side note: I could have had them reanodized at an additional (low) cost but they would be more of a duller finish (like factory). Also I may decide to have them clear coated if the maintance gets to extreme. I will keep everyone posted, of course.
In a side note: I could have had them reanodized at an additional (low) cost but they would be more of a duller finish (like factory). Also I may decide to have them clear coated if the maintance gets to extreme. I will keep everyone posted, of course.
The following users liked this post:
Gatorman67 (06-26-2023)
#6
12-10-2009, 12:16 PM
Veteran Member
Glad you're happy with the outcome, Rick. Also glad to know that there's a relatively reasonably-priced solution for those who decide they can't accept their cloudy-looking trim any longer. Ours looks much better now than it did back in the springtime. Our local dealership buffed and polished it and I've hit it once with regular ol' chrome polish since then. Carnauba wax also helps. I still believe that our dealer should have replaced all of our window trim under warranty when I complained about the problem last spring. I was told "we no longer replace it just for appearance reasons". But I was much more concerned about the limp home mode problem my wife had just experienced with the car at that time, and I let the trim issue slide. Now I regret it....
Last edited by Jon89; 12-10-2009 at 12:19 PM.
#7
12-10-2009, 11:29 PM

Member
Join Date: Nov 2009
Location: Allen, Texas
Posts: 47
Likes: 0
Received 0 Likes
on
0 Posts
How hard was it to re-attach the trim? My '03 has the driver side and passenger side front trim (in black) that has popped out of these holders. How hard is it to replace the holders and trim? Thanks for any additional info you can provide.
BB
Trending Topics
#8
12-11-2009, 05:27 AM
Bytor, in your case you should purchase the 17 new "X fasteners" (dealer only) and a roll of 3M 1/2" wide trim tape (any big box auto parts store about $10.00) Follow the above instructions and you should be done in less than two hours. For the removal of the "X fastners" I used a flat screw driver and my palm. I am attaching a pic of the "X fastners" Double check that these are the same for the '03. Pull tape backing off alittle at a time, maybe a foot or so, pop the trim in the fastner, pull alittle more tape backing.
Last edited by joycesjag; 12-11-2009 at 05:43 AM.
#9
12-11-2009, 10:50 AM
Member
Join Date: Nov 2009
Location: Allen, Texas
Posts: 47
Likes: 0
Received 0 Likes
on
0 Posts
#10
12-11-2009, 11:19 AM
The tape I believe is there for 2 reasons:
1) obviously to help secure trim
2) keep water form flowing through the fastner holes in the door frame.
Take your time when cutting the tape, the narrowness of the cut piece (the pieces you want) make this task tedious but not impossible. Have a couple of sharp blades handy!
Good Luck
1) obviously to help secure trim
2) keep water form flowing through the fastner holes in the door frame.
Take your time when cutting the tape, the narrowness of the cut piece (the pieces you want) make this task tedious but not impossible. Have a couple of sharp blades handy!
Good Luck
#11
07-29-2010, 11:43 PM
Veteran Member
#12
07-30-2010, 05:53 AM
Tom, Just a stiff 2" wide putty knife of some sort, I used a painters 6 in 1 tool available at any hardware store (its in the picture) and the lower trim pieces all just pry up no fastners.
You will have to purchase the aluminum trim with the rubber attached, the rubber cannot be purchased alone. You might want to check on a used one from here www.car-part.com They are expensive brand new from dealer only.
You will have to purchase the aluminum trim with the rubber attached, the rubber cannot be purchased alone. You might want to check on a used one from here www.car-part.com They are expensive brand new from dealer only.
#13
07-30-2010, 08:12 AM
Veteran Member
I already have spent the $150 for the piece and it is due in today. Just for the sake of the learning curve here. Once i take off the trim panel and lower the window -am I am able to use the tool and pry it up and out, without removing anything else? What actually holds it in place then or does it fit in such a way that the fit causes to to hold?
Thanks for helping the first- timer.
Tom
Thanks for helping the first- timer.
Tom
#14
07-30-2010, 08:28 AM
No problem Tom, you will see on the new trim piece that the underneath has little tabs built into it (they bend easily upon removal). With mine I just gently squeezed the tabs back a wee bit (again because I reused my old ones). Locate the tabs on the new piece and mentally take note as to where they are, then hold the new trim piece against the one you are removing and place putty knife where the tabs are inbetween the outside and inside window groove.
Wow $150.00 from a dealer?
Good Luck
Wow $150.00 from a dealer?
Good Luck
#15
07-30-2010, 08:41 AM
Veteran Member
So, as the novice I am, to get to that point of prying up and then replacing, all I will need to do is take off the inner trim panel, lower the window and pry up the old one and replace with the new? None of the other steps for replacing the dull trim on top are4 necessary?
Thanks for helping the old man in Dallas.
Thanks for helping the old man in Dallas.
#16
07-30-2010, 08:53 AM
No need to remove anything including inner trim panel. Simply lower rear window and insert (stiff) putty knife into the window opening as the 3rd picture shows in the beginning of this thread, and pry up. Please note: as this is an after thought, you might want to use a wood shim on the inside trim panel to pry against so you do not mare the top of the interior trim panel. I did not mare anything but I was extremely careful not to.
Last edited by joycesjag; 07-30-2010 at 08:58 AM. Reason: add picture
#17
07-30-2010, 10:13 PM
No need to remove anything including inner trim panel. Simply lower rear window and insert (stiff) putty knife into the window opening as the 3rd picture shows in the beginning of this thread, and pry up. Please note: as this is an after thought, you might want to use a wood shim on the inside trim panel to pry against so you do not mare the top of the interior trim panel. I did not mare anything but I was extremely careful not to.
Excellent write up as usual. I have had good results using a random orbital buffer when I wax out my Jag. Philosophically I like the patina of the trim. It's not gaudy like chrome but it is still fairly shiny. One thing I've always liked about Jaguars is the tactile richness of the materials used. They seem to get the use of wood, leather and the metal trim just right. Granted it takes a little work to maintain it but the results seem to justify the effort.
#18
07-30-2010, 10:37 PM
Mike again thank you for the kind words. I agree with Jaguar choosing the right materials. Joyce and I are old school and really like shiney chrome. On our S the anodized aluminum was not pitted, it had more like white water spots under the finish itself (I know that sounds crazy but....) no matter what I used cleaners, waxes, polishes, 800 through 2000 grit wet sand paper and even easy off oven cleaner (yellow can) would not remove the spots by hand or machine.
To update since this thread has been bumped, the raw aluminum still has its mirror like finish, I did hit it with Mothers Aluminum Polish once back in early Jan. and the only reason I did was that I detailed the vehicle!
To update since this thread has been bumped, the raw aluminum still has its mirror like finish, I did hit it with Mothers Aluminum Polish once back in early Jan. and the only reason I did was that I detailed the vehicle!
#19
08-09-2010, 05:54 PM
Veteran Member
I replaced the outside window channel trim with the aluminum on it and it looks like there is some sort of sealing that is necessary in 2 locations. On is the area around the post between the fixed and main rear windows and the other is the piece that has a tab on the end and that fits under the black outside piece of the B pillar. If you look at the same position on the front windows (which is right next to the rear at the B post, you can clearly see there is some sort of seal)
When I called the Jag dealer to order the part, he asked what my Vin # was, as apparently there are some changes.
joycesjag
had indicated there were some tabs on the underneath of the trim piece, however the one I got did not have that and the tabs I had were metal and were little bulges in the metal that I was slipping the piece over in the door frame.
The reason I was bringing this up, was I noticed a gap between the piece on the front of the rear trim and the black outside of the B pillar and that caused a change in how water flowed. The other one occurred when i was doing a leak test and a good amount of water was coming into the door from a drip on the window that was coming from the post between the fixed window and normal window.
Does this invoke any thoughts or is there anything I am missing?
Thanks
Tom in Dallas
05-S-Type 3.0
#20
11-18-2010, 12:34 PM

Junior Member
Join Date: Nov 2010
Location: Georgia
Posts: 6
Likes: 0
Received 0 Likes
on
0 Posts