6HP26 trans leak and flush tips
#1
Hello Jag DIY’ers!
Concerning transmission cooling line leaks, complete fluid flushing, filter changing, and mechatronic sealing sleeve replacement I noticed there is already good info here at JF’s. However its scattered about and I felt there are some gaps about how to do these things to my 03 S-Type w/4.2L and 6HP26. I trust you’ll find this info helpful.
What I wanted to do was completely flush my own fluid, fix the leaking cooler lines, replace the mechatronic sleeve, and replace the filter. (I’m a firm believer in regular fluid changes and high quality parts… but I’m also cheap!)
Cost for fluid, filter kit, and properly spec’d transmission hose was $542 (March 2019 using the CTSC & Amazon)
This is not an all encompassing how-to. It’s more of a writeup to help fill the gaps on how to do these yourself.
Most important to me is to do anything I touch…. properly.
I’m posting three sets of info that I think will answer most any question a DIY’er might have for any of these.
1. Videos linked at bottom that I feel offer the most insight for this job.
2. Pictures that I feel fill the gaps and answer questions that I had prior to starting this job.
3. How to and tips that I learned so as to make this job easier for someone else.
Between these hopefully you can have increased confidence and get-er-done. If you have Q’s feel free to ask. (I’ll set notifications for daily)
Regards, Rich
Tips / how to fix trans cooler line leaks. (2003 4.2L w/6HP26 transmission)
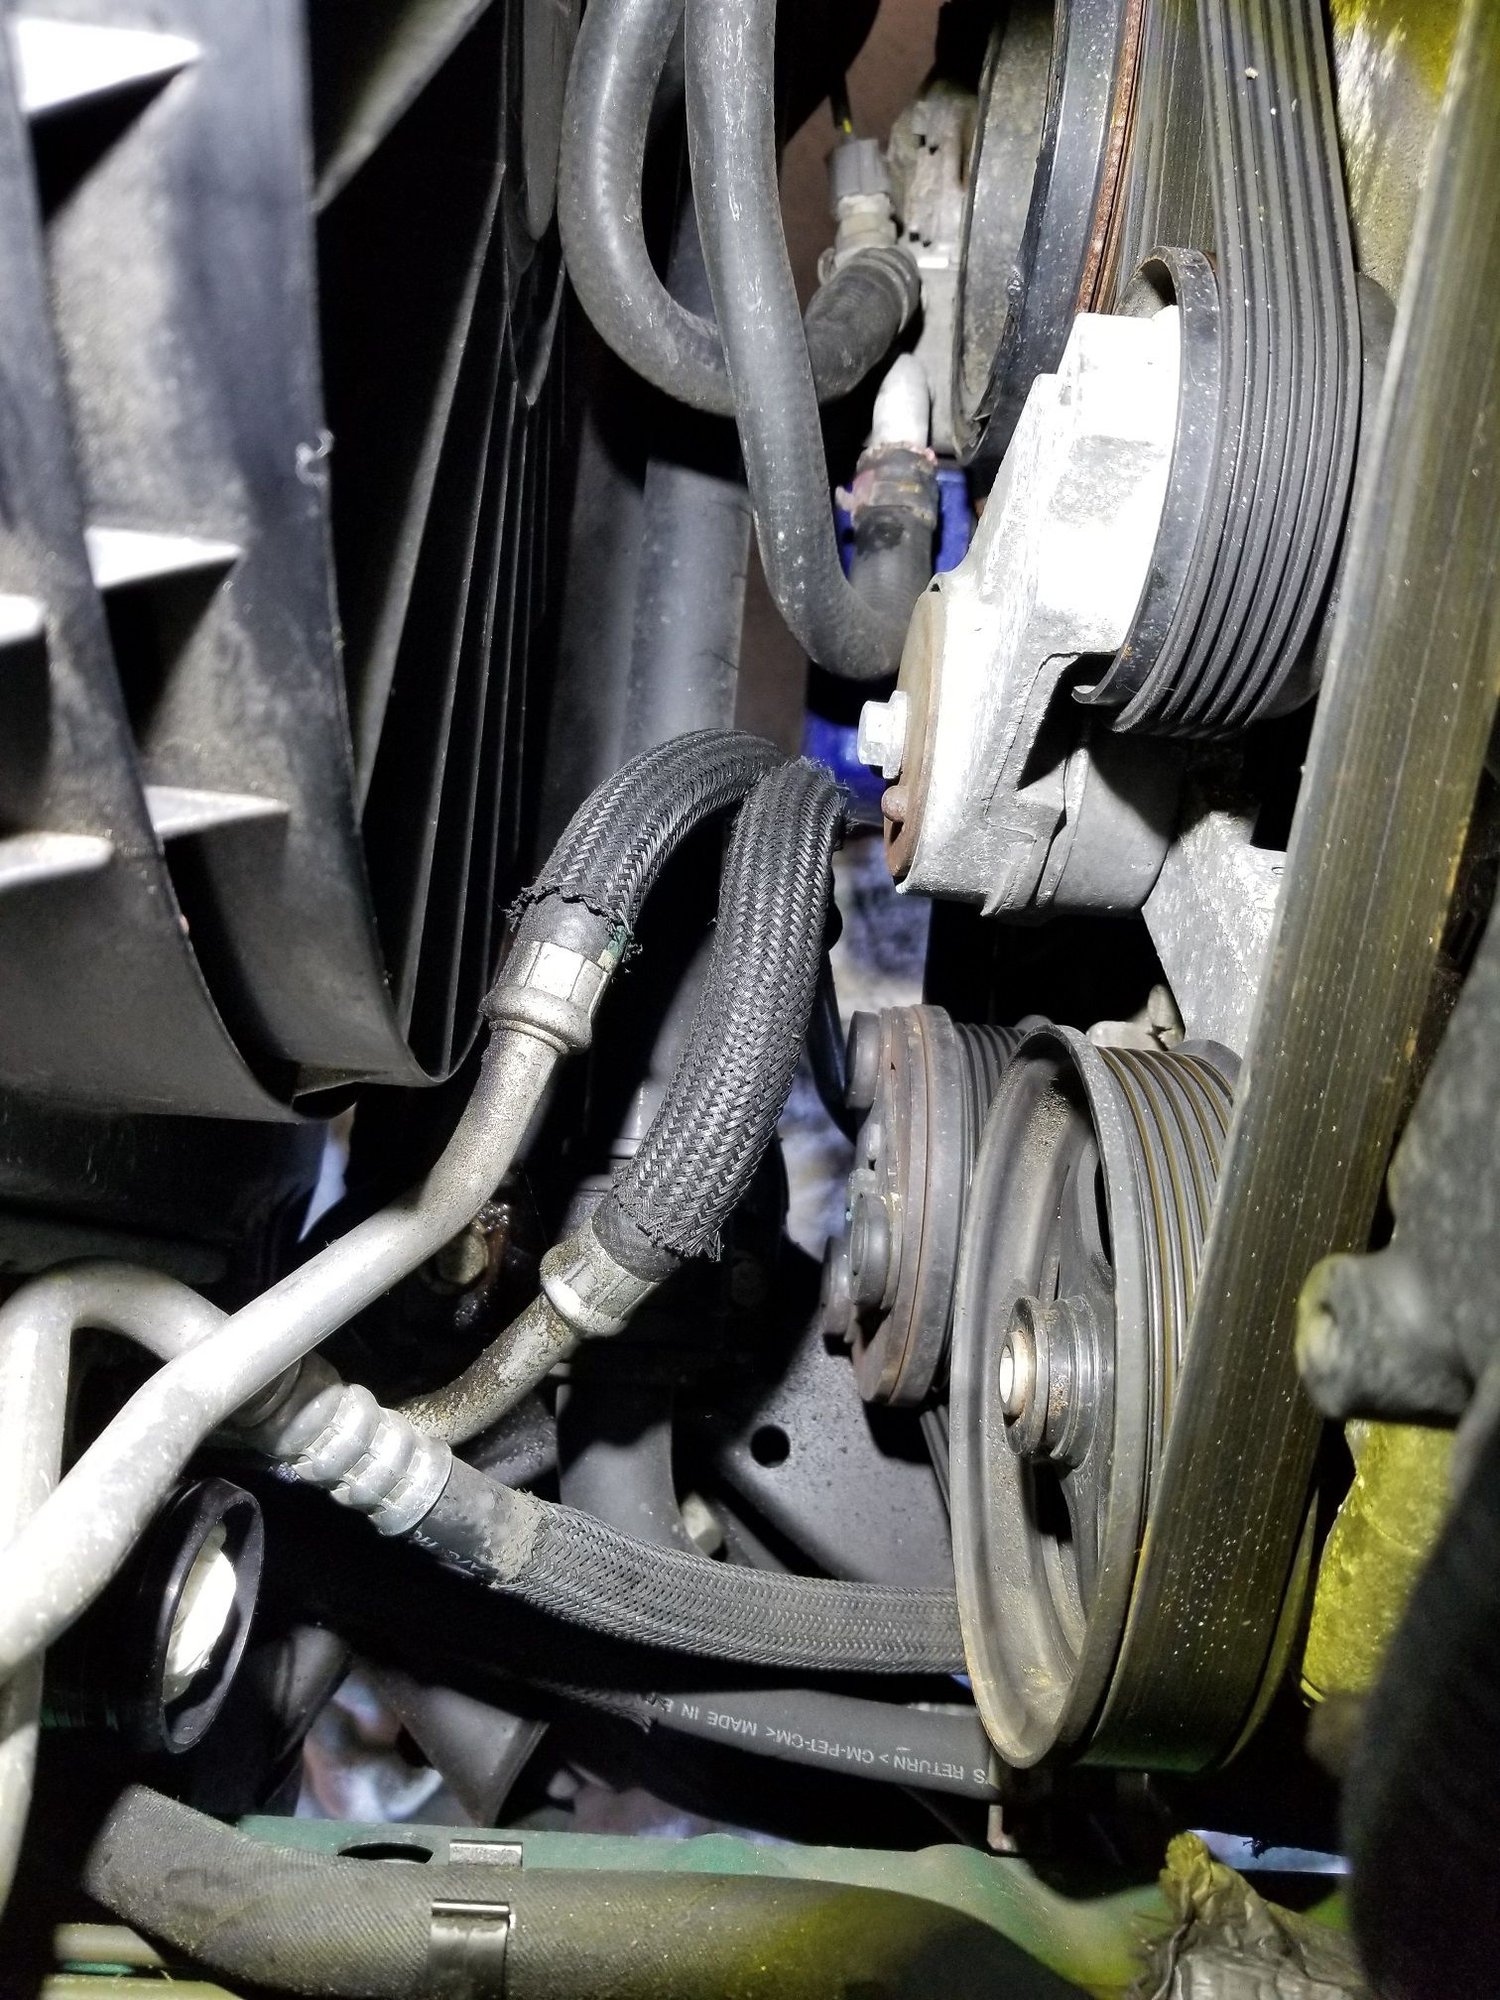
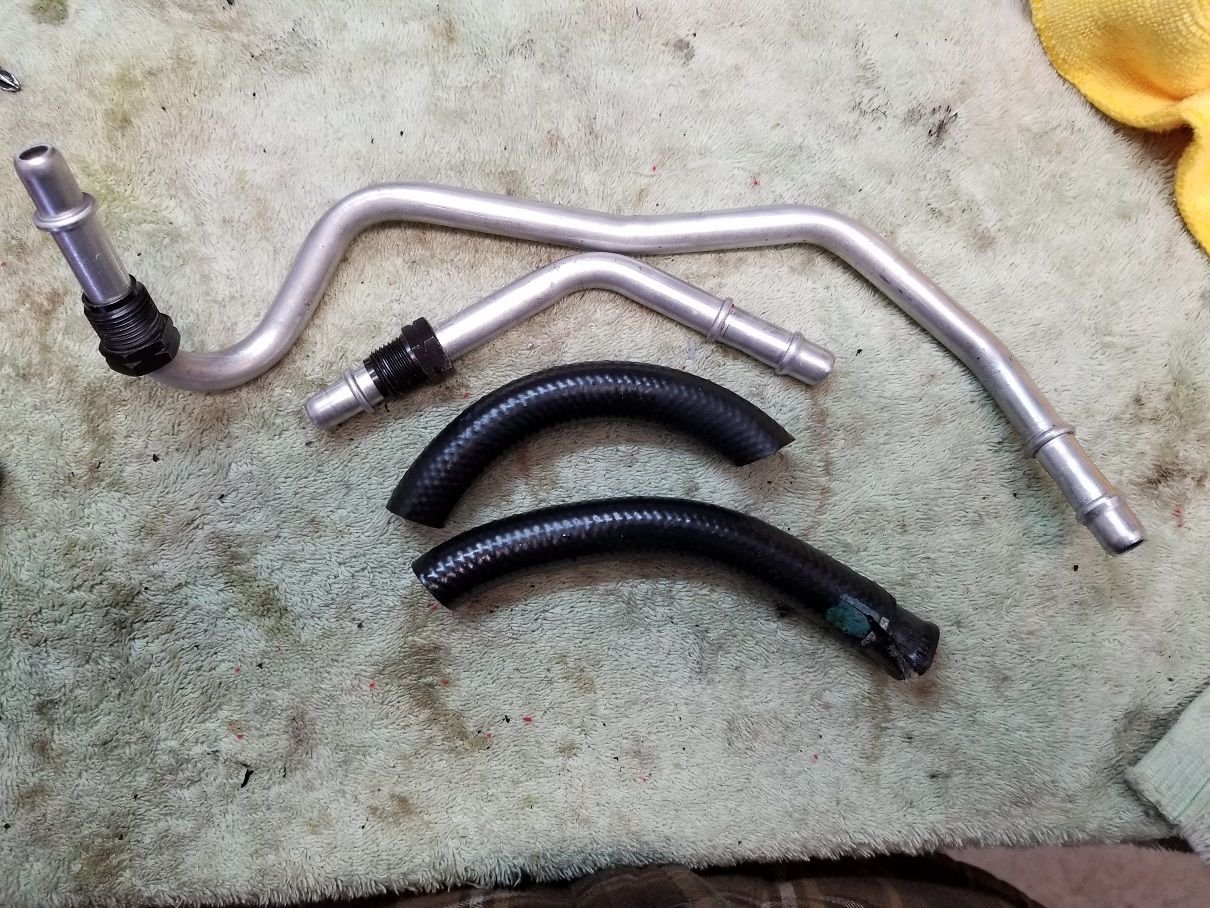
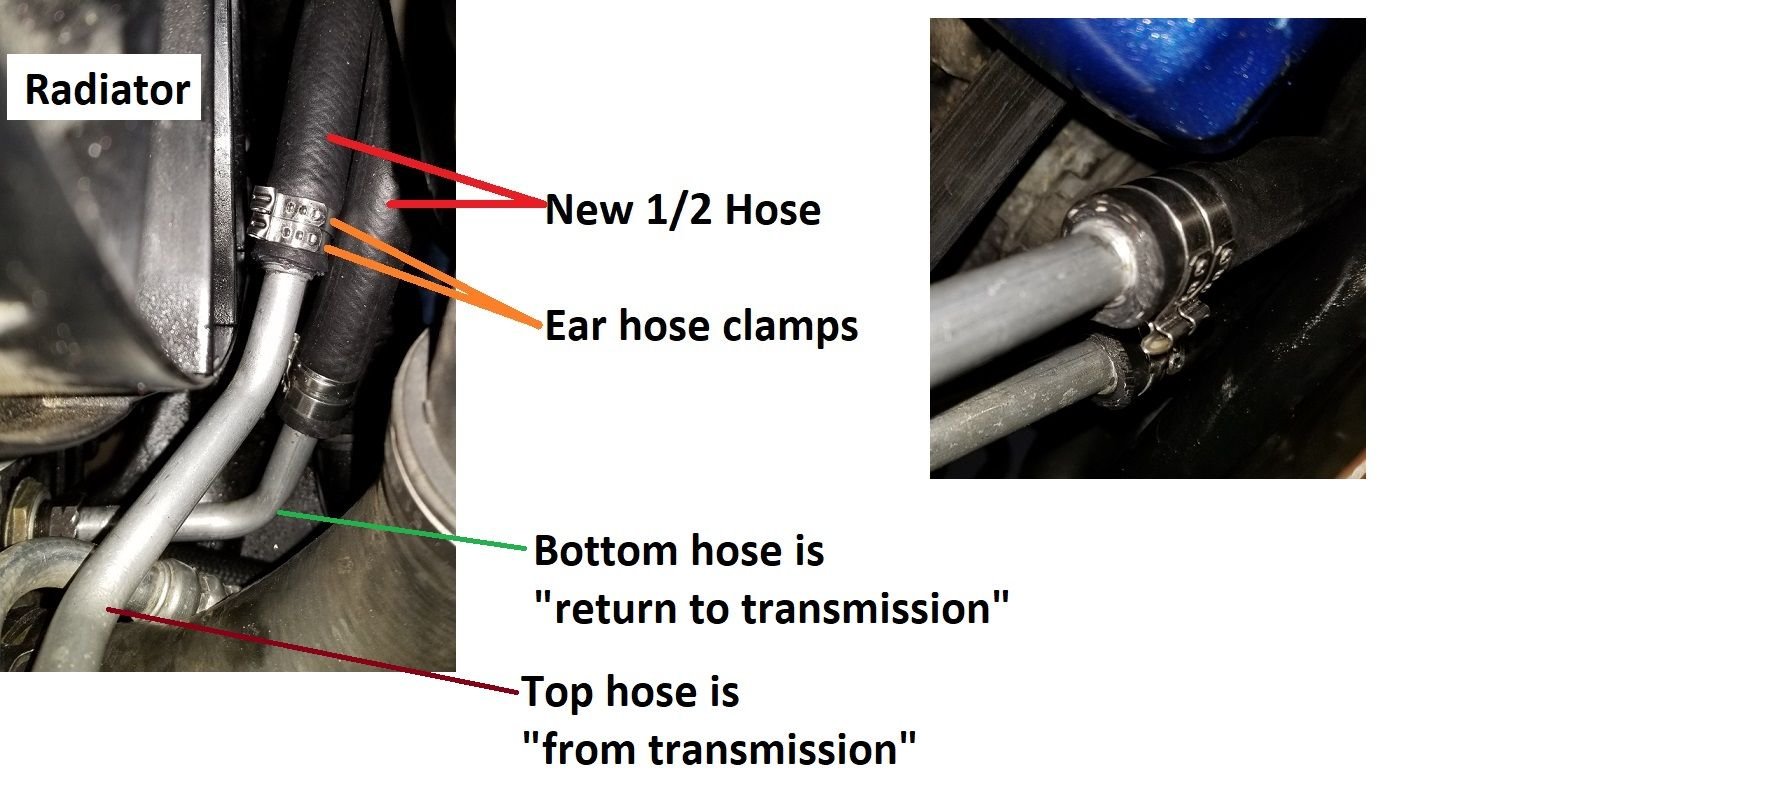
- There are two metal pipe assemblies w/small rubber hoses that route between the transmission and the radiator.
- You don’t have to replace the whole pipe assemblies to fix this. At the time of this post prices are about $170 for both pipe assemblies. I spent $21 for the hose and $4 for the SS ear clamps
- The rubber hoses in these pipe assemblies are located just above the oil filter on my 2003 (not sure about the V6 cars or other years). These rubber hoses in the pipe assemblies have a purpose. It’s simply to allow for engine rock. (radiator is stationary and engine rotates side to side)
- Pipe at top of radiator is fluid coming *from trans*
- Pipe at bottom of radiator is fluid *returning to trans*
- Raise and support car high enough to slide under on your back.
- Remove two under shields (between bumper and trans)
- Remove oil filter and cover exposed engine w/something like duct tape or a sock. (debris will fly when cutting metal crimps)
- Slide up protective expandable wrap and cut hoses near oil filter
- Remove airbox assembly & plastic radiator cover
- Drain radiator and disconnect large coolant hose at both radiator and engine. Leave small hoses attached and tuck hose off toward center of car between engine and fan.
- Remove upper and lower trans cooling pipe from radiator.
- **Make sure to remove o-ring that seals trans pipes into radiator**
- On bench cut off metal crimps (make sure to NOT cut into pipe so you don’t create a leak path. Just take it easy and use pliers, flat blade screw driver, knife, and Dremel tool. Care and it’ll come off w/o hurting the pipe)
- Now that you have experience doing this on the bench.. go under car and do the same thing to the other end of the cut hoses. **tip = remove the rectangle pipe spacer near the oil pan. This allows you to bend the pipes down enough to access w/Dremel tool and for crimping ear clamps**
- Back up on the bench and using the radiator end of the pipes, slide the old expandable protective sleeve on new hoses.
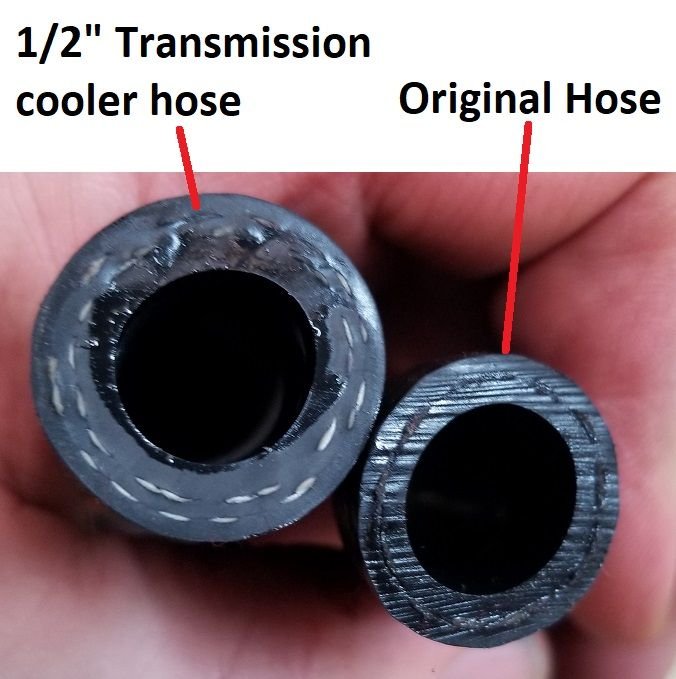
- Using properly specified ½” transmission cooler hose ($21 at amazon) cut both to proper length. **tip = cut them about 2”/50mm longer than the factory ones were in their original lengths**
- Clean and smooth pipes (if damaged / marked up during hose removal)
- Add thin coating of silicon resistant to oil in only the clamping area of the pipe (not on the end of the pipe and not on the barb)
- Push hose over barp and fully seat so that clamps will have plenty to bite into
- Place and crimp ear clamps (consider where the “head” of the clamp will be once back in the car. Do this to prevent it from digging into the other trans hose)
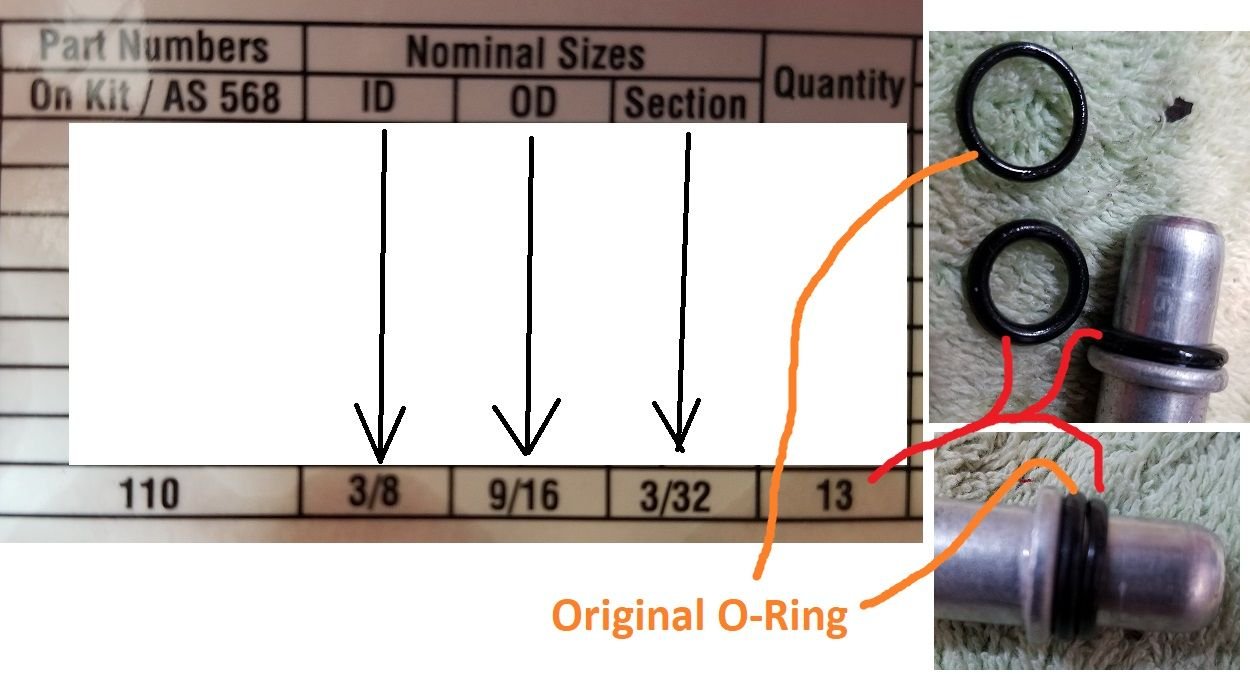
- Inspect or replace o-rings on radiator end of pipe. (I used new o-rings.. see picture below for size)
- Install newly assembled pipes w/hose into car. **tip = only finger tighten threaded fittings**
- Go under car and clean, smooth, and add silicon to flat area on both pipes near oil filter.
- Slide 2 ear clamps on each pipe
- Push on hoses and crimp ear clamps.
- Bend pipes back up into original positions.
- Reinstall pipe spacer
- Reinstall oil filter
- Tighten both fittings at radiator.
- Reinstall coolant hose
- Fill radiator (using proper venting procedure)
- Tip = I let silicon set for 24hrs before running engine (prevents trans fluid from touching silicon before it has a chance to set)
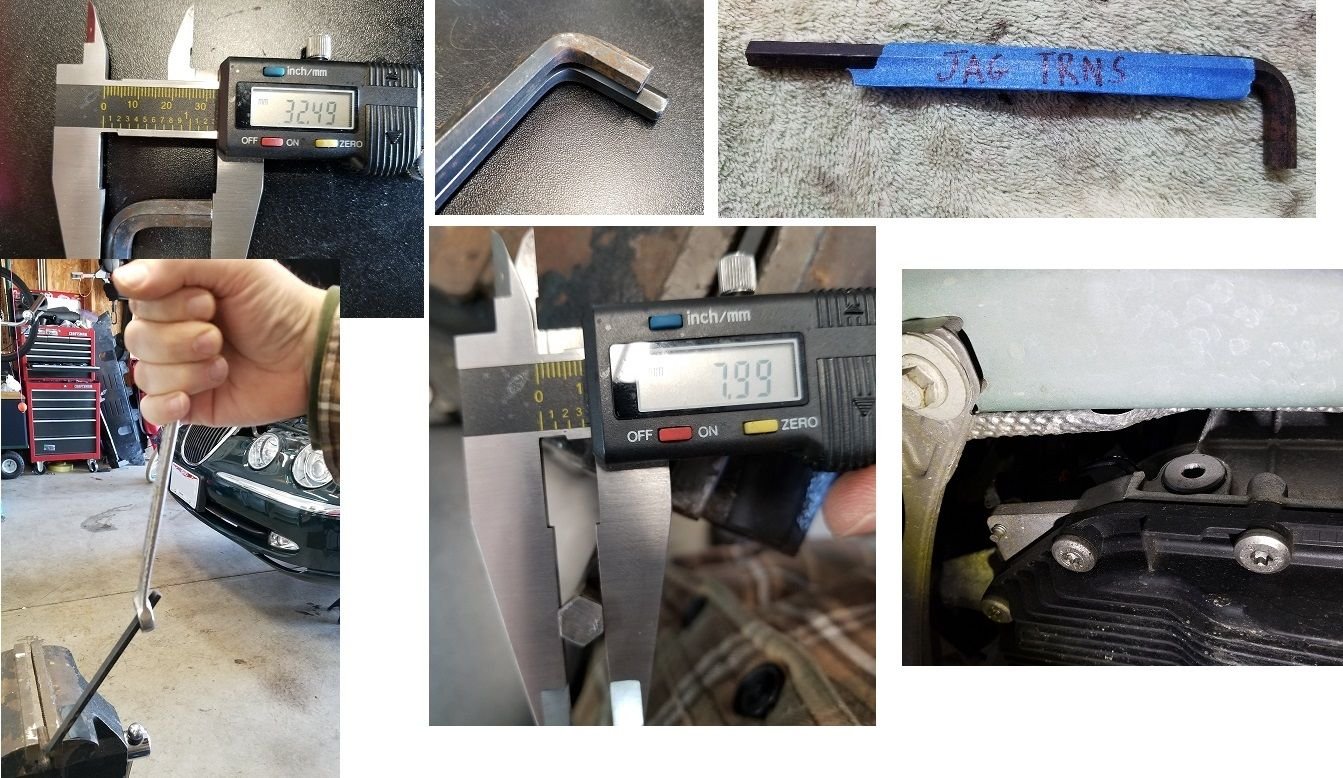
Tips / how to make fill plug tool and remove it. (2003 4.2L w/6HP26 transmission)
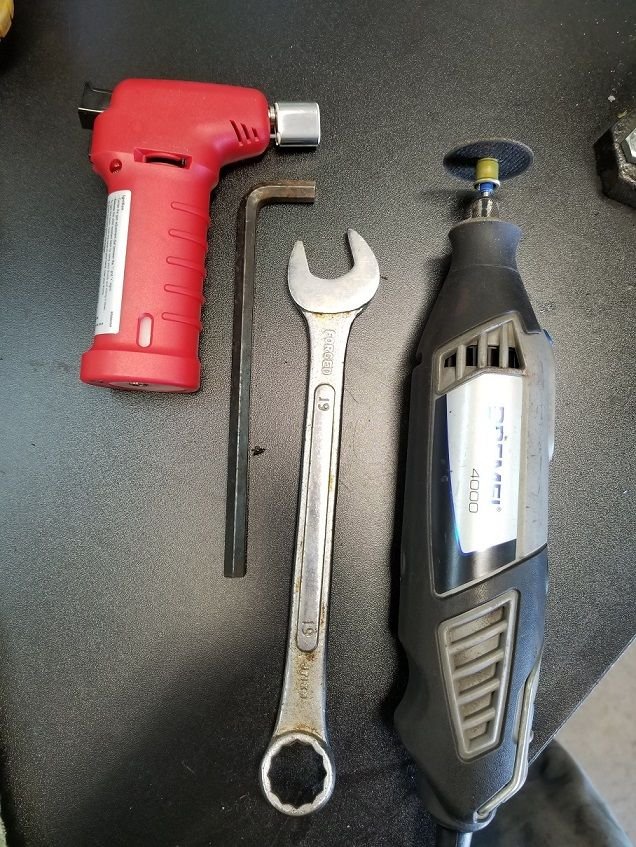
- Cut 8mm hex wrench down to 1.25” / 32mm
- Under car, use small butane torch to heat plug for 30 seconds. (orbit uniformly so that expansion is uniform)
- Use boxed end wrench on hex wrench to act as cheater (increases leverage)
Tips / how to completely flush transmission fluid. (2003 4.2L w/6HP26 transmission)
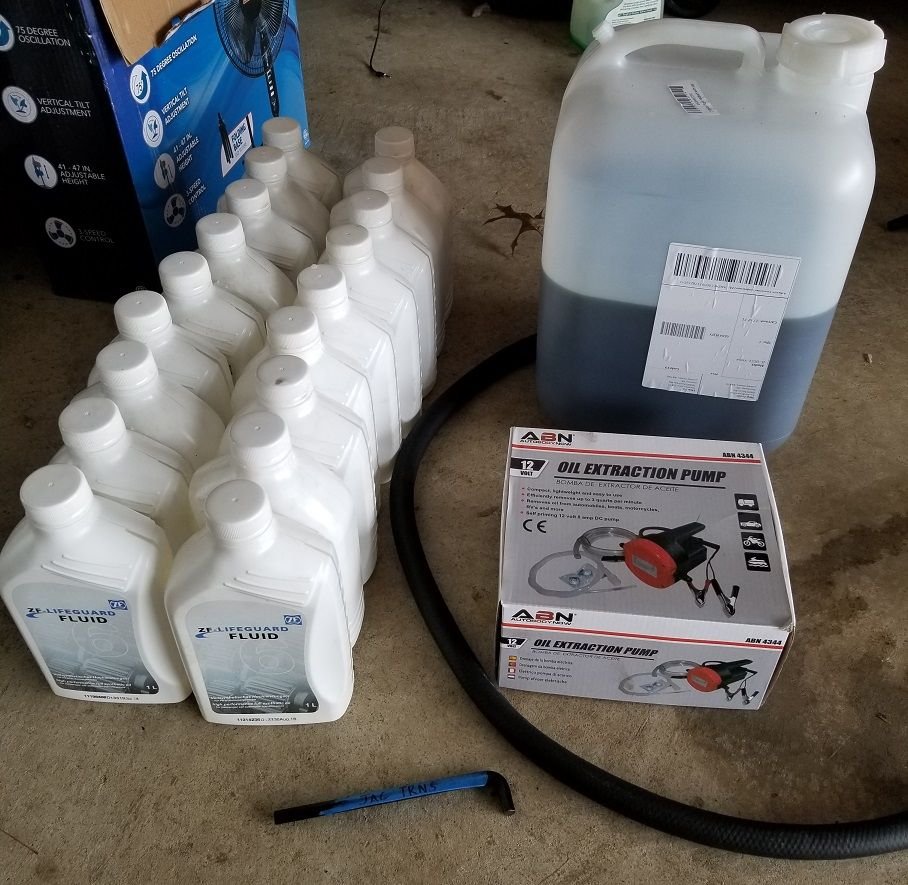
- Get 2 containers that hold about 5 gallons each
- Pour new fluid in one container (very clean container of course)
- Loosen and pull back top trans cooler line at radiator (tip = you might need to remove the lower part of the air filter box to get to the pipe. You’ll need the MAF connected so as not to set a CEL when starting the engine)
- Run clear hose from trans pipe to waste bucket. Clamp it to the bucket so it discharges and won’t slip loose. Worm gear clamp to trans pipe. (I **think** this is a ½” clear hose? Not sure exactly)
- Connect auxiliary oil pump to container w/new fluid, power, and the top of the radiator (port where trans pipe screws into)
- Tip = The pressure between your pump and the radiator is not very high and the hose feeding the port at the top of the radiator can be held by hand. But if your multitasking it might get loose and spray expensive fluid all over the place. You might consider finding a trans pipe that will screw in and seal exactly like its supposed to. That would make this job very simple. NOTE: The pump I used has higher volume than the engine/trans is pumping out. So every 30 seconds or so I’d shut off the pump for about 20 seconds then turn on. (I can hear it pressure up and its harder to hold the rubber hose in the top of the radiator)
- With everything in place (a friend is very helpful here) start the engine and let it pump out the old fluid.
- With your auxiliary pump your filling into the top radiator port with approximately the same volume that’s coming out. The volume is approx. 1qt every 15-20 seconds
- Continue until the entire transmission system capacity has been flushed. (I use and extra 1-2qt to overly flush and get new / virgin fluid coming out)
- Engine off and reconnect everything.
- Use proper 6HP26 transmission filter kit and service procedure w/infrared temp sensor. (do this after the flush so that you have the cleanest possible fluid in your trans. It might be a bit wasteful of fluid but it’s the best way to get the most fresh fluid in there)
Pictures:
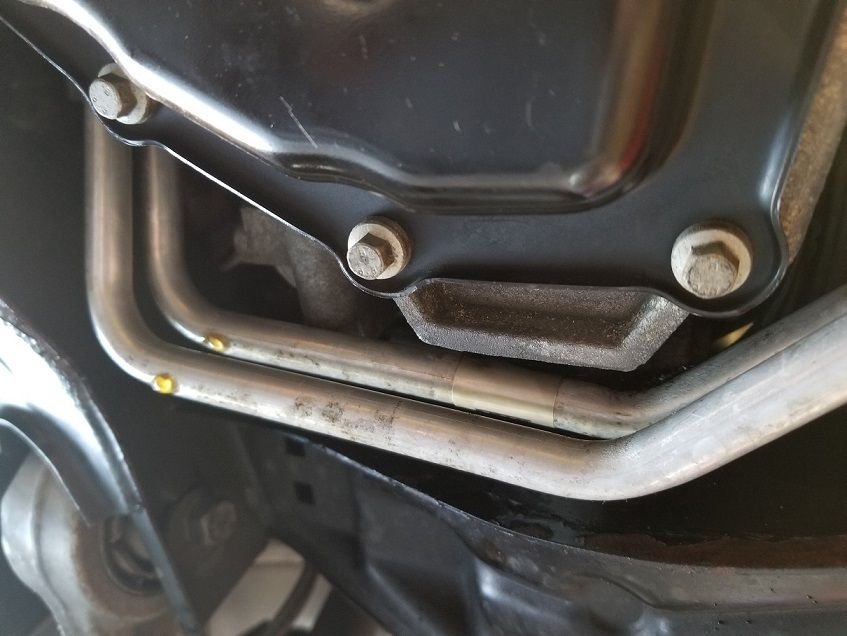
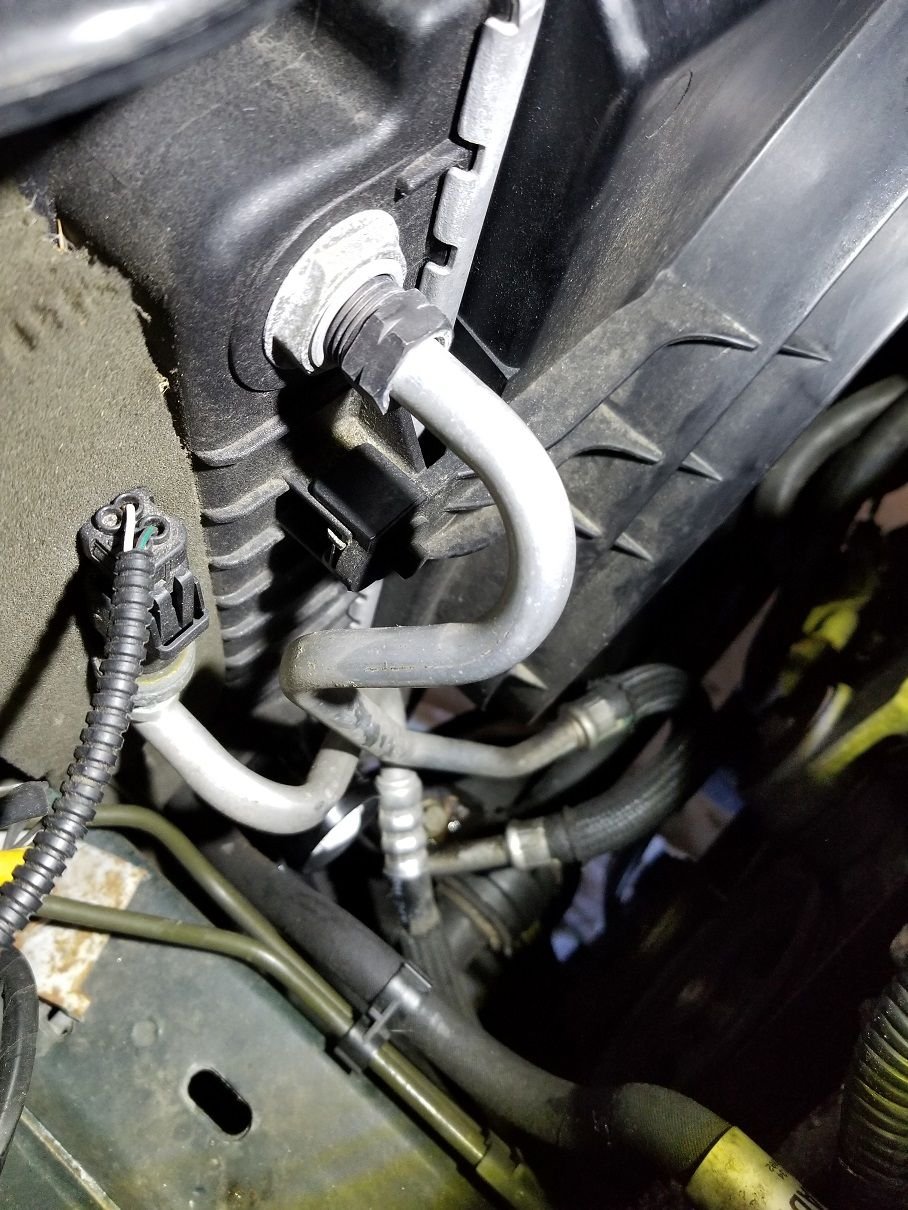
A = Symptom I was seeing. Puddle on ground and it was getting worse. This was dropping directly under the AC compressor. And at first I thought it was AC oil. But then realized the oil was running down the trans pipes and dripping onto the ground.
B = The pipe assembly going to the trans was leaking on both ends of the rubber hose. Other one was ok but since I was doing this job I replaced both hoses.
Last edited by wydopnthrtl; 03-31-2019 at 10:54 PM.
The following users liked this post:
Don B (04-04-2019)
#2
The following 2 users liked this post by wydopnthrtl:
Don B (04-04-2019),
S-Type Owner (05-21-2019)
#3
#4
Very nice write up...i did the same thing about a year ago using a compression fitting where i cut the pipes in two.,.made it real easy to clock them right.... what a difference the repair makes huh....peace of mind, better than factory and way cheaper....we have spoken before and if i remember right your dad was like mine....attention to detail...have pride in your work
The following 2 users liked this post by scottjh9:
Dwayne Mason (06-25-2020),
wydopnthrtl (03-31-2019)
#5
I've been blessed with this car so far. When I pulled the pan I noticed the date code on the inside was July 2013. I know that at that time the car had less than 29k on it and was still owned by the original buyer (elderly couple). So yes indeed... my 6HP26 has been pampered ;-)
The old fluid that was dripping on the ground looked mostly clear. That's why I first thought it was AC oil. But after pulling the covers I found the hose leaks.
In the above picture you can see how dark the old fluid was. It was easy to see through. Golden w/a black tint.
btw, the original hoses were very hard. It's no wonder these were leaking.. and why others report theirs leak too.
Last edited by wydopnthrtl; 03-31-2019 at 11:29 PM.
#7
Trending Topics
#9
The following users liked this post:
wydopnthrtl (07-25-2019)
#11
If your changing only the filter it takes 6L
If your flushing I think you'll need about 18L (a little extra won't hurt)
#13
According to post #1 in Don B's thread, "The published transmission capacity for the normally-aspirated models is 9.5 liters / 10 quarts, and for the supercharged models is 10.05 liters / 10.6 quarts. It generally takes 10-12 liters for a flush, but if your pan or connector sleeve was leaking you may need more. On a 2006 XJ8 I flushed recently it took 14 liters to expel all of the old fluid and get the transmission full again."
https://www.jaguarforums.com/forum/x...-217150/page2/
https://www.jaguarforums.com/forum/x...-217150/page2/
Thread
Thread Starter
Forum
Replies
Last Post
jahummer
XK / XKR ( X150 )
13
03-12-2021 10:10 AM
Muti007
XJ XJ8 / XJR ( X308 )
12
08-14-2015 09:39 AM
AlbBolivar
XJ XJ6 / XJR6 ( X300 )
15
11-23-2013 11:44 PM
Currently Active Users Viewing This Thread: 1 (0 members and 1 guests)


