When you click on links to various merchants on this site and make a purchase, this can result in this site earning a commission. Affiliate programs and affiliations include, but are not limited to, the eBay Partner Network.
I used my car to jump start someone else's car. The jump worked and my car was fully functional prior to the jump. My car was still on when I disconnected the jumper cables(first mistake). When I disconnected the negative jumper I didn't open it enough and the negative terminal came off the battery with it. The car died. Now it cranks, but will not start. I've checked all fuses. They are fine.
Could this have caused the security system to enter theft protection mode? Watch the red LED on top of the dash to see if any codes are stored. Here's how the light is supposed to behave if all is good and no faults are present:
First, lock the car with the key fob. Press the lock button a second time to set the alarm system. The horn should chirp once. Watch the little red light. It should flash once every few seconds or so to show the system is armed. Now press the key fob unlock button twice to unlock all the doors. The red light should go out. Now hop in the driver's seat and turn the key to RUN (Not start yet). The red light should come on solid ONCE for about 3 seconds and then go out. If it flashes anything after that, you've got a stored fault and the security system may have inhibited the fuel injectors.
Thanks for the walkthrough. I gave this a try and everything worked as described. When put in RUN mode the light came on for about 3 seconds and turned off without any flashing. I guess that rules out the security system.
That universal bolt-on cable terminal on the negative post? That blasted thing isn't doing any you favors. It didn't directly cause your present problem, but I've seen them cause all sorts of grief. After you get the no-start corrected, here's my recommended course of action:
Remove the cable terminal. Dig a hole in your backyard. Don't stop until you smell sulphur and brimstone. Climb out and drop the terminal to the bottom. Backfill the hole. Pour a concrete pad over the area. After the concrete cures, arrange some outdoor furniture. Enjoy your new patio. Order a replacement cable with a factory crimped terminal on the end.
Back to the no-start. Beg, borrow, or steal a scanner. Read live data and see what the fuel pump is doing. Turn the key to Run and let us know what pressure is displayed. I forget the exact number, but I think you should see about 55 PSI before engine start.
You can also listen for the fuel pumps. Turn off the radio and HVAC to make the cabin as quiet as possible. Turn the key to Run and you should hear the pumps prime the injector rail. The pumps only run for about 3 seconds to prime the lines, but you can hear it if the cabin is quiet. If still unsure, lift up the bottom of the rear seat so you can hear a little better.
Do a click test of the following relays. Place your finger on the relay while a helper cycles the key between Run and Off. You should feel a distinct click. Make sure you're not feeling the click from an adjacent relay.
If you feel the click, that means the relay is receiving the command to send power to the fuel pump and coils. It doesn't guarantee power is actually getting there, but it lets us know the control side of the circuit is happy.
I did listen for the fuel pump, it does hum from under the back seat when I turn the key to RUN mode. I tried running it a few times just in case it needed to build more pressure, still no ignition. I got a code reader though! I've uploaded the error codes and freeze frame data. I don't know what any of it means. Anything of concern?
I still need to check the relays.
I've uploaded the error codes and freeze frame data.
If I understand correctly, freeze frame data is basically a snapshot taken at the instant those OBD codes were set. The FRP (Fuel Rail Pressure?) of 54.8 PSI looks good, with a target of 55.
So that bit of info is good, or more accurately not bad. What we really need to see is live data, specifically what is the fuel pressure showing when you turn the key to Run?
Please play with your scanner to make sure I'm not in left field. If that is indeed live data (as opposed to a fixed snapshot from an earlier time), the fuel pressure is good.
Have you tried the click test on the two relays? If you're hearing the fuel pump run, the corresponding relay should be good. Still test the relay to the ignition coils, though.
UPDATE: Sorry for the late follow ups, if you're a family many you know how dad's projects can tend be low on the priority list of things to be done.
CLICK TEST: I tried the relay click test(never done this before). I checked R15 in the trunk fuse box and definitely felt it click when turning the key to RUN mode. I then checked R3 in the engine bay fuse box and it did not click. So I'm thinking I'll pop over to the auto store and grab a replacement for that. My question is if the relay needs to be a "jaguar" brand relay. Currently all the relays are imprinted with "jaguar", but since it's a 2003 jag and they were owned by Ford at the time I should be fine using a ford relay... right?
LIVE DATA: I tried accessing the live data with my scanner and failed. Maybe I have a cheap scanner, but it can't access live data unless the car is actually running. What's more I tried access the freeze frame data again to double check things and my scanner said that the previously stored freeze data was unavailable and now it won't read any data. I'm thinking maybe the previous data was stored from the last time I used it while the car was running.
TLDR: Going to try replacing relay R3 in the front fuse box.
TLDR: Going to try replacing relay R3 in the front fuse box.
For quick troubleshooting, swap R3 with a known-good relay from another system.
If the problem follows the relay, then you know it was bad. If no change, that means the relay isn�t receiving the command and we�ll have to dig deeper to figure out why.
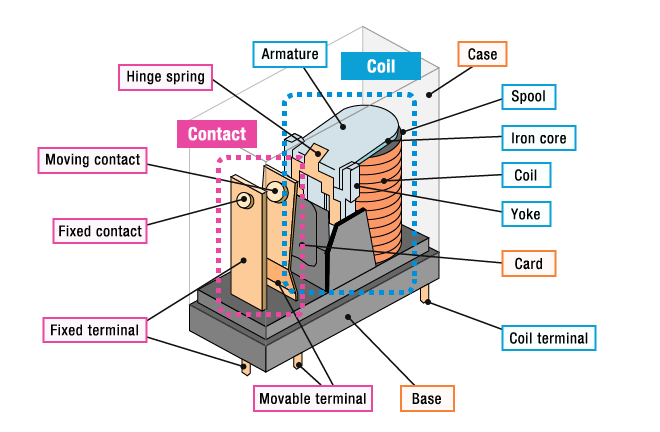
Also, the "diagram" of the pins of the relay should be printed on the relay itself. Just remove the relay and test it: Put 12VDC across the coil-pins (the symbol probably looks like a spring). The 12V could come from are good car battery, or the one in the car. connecting the pins to 12VDC should generate a click. Polarity does not matter here. Also, check the diagram where the com and where the NO and the NC is: with no voltage across the coil, confirm with a multimeter that you have continuation (=contact) between com and NC. And with 12VDC across the coil, confirm that you have contact between com and NO.
Any relay, which has the same rating (normally in A [Ampere]) and which fits physically and has the same pin-usage can be used.
I did not feel a click on R3. I tried swapping the relay with another one that did click. Again, R3 did not click. Someone irl told me that R3 was for the horn and that it wouldn't click unless the horn was pressed. I’ve been following a diagram online that labels it as ignition.
As for Peter's suggestion, I take the relay out and touch it to the positive terminal on the battery and see if it clicks?
....which will tell you what is what, with com meaning common input, NO meaning normally open, NC meaning normally closed. "Normally" means: when no voltage is connected to the coil. Again: Polarity on the coil does not matter, i.e. where plus and minus is.
And better than just listening for clicks is measuring across com and NO, and across com and NC with a multimeter for contact, to confirm that everything is as should be.
And if it is not: The relay is buggered anyway, and any failed attempt to repair it would not be a loss, hence try, if relay is damaged:
Try to pull off the plastic-cap see, why the contacts do not close, or if they close, why they are not giving you a contact anyway, which is most likely because the contacts are contaminated (oxidized or they have a layer of non-conductive carbon). The carbon would be the result of arcing - that is what relay-contacts do. And over time it could build up that non-conductive layer.
I did not feel a click on R3. I tried swapping the relay with another one that did click. Again, R3 did not click.
Making progress! I want to be positive I understand you correctly. When you said "Again, R3 did not click" you are talking about a known-good relay swapped into position R3, right? I want to be sure you are not talking about the former R3 relay not clicking when swapped into some other position. I think you mean the former, but don't want to head down the wrong path.
Originally Posted by Ehwoah
Someone irl told me that R3 was for the horn and that it wouldn't click unless the horn was pressed.
Your someone is wrong. R3 supplies power to all of the ignition coils.
Official Jaguar wiring diagrams are here, at the top of the page:
Open the 2003 diagram and scroll down to page 17 (page 19 of the PDF) to see the relay locations. I want to be triple sure we are dealing with the correct relay location.
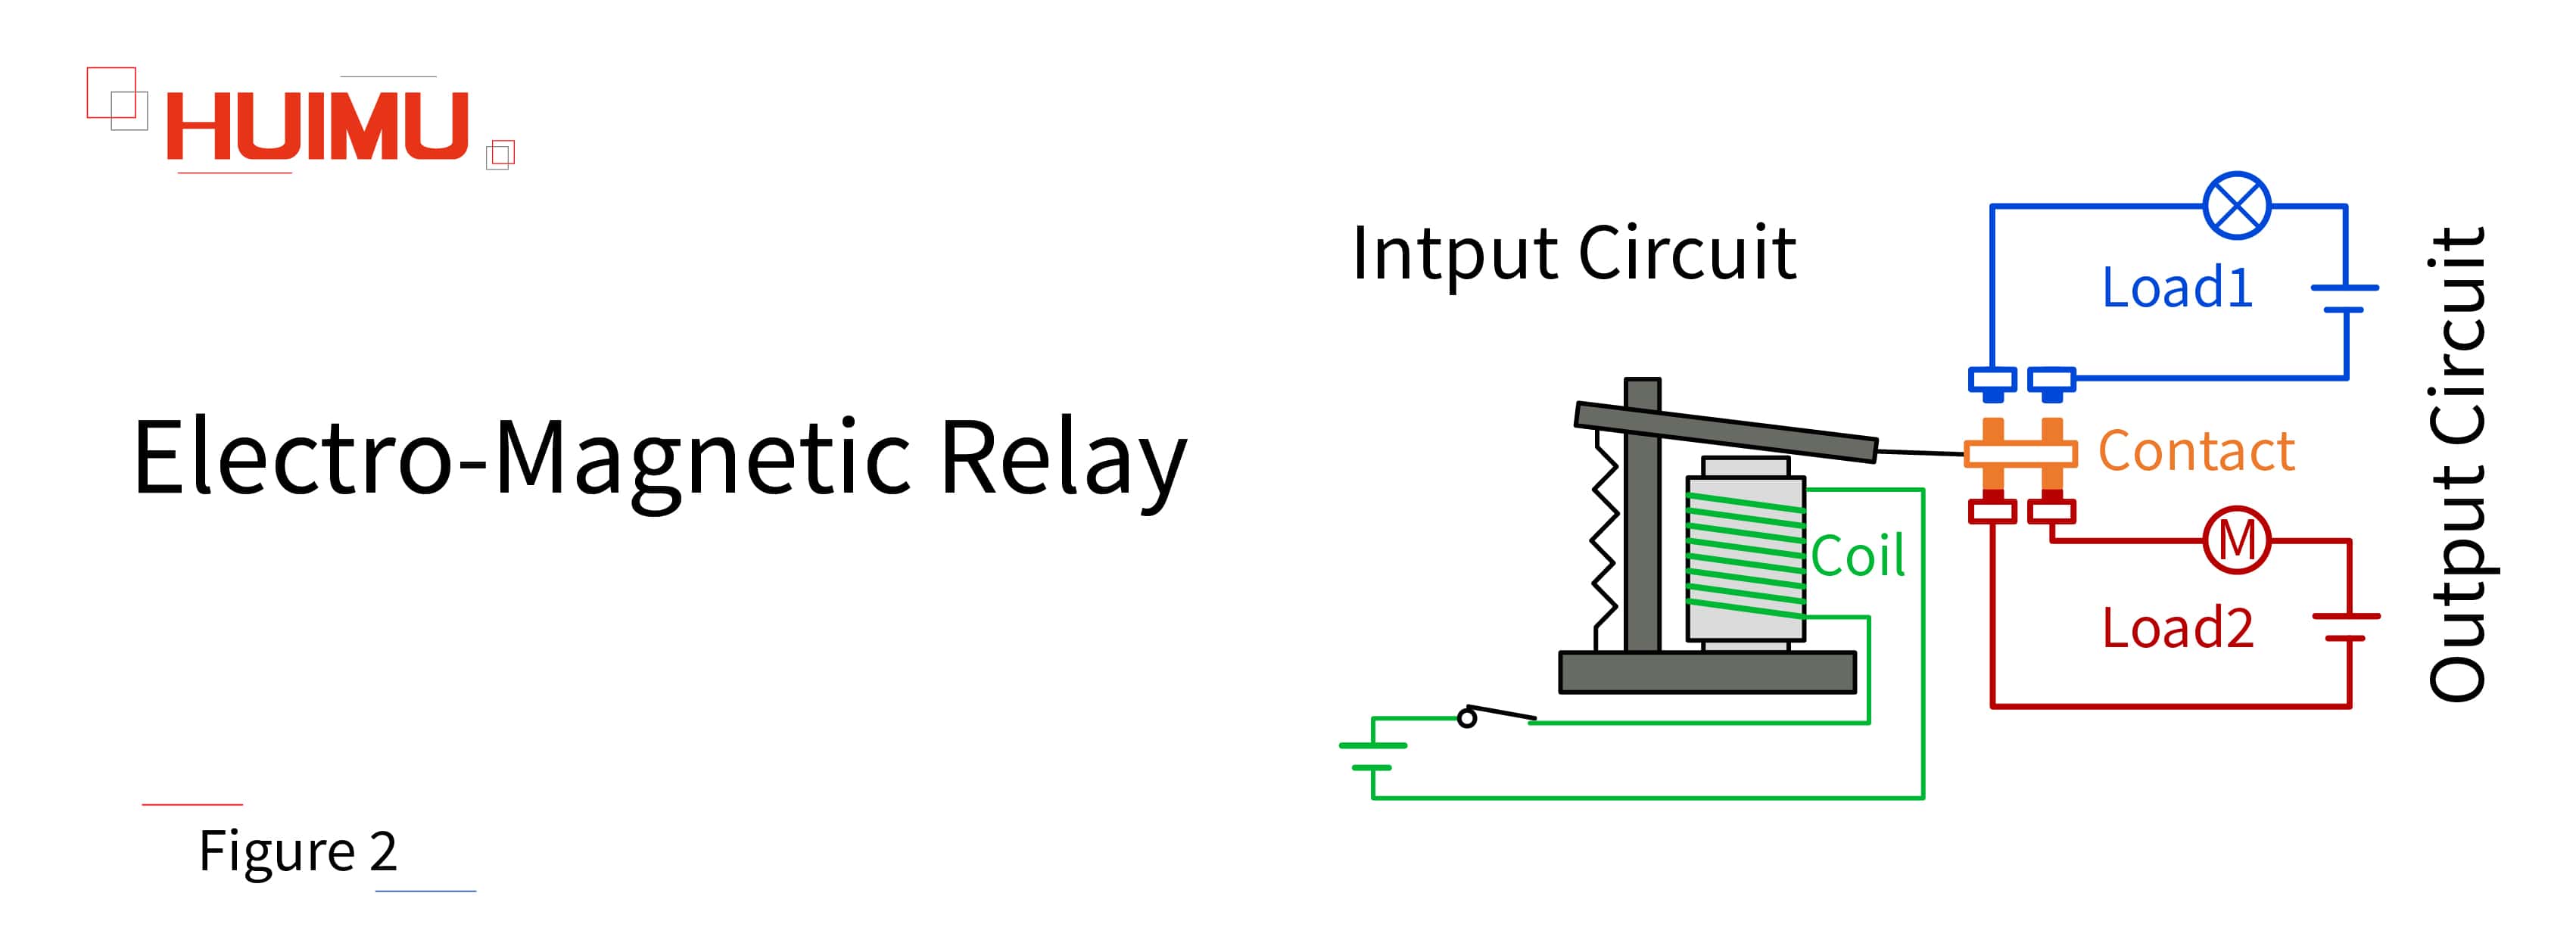
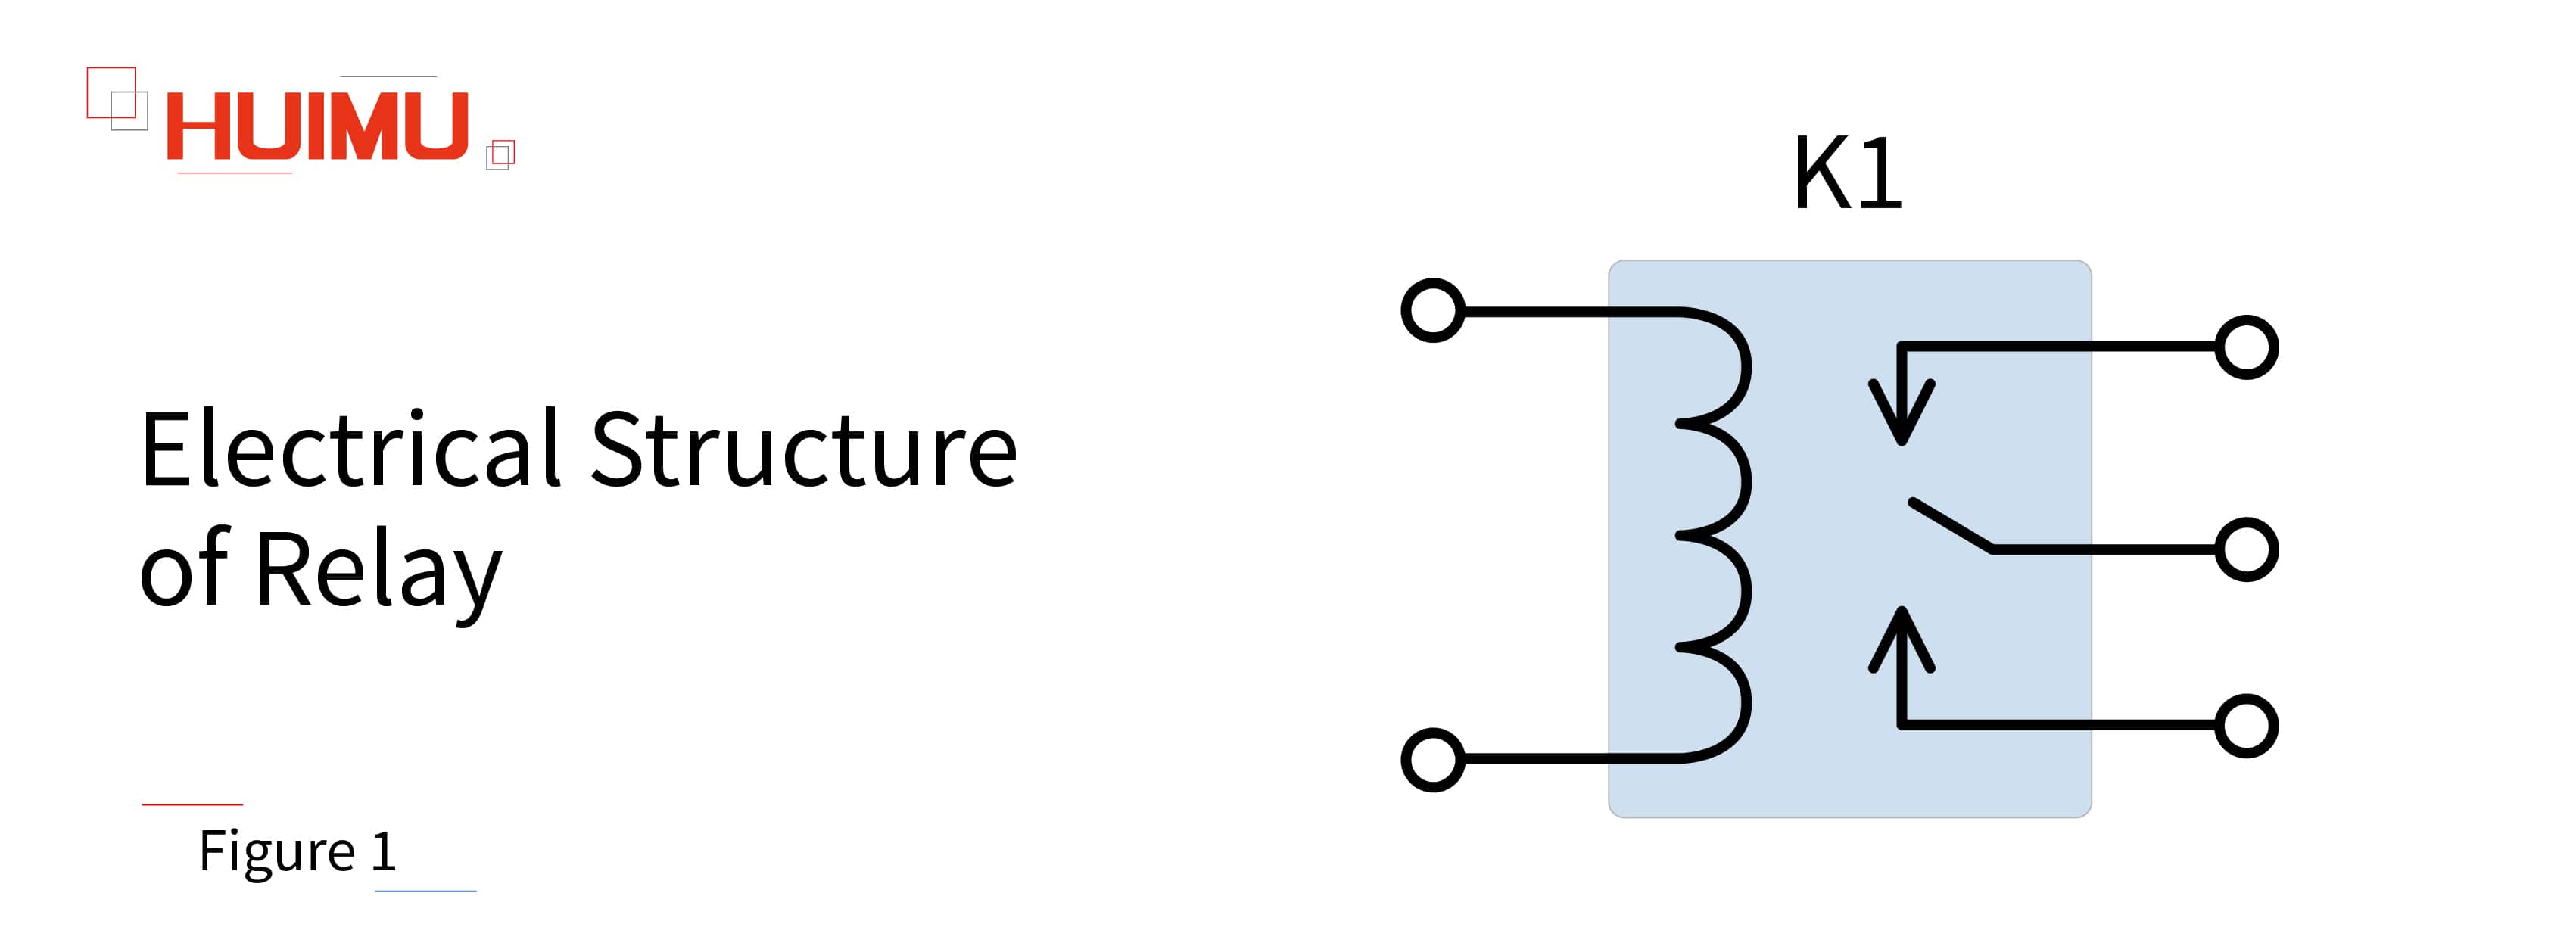
Next, scroll down to figure 03.6 to see the 8 coils. They all receive power via one source, with the legend 118E (in a circle) taking you to figure 01.7 and relay R3 under the hood. Note how the relay is illustrated. The bottom half is the electromagnet that actuates the internal switch shown in the top half. Since the relay is not clicking, we're only going to worry about the circuit controlling the bottom half (electromagnet).
Remove the relay and make sure socket #2 has a good ground. Use an multimeter set to read ohms between this socket and the chassis. You should see no more than small fraction of an ohm, as if you had touched the meter leads together. This is a fixed ground, and is highly unlikely to have failed, but we have to check it as part of normal troubleshooting.
If the ground is good, switch your meter to read DC volts. You can use the same ground as above. When you turn the key to the Run position (no need to go to Start), you should read battery voltage at relay socket #1.
If you do read battery voltage at socket #1, something is wrong with the relay.
If you don't see battery voltage, time to explore how power reaches relay socket #1. Note the diode off to the left, and then 31 II (also inside a circle). That takes us to the inertia switch in figure 01.5. Make sure the inertia switch didn't somehow trip, but I don't believe that happened as it would have also killed the fuel pump. It only takes a minute to make sure it's good. The inertia switch is located forward of the left front door hinge, outboard of the US driver's feet.
Next, check fuse F4 in the primary junction box. This is a small fuse panel inside the cabin, forward of the right front door hinge, outboard of the US passenger's feet. Like the inertia switch, I don't think this fuse has opened as it would also disable the fuel pump, but check it anyway.
After resetting the inertia switch and checking fuse F4 in the primary junction box, time for your voltmeter again. Turn the key to Run and make sure that battery power is present at either terminal of fuse F4. You can leave the fuse installed, and check at either of the two little openings on the head of the fuse.
If you've got power at this fuse, and the inertia switch has been reset, I'd suspect the diode feeding socket #1 at relay R3.
There are more checks we can run, but walk through these quick steps for now and report back.
I've recorded another video of what does or doesn't light up on the dash when put into run mode incase that indicates anything. I also tried to record the sound of the fuel pump kicking on. I've only assumed I hear it so I wanted to posted it in case it's something else.


 11-08-2023, 10:17 AM