
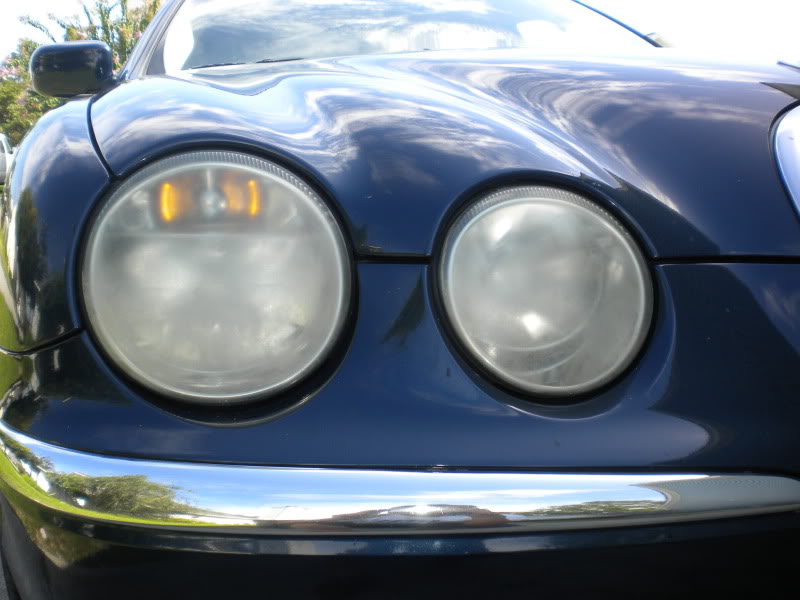
Best way to de-oxidize my lights....
#1
 08-08-2009, 10:03 AM


Join Date: Mar 2008
Location:
Posts: 16
Likes: 0
Received 0 Likes
on
0 Posts
#2
08-08-2009, 10:36 AM

dude, get this from autozone or advanced auto parts: http://www.youtube.com/watch?v=_t1RBw0IGXA
I tried on my car and WOWOWOWOWOWO what a difference. I was in the same boat as you, nothing seemed to work until I gave this a chance. Just remember for this kit, you need a basic drill.
The results will surprise you. The kit runs anywhere from 18.99 to 24.99
I tried on my car and WOWOWOWOWOWO what a difference. I was in the same boat as you, nothing seemed to work until I gave this a chance. Just remember for this kit, you need a basic drill.
The results will surprise you. The kit runs anywhere from 18.99 to 24.99
#4
08-08-2009, 11:55 AM
Join Date: Mar 2008
Location:
Posts: 16
Likes: 0
Received 0 Likes
on
0 Posts
#5
08-08-2009, 01:13 PM
Don't laugh to hard........
I saw this on an episode of "Two Guys Garage" before it basically became an infomercial. I've done it with great results and so have others (after they were done laughing). Go and get yourself a tube of white toothpaste, not the gel. Use it to polish your headlamps. Wipe it on with a soft cloth then buff it off with another soft cloth, preferably a microfiber cloth. Costs all of 2 bucks and works great. I didn't believe it would work until I tried it myself.
I saw this on an episode of "Two Guys Garage" before it basically became an infomercial. I've done it with great results and so have others (after they were done laughing). Go and get yourself a tube of white toothpaste, not the gel. Use it to polish your headlamps. Wipe it on with a soft cloth then buff it off with another soft cloth, preferably a microfiber cloth. Costs all of 2 bucks and works great. I didn't believe it would work until I tried it myself.
#6
08-08-2009, 01:20 PM
Don't laugh to hard........
I saw this on an episode of "Two Guys Garage" before it basically became an infomercial. I've done it with great results and so have others (after they were done laughing). Go and get yourself a tube of white toothpaste, not the gel. Use it to polish your headlamps. Wipe it on with a soft cloth then buff it off with another soft cloth, preferably a microfiber cloth. Costs all of 2 bucks and works great. I didn't believe it would work until I tried it myself.
I saw this on an episode of "Two Guys Garage" before it basically became an infomercial. I've done it with great results and so have others (after they were done laughing). Go and get yourself a tube of white toothpaste, not the gel. Use it to polish your headlamps. Wipe it on with a soft cloth then buff it off with another soft cloth, preferably a microfiber cloth. Costs all of 2 bucks and works great. I didn't believe it would work until I tried it myself.
#7
08-08-2009, 02:21 PM


Veteran Member
A bathroom cleanser product called SoftScrub always cleaned up the headlights on my wife's previous 2000 Lexus RX300 to crystal clear again. I had to do this about twice a year to that vehicle. I read about this tip on a Lexus forum probably 5 or 6 years ago. Maybe it's the bleach in the product, maybe it's the very fine granular texture of the product as well. Whatever it is, it works great.
I've recommended this to several friends with different makes and models, and it has always worked well for them, too....
I've recommended this to several friends with different makes and models, and it has always worked well for them, too....
Trending Topics
#8
08-08-2009, 03:50 PM
Join Date: Mar 2008
Location:
Posts: 16
Likes: 0
Received 0 Likes
on
0 Posts


#11
08-08-2009, 08:52 PM
Veteran member
Join Date: May 2008
Location: Great Mills, MD
Posts: 14,411
Likes: 0
Received 3,903 Likes
on
3,207 Posts
Not to question what you guys are using, but aren't the headlight assemblies on our cars glass vice plastic? Most of the headlight "fix-it" products are designed to be used on softer materials like the lexan/plastic covers, not a glass material. I had to fix my headlights on my Jag and tried some rubbing compound, but that didn't work too well. I ended up using a mix of 2000 grit sandpaper and some liquid 1500 grit rubbing compound. Once I was satisfied with the sanding (you can feel/see the coating come off), I sprayed the headlights with some clear and I haven't had to touch them in a year.
#12
08-09-2009, 07:19 AM
#13
08-09-2009, 11:43 AM

#14
08-09-2009, 12:28 PM
Veteran member
Join Date: May 2008
Location: Great Mills, MD
Posts: 14,411
Likes: 0
Received 3,903 Likes
on
3,207 Posts
#15
08-09-2009, 01:00 PM
HOLY BEJESUS!!!!!!!!!!!!!!!!!
So i went to auto zone and picked up the 3m kit. I figurered what the heck ill try it.
15 minutes later, and 1 high beam done completely. OMG the difference is night and day.
I took pictures of before and during the process. ALL I HAVE TO SAY IS WOW!!!!
and mine were marginally clear, just a little of yellowing at the top of the lights. the 3m kit does an amzing job as a DIY project. READ THE INSTRUCTIONS THOUROUGHLY!!! dont forget the thin foam pad between the paper and drill!! i almost did before i went to town sanding. as i get them done tonight ill post before and after pics
#16
08-09-2009, 07:51 PM
HOLY BEJESUS!!!!!!!!!!!!!!!!!
So i went to auto zone and picked up the 3m kit. I figurered what the heck ill try it.
15 minutes later, and 1 high beam done completely. OMG the difference is night and day.
I took pictures of before and during the process. ALL I HAVE TO SAY IS WOW!!!!
and mine were marginally clear, just a little of yellowing at the top of the lights. the 3m kit does an amzing job as a DIY project. READ THE INSTRUCTIONS THOUROUGHLY!!! dont forget the thin foam pad between the paper and drill!! i almost did before i went to town sanding. as i get them done tonight ill post before and after pics
So i went to auto zone and picked up the 3m kit. I figurered what the heck ill try it.
15 minutes later, and 1 high beam done completely. OMG the difference is night and day.
I took pictures of before and during the process. ALL I HAVE TO SAY IS WOW!!!!
and mine were marginally clear, just a little of yellowing at the top of the lights. the 3m kit does an amzing job as a DIY project. READ THE INSTRUCTIONS THOUROUGHLY!!! dont forget the thin foam pad between the paper and drill!! i almost did before i went to town sanding. as i get them done tonight ill post before and after pics
I can't believe how mine turned out when I used the 3M kit. Its def worth the price tag.
RIP Billie Mays.........

#17
08-09-2009, 08:16 PM
Join Date: Mar 2008
Location:
Posts: 16
Likes: 0
Received 0 Likes
on
0 Posts
#18
08-10-2009, 08:53 AM

There is a UV coating on the lamps to protect from sunlight. I assume that this process takes at least some of the UV protection off. How often does this process need to be repeated? There are some plastic "clear coatings" that can add a layer of clear coat UV protection back onto the plastic. But they cost more $$$.
How long does this process last. Is it an annual, bi-annual or monthly process?
Thanks.
How long does this process last. Is it an annual, bi-annual or monthly process?
Thanks.
#19
08-10-2009, 05:38 PM
Veteran member
Join Date: May 2008
Location: Great Mills, MD
Posts: 14,411
Likes: 0
Received 3,903 Likes
on
3,207 Posts
BugDoc, if you can clean up the headlight lenses using whatever product you want, you can then shoot the headlights with a clear. Almost all clears these days have a built in UV protectant in them. Other than that, you would need to read each product and see if they claim a UV protectant and normally they will say how often it needs to be re-applied. If not, write an e-mail to the company directly and see what they say. You may be surprised with the answer that they give.
#20
08-11-2009, 08:30 PM
don't make it harder on yourselfs, just buff them keep them clean and virgin by applying in a clear coat is just going to make it harder to keep them in a good shape. just my 2 cents. mines are 9 years old and they look like brand new. i just use high speed buffer and 3m light rubbing compund and in 15 min i'm done and happy very happy with results.