
Chrome Window Trim Separation....
#1
 08-05-2012, 08:56 AM


Yesterday I noticed that the chrome window trim on our 2005 S-Type 3.0 has popped out ever so slightly at the bottom rear seam of the drivers-side rear door. The trim moves up and down just a bit if I press on it there at that corner....
For those of you who have removed this trim to have it refinished (Rick, I'm talking to you!), is this a clip failure or an adhesive failure (or both)? I cannot see far enough behind and underneath the trim to be able to tell....
Advice on re-attaching this trim would be appreciated as well. It's not a big deal at this point, but I think that it could become one as the wind continues to work its way underneath the loose trim as the car racks up highway miles....
#2
08-05-2012, 09:48 AM
Veteran Member
The following users liked this post:
Jon89 (08-05-2012)
#3
08-05-2012, 12:11 PM
Veteran Member
Ok Jon, more than likely the little plastic (heres your sign  ) "X" clip has failed. Pictured below is the clip and part number. There is a white dowel (as seen in picture) Once the new clip is inserted push the white dowel into the X clip and through the door frame. The X clips are cheap, I would purchase a couple as you might break the next upper one, when trying to replace the lower one.
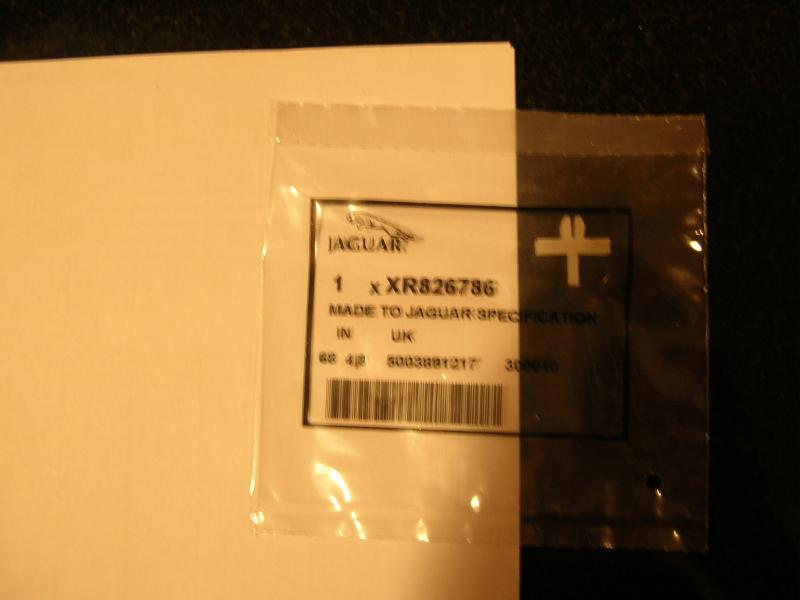

Joyces was actully broken when I picked up our vehicle a few years back. I used "GOOP Automotive Trim Glue" available at The Zone etc... I applied the GOOP to the trim and clamped it overnight, it held for a long time, until I did the chrome polishing.
BTW I forgot to say a prayer about the plastics in our Jags this morning.
) "X" clip has failed. Pictured below is the clip and part number. There is a white dowel (as seen in picture) Once the new clip is inserted push the white dowel into the X clip and through the door frame. The X clips are cheap, I would purchase a couple as you might break the next upper one, when trying to replace the lower one.Joyces was actully broken when I picked up our vehicle a few years back. I used "GOOP Automotive Trim Glue" available at The Zone etc... I applied the GOOP to the trim and clamped it overnight, it held for a long time, until I did the chrome polishing.
BTW I forgot to say a prayer about the plastics in our Jags this morning.
Last edited by joycesjag; 08-09-2012 at 03:13 PM.
#4
08-05-2012, 12:22 PM
Thanks as always, Rick. That spot you marked is exactly where our trim has lost its grip. I'll get some of these clips next time I'm near the dealership. I may clip it AND glue it. If I get mad enough at it, I just may screw that corner piece down on both sides of the car....
What is the best tool (and method) to use to pull the chrome trim away from that area to remove the failed clip and install the new clip without creasing or bending the trim?
From your photo, it appears that re-installation involves pushing the clip into the door first, getting it positioned correctly, then snapping the chrome trim onto it. I assume the trim has a channel on the back that pops into the clip....
I still love our S-Type, but I despise the lousy plastics that permeate these cars. Never had a vehicle before with so much potentially suspect plastic in it....
Last edited by Jon89; 08-05-2012 at 12:36 PM.
#5
08-06-2012, 06:20 AM
Veteran Member
Here is a write up:
https://www.jaguarforums.com/forum/s...ics-faq-29860/
Although you do not have to remove the whole chrome trim. The section of trim you are reffering to should be able to be pulled up enough to pop the old X clip out and install an new one.
The problem might just be the 3M tape that may need replaced. The 2 red strips in one of the photos in the link.
The following users liked this post:
Jon89 (08-06-2012)
#6
08-06-2012, 07:37 AM
Thanks, Rick. I'll purchase three or four clips just to be sure and have a go at reattaching the left rear window trim. I see from the previous link you provided that you are also recommending the use of some 3M molding tape. I may do that, but since I only need to snug up about a two-inch section of trim and have no intention of fully removing the entire trim piece, I may just glue it instead (along with using a new clip or two). Sure do wish these clips were metal instead of plastic....
#7
08-06-2012, 12:30 PM

Trending Topics
#8
08-06-2012, 03:44 PM
#9
08-06-2012, 07:06 PM

Veteran Member
#10
08-06-2012, 07:55 PM
Veteran Member
#11
08-08-2012, 03:01 PM

Senior Member
I installed my trim this (without disposing them).
Thanks,
Rizwan
#12
08-09-2012, 07:19 AM
Just finished doing this trim repair. It took me five minutes, total, and most of that time was simply cleaning seven years of debris out of the trim channel. Here's how it's done:
1. Gently pull the trim corner away from the door with your fingers. Do not force it, do not twist it, just pull it straight out very gently. You will hear the bottom plastic clip "pop" when it gives way, and then you will be able to raise that lower portion of trim far enough away from the door to be able to do the job.
2. You will now see the broken remnants of the white plastic lower clip stuck in the door frame underneath where the trim fits. Use your needle-nose pliers to gently pull those broken remnants out of the door frame. You will then see the square hole in the door frame that your new clip will snap in to.
3. Using a wet rag, clean out the built-up debris lodged in the trim channel. Take your time. You do not want to get rough here because you may break the next higher-up clip or worse, bend or crimp your chrome trim.
4. Once your trim channel is clean, you are ready to insert your new clip. As Rizwan said above, you do NOT discard the clip's dowel - once you snap the clip into place, you insert the dowel and push it all the way into the clip to ensure a tight grip by the clip.
5. With the new clip snapped into place and its dowel fully inserted, you are now ready to snap your chrome trim corner piece back into place on the door. Line up the chrome trim directly over the new clip, and push down firmly with your palm. You will feel and hear the trim snap correctly back into place. Ensure that the rubber edge is tucked properly into the channel where it belongs - you can do this even AFTER your trim has been successfully reattached.
6. Wipe up the area with your wet rag, and you're done. No glue or 3M tape needed.
I purchased 4 clips from the dealership parts department yesterday afternoon for 90 cents each. Not knowing if I would break any clips other than the one that had already failed, I wanted to be sure I had enough. I wound up using just one new clip, so I have three spares left. I'm sure the same spot on the passenger side of our S-Type will give way at some point, so I'll hold onto these spare clips until needed....
This is a very simple and straightforward repair. The key is to be very gentle with your chrome trim using only your fingers for removal if possible. If you bend or crimp the chrome trim, you're probably hosed unless you have a metal shop that can straighten it out for you....
Last edited by Jon89; 08-09-2012 at 07:59 AM.
The following users liked this post:
JagV8 (08-10-2012)
#13
08-09-2012, 03:14 PM
Veteran Member
I have edited my posts.
#14
08-09-2012, 03:15 PM
Veteran Member
The following users liked this post:
Jon89 (08-10-2012)
#15
08-10-2012, 08:11 AM

Veteran Member
The following users liked this post:
Jon89 (08-10-2012)
#16
08-10-2012, 09:05 AM
#17
08-10-2012, 12:51 PM
#18
08-10-2012, 01:49 PM
Veteran Member

#19
07-22-2013, 12:41 PM
Senior Member
Hi, the window trim on my 2004 Jaguar s-type R has detached after driving on the motorway yesterday at high speed. I have identified the problem as broken white 'X' clips that holds the plastic trim to the door frame. I have just bought four of the clips from Jaguar today (conveniently using the part number provided by Rick in his write up) and tried to change the broken clip at the bottom of the rear passenger side window. I used a set of needle nose pliers as suggested by Jon89 above but failed to pull out the remnants of the two broken X clips. Unfortunately, I broke the white clip down further in the process now making it harder to grip onto to pull out. Before I made it any worse I thought I should seek advice on how to remove this clip. Thanks in advance
#20
07-22-2013, 01:24 PM
Senior Member
Problem now sorted. I found out an easy method to remove the clips using a Stanley knife and had them out in 2 minutes. I cut the inside of the broken clips horizontally and vertically so it collapsed allowing me to carefully remove the remnants using the pliers. I found this much easier than using a screwdriver or plier to pull out the clip without cutting. I then inserted the new clips into the square holes which remained and attached the window trim securely onto the door frame.