
Dual Climate Control Valve (DCCV) Source
#21
 11-06-2009, 02:42 PM


Veteran Member
#22
11-06-2009, 04:59 PM

#23
03-20-2010, 04:16 PM
Just circling back to post my solution. I had replaced a leaky DCCV but still was getting very hot air out of the driver side vents no matter what the climate setting. I finally popped out the air cond. module today and pulled the circuit board to look for a burnt trace or component (per BRUTAL's suggestion somewhere in the archives). Sure enough I found a burnt trace on the circuit board that must've been caused by the DCCV shorting out. I jumper'd the bad trace (I'm an electrical engineer, so my soldering skills are ok) and everything's working fine again. It's satisfying to know I saved ~$1,300 or so doing this myself as opposed to paying the dealer to put in a new module. Hope this info helps someone.
The following 2 users liked this post by Bob Smith:
Mechtech (08-13-2011),
StephanWolf (05-07-2011)
#24
03-20-2010, 05:42 PM

Join Date: Sep 2008
Location: Damon /Houston, Texas
Posts: 7,254
Received 2,190 Likes
on
1,357 Posts
#25
03-21-2010, 11:40 AM

Veteran Member
#26
03-21-2010, 11:48 AM
Join Date: Sep 2008
Location: Damon /Houston, Texas
Posts: 7,254
Received 2,190 Likes
on
1,357 Posts

The following users liked this post:
Jumpin' Jag Flash (08-02-2013)
#27
03-22-2010, 12:28 PM
Veteran Member
#28
03-22-2010, 01:17 PM
Join Date: Sep 2008
Location: Damon /Houston, Texas
Posts: 7,254
Received 2,190 Likes
on
1,357 Posts
yes your correct, but I have never had this issue with the sperate module. I would say it damages the driver circuits in the module not the switch pack. I would open the module to see, but you can pin out the wiring to the DCCV on the left side of the dash and watch your DVOM for ground circuit to valve to check for proper climate control driver operation(akablown out circuit) youll have to look at the wiring diag, I only remember from looking at it
#29
04-17-2010, 02:23 PM
Veteran Member
I just changed the heater control valve (DCCV) on my 2005 STR and wanted to post some differences from the way Bob Smith did his non super charged 2005 4.2L. I did not follow the JTIS.
I did everything from the top of the engine. Drove car up on ramps to get a more comfortable working height. Trying to save the back!! Did not remove the passenger side wheel well cover or wheel. I did remove the under body tray and the one attached to the front bumper cover. Remove the engine cover and the cover over the head lights for better access. I did not drain the coolant. I put a big drain pan under the front of the engine and it caught the fluid that drained from the hoses I unhooked. First remove the upper radiator hose completely. Then remove the two small hoses on top of the radiator tank. Now remove the radiator overflow tank. The bottom hose on the tank has a unique wire retainer that must be pulled back before the hose can come off the nipple on the bottom of the tank. Remove the attachment bolt from the tank then swivel it up a bit until you can get to the wire retainer. Pull the wire back with a hooked ice pick or something similar. Also remove the electrical connection attached to the radiator tank. Remove the inter cooler hoses attached to the inter coolers and bend back out of the way. You only need to remove half of the inter cooler hoses. You will see which ones are in the way. Also remove the top heater hose so you can access the two hoses underneath. These two hoses go to the DCCV and have a quick connect that is a bit fiddly. Note what Bob said on removing them. I did not unhook the AUX coolant pump. Just unbolted it from the fan shroud and pushed it out of the way so I could use a long 1/4" extension to get the DCCV attachment bolt off. Three hoses attach to the DCCV (Which by some stroke of luck IS the same part for the STR as the non super charges 4.2L!! XR840091 about $300 from Nalley Jaguar. Thanks again to Dan Wicker!!). You have removed the two hose quick connects already. The third hose is attached to the front of the engine. Just follow it and unhook it at that point.
I found the electrical connection to the DCCV to be tough!! The electrical connector has a red piece of plastic that must be pulled back BEFORE you can get access to the tab you need to push down while pulling the connection apart. Hard to see because the wire harness is short. Don't try to remove the electrical connector until AFTER you have the DCCV bolt removed. The bolt needs to be removed and it's hard to get to. May need a set of long nose pliers to pull it out. I was able to get it with my fingers. You can now slide the DCCV out of the bracket and twist it around to get at the electrical connector and unplug it. Finally the DCCV is now free but will take a good bit of twisting and squeezing around things to remove. Take your time, everything is very expensive if you break it!! Transfer the three hoses to the new part. Note CAREFULLY how the hoses are orientated and put them on EXACTLY the same on the new valve. ONLY transfer one hose at a time. There is very little room on the "R" with the added inter cooler hoses so the hoses must be correct!!
Reinstall is just the reverse. I have a couple of more tips. I had to buy a set of cable clamp pliers to get the hose clamps off. Some off them are impossible to get at with regular pliers. Some must be removed with regular pliers because the long cable does not fit everywhere. I have attached a picture of the needed pliers. They are expensive and buy a new one. The cable gets screwed up on the used ones. I paid about $45 on EBay for a new one.
My DCCV was starting to weep and thanks to this forum I knew to inspect it and sure enough if was already stained red with a small drip of coolant. No problems with A/C or heat yet. But I did have a smell of cooked coolant when I get out of the car. Also a bit of an oil smell but everything is dry so far? Car is at 54K miles.
.
.
.
The following users liked this post:
StephanWolf (01-06-2011)
#30
04-18-2010, 08:30 AM
Veteran Member
#31
05-11-2010, 11:31 PM

Junior Member
Join Date: May 2010
Location: WEST HOLLYWOOD
Posts: 2
Likes: 0
Received 0 Likes
on
0 Posts
#32
05-17-2010, 08:00 AM
Veteran Member
For all you guys that INSIST that LS and the S-Type are SO different... Please don't believe it. What Jaguar has done is basically created their own part # system, and in turn no one has take the time to create a cross reference.
I've managed to source pretty much everything I've needed for My S-Type 3.0 - Upper and lower intake manifold gaskets, Wheel Studs, and now the DCCV, from the Ford Side. All at 1/2 or less the price of the Jaguar branded Equivalent.
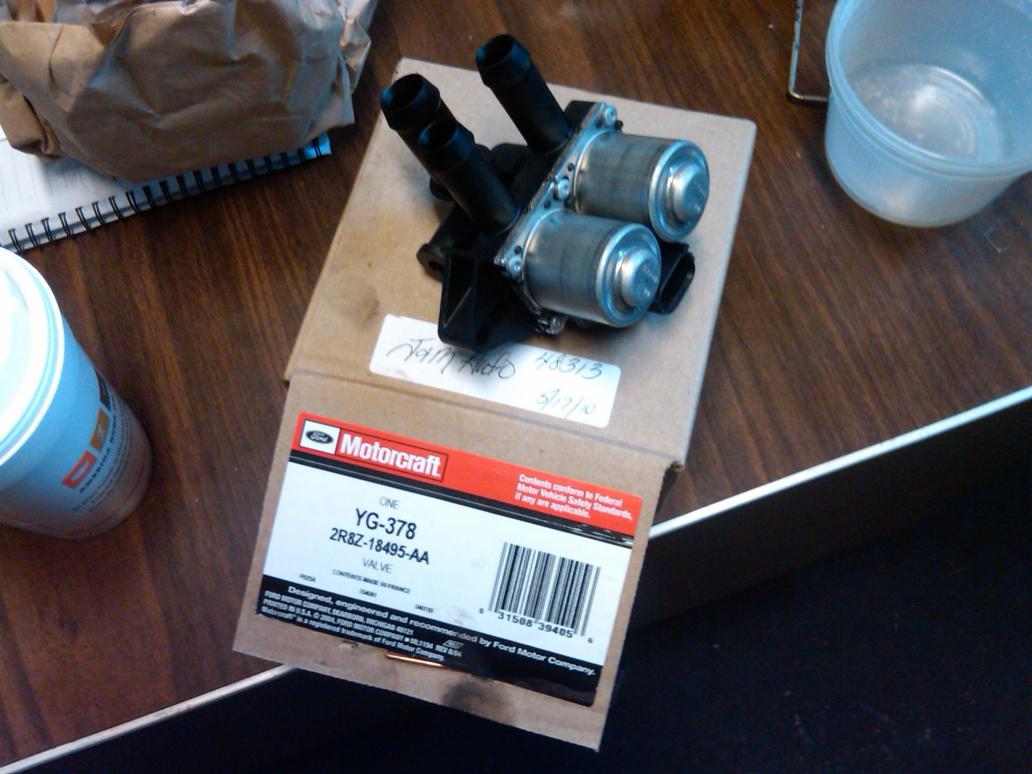
The Motorcraft part # for the 3 hose (2003+) Lincoln LS DCCV is YG378. There is also a Four Seasons part # 74010 - (Which is just reboxed motorcraft), however it's carried by the bigger parts wholesalers - Eastern, WAWD etc, if any of you have access to a mechanic that will let you buy parts wholesale.
The 5 hose 00-02 DCCV is Motorcraft part # YG355 just fyi.
I ended up getting mind from the local ford dealer, cause he was the only guy who could get it the same day. The list on the part is $164. Still beats any jaguar source.
Rockauto has the Motorcraft part for $96.79 if you don't need it yesterday.
I'll attach an image of the part and the rockauto page...
George
I've managed to source pretty much everything I've needed for My S-Type 3.0 - Upper and lower intake manifold gaskets, Wheel Studs, and now the DCCV, from the Ford Side. All at 1/2 or less the price of the Jaguar branded Equivalent.
The Motorcraft part # for the 3 hose (2003+) Lincoln LS DCCV is YG378. There is also a Four Seasons part # 74010 - (Which is just reboxed motorcraft), however it's carried by the bigger parts wholesalers - Eastern, WAWD etc, if any of you have access to a mechanic that will let you buy parts wholesale.
The 5 hose 00-02 DCCV is Motorcraft part # YG355 just fyi.
I ended up getting mind from the local ford dealer, cause he was the only guy who could get it the same day. The list on the part is $164. Still beats any jaguar source.
Rockauto has the Motorcraft part for $96.79 if you don't need it yesterday.
I'll attach an image of the part and the rockauto page...
George
Last edited by androulakis; 05-17-2010 at 08:32 AM.
The following users liked this post:
Jumpin' Jag Flash (08-02-2013)
#33
05-17-2010, 08:51 AM

Veteran Member
Thanks for posting this information, George. So the Motorcraft YG378 will fit our 2005 S-Type 3.0, huh? Getting it from rockauto.com may indeed be the way to go once you notice any orange stains around the valves. I looked at ours fairly closely over the weekend, even wiped the casing pretty thoroughly with a white paper napkin. The napkin stayed clean with no coolant stains on it at all. So our DCCV seems to be okay for the time being....
How long did it take you to swap out your old DCCV? Did you use the original hose clamps on the new DCCV or did you replace those as well? Access down in that area will be quite difficult for me due to my huge hands....
How long did it take you to swap out your old DCCV? Did you use the original hose clamps on the new DCCV or did you replace those as well? Access down in that area will be quite difficult for me due to my huge hands....
#34
05-17-2010, 09:08 AM
Veteran Member
Jon,
It's really NOT that bad.... Yes that YG378 valve will fit all the S-types with the 3 hose valve.
There are only two DCCV's used across the DEW platform. A 3 hose version post 2003, and a 5 hose version used between 00-02. The basic difference is that the 5 hose version also has provisions for the coolant expansion tank located in the fender well on an earlier car. The YG355 valve is the 5 hose version.
I did it on the lift at my brothers shop, so having the proper tools handy always helps....
I dropped the belly pan and the inner wheel well liner on the passenger side.
Best thing to use to get to the 8mm bolt holding the valve to the rad support is a ratcheting gear wrench.
Undo the connectors to output hoses where they meet the metal pipes, not at the valve. Push the connector further onto the pipe, release the connector and wiggle the hose off.
Next undo the electrical connector. The electrical connector can be a bit of a pita, it has a sliding release tab...
Pull the valve up and disconnect the input hose from the top a set of hose clamp pliers helps greatly, then drop the valve out via the wheel well... Reconnect the two output hoses to the new valve.
I used new hose clamps at the valve side, the standard screw down type.
Any more questions please feel free to ask.
George
Last edited by androulakis; 05-17-2010 at 09:11 AM.
The following users liked this post:
Jumpin' Jag Flash (08-02-2013)
#35
05-17-2010, 09:39 AM
Veteran Member
George,
Thanks for the step-by-step. Looks like you were able to shortcut the procedure a bit versus what JTIS says to do....
Did you drain any coolant before you started? If so, how much? If not, how much coolant did you lose during the job? I assume you had to bleed and refill some coolant afterwards?
Thanks for the step-by-step. Looks like you were able to shortcut the procedure a bit versus what JTIS says to do....
Did you drain any coolant before you started? If so, how much? If not, how much coolant did you lose during the job? I assume you had to bleed and refill some coolant afterwards?
#36
05-17-2010, 11:26 AM
Veteran Member
George,
Thanks for the step-by-step. Looks like you were able to shortcut the procedure a bit versus what JTIS says to do....
Did you drain any coolant before you started? If so, how much? If not, how much coolant did you lose during the job? I assume you had to bleed and refill some coolant afterwards?
Thanks for the step-by-step. Looks like you were able to shortcut the procedure a bit versus what JTIS says to do....
Did you drain any coolant before you started? If so, how much? If not, how much coolant did you lose during the job? I assume you had to bleed and refill some coolant afterwards?
It will make a mess but what can u do.
And Yes you have to bleed it. With someone sitting the car, with the heat on full blast 90 degrees, holding the throttle at 1500rpm...
George
#37
05-17-2010, 12:02 PM
Veteran Member
Thanks for the additional info, George. I hope my DCCV will be one of the rare ones that doesn't die prematurely. But in case it does, I'll keep this information in my S-Type file for future reference. Paying $100 for a Lincoln LS DCCV from rockauto.com sure beats buying the exact same unit from a Jaguar dealership for three times that amount....
#38
05-18-2010, 07:57 AM
Veteran Member
The following 2 users liked this post by androulakis:
Jumpin' Jag Flash (08-02-2013),
StephanWolf (01-06-2011)
#39
05-18-2010, 08:34 AM
Veteran Member
#40
05-18-2010, 08:46 AM
Veteran Member