
Help with Hood/Bonnet Removal RESOLVED
#1
 04-07-2015, 11:29 PM

MY2003 with the windscreen washers mounted on the bonnet. The washer feed hose is routed up the RHS hinge. I don't see a disconnect.
Anyone know where you detach the windscreen washer hose to facilitate bonnet removal?
Otherwise, looks fairly straightforward - remove two hinge-to-bonnet fixing bolts on each side, disconnect the assist-struts, and lift off. (Easier said, than done, no doubt)
_______________________
Arrrgggh! Never mind...I checked JTIS...apparently you have to remove the insulation and thread the hose through the bonnet....
Last edited by aholbro1; 04-07-2015 at 11:37 PM.
#2
04-08-2015, 04:22 PM
Veteran Member

The following users liked this post:
aholbro1 (04-10-2015)
#3
04-10-2015, 08:37 AM
FWIW....the 00/01 bonnet is not exactly a plug-n-play swap into the MY03; Not sure what MY the donor car was but somewhere near that era....had no growler on the grille....as neither does my 03 since my eBay "win" of a grille from an 00. Air driven cut-off tool and a bit of painter's choice (color) paint for the bare metal and bob's yer uncle, though! Otherwise....you slap it on unmodified and slam it shut...you're gonna crush the plastic air intake snorkel....
Last edited by aholbro1; 04-10-2015 at 08:39 AM.
#4
04-10-2015, 09:18 AM

Veteran Member
The following users liked this post:
aholbro1 (04-10-2015)
#5
04-10-2015, 11:27 PM
Funny you should mention it, Jon! I've got one left here, who is already considerably bigger than me... not that that's saying much.... but he's actually a pretty big kid. As it happens... parts availability and his extra-curricular school activities conspired against me! He was on two separate overnight trips this week; one of which was the evening I absolutely had to R&R the bonnet! It wasn't terribly heavy as I toted the replacement in from the trailer and gently placed it to my work-table, solo. However, as you might imagine, considerations quite apart from total mass come into play when you have to remove the fixings from opposite sides of the car all while supporting it!
I recruited "management" and my eldest daughter (who was the genesis of the necessity for a replacement bonnet, LHS headlight and chrome trim, and grille, btw) to assist in removal. Aware that upper body strength is the province of neither of them, and thinking ahead to the re-install, I had rigged a couple of ratchet tie-downs from the bonnet latch loops to an overhead truss.... essentially extended in line with the open bonnet, before prising the assist-struts loose. As the women seemed a bit skittish around the air-ratchet, they insisted I remove the fixings from one side then they would hold that end while I walked round to undo the other side.... ok.... it was mgmt speaking, after all.
So with the bolts removed, we had only to lift the trailing edge enough to clear the engine and walk it forward of the car until it was hanging vertically from the ceiling in front of the car. Then I got a grip on the leading and trailing edges and lifted slightly so my daughter could unhook the tie-straps from the latches and off to the table.
Installation was much later the same evening and complicated by mgmt.'s announcement that she had bathed for the evening and had no intention of going back outside for any reason!!! So my daughter and I accomplished the install in fine fashion sans mgmt. It really wasn't bad at all with the strap arrangement. To be fair, I think I got very lucky in that the truss and car position was such that the straps were along an extended bonnet-line rather than straight up from the leading edge or worse, back over the engine bay or windscreen.
I'll try to get some before/after pictures posted tomorrow.... but overall, it came out nicely for a total repair cost of $400!!!
Last edited by aholbro1; 04-11-2015 at 07:34 AM.
The following users liked this post:
Jon89 (04-11-2015)
#6
04-11-2015, 09:33 AM
Veteran Member
#7
04-11-2015, 10:01 AM
Back in mid-Febuary, my college girl called to report an unfortunate mishap. Seems a "work truck" didn't get over the speed bumps at the mall as fast as she did. The occupants bailed out and inspected their "work truck" (I suspect a utility-bed pickup, but work with what I'm told) and pronounced it good, no need to report to police nor insurance from their point of view. So that was goodness. Her car apparently driveable and here are the pics as rec'd over text:

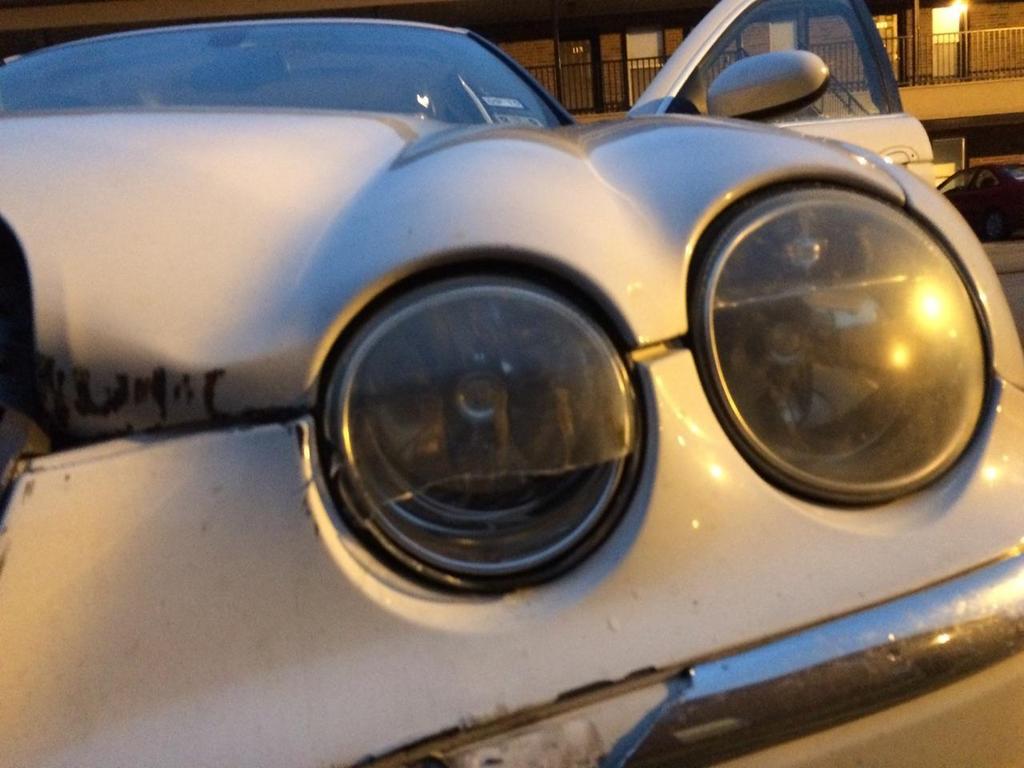
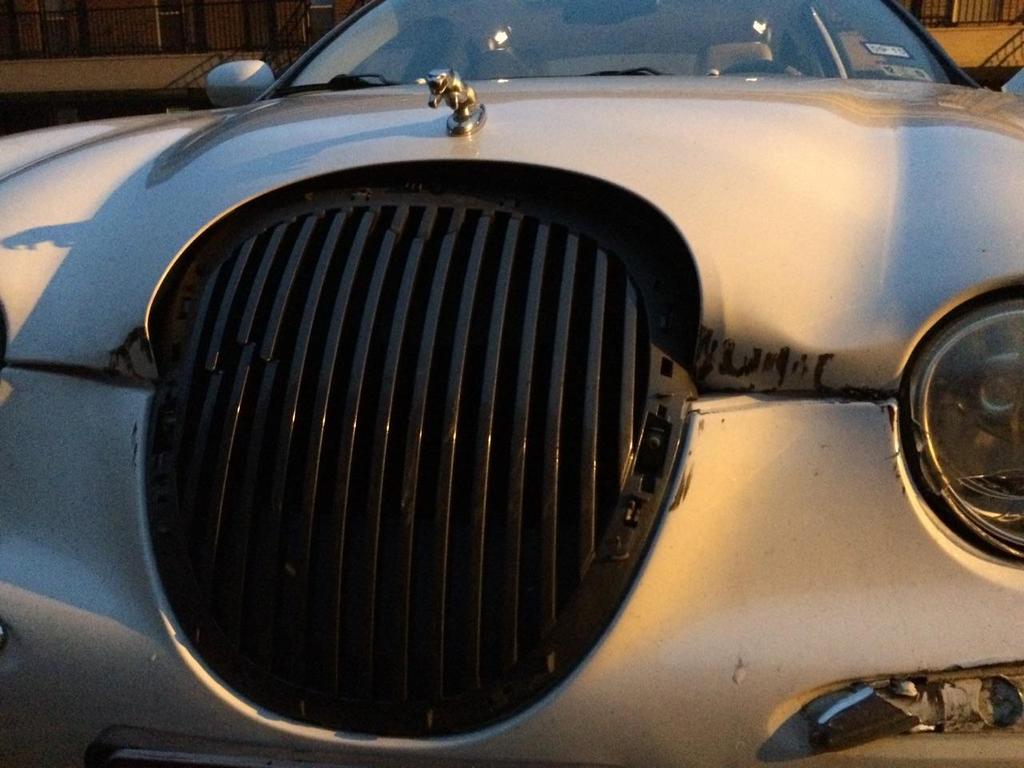
I told her to keep it well below highway speeds until her brother, who attends the same school 6 hours from home, could check out the engagement of both primary and secondary bonnet latches. He inspected it the next day and said they were engaged but he did a bit of on-site body work (making a LOT of noise, according to his sister) This is how it arrive home this week:


I had read they changed the grille-angle (and bonnet) for the 05 refresh, and despite owning both, I rarely get to line them up side-by-side, but restricted my part-search to MY-00 thru MY04 which seemed to align with most fitment info found on eBay. After-the-fact, I discovered you give up the grille-growler with the 00/01 grille and the 00/01 bonnet has a spot-welded panel that must be removed to fit the 03. Inner panels were otherwise identical save the 03 having a punched hole to allow shorter routing of the windscreen washer hose. So removing the panel undoubtedly resulted in the bonnet being less-stiff, it surely was no less-stiff than the MY03.
This panel has to go:

Gone:

I painted it with two coats of brush-on rustoleum black later but failed to snap a pic. Can't leave bare metal...
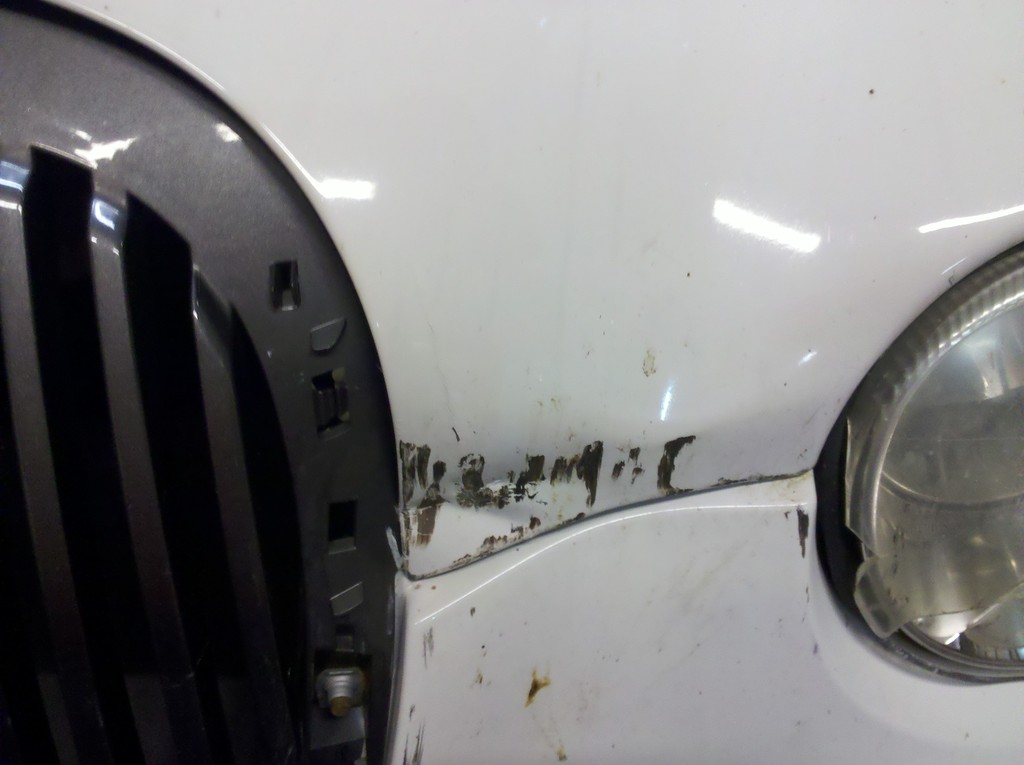
Here's why it must go:

Well, it also had to go because it blocked socket access to the remnants of the leaper mount. (Don't know if it was stolen from the donor bonnet or if "Mike" was just careless in removing it for separate sale on eBay, but the cable was cut and leaper gone, but base remained. Base is affixed with double-sided molding tape and a plastic nut.
I bid-sniped a Minnesota LHS headlight assembly on eBay advertised as "works great!" and the pics showed a reasonably clear, non fogged/yellowed lens. Got by for just over $100 vs. my second choice, a Louisiana offering for "Parts only" described as a scratched lens with broken adjusters. It was listed for $100 buy-now or make-offer. I planned to offer $20 or so on that one, still steep at $20 additional shipping had I failed in the auction. Anyway, the purchase was completed early THursday but the seller didn't get it to post until Saturday, resulting in a Wednesday arrival....1st disappointment...I had hoped to take the car apart on the weekend and finish Monday night when the light "should've" arrived. When I was removing it from the box, it rattled, 2nd disappointment - a sure sign of broken adjusters. I noted the hi-beam connector locking feature was broken off and a clamp was missing from the back of the housing (3rd and 4th disappointments)
I found the PO had "brutalized" the Brutal fix by using a drywall screw which had bored clean through the floating reflector and cinched it up against the lens - ensuring it will be forever "drooped." The keen observer, looking above and right of the screw will find the PO also "*******ized" the Brutal fix with an additional hole (5th and 6th disappointments):

I decided my path of least-work and best fix was to just transfer this lens to my existing functional, though slightly deformed assembly: https://www.jaguarforums.com/forum/s...t-have-109123/
When trying to separate the lens from the assembly, I found three additional holes, one of which contained a screw that had also bit into the reflector. (disappointments 7, 8, and 9!) I sealed all the holes with silicone sealer after I mated the lens to the housing:


My eBay Grille purchase was smooth, timely and bereft of such disappointments. I obtained a bumper trim blade from "Mike" in Irving along with the bonnet so the accounting looks like this:
Bonnet: $175
Bumper trim: $50
(trip to Irving TX in the EXc dragging the trailer for pickup- gratis)
Headlight: $115.24 incl shipping
Grille: $59.99 incl shipping
for a grand total of $400.23 excluding fuel and incidentals (vacuum connector to add a bit of windscreen washer hose that was already on-hand)
Here is the finished product:

(the yard looks like that because I maintain 3 Jaaa'gs!)


I told her to keep it well below highway speeds until her brother, who attends the same school 6 hours from home, could check out the engagement of both primary and secondary bonnet latches. He inspected it the next day and said they were engaged but he did a bit of on-site body work (making a LOT of noise, according to his sister) This is how it arrive home this week:


I had read they changed the grille-angle (and bonnet) for the 05 refresh, and despite owning both, I rarely get to line them up side-by-side, but restricted my part-search to MY-00 thru MY04 which seemed to align with most fitment info found on eBay. After-the-fact, I discovered you give up the grille-growler with the 00/01 grille and the 00/01 bonnet has a spot-welded panel that must be removed to fit the 03. Inner panels were otherwise identical save the 03 having a punched hole to allow shorter routing of the windscreen washer hose. So removing the panel undoubtedly resulted in the bonnet being less-stiff, it surely was no less-stiff than the MY03.
This panel has to go:

Gone:

I painted it with two coats of brush-on rustoleum black later but failed to snap a pic. Can't leave bare metal...
Here's why it must go:

Well, it also had to go because it blocked socket access to the remnants of the leaper mount. (Don't know if it was stolen from the donor bonnet or if "Mike" was just careless in removing it for separate sale on eBay, but the cable was cut and leaper gone, but base remained. Base is affixed with double-sided molding tape and a plastic nut.
I bid-sniped a Minnesota LHS headlight assembly on eBay advertised as "works great!" and the pics showed a reasonably clear, non fogged/yellowed lens. Got by for just over $100 vs. my second choice, a Louisiana offering for "Parts only" described as a scratched lens with broken adjusters. It was listed for $100 buy-now or make-offer. I planned to offer $20 or so on that one, still steep at $20 additional shipping had I failed in the auction. Anyway, the purchase was completed early THursday but the seller didn't get it to post until Saturday, resulting in a Wednesday arrival....1st disappointment...I had hoped to take the car apart on the weekend and finish Monday night when the light "should've" arrived. When I was removing it from the box, it rattled, 2nd disappointment - a sure sign of broken adjusters. I noted the hi-beam connector locking feature was broken off and a clamp was missing from the back of the housing (3rd and 4th disappointments)
I found the PO had "brutalized" the Brutal fix by using a drywall screw which had bored clean through the floating reflector and cinched it up against the lens - ensuring it will be forever "drooped." The keen observer, looking above and right of the screw will find the PO also "*******ized" the Brutal fix with an additional hole (5th and 6th disappointments):

I decided my path of least-work and best fix was to just transfer this lens to my existing functional, though slightly deformed assembly: https://www.jaguarforums.com/forum/s...t-have-109123/
When trying to separate the lens from the assembly, I found three additional holes, one of which contained a screw that had also bit into the reflector. (disappointments 7, 8, and 9!) I sealed all the holes with silicone sealer after I mated the lens to the housing:


My eBay Grille purchase was smooth, timely and bereft of such disappointments. I obtained a bumper trim blade from "Mike" in Irving along with the bonnet so the accounting looks like this:
Bonnet: $175
Bumper trim: $50
(trip to Irving TX in the EXc dragging the trailer for pickup- gratis)
Headlight: $115.24 incl shipping
Grille: $59.99 incl shipping
for a grand total of $400.23 excluding fuel and incidentals (vacuum connector to add a bit of windscreen washer hose that was already on-hand)
Here is the finished product:

(the yard looks like that because I maintain 3 Jaaa'gs!)
Last edited by aholbro1; 04-11-2015 at 11:40 AM.
The following users liked this post:
Jon89 (04-11-2015)
Trending Topics
#8
04-11-2015, 12:15 PM
A couple of final observations on this one:
A personal achievement: I met Rick's recommended duration when performing this step:
https://www.jaguarforums.com/forum/s...ics-faq-28534/
which is a "first" for me....but I caution, I think this is the 4th or 5th crack I've had at this one!
Secondly, all was not quite well upon reassembly when I started the car to move it out of the shop. The message center presented, "Fuel Computer Data Error" along with fuel gauge on "E" and no low-fuel notification. Additionally, no "Miles-to-empty" value in msg center. Since I'm convinced Bob knows everything worth knowing about Jags, I placed an immediate call to Motorcarman to see if he could guide my diagnosis. He recommended putting it in engineering test mode and searching for the unhappy sensor. In describing the above repairs to him, it dawned on me that I hadn't bothered to plug the bumper electrical connector back in upon reassembly. So no operable fogs nor front side-markers. He suggested this might offend some module or another regarding bus-traffic which could possibly irk the fuel data computer.....
so I confirmed with baby-girl that she wasn't going anywhere, repatriated it to the shop and went on to work for a 1/2 day. In the evening, I found by turning the wheels to right-lock, and removing the one screw that goes into the little plastic cleat that grips the bumper cover internal seam with a small metal tinnerman (you know? the one that let's go within a day or two of when you cinch up the screw? That one) I could force the inner wheelwell liner back "just" enough to get one hand in and, once I figured out how to hold my tongue right, could manage to seat both halves of the connector together! If my hands/arms were any bigger, I think more dis-assembly would be required!
Upon startup, all messages were cleared, with only a low-fuel caution and gauge showing below 1/8 tank which was as-expected. So.....don't forget to plug stuff back in!
The following users liked this post:
Jon89 (04-11-2015)
#9
04-11-2015, 12:28 PM
Veteran Member
Join Date: Nov 2006
Location: Glasgow, Scotland UK
Posts: 47,302
Received 9,008 Likes
on
4,113 Posts
The following users liked this post:
aholbro1 (04-11-2015)
#10
04-11-2015, 02:37 PM
Veteran Member
#11
04-12-2015, 11:11 AM

Veteran Member

Thread
Thread Starter
Forum
Replies
Last Post
aholbro1
XJ XJ6 / XJR6 ( X300 )
17
08-05-2021 05:02 AM
doctordeuce
F-Type ( X152 )
1
09-12-2015 08:30 AM
Currently Active Users Viewing This Thread: 1 (0 members and 1 guests)