
How To Charge AC System c/w pics FAQ
#21
 05-03-2013, 03:51 AM


I just read the official jaguar factory guide s type 1999 for the air con and it states at page 67 the recharge should be through the high side charge port only which is easy to get to behind the rhs headlight. R134a Charge is 800 and oil is 200cc. .
Who is right bec I am about to recharge. if you need pdf of Jag Cars Technical guide let me know. Paul
Who is right bec I am about to recharge. if you need pdf of Jag Cars Technical guide let me know. Paul
#22
05-06-2013, 04:10 PM

Veteran Member
I have often wondered about this, too. FWIW, I had an Audi A4 that didn't even have a low side port. The only way to charge it was through the high side port. I don't understand the logic of charging via the high side port, but if you do, it's vitally important to leave the engine off. Otherwise the can will be pressurized to 200-300 psi and it will explode.
I've charged AC systems both ways and prefer to use the low side when possible. If nothing else, you can draw more of the contents from each can due to the greater pressure differential compared to the can. (As previously mentioned, gently heating the can in a bucket of warm tap water is a big help, too.) With that said, I am planning to top off my '02 S-type's AC this afternoon and will probably just use the high side as I'm too lazy to crawl underneath for access to the low side port.
One other suggestion which I didn't see mentioned: After connecting each can, briefly crack open the yellow charge line at the charging manifold. This helps purge any moisture in the line. My manifold set even has a spring-loaded purge valve just for this purpose. Purge the line with each new can, as ambient air enters the line after the previous can is removed.
The following users liked this post:
solidaxel (02-06-2017)
#23
05-07-2013, 03:31 PM
Thanks for that, My AC tech son topped up the system last night through low pressure because still easy to get to and can run AC to test pressure drops when it cycles.
He said recharge using High pressure is for when system is empty and putting in new gas and not for testing. PSI cycled in the low pressure between 55 to 62 and AC worked fine.
Now I have found my heater doesn't work and I have seen the threads on what could be wrong...... Paul
He said recharge using High pressure is for when system is empty and putting in new gas and not for testing. PSI cycled in the low pressure between 55 to 62 and AC worked fine.
Now I have found my heater doesn't work and I have seen the threads on what could be wrong...... Paul
#24
12-04-2013, 12:47 PM
Member
Difficulty: easy
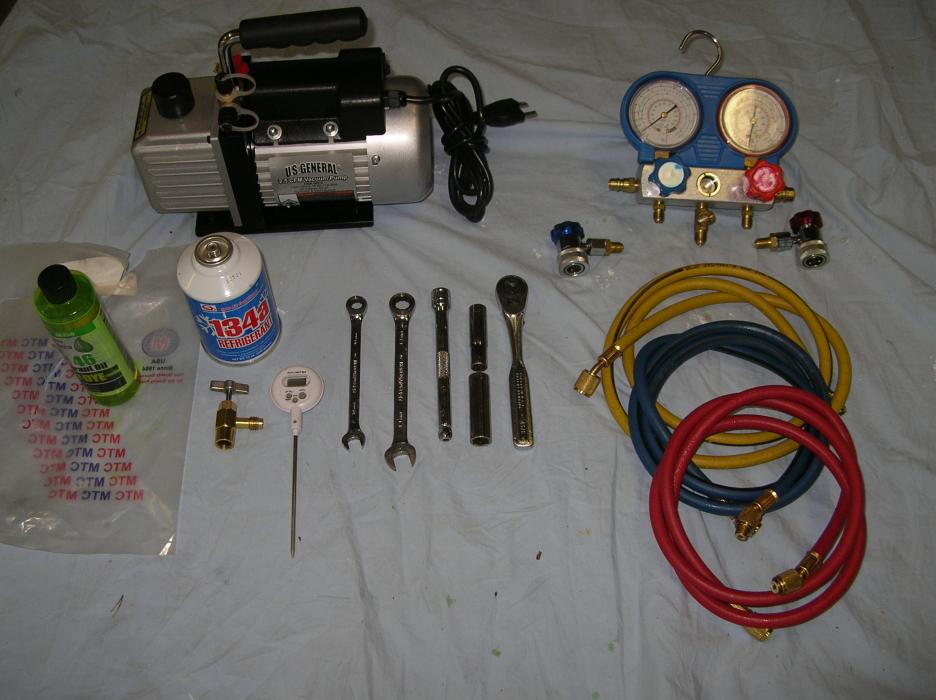
Tools Needed: AC Block Gauge (with quick connects and hoses) and Vacuum Pump (available inexpensively @ Harbor Freight Tools), R134a brass shut off, Green Dye (checking leaks, optional), Meat Probe, Kitchen Scale (not pictured). **Disreguard rachet, sockets and wrenches in below picture).
Time: (relaxing) 2 hours
**This procedure was done to a 2005, 3.0 litre, S Type with a complete evacuation of R134a Refriderant.** The following instructions will give you basic knowledge on how to recharge a repaired HVAC system.
It has been brought to my attention that people are worried about confusing HIGH Preasure and Low Preasure Lines. There are only 1 of each on this model. The quick connects on vehicle are different sizes, there will be NO confusing the smaller of the 2 which is the LOW Preasure Line. Red = HIGH preasure line, BLUE = LOW preasure line.
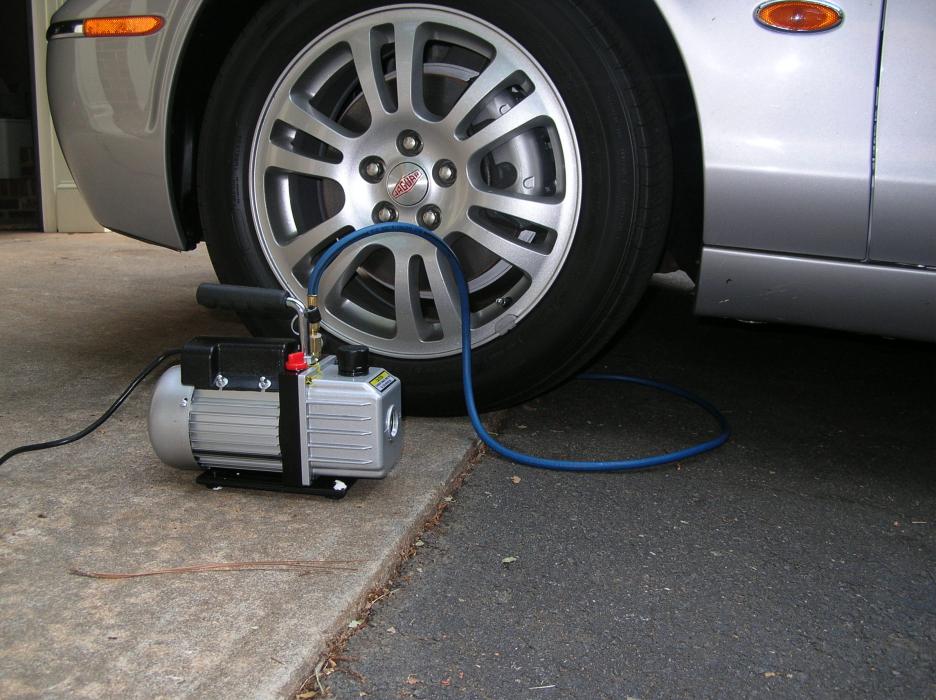
Locate the "low preasure side" (smaller of the 2) AC line quick connect. In my case behind drivers side (US) front tire. Connect the vacuum pump to the low side line. Vehicle does NOT have to be running. Turn pump on and let run approx. 45 minutes. There isn't a guage for letting you know when the air is sucked out on the pump I used. Good time to enjoy a few cold beverages.
Locate the AC System Sticker under hood which will tell you how many grams or ounces to fill your system, (ours is located on radiator splash shield). I needed 2-15 oz cans of R134a.

Moving on. Close Blue quick connect valve or disconnect vacuum line from AC system BEFORE turning off vacuum pump.
Heres where it gets tricky. Using the kitchen scale weigh the can of R134a WITH the brass shut off valve fitting secured to the can and hose attached. Connect to low preasure side quick connect, again an acurrate scale reading here is important!

(In the above picture, note the short blue dial gauge connected to the R134a can, I borrowed the AC Block gauges from a fellow member and it was missing a fitting to use with the long blue hose. I had the short line laying around (cheapie) from a big box store, that I ended up using)
Start vehicle, turn on AC, full fan at coldest setting. Following the R134a can directions I tilted the first can back and forth, approx. 10 minutes until empty. Close shut off on brass can fitting. WEIGH empty can and write down or remember figure. Attach second can of R134a, open shut off and let fill again keeping watch on the weight. About midway through can #2 the compressor kicked on, continue filling.
Using meat probe in a vent monitor temperature reading, until a temp between 39 and 44 degrees is displayed.

Close brass shut off. Add up total weight of refriderant added to system. If the total weight meets your AC System label, Congrats your finished!
AC Block Gauge reading after buttoned up

A BIG thank you goes out to fellow member Androulakis (George) for taking the time for explaining and holding my hand through this procedure!!
Also a BIG thank you to fellow member 01stype30 (Nick) for loaning me his AC tools!!
Tools Needed: AC Block Gauge (with quick connects and hoses) and Vacuum Pump (available inexpensively @ Harbor Freight Tools), R134a brass shut off, Green Dye (checking leaks, optional), Meat Probe, Kitchen Scale (not pictured). **Disreguard rachet, sockets and wrenches in below picture).
Time: (relaxing) 2 hours
**This procedure was done to a 2005, 3.0 litre, S Type with a complete evacuation of R134a Refriderant.** The following instructions will give you basic knowledge on how to recharge a repaired HVAC system.
It has been brought to my attention that people are worried about confusing HIGH Preasure and Low Preasure Lines. There are only 1 of each on this model. The quick connects on vehicle are different sizes, there will be NO confusing the smaller of the 2 which is the LOW Preasure Line. Red = HIGH preasure line, BLUE = LOW preasure line.
Locate the "low preasure side" (smaller of the 2) AC line quick connect. In my case behind drivers side (US) front tire. Connect the vacuum pump to the low side line. Vehicle does NOT have to be running. Turn pump on and let run approx. 45 minutes. There isn't a guage for letting you know when the air is sucked out on the pump I used. Good time to enjoy a few cold beverages.
Locate the AC System Sticker under hood which will tell you how many grams or ounces to fill your system, (ours is located on radiator splash shield). I needed 2-15 oz cans of R134a.
Moving on. Close Blue quick connect valve or disconnect vacuum line from AC system BEFORE turning off vacuum pump.
Heres where it gets tricky. Using the kitchen scale weigh the can of R134a WITH the brass shut off valve fitting secured to the can and hose attached. Connect to low preasure side quick connect, again an acurrate scale reading here is important!
(In the above picture, note the short blue dial gauge connected to the R134a can, I borrowed the AC Block gauges from a fellow member and it was missing a fitting to use with the long blue hose. I had the short line laying around (cheapie) from a big box store, that I ended up using)
Start vehicle, turn on AC, full fan at coldest setting. Following the R134a can directions I tilted the first can back and forth, approx. 10 minutes until empty. Close shut off on brass can fitting. WEIGH empty can and write down or remember figure. Attach second can of R134a, open shut off and let fill again keeping watch on the weight. About midway through can #2 the compressor kicked on, continue filling.
Using meat probe in a vent monitor temperature reading, until a temp between 39 and 44 degrees is displayed.
Close brass shut off. Add up total weight of refriderant added to system. If the total weight meets your AC System label, Congrats your finished!
AC Block Gauge reading after buttoned up
A BIG thank you goes out to fellow member Androulakis (George) for taking the time for explaining and holding my hand through this procedure!!
Also a BIG thank you to fellow member 01stype30 (Nick) for loaning me his AC tools!!
Thanks for the detailed pics ! Is it necessary to evacuate before refilling after changing my compressor and hose ?
#25
12-04-2013, 01:46 PM

Veteran Member
The following users liked this post:
taylor_cj2009 (12-04-2013)
#27
12-04-2013, 04:42 PM
Veteran Member
#28
12-04-2013, 04:59 PM

Just another note. The more time and effort you spend on vacuuming the system the better it will cool. Moisture is your enemy here. If you are a DIY guy you can spend a bit more time to get a better end result.
I pull a vacuum for at least 30 minutes then shut the system in overnight. Next morning I check if it held vacuum all night. Then I pull vacuum for another 30 minutes before starting the recharge. I also recommend the hot water method to get the last bit of gas out of the cans.
If you charge using the high side port remember that should be liquid and hold the can upside down. Most DIY guys should stick to charging thru the low side only. Much safer. The reason shops like to charge thru the high side is time. You can fill an A/C system with a charging cylinder in minutes but you need to know what you�re doing and measure exactly how much refrigerant is being put in.
Also it is mandatory to change the filter/dryer when you change any component, especially the compressor. Did your compressor fail? Why is it being replaced? If it did fail was the system flushed? If you read the warranty paperwork with the compressor they all say no coverage if you can't prove the filter/dryer was changed at the same time.
The dryer media does get saturated and is difficult to dry out plus the dryer is usually pretty cheap.
.
.
.
#29
12-04-2013, 05:04 PM
Member
Just another note. The more time and effort you spend on vacuuming the system the better it will cool. Moisture is your enemy here. If you are a DIY guy you can spend a bit more time to get a better end result.
I pull a vacuum for at least 30 minutes then shut the system in overnight. Next morning I check if it held vacuum all night. Then I pull vacuum for another 30 minutes before starting the recharge. I also recommend the hot water method to get the last bit of gas out of the cans.
If you charge using the high side port remember that should be liquid and hold the can upside down. Most DIY guys should stick to charging thru the low side only. Much safer. The reason shops like to charge thru the high side is time. You can fill an A/C system with a charging cylinder in minutes but you need to know what you�re doing and measure exactly how much refrigerant is being put in.
Also it is mandatory to change the filter/dryer when you change any component, especially the compressor. Did your compressor fail? Why is it being replaced? If it did fail was the system flushed? If you read the warranty paperwork with the compressor they all say no coverage if you can't prove the filter/dryer was changed at the same time.
The dryer media does get saturated and is difficult to dry out plus the dryer is usually pretty cheap.
.
.
.
I pull a vacuum for at least 30 minutes then shut the system in overnight. Next morning I check if it held vacuum all night. Then I pull vacuum for another 30 minutes before starting the recharge. I also recommend the hot water method to get the last bit of gas out of the cans.
If you charge using the high side port remember that should be liquid and hold the can upside down. Most DIY guys should stick to charging thru the low side only. Much safer. The reason shops like to charge thru the high side is time. You can fill an A/C system with a charging cylinder in minutes but you need to know what you�re doing and measure exactly how much refrigerant is being put in.
Also it is mandatory to change the filter/dryer when you change any component, especially the compressor. Did your compressor fail? Why is it being replaced? If it did fail was the system flushed? If you read the warranty paperwork with the compressor they all say no coverage if you can't prove the filter/dryer was changed at the same time.
The dryer media does get saturated and is difficult to dry out plus the dryer is usually pretty cheap.
.
.
.
#30
12-04-2013, 05:17 PM
Well you are lucky that you have the early S Type because it's real easy to get to and change the filter dryer. It's inside a small Aluminum canister. They are cheap too.
The later 2003 and up S Types have a desiccant bag that is in a tube on the side of the condenser. I have never seen this before and changing it was a bit of a challenge!
Is the system sitting open to the atmosphere now? You should never leave it open. Install rubber plugs or at least stuff something in the open ports.
.
.
.
#31
12-05-2013, 10:48 AM
Member
Well you are lucky that you have the early S Type because it's real easy to get to and change the filter dryer. It's inside a small Aluminum canister. They are cheap too.
The later 2003 and up S Types have a desiccant bag that is in a tube on the side of the condenser. I have never seen this before and changing it was a bit of a challenge!
Is the system sitting open to the atmosphere now? You should never leave it open. Install rubber plugs or at least stuff something in the open ports.
.
.
.
The later 2003 and up S Types have a desiccant bag that is in a tube on the side of the condenser. I have never seen this before and changing it was a bit of a challenge!
Is the system sitting open to the atmosphere now? You should never leave it open. Install rubber plugs or at least stuff something in the open ports.
.
.
.
#32
05-13-2014, 05:50 PM
Veteran Member
#33
05-13-2014, 06:35 PM


The following users liked this post:
Don B (05-13-2014)
#34
05-13-2014, 09:45 PM


Join Date: Feb 2014
Location: Crossroads of America
Posts: 19,500
Received 12,942 Likes
on
6,466 Posts


#35
05-14-2014, 01:23 PM
There is a low side charging port and if you can't find it that is a very good reason to get and install the Jaguar shop manual which is the JTIS.
It's free on this site. Just look at the sticky threads at the top of the list and look for JTIS.
Try to leave the plastic caps on the ports too. Keeps dirt and crud out. This is a problem with the low side port since it's basically under the car!
.
.
.
It's free on this site. Just look at the sticky threads at the top of the list and look for JTIS.
Try to leave the plastic caps on the ports too. Keeps dirt and crud out. This is a problem with the low side port since it's basically under the car!
.
.
.
#36
04-25-2015, 08:47 PM
Veteran Member
If I may, please allow me to add some more information to this very useful thread. I had always been confused about the location of the low side port. Judging by many comments in other threads, I don't think I'm the only one. Without access to JTIS (no home PC anymore), I had to rely on the description here. When I read "behind the front left tire", I thought that meant "aft", as in under the splash shield at the rear edge of the wheel well.
Today I had to do a full evac and recharge on my '02 S-Type, so I thought rather than blindly yank panels searching for the mythical low side port, I'd start at the compressor and follow the lines aft. If anybody just heard a dull thudding sound just a few minutes ago, that was me slapping my forehead as I found the low side port and then realized what was meant. The low side port is directly on the compressor, which is at the bottom forward left corner of the engine. I was thinking "aft" of the tire, when perhaps "inboard" would have been a better description for a literal CDO type such as myself.
For anybody else searching for the low side port, it's actually easier to reach from the front of the car. Measure approximately 14" inboard of the inner edge of the front left tire, and approximately 3.5" forward of the front crossmember. Access is super easy once you realize where the port is located.
Also, if purchasing an AC manifold set, 36" hoses BARELY reach the high and low ports at the same time. I had to let the manifold hang from the high side hose, down in front of the bumper. 48" (or longer) hoses would have been better.
Hope this helps. Moderators, please feel free to incorporate as much (or as little) of this info as you deem best, and delete the rest.
The following users liked this post:
aprilneo (04-08-2019)
#37
04-25-2015, 09:15 PM


Join Date: Oct 2007
Location: PHX some of the time
Posts: 117,267
Received 6,307 Likes
on
5,495 Posts
The following users liked this post:
joycesjag (06-27-2021)
#38
04-28-2015, 01:03 PM
#39
07-30-2016, 04:13 PM
Veteran Member
I just noticed this post as I was looking for some help for a friend.
The S type 05 indicate 1 pound 11 ounces +/-2 -so a range of 25-29 ounces. At what point, if you know, does the pressure from being overfilled take over and initiate the high pressure switch and cuts off the compressor vs. just being overfilled and not efficiently cooling- since too much can be just as bad for effective cooling as too little freon.
Thanks
Tom in Plano/Dallas 05 S-type 3.0 92k
Last edited by jazzwineman; 07-30-2016 at 04:15 PM.
The following users liked this post:
solidaxel (02-06-2017)
#40
07-31-2016, 10:09 AM
Veteran Member
The proper procedure is to use a common a/c recharging machine as owned by people who deal with a/c all the time. They do a LOT for not much money. Remove gas, hold vacuum (removes moisture), weigh gas, refill properly, adding oil.
Only someone who really knows what they're doing would avoid what is a cheap and great way to check and recharge the system IMO.
Only someone who really knows what they're doing would avoid what is a cheap and great way to check and recharge the system IMO.