
Lock lever replacement on driver side FAQ
#1
 01-03-2010, 11:21 AM

Hi folks,
The silver coating on the lock lever on my interior driver side door is flaking off. I've been trying to find a source for a replacment door handle and lock lever but can't seem to find one anywhere - apart from Jaguar themselves.
Can someone point me in the right direction?
And is this something that I could switch out relatively easily or should I be taking it in to have professionally done?
Thanks in advance!
Rob
#2
01-09-2010, 12:26 PM
#3
01-09-2010, 10:21 PM
Veteran Member
#4
01-10-2010, 08:57 AM

Rob:
Congratulations on finding the piece!! I just cannot find any S Types in the junkyards. It looks like you are a DIY type. I really recommend getting the JTIS (Jaguar Technical Information Service) CD. They are all over EBay for under $10 including shipping. I would burn you a copy but it's simply quicker and cheaper to order it on-line.
One other comment. I have had the door panels off my 2005 S Type and you are likely to break one or more attaching pins. Order a couple ahead of time just in case. The Lincoln LS uses the identical part.
Ford # 2W4Z-54228A70-AA. About $6.50 each (Yes I know too expensive for a piece of plastic!!) One small difference-the Jaguar version has a foam washer on the head. This can be swapped over really easy because the foam is always intact even if the attaching pin breaks.
Second do not remove the door panels in cold weather!! Get the car inside and warm as possible. Be aware that removing the panels can create some squeaks/creaks so really inspect everything closely, I use clear silicone to fill or glue any movement of the panel. The panels are made from layers of different materials and have a number of surfaces that can generate noise.
Third get one or more tools to pry the panel off. The pins have a very tight grip and really "pop" when they come loose!! Try to use a plastic or Nylon tool or at least wrap the metal end with tape so you don't scratch the door all up. I use nylon wedges to hold the panel open until I can look up and see where the pins are to pry on. Not hard just take you time because anything you break WILL be expensive to replace! That's why you get the JTIS!
I have attached a diagram from the JTIS to show you where the attaching pins are located. Be aware there are some screws that must be removed first. They are in the door pull cup and under the small plastic cover. If anybody has an extra passenger side cover I have been looking for one!! It must be from 2004 or later S Type as Jaguar changed them over the years.
Report back and let the list know how it went?
.
.
.
The following users liked this post:
Joeaksa (09-01-2017)
#5
01-10-2010, 09:05 AM
Veteran Member
#6
01-10-2010, 10:44 AM
Tbird6 and joycesjag - Excellent, thanks for the upcoming help!
I'm just waiting for the new door handle to come in from the US as well as the CD you mentioned Tbird6. I ordered that right after I purchased the part.
I'm looking forward to tackling my first DIY project on the Jag, but I'm also a little trepidatious in that I'll screw something up in the process that will cost me more than having it done professionally in the first place. That being said, I'm looking forward to forging ahead .
I'll definitely take a lot of step by step photos that I can post on the forums that will hopefully help some other members in the future.
My first step is to find a heated garage I can work in.... it's dang cold up here in Canada right now!
Cheers!
Rob
#7
01-10-2010, 11:13 AM
Veteran Member
Trending Topics
#8
04-04-2010, 09:32 AM
Hello again everyone! Well we finally got some great weather and I tackled replacing my interior driver side door panel. Everything went nice and smooth and I took some photos to outline the process for those that may need to do the same.
Here we go!
1. The first step is to remove the handle trip piece. Take a small flat screw driver and pry the piece off. It pops off quite easily as it's held by three pins shown here :
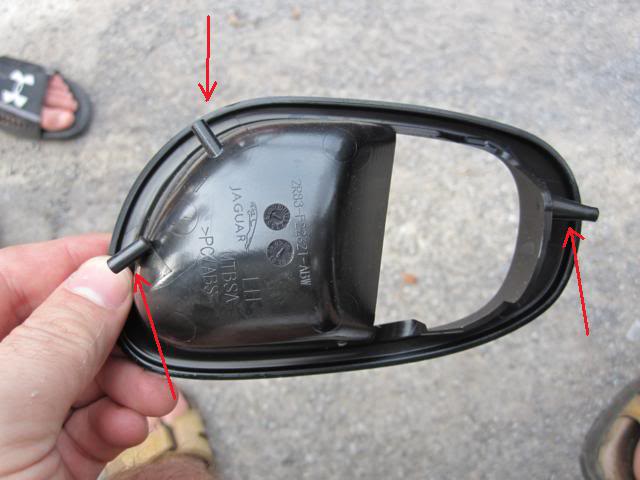
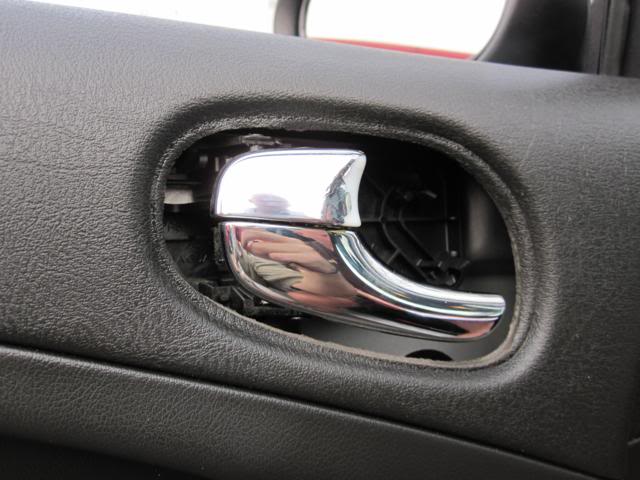
2. Here's the door with the trim piece removed :
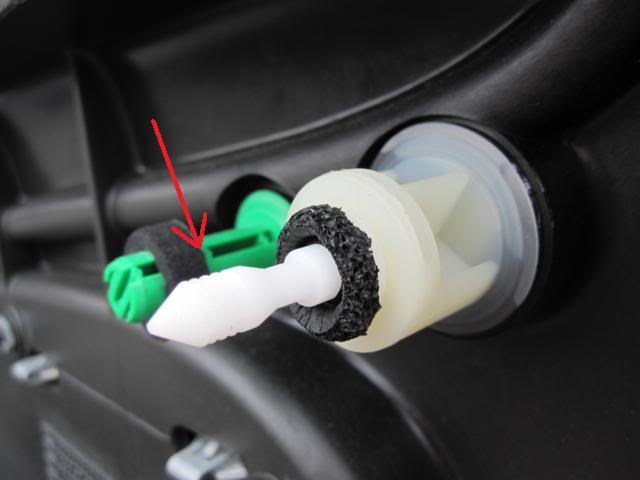
3. Next, reach into the door well you grab to close the door. There's a small rubber piece at the bottom - remove that piece. Underneath there are two screws - remove those.
4. Now you need to remove the door panel. The door panel is held on by 8 attachment pins. Buy a door pin removal tool for this step. It looks like a small pry bar. Here's what the pins look like. The pin shown by the arrow is replaceable. It slides out of the pin base that's attached permanently to the door panel. If you break a pin, make sure to keep the foam washer to use again.
5. Here's the door panel removed with the attachment pin locations circled in red.

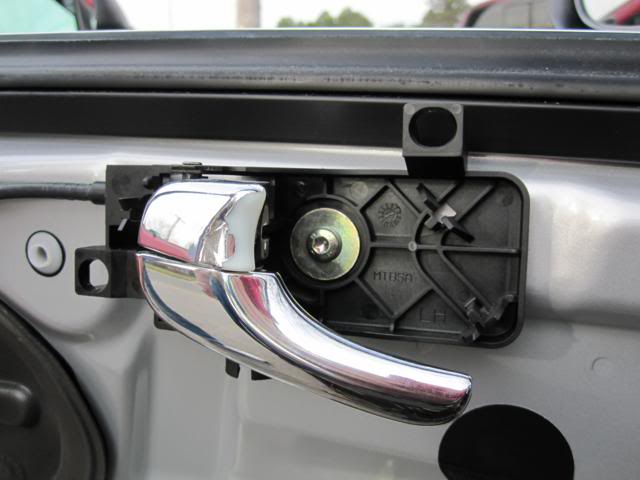
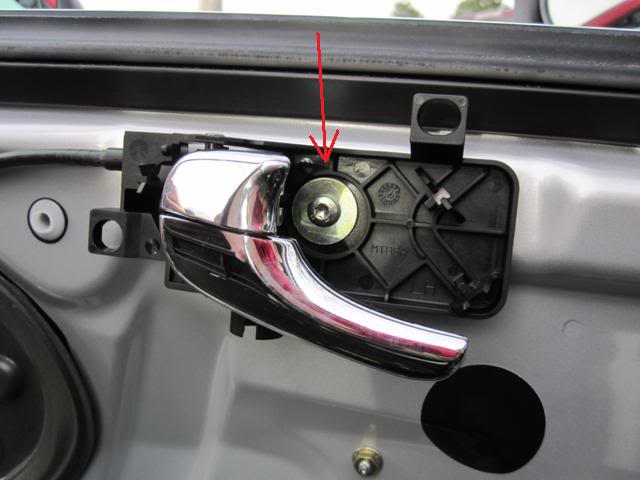
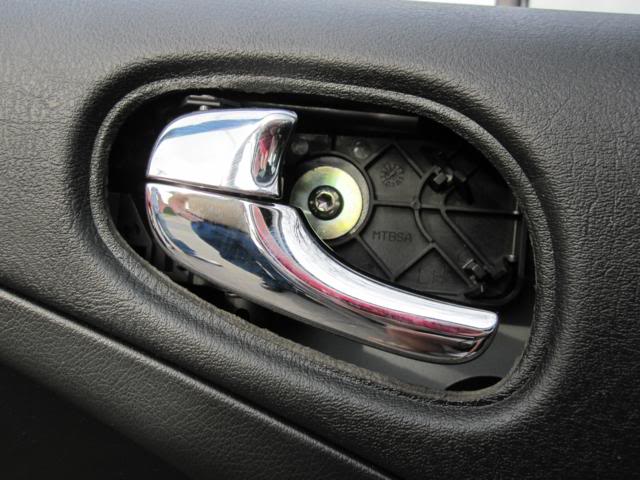
6. Here's my offending door handle. You can see the "chrome" flaking off the locking mechanism. To remove the assembly, simply remove the single screw in the center.
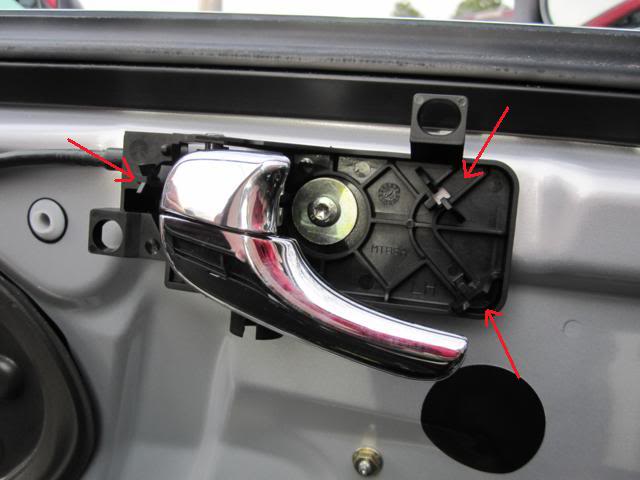
7. After removing the assembly, detach the single cable from the assembly. Here it is after removing the assembly :
8. You can now work in reverse! Attach the cable to the new handle assembly and screw the assembly back onto the door. Do NOT tighten the screw down at this stage - leave it somewhat loose. I'll explain in the following pictures...
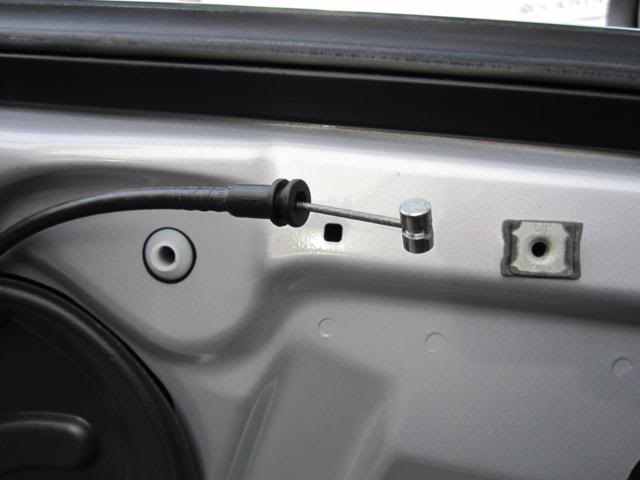
9. On the assembly, there are two alignment holes :
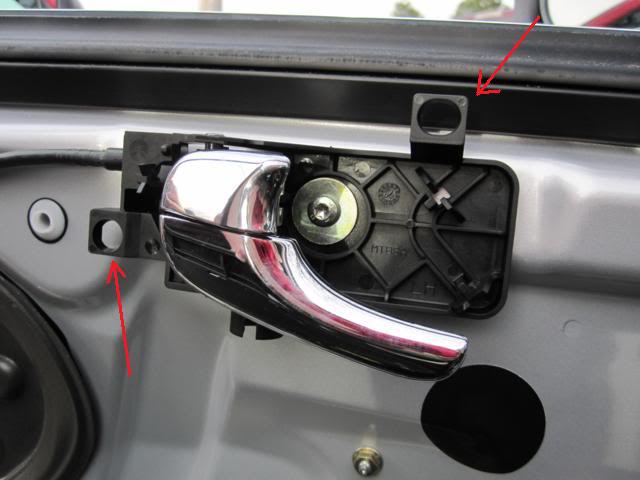
10. On the door panel, there are two alignment pins, circled in red :
11. When you re-attach the door panel, the alignment pins will move the handle assembly into the proper position. Tighten the handle assembly screw down once the door panel is back on. You can easily reach the screw as seen in this photo :
12. Pop the handle trim piece back into position over the door handle. Here's a shot of the three slots the handle trim tabs snap into (as shown in the first picture above) :
13 . Replace the 2 screws in the door well and replace the rubber cover over top. Voila! You're done!
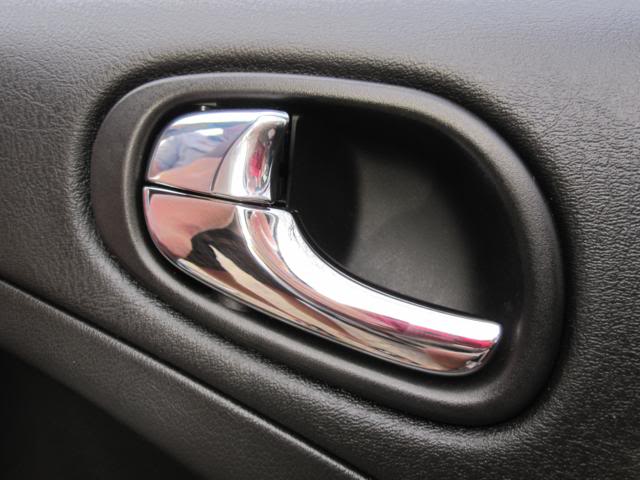
Here's a snap of the final product :
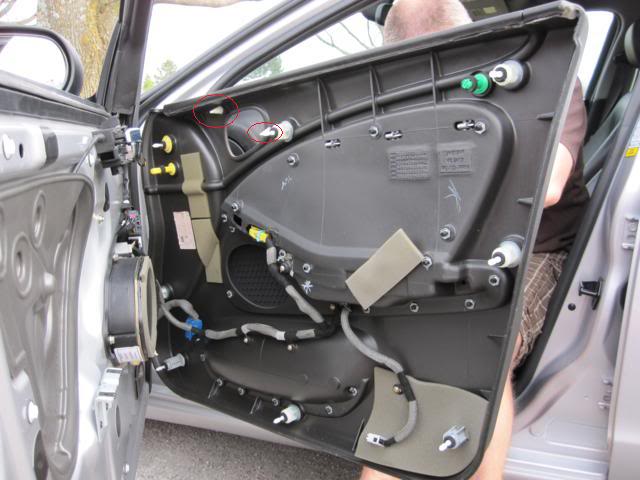
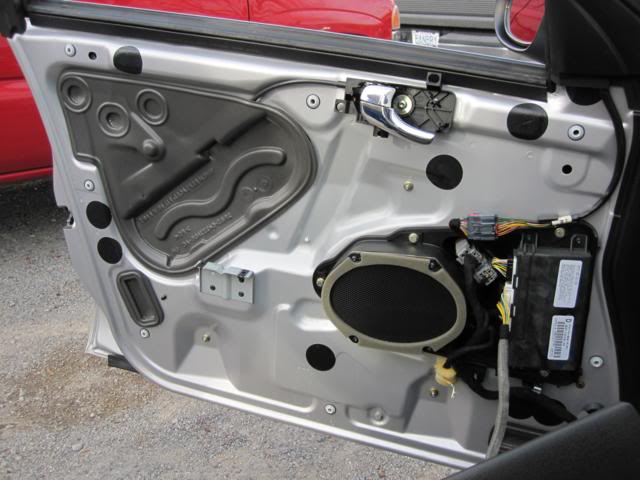
Here's a shot of the inside of an S-type door for those that are interested :
I had a lot of fun working on my Jag for the first time. This was a pretty easy project for those that need to remove their door panel or replace their interior door handles.
I hope this helps some fellow members in the future!
Cheers!
Rob
Here we go!
1. The first step is to remove the handle trip piece. Take a small flat screw driver and pry the piece off. It pops off quite easily as it's held by three pins shown here :
2. Here's the door with the trim piece removed :
3. Next, reach into the door well you grab to close the door. There's a small rubber piece at the bottom - remove that piece. Underneath there are two screws - remove those.
4. Now you need to remove the door panel. The door panel is held on by 8 attachment pins. Buy a door pin removal tool for this step. It looks like a small pry bar. Here's what the pins look like. The pin shown by the arrow is replaceable. It slides out of the pin base that's attached permanently to the door panel. If you break a pin, make sure to keep the foam washer to use again.
5. Here's the door panel removed with the attachment pin locations circled in red.
6. Here's my offending door handle. You can see the "chrome" flaking off the locking mechanism. To remove the assembly, simply remove the single screw in the center.
7. After removing the assembly, detach the single cable from the assembly. Here it is after removing the assembly :
8. You can now work in reverse! Attach the cable to the new handle assembly and screw the assembly back onto the door. Do NOT tighten the screw down at this stage - leave it somewhat loose. I'll explain in the following pictures...
9. On the assembly, there are two alignment holes :
10. On the door panel, there are two alignment pins, circled in red :
11. When you re-attach the door panel, the alignment pins will move the handle assembly into the proper position. Tighten the handle assembly screw down once the door panel is back on. You can easily reach the screw as seen in this photo :
12. Pop the handle trim piece back into position over the door handle. Here's a shot of the three slots the handle trim tabs snap into (as shown in the first picture above) :
13 . Replace the 2 screws in the door well and replace the rubber cover over top. Voila! You're done!
Here's a snap of the final product :
Here's a shot of the inside of an S-type door for those that are interested :
I had a lot of fun working on my Jag for the first time. This was a pretty easy project for those that need to remove their door panel or replace their interior door handles.
I hope this helps some fellow members in the future!
Cheers!
Rob
The following 5 users liked this post by Spitfire:
baldeagle15 (03-22-2015),
cinqueneuf (06-01-2014),
jaidank (08-11-2020),
joycesjag (05-28-2011),
malcolmt (01-14-2023)
#9
04-04-2010, 09:37 AM


Veteran Member
#10
04-04-2010, 09:52 AM
#11
04-04-2010, 10:39 AM

Veteran Member

#13
04-04-2010, 11:19 AM
Veteran Member

#14
04-04-2010, 11:08 PM
Veteran Member
#15
04-05-2010, 07:45 AM
Veteran Member
#16
04-05-2010, 01:49 PM

#17
05-27-2011, 10:38 PM

Junior Member
Join Date: May 2011
Location: Maryland
Posts: 7
Likes: 0
Received 0 Likes
on
0 Posts
#19
05-31-2011, 04:40 AM
That is pretty awesome, and great pictures too. I really want to say thanks because I have to take off the rear door panel once the weather clears up overheat because the lock doesn't engage properly. If you have any advise let me know. Thanks.
If you haven't removed your panel yet, you should definitely take some photos of the process like I did for the front panels.
Good luck and keep us posted on how you make out!
Rob
The following 2 users liked this post by Spitfire:
arty914 (10-02-2011),
cinqueneuf (06-01-2014)
