

Oil Pan Change SOS
#1
 08-06-2013, 10:58 AM


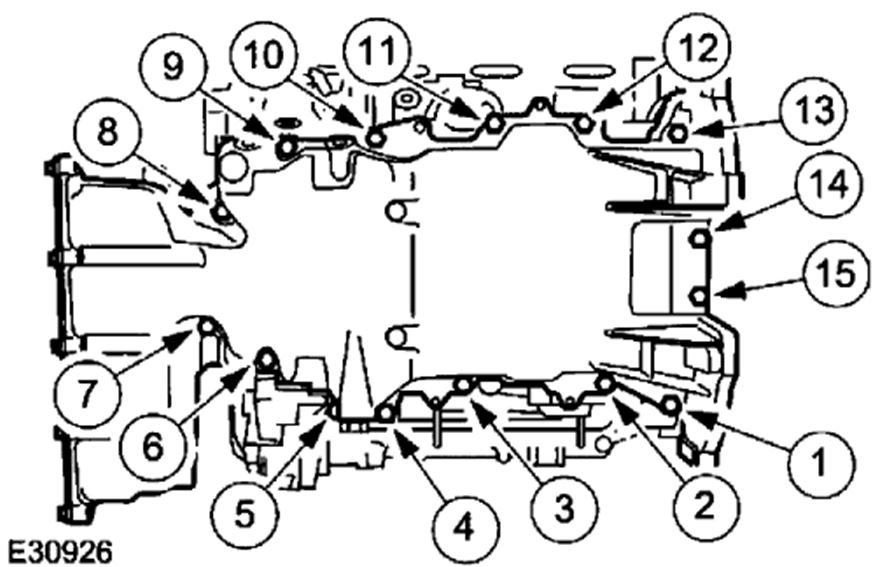
OK so I finally decided to tackle the oil pan change on my 05 stype. I have the Alldata procedure and bought an engine lift to get the pan out. When I completed the job I had a leak worse than when I started. I did it three more times and still every time it leaked from around bolt number 14. Bolt 14 is next to the transmission housing on the passenger side and on the corner. Each time I clean thoroughly and apply a spray on gasket sealant to the head and oil pan. I apply the appropriate 25nm of torque to each bolt and follow the tightening sequence. I believe two things maybe causing issues:
1. When removing the pan I had to wiggle it free and I think this caused a couple of scores in the right and left side of the pan (the side closest to the tranny housing). The one score is next to bolt 14 and goes right across the surface. The other is more of a scuff on the inside and before the gasket rubber.
2. The ALLDATA instructions say "Apply an 10 mm dot of silicone gasket and sealant meeting Jaguar specification to the engine block and front cover mating surface". I don't really know what this means so not sure if I am covering this point correctly or if it is significant to my problem.
So my questions are:
1. Would the score cause the leak and should I replace the pan or can I overcome this with sealant?
2. What does the ALLDATA sealant instructions mean and would this cause my leaking issue?
3. Am I missing the actual issue here and should try something else?
thanks,
Shawn

#3
08-06-2013, 12:29 PM
Veteran member
Yes you have to be careful when removing oil pans. They tend to stick and prying on them can leave score marks that will leak oil. The best thing I have found to use is a wood wedge so you won't hurt the pan.
I am sure someone else will chime in with what is Jag spec on the sealant, but usually some form of RTV sealant is used.
I am sure someone else will chime in with what is Jag spec on the sealant, but usually some form of RTV sealant is used.
#4
08-06-2013, 12:54 PM
#5
08-06-2013, 06:57 PM


#6
08-07-2013, 07:30 AM
Veteran Member
Shawn, sorry I am late to the party.
The 10mm dots of silicone go on the front top side of the new oil pan gasket. If you look at the bottom of the engine block towards the front, you will see where the front cover mates to the engine block. This is where the 10mm daps of silicone go. I have actual pictures of this but unfortunately I am unable to post at this time, sorry.
If you still have your old pan gasket you will see the factory daps of silicone on it.
For the leak near the #14 bolt, do as Abonano stated and use silicone to cover the score marks on the pan.
#7
08-07-2013, 09:42 PM


Veteran Member
Trending Topics
#8
08-07-2013, 09:44 PM
Veteran Member
#9
08-08-2013, 07:43 AM
Veteran Member
#11
08-08-2013, 05:28 PM
Veteran Member

#12
08-08-2013, 05:48 PM
Veteran Member
#13
08-27-2013, 02:20 PM
OK I finally have this problem fixed and wanted to post to close out this issue. Based on everyone's feedback I agreed that the pan was likely warped or damaged and used an RTV to seal the pan. This appeared to fix the seal around the pan however it then was seeping out of the pan. Not from the seal or bolts but just from a corner of the pan, the 90 degree bend next to the bolt holes. I contemplated trying to repair with epoxy but decided I'd spent to much time already and bought a new pan. The pan wasn't to bad @$300 and included a new seal and bolts. First attempt to put it on went perfectly and no longer have a leak.
Lesson learned, make sure the pan comes off nicely so I don't damage. The new pan came wrapped better than anything I have seen so obviously this can be an issue.
Lesson learned, make sure the pan comes off nicely so I don't damage. The new pan came wrapped better than anything I have seen so obviously this can be an issue.
The following users liked this post:
Norri (08-27-2013)

Thread
Thread Starter
Forum
Replies
Last Post
aholbro1
XJ XJ6 / XJR6 ( X300 )
17
08-05-2021 05:02 AM
Wes Steenrod
New Member Area - Intro a MUST
6
09-06-2015 06:52 PM
Currently Active Users Viewing This Thread: 1 (0 members and 1 guests)