
Project make my halogen a xenon projector!!!
#1
 08-24-2011, 02:42 AM

Ok, so some of you may know that I've been wanting the STR lights in my S-Type.
I took delivery of some used STR lights yesterday and one of them had broken. Basically the droop you guys talk of seemed to have occured.
On inspection, there are 2 points at the top of the reflector that move it up and down. both of these had snapped.
So I decided to take it apart!!
After about 15 mins with a hairdrier....... yes a hairdrier..... here are the results:

And then some further fiddling and 15mins more:

My hope is to transfer the reflector with projector into a donor halogen housing so I'll have all the right connections for my car.
I know, alot of work maybe and you're asking why am I staying with halogens?
Well, the plan is to convert the halogen to xenon using a kit anyway, but those kits are geared up for converting halogen units, so it makes sense (at least to me) to do it this way.
Besides, I don't have the cash right now to do the conversion, so it will stay as a halogen projector until I can afford to convert.
I do have a Xenon ballast if anyone wants to buy it though??? - it could help me fund my xenon aftermarket kit!! Lol
Otherwise I'll be listing that on eBay soon.
Cheers
Tris
I took delivery of some used STR lights yesterday and one of them had broken. Basically the droop you guys talk of seemed to have occured.
On inspection, there are 2 points at the top of the reflector that move it up and down. both of these had snapped.
So I decided to take it apart!!
After about 15 mins with a hairdrier....... yes a hairdrier..... here are the results:
And then some further fiddling and 15mins more:
My hope is to transfer the reflector with projector into a donor halogen housing so I'll have all the right connections for my car.
I know, alot of work maybe and you're asking why am I staying with halogens?
Well, the plan is to convert the halogen to xenon using a kit anyway, but those kits are geared up for converting halogen units, so it makes sense (at least to me) to do it this way.
Besides, I don't have the cash right now to do the conversion, so it will stay as a halogen projector until I can afford to convert.
I do have a Xenon ballast if anyone wants to buy it though??? - it could help me fund my xenon aftermarket kit!! Lol
Otherwise I'll be listing that on eBay soon.
Cheers
Tris
Last edited by TristanC; 09-02-2011 at 10:44 AM. Reason: Typos :)
The following 2 users liked this post by TristanC:
Bacardi 151 (08-24-2011),
Panthro (06-02-2012)
#2
08-24-2011, 05:27 AM
Veteran Member

The following users liked this post:
TristanC (08-24-2011)
#3
08-24-2011, 05:37 AM

#5
08-26-2011, 04:10 AM
I'm glad it's helped you out.
I've now also taken the second unit apart.
To make taking it apart easier, I put the light unit in the oven for a few minutes at 150c taking it out to check now an then!!
If you use an oven, make sure you don't leave it there too long or it could seriously muck up the lenses or housings or electrics!! - But it does make the job alot easier.
No more updates yet because I haven't got donor halogen housings just yet.
Tris
The following users liked this post:
Norri (08-26-2011)
#6
08-26-2011, 06:16 AM

Join Date: Oct 2007
Location: PHX some of the time
Posts: 117,430
Received 6,321 Likes
on
5,508 Posts
#7
08-26-2011, 07:38 AM
FAIL !! Lol
Tris
Trending Topics
#8
08-28-2011, 03:58 AM
Ok, so the merge of lights will commence next weekend.
I'm going to use my halogens as the donors as I've bought a xenon kit.
The company customised it for me to work with the H7 connector which goes to a D2S bulb in the projector housing.
I'll be transplanting the wiring from the halogen unit to the xenon one.
Hopefully the plastic adjuster in my unit hasn't disentergrated yet!
I will update once done
Tris


#11
08-31-2011, 05:25 AM

#12
08-31-2011, 05:36 AM
Veteran Member
#13
08-31-2011, 05:43 AM
Not at all, it cost �74.99 GBP and the chap at MidnightStyling UK (Adam) made this kit up for me to my specs and has been in constant contact over email to answer my questions.
The kit is custom because I'm using a halogen H7 connector wiring, but that needs to power the D2S xenon bulbs. And I need to use D2S Xenon bulbs because that's what fits in the projector lens. Lol
And for info I'm using 5000k bulbs, which are an ice white. So I shouldn't get any hassle for blue tinges in my lights either
The benefit of building my own headlight unit means that I can route all the aftermarket wires neatly and make use of the OEM ballast mount. I mounted all the xenon electrics last night to the housing. So I'll post pics of that when I get a min.
I love doing this!!! :-D
Tris
#14
08-31-2011, 07:26 PM
Ok, just a quick update because it's 1:30am here and I've just finished the conversion!!!
I couldn't stand seeing all the parts there begging me to install them, so I buckled, seeing as I'm not working tomorrow.
Will post pics and a final write up tomorrow.
Here's a pic as I'm assembling one of the lamps.
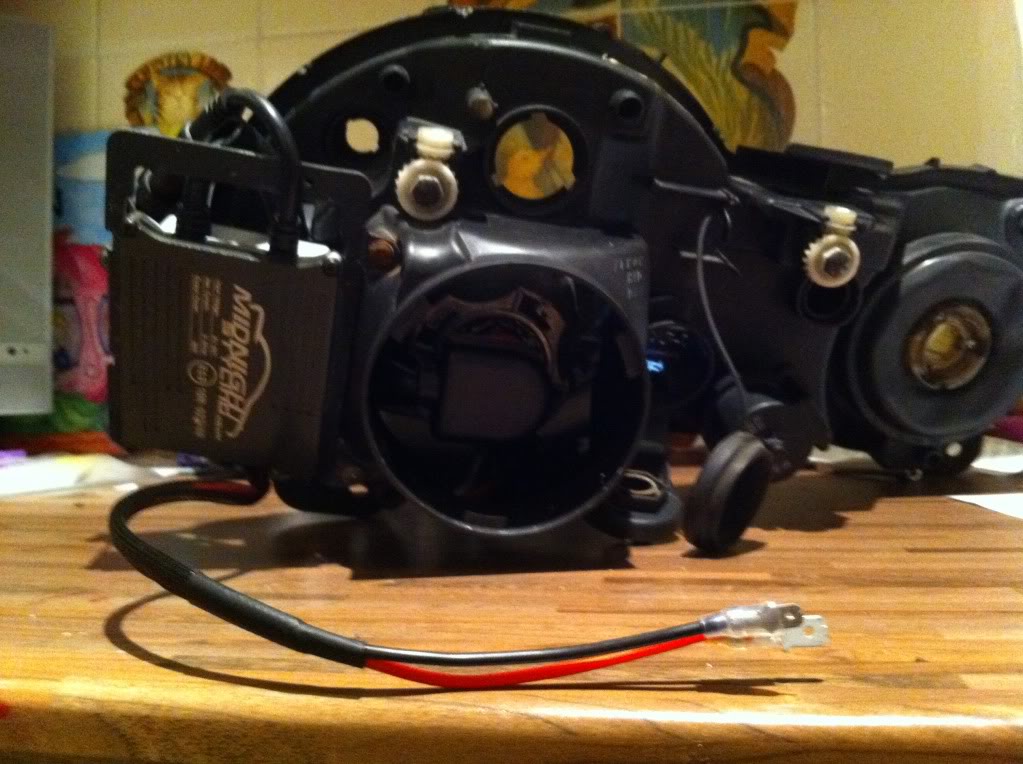
You can see where I used the oem ballast bracket to mount my ballasts.
There a quite a few differences between the xenon and halogen housings, which will detail tomorrow.
For now, night night. Zzzzzzzzzzzzz
Tris.
I couldn't stand seeing all the parts there begging me to install them, so I buckled, seeing as I'm not working tomorrow.
Will post pics and a final write up tomorrow.
Here's a pic as I'm assembling one of the lamps.
You can see where I used the oem ballast bracket to mount my ballasts.
There a quite a few differences between the xenon and halogen housings, which will detail tomorrow.
For now, night night. Zzzzzzzzzzzzz
Tris.
#15
09-01-2011, 03:10 PM
Well, I have to say it was an enjoyable experience doing this project.
In summary, here's what I did:
1. Obtain a set of STR xenon housings
2. Took them apart as per pic in first post and cleaned up and assessed any internal damage.
3. Removed the xenon wiring harness from the housings.
4. I had to repair one of the adjusters because the cog on the outside was turning on the metal screw. An easy fix with 2 part steel epoxy weld.
I dabbed some of this on the other 3 cogs for good measure.
5. Ordered a custom HID conversion kit that had a D2S bulb for the xenon projector, but with H7 compatible power connections for the halogen wiring harness.
6. Fitted the HID kit to the housings using the oem xenon ballast brackets.
7. Reassembled both housings using only the wiring from the ballasts at this point.
8. Remove bumper from car
9. Remove headlights, BUT, there is no need to detatch the harness from the car for the halogen lights. Just remove all the bulbs and the one connector that holds the harness to the housing.
10. Plug all the bulbs into the new xenon housing (the D2S xenon bulb will already be installed into the projector)
11. Be creative with connecting the red and black wires from the new ballast to the snap connector from the halogen wiring harness. I made up a makeshift harness between the two using the wires from the xenon wiring harness I removed earlier.
12. Test the new setup and align bulbs the best you can.
The way I did this was to mark the beam pattern of my properly adjusted halogens on my garage door before removing them and line up the xenons using these marks.
When doing this, make sure you mark the position of the car from the garage door if you intend to move it in-between.
That's it!
Now for the differences between the halogen and xenon housings.
1. The black plastic housing is very different . The xenon has an opening to allow the switching of the beam pattern to flatten it for continental driving.
The adjusters are in different places. Both have a middle adjustor, but the halogen has an adjustor on the inner lamp and the xenon has one on the outer lamp.
2. The wiring. Obvious I know, but the xenon wiring is routed inside the housing, while the halogen wiring is all outside and can be removed from the light by unclipping it near where the H7 bulb is held.
3. The levelling motors. Totally different and are not interchangeable. I tried using my halogen motor in the xenon housing, and whilst it did fit, the arm wasn't long enough and made the light point too far down with no room for adjustment. So you need to forfeit the leveller and leave the xenon motor in and adjust the level from the two adjusters. This worked perfectly for me.
The only things that are identical are the actual lenses (which are marked for use with H7 and D2S bulbs) and the indicator, high beam and sidelights connectors.
That's enough waffle. Here are a couple before and after shots

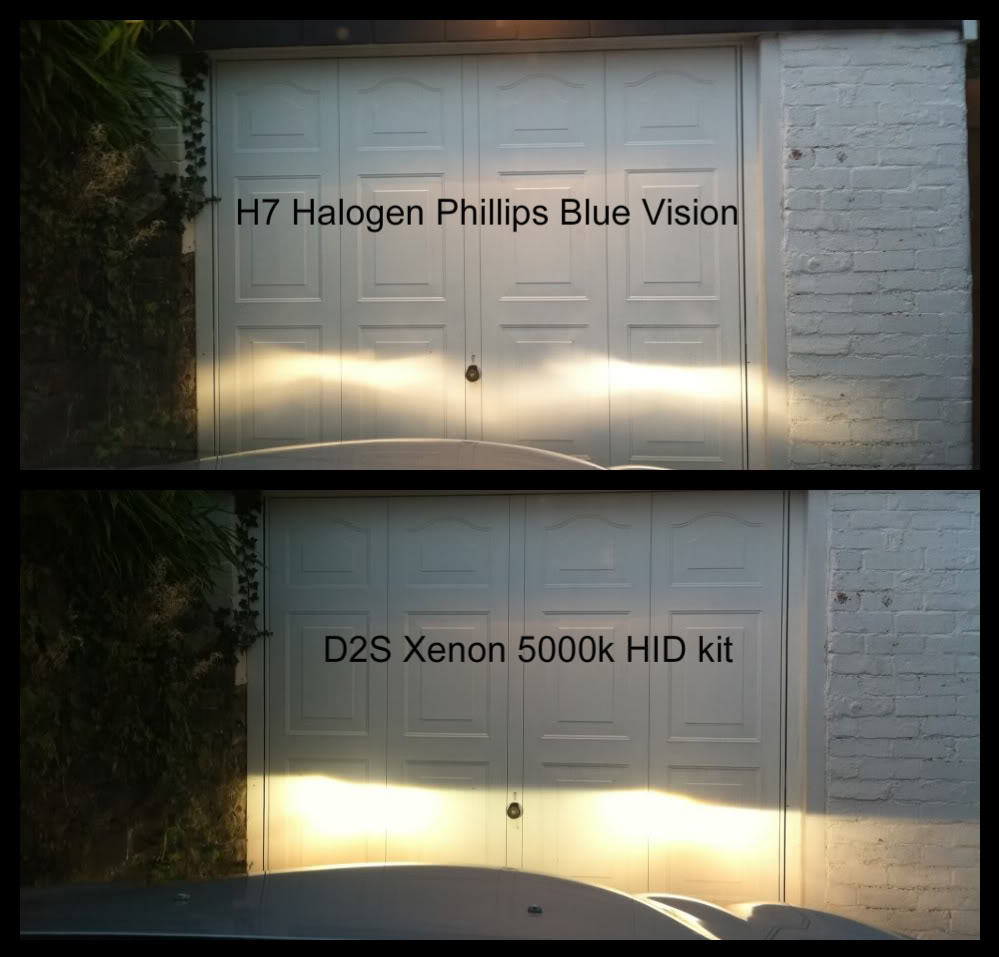

The lights look yellow in these shots, but they are actually a pure ice white.
I'm really really pleased with the outcome. Next on the list is a set of 19inch Barcelona's
Tris
In summary, here's what I did:
1. Obtain a set of STR xenon housings
2. Took them apart as per pic in first post and cleaned up and assessed any internal damage.
3. Removed the xenon wiring harness from the housings.
4. I had to repair one of the adjusters because the cog on the outside was turning on the metal screw. An easy fix with 2 part steel epoxy weld.
I dabbed some of this on the other 3 cogs for good measure.
5. Ordered a custom HID conversion kit that had a D2S bulb for the xenon projector, but with H7 compatible power connections for the halogen wiring harness.
6. Fitted the HID kit to the housings using the oem xenon ballast brackets.
7. Reassembled both housings using only the wiring from the ballasts at this point.
8. Remove bumper from car
9. Remove headlights, BUT, there is no need to detatch the harness from the car for the halogen lights. Just remove all the bulbs and the one connector that holds the harness to the housing.
10. Plug all the bulbs into the new xenon housing (the D2S xenon bulb will already be installed into the projector)
11. Be creative with connecting the red and black wires from the new ballast to the snap connector from the halogen wiring harness. I made up a makeshift harness between the two using the wires from the xenon wiring harness I removed earlier.
12. Test the new setup and align bulbs the best you can.
The way I did this was to mark the beam pattern of my properly adjusted halogens on my garage door before removing them and line up the xenons using these marks.
When doing this, make sure you mark the position of the car from the garage door if you intend to move it in-between.
That's it!
Now for the differences between the halogen and xenon housings.
1. The black plastic housing is very different . The xenon has an opening to allow the switching of the beam pattern to flatten it for continental driving.
The adjusters are in different places. Both have a middle adjustor, but the halogen has an adjustor on the inner lamp and the xenon has one on the outer lamp.
2. The wiring. Obvious I know, but the xenon wiring is routed inside the housing, while the halogen wiring is all outside and can be removed from the light by unclipping it near where the H7 bulb is held.
3. The levelling motors. Totally different and are not interchangeable. I tried using my halogen motor in the xenon housing, and whilst it did fit, the arm wasn't long enough and made the light point too far down with no room for adjustment. So you need to forfeit the leveller and leave the xenon motor in and adjust the level from the two adjusters. This worked perfectly for me.
The only things that are identical are the actual lenses (which are marked for use with H7 and D2S bulbs) and the indicator, high beam and sidelights connectors.
That's enough waffle. Here are a couple before and after shots
The lights look yellow in these shots, but they are actually a pure ice white.
I'm really really pleased with the outcome. Next on the list is a set of 19inch Barcelona's
Tris
Last edited by TristanC; 09-05-2011 at 02:57 AM. Reason: Updated photos
The following 3 users liked this post by TristanC:
#16
09-01-2011, 03:20 PM
Veteran Member
#17
09-01-2011, 04:05 PM
Join Date: Oct 2007
Location: PHX some of the time
Posts: 117,430
Received 6,321 Likes
on
5,508 Posts

#20
06-02-2012, 03:45 AM

Hi TristanC!
Fantastic write up by the way, it's great to posts like these on the forum, helps no end!
But I do have a quick question. The front lens has just been damaged on my my STR, and I was wondering, if I can just follow your route for removing the clear plastic from the rest of the light unit and fit another on another lens from a any other S Type headlight assembly; whole STR head light units are too difficult to find!!
I've done the whole "headlamp-in-oven" thing before about 10 years ago(!), so I'm not worried about doing that all again!
Thanks in advance!!
Liam