
Rear Video System Install
#1
 10-22-2010, 10:00 AM

OK, so off work today and decided to install the new rear video system I just got from Nalley....
They have them listed in the vendor classified section of this forum (not in the S Type section since they have systems for the S and the X).. Price, 127.50 for the complete system. Again, Dan from Nalley was great and I had my new system in only a few days.
I actually ordered two...One for the S and one for the X... I am in the process of cutting up the X type system in order to retrofit it into our Caravan... (He He He...The Mommy mobile is going to have monitors with Jaguar logo's on them!!!)
Anyway, I will be posting up any snags and hints.. You can download the instructions from the owner information site. A set of manuals and instructions is included with the system. It is typical Jaguar...step by step pictures with little text.
So.......Let the fun begin...
#2
10-22-2010, 10:12 AM
OK... Snag number one.. Oh, BTW, the system for sale is listed as fitting the 07 and 08 S Type only.. The headrest posts are a bit different...
So here is the first snag / hint....
The 05 base car that I have does not have power headrests, so unlike the instructions state, you cannot easily remove the back section of the seat.
I felt around real good and cannot find anyway the the back section can be separated.
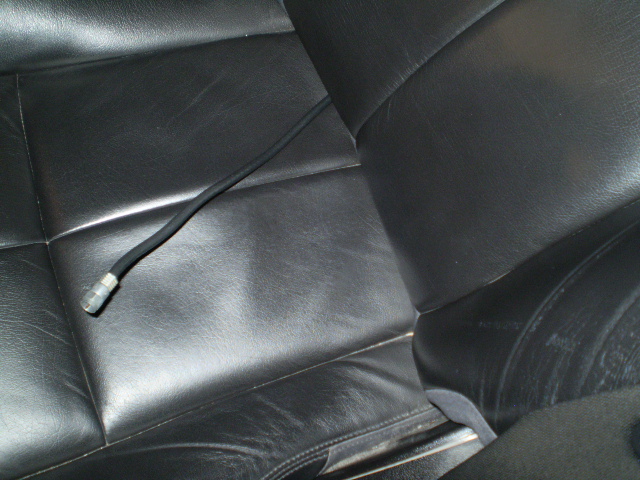
So, I took a section of coax cable..Like you use for cable TV and fed it down the corresponding headrest socket until it came out the bottom of the seat. You will need to reach in from the front to grab the cable. I then taped the monitor wire to the cable and fed it through the seat as I set the monitor headrest into the socket..
I used coax since it is a flexible yet semi-rigid pulling medium that would not damage anything in the seat if it hit it... Do not use a rigid wire or you risk it turning and poking a hole in a very expensive seat! And don't plan on fishing something up...plan on it passing through. (you will see a coax connector in the pictures..I left one connector on there so if I needed to reach up to get it I had something metal to grab. It ended up being unnecessary)

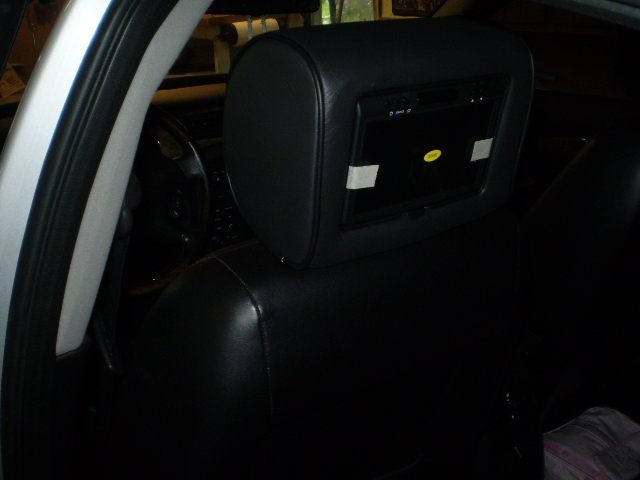
They fit perfectly and look awsome...
So here is the first snag / hint....
The 05 base car that I have does not have power headrests, so unlike the instructions state, you cannot easily remove the back section of the seat.
I felt around real good and cannot find anyway the the back section can be separated.
So, I took a section of coax cable..Like you use for cable TV and fed it down the corresponding headrest socket until it came out the bottom of the seat. You will need to reach in from the front to grab the cable. I then taped the monitor wire to the cable and fed it through the seat as I set the monitor headrest into the socket..
I used coax since it is a flexible yet semi-rigid pulling medium that would not damage anything in the seat if it hit it... Do not use a rigid wire or you risk it turning and poking a hole in a very expensive seat! And don't plan on fishing something up...plan on it passing through. (you will see a coax connector in the pictures..I left one connector on there so if I needed to reach up to get it I had something metal to grab. It ended up being unnecessary)
They fit perfectly and look awsome...
Last edited by JOsworth; 10-23-2010 at 06:23 AM. Reason: Added Pictures
#3
10-22-2010, 10:45 AM

Veteran Member
OK... Snag number one.. Oh, BTW, the system for sale is listed as fitting the 07 and 08 S Type only.. The headrest posts are a bit different...
So here is the first snag / hint....
The 05 base car that I have does not have power headrests, so unlike the instructions state, you cannot easily remove the back section of the seat.
I felt around real good and cannot find anyway the the back section can be separated.
So, I took a section of coax cable..Like you use for cable TV and fed it down the corresponding headrest socket until it came out the bottom of the seat. You will need to reach in from the front to grab the cable. I then taped the monitor wire to the cable and fed it through the seat as I set the monitor headrest into the socket..
I used coax since it is a flexible yet semi-rigid pulling medium that would not damage anything in the seat if it hit it... Do not use a rigid wire or you risk it turning and poking a hole in a very expensive seat! And don't plan on fishing something up...plan on it passing through. (you will see a coax connector in the pictures..I left one connector on there so if I needed to reach up to get it I had something metal to grab. It ended up being unnecessary)
They fit perfectly and look awsome... (pictures to follow)...
Update: Placed my order on this! I just called Dan at Nalley's what a nice guy! He told me that I shouldn't have any problems with the TV headrests fitting an O3' STR or S. He said the center console might need a little cutting to make it fit properly and look nice, but other than that it should be a piece of cake. I wish it had a USB port though, that would have been even better, but atleast it has a memory card slot. For $127 free shipping, you cant beat that price anywhere, its an OEM JAG part ontop of that!
***Jeff by the way great find, and thanks for sharing the install, my only question to you is, how did the center console install fit? I wonder how much of a difference there is from a 03' to a 07' on the back center console of the S? I might run into a problem there, also tell us how the resolution is on the screen too bad its not HD,lolz...
Last edited by jag79; 10-22-2010 at 11:22 AM.
#4
10-22-2010, 12:32 PM
Veteran Member
I beg to differ, I see jpam as the first thread in the sticky...
Awaiting pictures Jeff, oh nice to blow off work to install some new dodads.

#5
10-22-2010, 01:07 PM
#6
10-22-2010, 01:16 PM
..will this fit onto a 03' STR?
He said the center console might need a little cutting to make it fit properly and look nice, but other than that it should be a piece of cake.
my only question to you is, how did the center console install fit? I wonder how much of a difference there is from a 03' to a 07' on the back center console of the S? I might run into a problem there, also tell us how the resolution is on the screen too bad its not HD,lolz...
Getting it back together is just as hard..
The control panel snaps into a trim ring that goes in place of the little storage pocket on the back of the console..It is REAL tight and takes some force to get in there...
#7
10-22-2010, 03:02 PM
Veteran Member
OH, I assumed that you meant this https://www.jaguarforums.com/forum/s...ad.php?t=43579
I should have known better than to question you

BTW put down the remote and the and get the pics posted!
I should have known better than to question you
BTW put down the remote and the
Trending Topics
#8
10-22-2010, 03:13 PM
Veteran Member
The control module fits just fine... Just be very very careful when taking off the rear panel... The duct work elbow DOES NOT want to just slide out like the illustration says. I don't have pictures of that to show..Really no secret to do it, just keep gently prying it out and up at the same time..
Getting it back together is just as hard..
The control panel snaps into a trim ring that goes in place of the little storage pocket on the back of the console..It is REAL tight and takes some force to get in there...
Getting it back together is just as hard..
The control panel snaps into a trim ring that goes in place of the little storage pocket on the back of the console..It is REAL tight and takes some force to get in there...
***Someone needs to make a YOUTUBE video on how to install this(ahem..Jeff
Last edited by jag79; 10-22-2010 at 03:31 PM.
#9
10-22-2010, 04:07 PM

Senior Member
***Someone needs to make a YOUTUBE video on how to install this(ahem..Jeff ), I just took a look at the manual and its all pictures without telling you in words what to do, you gotta figure it out by following the diagrams here's the pdf for the installation process if anyones interested.
.Thanks for the great find and sharing. Will be ordering after making sure I or some right person can do it
.A Video will be Highly Appreciated!!!
Thanks,
Rizwan
#10
10-22-2010, 05:42 PM
Veteran Member
OK... Snag number one.. Oh, BTW, the system for sale is listed as fitting the 07 and 08 S Type only.. The headrest posts are a bit different...
So here is the first snag / hint....
The 05 base car that I have does not have power headrests, so unlike the instructions state, you cannot easily remove the back section of the seat.
I felt around real good and cannot find anyway the the back section can be separated.
So, I took a section of coax cable..Like you use for cable TV and fed it down the corresponding headrest socket until it came out the bottom of the seat. You will need to reach in from the front to grab the cable. I then taped the monitor wire to the cable and fed it through the seat as I set the monitor headrest into the socket..
I used coax since it is a flexible yet semi-rigid pulling medium that would not damage anything in the seat if it hit it... Do not use a rigid wire or you risk it turning and poking a hole in a very expensive seat! And don't plan on fishing something up...plan on it passing through. (you will see a coax connector in the pictures..I left one connector on there so if I needed to reach up to get it I had something metal to grab. It ended up being unnecessary)
They fit perfectly and look awsome... (pictures to follow)...
So here is the first snag / hint....
The 05 base car that I have does not have power headrests, so unlike the instructions state, you cannot easily remove the back section of the seat.
I felt around real good and cannot find anyway the the back section can be separated.
So, I took a section of coax cable..Like you use for cable TV and fed it down the corresponding headrest socket until it came out the bottom of the seat. You will need to reach in from the front to grab the cable. I then taped the monitor wire to the cable and fed it through the seat as I set the monitor headrest into the socket..
I used coax since it is a flexible yet semi-rigid pulling medium that would not damage anything in the seat if it hit it... Do not use a rigid wire or you risk it turning and poking a hole in a very expensive seat! And don't plan on fishing something up...plan on it passing through. (you will see a coax connector in the pictures..I left one connector on there so if I needed to reach up to get it I had something metal to grab. It ended up being unnecessary)
They fit perfectly and look awsome... (pictures to follow)...
Did you figure out anything as far as the "notches" for the manual headrests not being present? I don't suppose that side is interchangeable is it?
Did you have to actually unbolt the seats at all to get things to where they needed to be?
Once again... PICS. (Says the guy who got it first and it's still sitting in the box sealed!)

#11
10-22-2010, 09:16 PM
Senior Member
#12
10-23-2010, 02:06 AM

Veteran Member
#13
10-23-2010, 05:53 AM
Jeff... Thanks for that heads up! where did the cables come out of the bottom of the seat?
Did you figure out anything as far as the "notches" for the manual headrests not being present? I don't suppose that side is interchangeable is it?
Did you have to actually unbolt the seats at all to get things to where they needed to be?
Once again... PICS. (Says the guy who got it first and it's still sitting in the box sealed!)
2) This may put some people off. The head rests just slide freely in the socket and don't lock in any of the upright spots. Then again, these headrests are larger than the stock ones so they really don't need to go up and there is no way to pull them out without reclining the seat waaay back. I expected that going in.
3) Nope I didn't unbolt the seats, nor did I remove the entire console. I will write up what steps I used from the instructions, and how I "cheated".
#14
10-23-2010, 05:56 AM
Yup, I get where you're going.. Unfortunately, this is a self contained system. It only draws switched power from the car. Other than that, the rear control module accepts inputs and sends the signal the the monitors. The audio only plays through the included headphones.
#15
10-23-2010, 06:32 AM
..Jeff I really wish you had pics to show that part of the installation, that would help me and fellow S type owners trying to put this together, nevertheless I'm really excited to see your pics 
***Someone needs to make a YOUTUBE video on how to install this(ahem..Jeff), I just took a look at the manual and its all pictures without telling you in words what to do, you gotta figure it out by following the diagrams here's the pdf for the installation process if anyones interested.
***Someone needs to make a YOUTUBE video on how to install this(ahem..Jeff
The instructions you posted are a little different than the ones that come with the kit. They do show how the early seat does come apart and the rear console pocket is a little different. So, having both may help more people that get the set but have a pre 2005 car.
#16
10-23-2010, 06:32 AM
Veteran Member
#17
10-23-2010, 10:31 AM
Veteran Member
1) The cables came out between the seat back and cusion. I then fed them behind the cusion and out the bottom.
2) This may put some people off. The head rests just slide freely in the socket and don't lock in any of the upright spots. Then again, these headrests are larger than the stock ones so they really don't need to go up and there is no way to pull them out without reclining the seat waaay back. I expected that going in.
3) Nope I didn't unbolt the seats, nor did I remove the entire console. I will write up what steps I used from the instructions, and how I "cheated".
#18
10-23-2010, 12:28 PM

Former Sponsor
#19
10-23-2010, 01:19 PM
Veteran Member
To remove the seatback on the base cars, stick ur fingers under the edges, and push the top of the seatback to the left about 1/2 inch and pull toward you. There are two clips at the top of the seatback the male is in the seat, the female is on the back, it looks like a raised area with a "pac man" shape on it, one you move it to the side, the clip slides out of the groove and the top of the back will release. You will notice that the elastic for the seat pocket is threaded through the seat leather, but this will let the top half of the back hang about 6" from the seat, giving you more than enough room to get in there.
To put it back press the seat up against the back, with it off to the side, then while maintaining pressure on it slide it to the right to engage the clips.
I'll take pics when I get a chance...
Oh and Dan, I emailed you the other day about a bolt... No big deal just wondering if you got it.
George
#20
10-23-2010, 01:25 PM
Veteran Member
The way the system is designed is as follows.
Draws switched power from the car as Jeff said.
The audio and video connections are handled through the control panel.
The system comes with two sets of wireless headphones which receive the audio and play it back for the rear passengers.
You could theoretically connect things a bit differently if you had the ACM, but if you wanted to play the sound from say a dvd player through the cars audio system you would need the ACM as well. Wire the video signal to the control panel of the Rear Screen system, and the audio to the RCA jacks on the ACM. You could also split the audio output of the DVD player and wire to both, giving you a choice of having the audio on the wireless headphones or the cars audio system (or both if you really wanted).
George
The following users liked this post:
Sponge (03-31-2011)