When you click on links to various merchants on this site and make a purchase, this can result in this site earning a commission. Affiliate programs and affiliations include, but are not limited to, the eBay Partner Network.
What is your situation as far as access to the car? Are you still under a severe time shortage and the car is about to go to the wrecker at any moment? Or has the owner finally relented and agreed to let you spend a bit more time?
The reason I ask is the sense of urgency is not helping you at all. If anything, it's encouraging you to divert your energy to try anything and everything in hopes of a fix. Such a Hail Mary approach can be a VERY expensive proposition, with little hope of success. At this point, we still don't know if you even have spark or the injectors operating. All we can be sure of is that there was no fuel pressure. For all we know, the original pump may have been just fine but didn't receive the command to run, for reasons still unknown. This same fault may have also stopped the ignition and injector operation, but we are strictly guessing.
If you have a little more time now, I'd really like to encourage you to troubleshoot systematically, versus lobbing parts in hope of a fix. We can walk you through that, with simple steps such as checking for voltage at certain points, feeling if a relay clicks, etc.
That main computer? I highly doubt it is at fault. I guess you could clean and reseat the connector if desired, but I wouldn't go any deeper there for now.
The crankshaft position sensor? Possibly, but I'm not sure exactly what happens when one fails. On other cars of this vintage, I've seen one cause a no-start with no fault codes, but who knows with this car?
Please let us know the present situation for being able to work on the car. I highly, highly doubt the root cause is anything major, but the trick is figuring out without wasting a lot of time or money.
As soon as you turn the ignition on, the fuel pump is supposed to prime the fuel lines, as in the pump will run momentarily every time you turn the key on/off.
As the fuel pump is controlled via the Rear Electronic Module, this is where you should start looking.
As soon as you turn the ignition on, the fuel pump is supposed to prime the fuel lines, as in the pump will run momentarily every time you turn the key on/off.
As the fuel pump is controlled via the Rear Electronic Module, this is where you should start looking.
Exactly....those modules either work or they don't.... hopefully your time constraints will allow for some pinpoint troubleshooting.....
What is your situation as far as access to the car ? ---> I live about 15 minutes of the place where the car is parked, I can't put the car in the air to look at it from below.
Are you still under a severe time shortage and the car is about to go to the wrecker at any moment? Or has the owner finally relented and agreed to let you spend a bit more time? ----> It needs to be fixed before the end of the week (Bonus time), then it might go to a wrecker... I can try again to get more time but I think it's going to be hard.
At the moment there's no spark and no fuel pressure in the injectors rail... This fault seems have also stopped the ignition and injector operation, but we are strictly guessing. Yes you are right !! It seems that everything is linked !!
Right, At the moment I forget the crankshaft position sensor and the ECU, I found this on internet to know where is the Rear Electronic Module :
It is on the right side of the trunk behind the emergency gas door release. You'll need to remove the cover over the spare tire and then remove the plastic trim panel that surrounds the trunk latch. Then it is just unscrewing the plastic retainers that hold the right side trunk panel in. You'll then roll it towards the front of the car. The unit is mounted behind a brace towards the right side taillamp.
Last edited by Geoffrey_ml; 06-14-2019 at 01:45 AM.
As soon as you turn the ignition on, the fuel pump is supposed to prime the fuel lines, as in the pump will run momentarily every time you turn the key on/off.
+1 on that. I think I got a little sidetracked myself, thinking of other possibilities (such as no ignition or injector operation) to explain why the engine didn't start when you hot-wired the fuel pump. For all we know, that may have been caused by air in the lines or low fuel pressure, and not necessarily be a true fault. Let's stick to troubleshooting the one hard fault staring us in the eye: the inoperative fuel pump.
I pulled up the 2002 wiring diagrams and notice it was different than the excerpt Cambo had posted. It appears he was looking at the 2002.5 wiring diagrams. I'm a bit fuzzy on the details, but somewhere in the later half of 2002, big changes were made for the upcoming model year. However, some of those cars were sold as 2002 models, even though they had all the later features of 2003 cars. Before we proceed, we should clarify exactly which diagram is correct for your car.
There are two easy methods to determine early or late models.
1) For cars with an automatic transmission, look at the bezel at the base of the shift lever. Early models have a 5-speed transmission, and D=5. To the left, you will see 2, 3, 4. Late models have a 6-speed. D=6, with 2, 3, 4, 5 to the left.
2) Look at the shape of the rear power distribution box in the trunk.
The early models have a rectangular box set at an angle:
Later models have a curved box, kind of like a banana or half of a boomerang:
Please let us know which features match your car so we can use the correct wiring diagrams.
Sorry this process is going so slow. That's a drawback of online troubleshooting, but at least the price is right.
Okay, making some progress. The link in a previous message was for the earlier wiring diagram, and should not be used. I'm glad Cambo caught that, and the 2002.5 wiring diagrams are here:
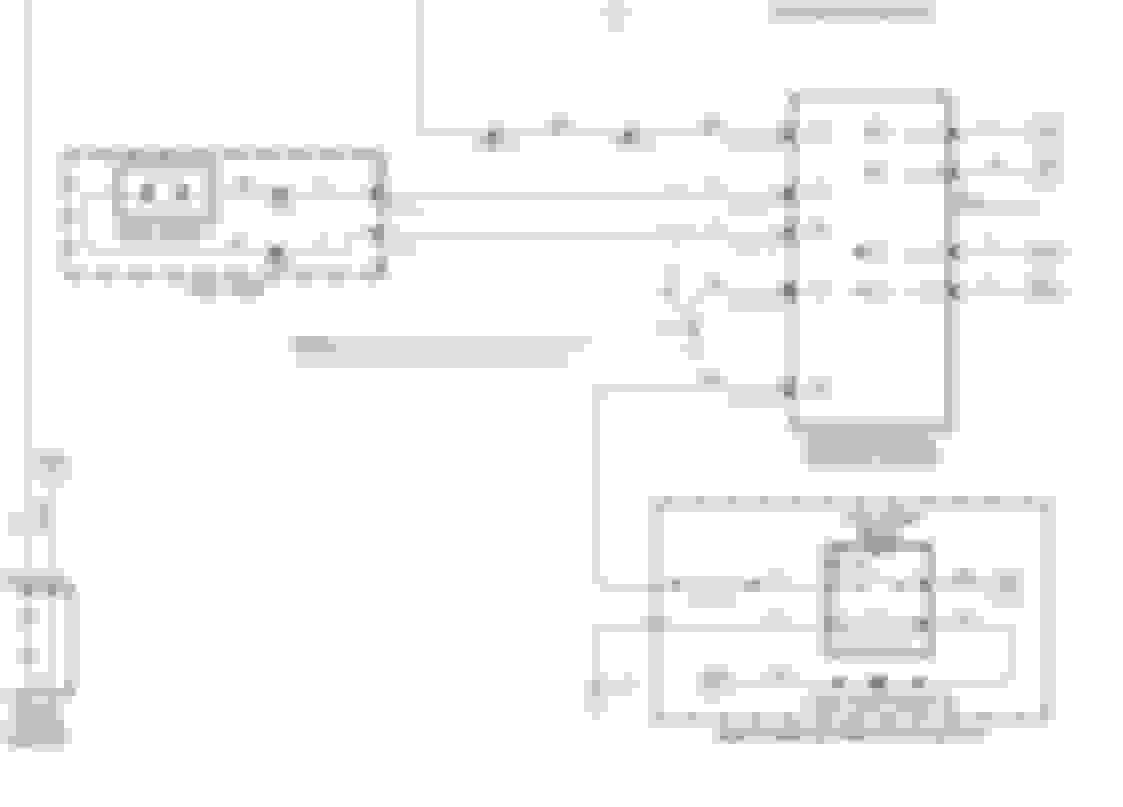
Scroll down to fig 3.4 for the fuel pump and RECM. I want to check some basics like power and ground before worrying that the RECM is faulty.
First thing I noticed is that fuse F47 in the trunk. In the wiring diagram, it's just to the left of the fuel pump relay. Have you checked this fuse yet? Earlier models don't have this fuse, and since I was using the wrong wiring diagram, I never knew to have you check it.
Next, let's check the operation of the R15 fuel pump relay in the trunk. See page 17 of the wiring diagrams for the relay and fuse location at each panel.
Place your finger on the relay and have a helper cycle the key from OFF to RUN and then back to OFF. You should feel the relay click as it gets energized. Make sure you're not detecting a click from an adjacent relay, as more than one will cycle with the key. If R15 clicks as it should, that tells us at least a portion of the control circuit is working.
If no click at R15, try swapping the relay with another of the same size. R7 for the blower motor would be a good one to try, as long as you know it is good. To test R7, turn the key to RUN and manually toggle up the fan speed at the AC/Heat control panel. If the fan works, then R7 is good. Swap R7 in place of R15 and try the click test again for R15.
If still no click at R15, even with a known-good relay, let's check the control circuit for R15. If you're not familiar with how a relay works, it's just a small electromagnet (typically shown at the bottom of the relay illustration) that operates a heavy-duty switch (shown at the top of the relay). It's basically a remote control switch, where a small current through the electromagnet controls a larger current through the switch contacts. Unplug the relay and look at the prongs for any sign of damage. If discolored, that means the socket was loose and arcing/overheating occurred.
If no damage, look at the numbers next to each prong. Typically, only the prongs on the relay are labeled, but not the sockets on the panel. You will have to make note of which socket is which. Insert your voltmeter's red lead into socket #1. You may have to use a paper clip (or similar) to let the meter lead make good contact. Put the meter's black lead on the battery (-) post. Turn the key to ON and you should see battery voltage. Turn the key to OFF and the voltage should drop to zero. If you don't get any power here with the key ON, check the inertia switch and fuse F4 at the primary junction box in the cabin.
The next step is to check for good continuity to ground at socket #2. Switch your meter to ohms and make sure you have good continuity from socket #2 to the battery (-) post. These two steps are the (switched) power and ground for the electromagnet inside the relay.
If those two steps were good, then a good relay should pass the click test. Now let's test the actual battery power being sent to power the pump (via the RECM, if you want to get particular). At relay socket #3, you should have full battery power present at all times. Power here is not switched via the key, it's always available. If no power is present, check fuse F23 in the trunk.
If the relay passes the click test, that still doesn't mean power is being sent across the switch contacts (from socket #3 over to #5). The easiest way to test for proper operation is to swap in a known-good relay, as described above.
If all of the above checks good, it's time to check the basics at the RECM. The RECM has three (!) power inputs and all must be good for the pump to run properly. Look at page 27 of the wiring diagrams to see how the connectors and individual pins are labeled. The RECM has 5 connectors. For now, we will only be concerned with CA100 and CA101. CA 100 is the small back connector in the middle of the four on one side. CA101 is the larger black connector at the end of the same row, the plug with 4 larger contacts at one edge.
Start by checking for good continuity to ground at CA101 pin #2 (CA101-2). This is a black wire.
Next, let's check the three power inputs at the RECM. Relay F15 (tested above) must be installed:
At CA101-1 (Green wire with red stripe), check for battery power when the key is turned to ON. This power source comes through relay F15 and fuse F47.
At CA101-3 (Brown wire), battery power should be present at all times. If not, check fuse F20 in the trunk.
At CA100-8 (This is the small black plug, green wire with blue stripe), check for battery power when the key is turned ON. If not present, check the inertia switch and fuse F4 at the primary junction box in the cabin. This is the same power supply as the R15 relay socket #1, tested above.
If all of the above checks good, test for continuity through the fuel pump itself. At RECM connector CA101, test for continuity between pins 11 (red wire) and 12 (yellow wire). I don't know the exact specs, but would expect to see around an ohm or two.
I found the REM (Rear Electronic Module), under the REM there is a black plastic cover preventing the trunk of water !!
It seems that it is not hermetic, the place is very humid !!!
Sorry, forgot to reply to this observation earlier. Do any of the connectors appear to have any water damage? Do you see any evidence of water filling the trunk? These cars are notorious for water leaking into the trunk. If enough water collects, this can cause the electronics back there to misbehave.
We have had several reports of water causing problems, but I can't remember the symptoms. I think some of the rear lights may have acted up, but am not sure. I don't remember any fuel pump problems, though. Good news, though, because I do remember in at least one case, everything went back to normal after the trunk had a chance to dry out thoroughly.
It might be worthwhile to leave the trunk open and set up a fan to circulate the air. Disconnect the battery so it doesn't run down.
Do the rear lights work normally? They are all controlled by the RECM, so it would be good to observe their behavior.
F47 in the trunk is fine, Next, the same for R15 fuel pump relay in the trunk.
Control circuit for R15 and prongs are good
Fuse #4 in the cabin is not blown, the same for fuse F23 in the trunk.
The trunck wasn't so wet, I dried the few water of it, then plugged back the REM and no power to fuel pump
REM is in good condition and works fine
I checked wires from the trunck to to fuel pump, no problem here.
Inertia Switch and it fuse are ok and working...
I'm 80% percent sure that it might be the crankshaft sensor...
Time is out, I cant lift off the car (the place isn't safe enough), i'm disappointed, regarding to the mileage of that Jag, I think this car might become a money sink....
It has been a very great and former experience...
It's time to say goodbye to this lovely car
I will save some parts before the car leaves to the car's yard...
Well, what a shame. Thanks for humoring me and doing all of those checks.
The only thing I didn't see mentioned was if you had tried swapping a known-good relay into the R15 spot. But it sounds like you're out of time, I get it.
Stiil, it's sad. At the very worst, if all the inputs are good, you've probably had a failure in the RECM. Even that is no big deal. IIRC, no reprogramming is required if you can locate a used replacement with the exact same part number.
For anybody else with similar symptoms, I'm pretty sure an independent Jaguar specialist will have the proper scanner interface to get more detailed troubleshooting info, such as various module faults. I think (not 100% sure) the scanner can command the RECM to run the pump as a test, too. If so, a small fee for diagnostic time would be money well spent.
This is a big what if....but what if the inertia switch is faulty, even though it is not tripped....is it easy to bypass with a wire with clips, or verify continuity with a test light or volt meter....it was running then stopped like the ignition was turned off.....Karl has gone through every scenario I can think of and more.... something switched has failed as has been covered extensively....it will be one of those step over a dollar to pick up a dime situations I bet
This is a big what if....but what if the inertia switch is faulty, even though it is not tripped....is it easy to bypass with a wire with clips, or verify continuity with a test light or volt meter....
This is not far-fetched at all.
Something I haven't really covered is how basic voltage checks can give a misleading positive indication. In an unloaded circuit, a marginal connection can let just enough electrons squeak through to show good voltage for the teensy current draw of a meter. But when you power up the device, current flow drops far below what is required.
For electrical troubleshooting, it's VERY important to realize a good voltage reading is NOT conclusive when the circuit is unloaded. An unloaded voltage reading will find total failures such as a blown fuse, broken wire, etc. However, it won't find most partial failures such as dirty switch contacts, loose crimps, etc.
Whenever possible, I like to test a circuit while loaded (The circuit, not me) but this is not always practical. A test light can be better than a meter because it draws more current, but this may not make much difference in a high current circuit.
But alas, we are out of time with this car to dig deeper. I'd be willing to bet your reputation that this car could easily live again without much expense, but oh well.
FWIW, when I was just a young pup in my career, barely capable of holding a flashlight, we had a 757 out of service for two days due to a defective hydraulic pump circuit breaker. It had tripped, but not 100%. The circuit passed an unloaded voltage check, but wouldn't run the pump. By the third pump, we were all getting suspicious. A voltage drop test on that wire run under load quickly pinpointed the problem. We had been following the Boeing troubleshooting manual to the letter with no joy. Even the Boeing engineers who wrote the manual never included that extra step. Lesson learned for me about how an unloaded voltage check is a good starting point, but is NEVER conclusive.
well I hope mighty Boeing noticed your capabilities and did something nice for you Karl....too bad about this car...I think he is close to getting it going


 06-13-2019, 04:49 PM