

Undertray/Bellypan fasteners
#1
 07-18-2011, 02:03 PM

Someone had asked about sizes & thread. I had Lauries off to replace the broken center brackets so took a photo.
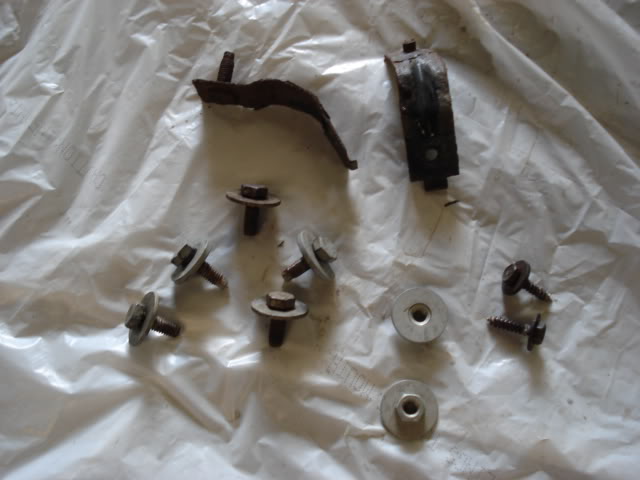
There are 9 attachment points all together. The two nuts go in the middle. I included the middle brackets I was replacing in the photo. They attach to the engine cradle right by the steering rack. Two of the bolts go into brackets at the far rear corners. The two sheetmetal screws attach the pan to the frt crossmember. The last three bolts actually attach the belly pan to the lower bumper cover splash pan.
The bolts are all the same size. I didn't have a way to actually determine the size but I'd guess 6mm and about 3/4" long. A little longer won't hurt and would make it a bit easier getting them started. In any case, they are the same size & thread as the bolts for the fenders and headlights. Anything on the frt end with a 10mm hex head is the same. So you can match them up at a parts store if need be.
I found it easier to hold it up and start the two nuts in the middle first. Just be sure the belly pan is slid in above the bumper piece. Then it will hang there while you start the rest. Don't tighten any until they are all started. Put some antisieze or lube on all of them so you don't have a problem come next oil change. The brackets are flimsey and the J-nuts will rip out of the plastic if they get rusted. How well I know.
Hope this helps.
The following 2 users liked this post by Bodyman:
leeshepherd (08-15-2014),
Michael Moore (12-21-2021)
#2
07-18-2011, 05:16 PM
Senior Member
Thanks for the post.
I was looking for these details a few months ago when the STR belly pad decided to come loose on the highway. I think everytime it was at the Quicklube for an oil change, one less fastener was replaced. I took it to the mechanic and we fastened the pan real nice and then cut a hole right under the oil filter so the pan does not have to come off anymore for the oil changes
I was looking for these details a few months ago when the STR belly pad decided to come loose on the highway. I think everytime it was at the Quicklube for an oil change, one less fastener was replaced. I took it to the mechanic and we fastened the pan real nice and then cut a hole right under the oil filter so the pan does not have to come off anymore for the oil changes

#4
03-11-2013, 10:33 AM

Veteran Member
#5
03-11-2013, 12:04 PM

Veteran Member
#6
03-11-2013, 12:26 PM
#7
03-13-2013, 03:03 PM
Trending Topics
#8
12-04-2013, 06:40 PM

Someone had asked about sizes & thread. I had Lauries off to replace the broken center brackets so took a photo.

There are 9 attachment points all together. The two nuts go in the middle. I included the middle brackets I was replacing in the photo. They attach to the engine cradle right by the steering rack. Two of the bolts go into brackets at the far rear corners. The two sheetmetal screws attach the pan to the frt crossmember. The last three bolts actually attach the belly pan to the lower bumper cover splash pan.
The bolts are all the same size. I didn't have a way to actually determine the size but I'd guess 6mm and about 3/4" long. A little longer won't hurt and would make it a bit easier getting them started. In any case, they are the same size & thread as the bolts for the fenders and headlights. Anything on the frt end with a 10mm hex head is the same. So you can match them up at a parts store if need be.
I found it easier to hold it up and start the two nuts in the middle first. Just be sure the belly pan is slid in above the bumper piece. Then it will hang there while you start the rest. Don't tighten any until they are all started. Put some antisieze or lube on all of them so you don't have a problem come next oil change. The brackets are flimsey and the J-nuts will rip out of the plastic if they get rusted. How well I know.
Hope this helps.
There are 9 attachment points all together. The two nuts go in the middle. I included the middle brackets I was replacing in the photo. They attach to the engine cradle right by the steering rack. Two of the bolts go into brackets at the far rear corners. The two sheetmetal screws attach the pan to the frt crossmember. The last three bolts actually attach the belly pan to the lower bumper cover splash pan.
The bolts are all the same size. I didn't have a way to actually determine the size but I'd guess 6mm and about 3/4" long. A little longer won't hurt and would make it a bit easier getting them started. In any case, they are the same size & thread as the bolts for the fenders and headlights. Anything on the frt end with a 10mm hex head is the same. So you can match them up at a parts store if need be.
I found it easier to hold it up and start the two nuts in the middle first. Just be sure the belly pan is slid in above the bumper piece. Then it will hang there while you start the rest. Don't tighten any until they are all started. Put some antisieze or lube on all of them so you don't have a problem come next oil change. The brackets are flimsey and the J-nuts will rip out of the plastic if they get rusted. How well I know.
Hope this helps.
Last edited by jerry814; 12-05-2013 at 12:41 PM. Reason: Add second link
#9
05-12-2014, 09:25 PM
THANKS

#11
05-13-2014, 01:42 PM

Veteran Member
I'm unsure what they are other than cross-head (posidrive) screws with integrated washer (I don't know the right term!). I can't see it being vital exactly what's used so long as they keep the undertray attached.
I expect the dealer can supply and TBH I'd just buy from them as some cost savings are too trivial to bother with.
There are too many, of too many types...
I expect the dealer can supply and TBH I'd just buy from them as some cost savings are too trivial to bother with.
There are too many, of too many types...
#12
05-13-2014, 08:38 PM
Veteran Member
6mm bolts & nuts; I think Jerry is talking socket size - they do take a 10mm spanner/socket for R&R
The sheet metal screws? Dangit man! Don't you have a "hell-box?" Dad used to use a cigar box - mine is a decorative holiday candy tin. Anyway...a container that you put all the extra bits in after you disassemble then reassemble something? (always have parts left over or it wasn't complicated enough) So...if you do that for a couple of years' worth of tinkering - then "whateverthehellyouneed" is in your hell-box. So that's why I can't tell you what size the screws are even though I've had to come up with replacements several times across both S-types!
The sheet metal screws? Dangit man! Don't you have a "hell-box?" Dad used to use a cigar box - mine is a decorative holiday candy tin. Anyway...a container that you put all the extra bits in after you disassemble then reassemble something? (always have parts left over or it wasn't complicated enough) So...if you do that for a couple of years' worth of tinkering - then "whateverthehellyouneed" is in your hell-box. So that's why I can't tell you what size the screws are even though I've had to come up with replacements several times across both S-types!
The following users liked this post:
leeshepherd (08-15-2014)
#13
05-14-2014, 07:46 AM
Veteran Member
+1 to Zane's suggestion of checking your assorted supply of screws and bolts....
Not long after I purchased our S-Type in December 2008, I replaced the two somewhat stripped and rusted posidrive sheet metal screws with galvanized ones scrounged from my collection. Added a couple of larger galvanized washers to better spread the load and no undertray fastener problems since....
The long-term key to keeping your fasteners intact is to never allow a shop to remove them whenever you're forced to take the vehicle in for service or repairs. Remove the undertray yourself before dropping off the car. Install it again once the car is back in your possession. You know which fasteners go where and you won't shortcut the job by not bothering to re-install all of them properly....
The following users liked this post:
aholbro1 (05-14-2014)
#16
05-14-2014, 03:23 PM

Thread
Thread Starter
Forum
Replies
Last Post
08292
XF and XFR ( X250 )
31
07-09-2018 01:44 AM
Currently Active Users Viewing This Thread: 1 (0 members and 1 guests)