
Windows no-bueno: Tron Wizard challenge
#1
 07-05-2013, 05:36 PM

2005 S-Type 3.0L: All 4 windows down and will not go up with any switch nor with global close from the driver's door lock barrel. Global close will close the sunroof only. Previously, seemingly only a switch-pack problem with global open/close working 4.0.
Initially, Sunroof would not open, windows would not open from driver's door or any individual door switch. Unknown whether global open/close would work from the door key as car was in FL with the wife and the door lock barrel was siezed-up and/or it was just too hard to explain global open/close to the wife over the phone. Pick one. At some point, she managed to get all the windows down from the driver's switch pack, but then they would not go up. After a few minutes of fiddling, she managed to get them back up with the driver's switch-pack.
Once home, I disconnected the battery, touched the disconnected cables together, and re-connected. Still no-joy. Held "unlock" button on remote and got a global open (all windows down, sunroof open). Then realized lock barrel truly was siezed (dayum, I just freed up the 2003 a few months ago and treated all locks on the property with Teflon at the same time!
Ruh-roh! In the process of trying to determine if the child-lock on the windows was engaged or not, I managed to get the left rear window started upward from the left rear door switch! Since that door was closed and I was reaching in, I could see only limited success so moved to the driver's door and zipped all four windows up. Cool! Sunroof still wouldn't close, though.
So after about 30 mins with spray lube, baling wire, and the door key, I had the lock freed-up and managed a global close with the key. Global open. Global close. Open. Close...all good. Still only random intermittent success with the switch-pack, but can save that for another day.
Another day: Global open to let the heat out. Everything open. Tried global close and only the sunroof closed. Currently sitting with four windows stuck down.
Had it scanned with WDS, and there are no body codes or any other related codes.
Any ideas? Window fuses are good. From the wiring diagram, it appears that global close goes through the driver's door module, but the driver's window switch-pack appears to be an alternate path. Almost points to two separate, unrelated failures with the same resultant outcome.
I found one similar instance via "Search" but no resolution posted.
Last edited by aholbro1; 07-11-2013 at 07:51 AM. Reason: solved
#2
07-05-2013, 05:47 PM
Might sound daft but open and close the driver's door a few times and try with it open and closed.
The reason I suggest this a friend had similar problem, turned out to be chuffed wires going from car to door, opening and closing the door must have been connecting /disconnecting them.
Good luck
The reason I suggest this a friend had similar problem, turned out to be chuffed wires going from car to door, opening and closing the door must have been connecting /disconnecting them.
Good luck
The following users liked this post:
aholbro1 (07-06-2013)
#3
07-06-2013, 09:36 AM
Thanks,
Intermittent nature of the switchpack operation lends support to that postulate. But I've tried it open, closed and whilst massaging the door-to-car wiring, even with the door trim panel off where I can access more of the wiring loom. No Joy.
If they are abraided/broken....I can't blame Jag for it. VERY well secured with rubber grommet into door panel, then out of door panel to car with flexible rubber grommet/hose asy - much protective looming and friction tape - the only exposed wiring is about a half-inch at each connector. I'm not saying the wires COULDN'T be chafed and/or broken inside there, but I'd think the odds are slim. Doesn't look easy to get a look at the condition of those wires, due to the aforementioned protective measures and lack-of-access at the hinge-point, so I'm gonna go out and check for +B on a couple of pins at the DDM connector the diagrams say should have it first....
#4
07-06-2013, 09:42 AM


Veteran Member
The following users liked this post:
aholbro1 (07-06-2013)
#5
07-06-2013, 03:27 PM
UPdate: It's not the driver's door module nor driver's door switchpack. I just plugged each, in turn, into the 2003 and they work the windows just fine in it...ruh-roh....I didn't try them as a pair....maybe should check that. Still suspect something is going on in the SCP network that is causing the problem, but will probably try to get a look at the door-to-car-wiring next........
(now to get a few of those trim panel fasteners...grumble grumble harrumph!)
Some time later............Ok, I've gone all "Roberto Duran" on this one. Put it all back together and placed it to the garage. Wife can just drive the Exc until that FEAD squeal in my XJ manifests itself in some identifyable failure - then she can stay home a few days - she's a teacher, has summers off anyway...or if it's THAT important, she won't mind going with the windows down.
Here's a couple of things I know:
Driver's door switchpack and driver's door module plugged into 2003 S-type and windows/sliding roof work 4.0 (yes, even if paired together)
I confirmed +B on the YR "enable" lead at DD4-1 (this seems to be the one that would kill all 4 windows and the roof if it was broken. I probably need to go to the roof console or another door and check it to confirm/deny that it is getting through the hinge-point - but see above...I've already declared "no mas, no mas."
(at work we call this next one a "known-unknown"): I don't know what the SCP network signals are supposed to be, but I measured about a volt on the yellow wire on CA85-3 and a full 5V on the blue wire on CA85-4:

Not understanding this, I moved on...hey! that green/white wire looks accessible....let's study it. Looking at the diagram, I reckoned pushing "up" on the RF switch should ground the green/white and cause the passenger side front window to rise:
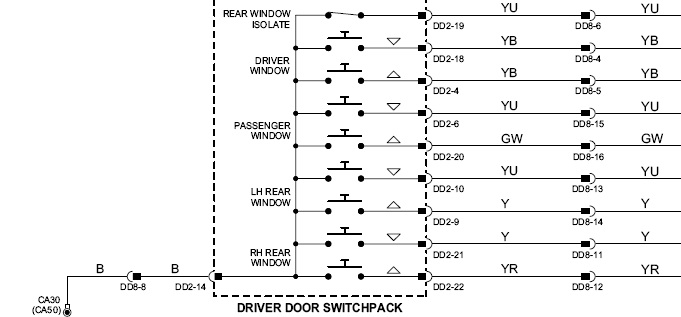
So let's see....plugged it all up together, turned the key on, probed the green/white, pressed "Up" for the pax window on the driver's switchpack and resistance between G/W and ground went to zero. Ok..as predicted. Don't know if out of curiousity or ignorance, but decided to probe G/W for voltage...found it at +B, going to zero when "Up" button pressed. Checked it again with key off. Same. Puzzled beyond recognition, it was at that point I decided pulling the trim panel off the 2003 would not be a bad idea...which begat the information that if the 2005 switchpack and/or DDM have "issues" they are at least not the cause of the windows/sliding roof inoperability.
I spent the rest of the day trying to get a look at the wiring between the door and cabin. No joy. That loom is wrapped to a hangar with a christmas tree pin inside the door panel that simply can't be popped out. My plan was to pull the whole harness out of the door, start unwrapping it all the way up to the cabin grommet for inspection. No bueno with the hanger there, I'd have to cut it, and then there would be no means of reattachment. Given the observable condition of the friction tape wrap, the grommets and conduits, I simply couldn't justify destroying what appeared to be a key fixing point knowing I could not replicate it on reassembly. I know it's a possibility, but I find it very hard to believe the wires could be damaged given the condition and security of the wrap, the grommets and the overall "feel" of the harness. Very pliable, no popping or cracking when handled, none of the brittleness of the cooling system plastic bits. Just really think I'd create more probability of future damage than any good I would do tearing it apart.
Does anyone speak "Network?" what is one supposed to see on CA85-3/4? Is the "enable" signal something that is produced after the network communication is satisfied? B/C I have +B on the YR DD4-1 at all times with Key on. According to the electrical guide: " O DD4–1 POWER WINDOWS ENABLE: TO ACTIVATE, DDM SWITCHES CIRCUIT TO B+"
Here's the whole bit:
(now to get a few of those trim panel fasteners...grumble grumble harrumph!)
Some time later............Ok, I've gone all "Roberto Duran" on this one. Put it all back together and placed it to the garage. Wife can just drive the Exc until that FEAD squeal in my XJ manifests itself in some identifyable failure - then she can stay home a few days - she's a teacher, has summers off anyway...or if it's THAT important, she won't mind going with the windows down.
Here's a couple of things I know:
Driver's door switchpack and driver's door module plugged into 2003 S-type and windows/sliding roof work 4.0 (yes, even if paired together)
I confirmed +B on the YR "enable" lead at DD4-1 (this seems to be the one that would kill all 4 windows and the roof if it was broken. I probably need to go to the roof console or another door and check it to confirm/deny that it is getting through the hinge-point - but see above...I've already declared "no mas, no mas."
(at work we call this next one a "known-unknown"): I don't know what the SCP network signals are supposed to be, but I measured about a volt on the yellow wire on CA85-3 and a full 5V on the blue wire on CA85-4:
Not understanding this, I moved on...hey! that green/white wire looks accessible....let's study it. Looking at the diagram, I reckoned pushing "up" on the RF switch should ground the green/white and cause the passenger side front window to rise:
So let's see....plugged it all up together, turned the key on, probed the green/white, pressed "Up" for the pax window on the driver's switchpack and resistance between G/W and ground went to zero. Ok..as predicted. Don't know if out of curiousity or ignorance, but decided to probe G/W for voltage...found it at +B, going to zero when "Up" button pressed. Checked it again with key off. Same. Puzzled beyond recognition, it was at that point I decided pulling the trim panel off the 2003 would not be a bad idea...which begat the information that if the 2005 switchpack and/or DDM have "issues" they are at least not the cause of the windows/sliding roof inoperability.
I spent the rest of the day trying to get a look at the wiring between the door and cabin. No joy. That loom is wrapped to a hangar with a christmas tree pin inside the door panel that simply can't be popped out. My plan was to pull the whole harness out of the door, start unwrapping it all the way up to the cabin grommet for inspection. No bueno with the hanger there, I'd have to cut it, and then there would be no means of reattachment. Given the observable condition of the friction tape wrap, the grommets and conduits, I simply couldn't justify destroying what appeared to be a key fixing point knowing I could not replicate it on reassembly. I know it's a possibility, but I find it very hard to believe the wires could be damaged given the condition and security of the wrap, the grommets and the overall "feel" of the harness. Very pliable, no popping or cracking when handled, none of the brittleness of the cooling system plastic bits. Just really think I'd create more probability of future damage than any good I would do tearing it apart.
Does anyone speak "Network?" what is one supposed to see on CA85-3/4? Is the "enable" signal something that is produced after the network communication is satisfied? B/C I have +B on the YR DD4-1 at all times with Key on. According to the electrical guide: " O DD4–1 POWER WINDOWS ENABLE: TO ACTIVATE, DDM SWITCHES CIRCUIT TO B+"
Here's the whole bit:
Driver Door Module
Pin Description and Characteristic
Pin Description and Characteristic
S CA85–3 SCP +
S CA85–4 SCP –
PG CA85–8 POWER GROUND: GROUND
B+ CA85–11 BATTERY POWER SUPPLY: B+
B+ CA85–12 SWITCHED SYSTEM POWER SUPPLY: B+
O DD4–1 POWER WINDOWS ENABLE: TO ACTIVATE, DDM SWITCHES CIRCUIT TO B+
O DD4–26 GLOBAL CLOSE SIGNAL: 20 ms PULSED SIGNAL
I DT2–16 DRIVER DOOR ALARM SET / LOCK SWITCH (NORMALLY OPEN): OPEN CIRCUIT / GROUND
I DT2–17 DRIVER DOOR ALARM RESET / UNLOCK SWITCH (NORMALLY OPEN): OPEN CIRCUIT / GROUND
Rear Electronic Module
Pin Description and Characteristic
Pin Description and Characteristic
I CA100–9 GLOBAL CLOSE SWITCH (NORMALLY OPEN): OPEN CIRCUIT / GROUND
B+ CA101–3 BATTERY POWER SUPPLY: B+
S CA102–1 SCP +
S CA102–2 SCP –
PG CA102–12 POWER GROUND: GROUND
I CA102–13 BRAKE ON / OFF SWITCH (NORMALLY OPEN): OPEN CIRCUIT / B+B+ CA101–3 BATTERY POWER SUPPLY: B+
S CA102–1 SCP +
S CA102–2 SCP –
PG CA102–12 POWER GROUND: GROUND
Last edited by aholbro1; 07-06-2013 at 09:47 PM.
The following users liked this post:
harry42 (07-28-2013)
#6
07-06-2013, 10:22 PM
Thank God for small victories! Despite the total waste of a day trying to get the windows up (notice, I'm shooting low as if they're riding Shetlands....I didn't say get them working...just up would satisfy me for now) I did manage to do a bit of good:
I noticed some stress-cracking where the 2005 driver's door arm rest mounts to the door:

When I was pulling the 2003 apart, a pant-load of beige plastic bits came came rolling out when I was separating the bottom edge. As it happens, it was in worse shape:

So I set about making some doublers from a bit of aluminum flat stock I had lying about:

Decided to go ahead and make 4 in case I had occasion to pull the pax doors apart one of these days. On second thought, remembered those two screws are the first step and I needen't pull the whole panel to install 'em, so rather than store them to be lost whenever I did have to pull the panels....

In theory, I should've probably trimmed the thickness of the aluminum off the tabs,

but it seems to fit just fine:

#7
07-07-2013, 08:56 AM
I think this is the one I referred to in the opening post about having found via search. Didn't remember then that it was EXACTLY like what I have. Pity, last activity on Mar 6 and no indication of whether Jaguar105 ever sorted the problem or not:
https://www.jaguarforums.com/forum/s...ck-open-89553/
https://www.jaguarforums.com/forum/s...ck-open-89553/
Last edited by aholbro1; 07-07-2013 at 10:23 PM.
Trending Topics
#8
07-07-2013, 09:30 AM

Veteran Member
Looks like SCP (which is J1850 PWM) passive state (no packets) volts should be
SCP+ 0 to 1.2V
SCP- 3.8 to 5.25V
Which seems a bit weird (i.e. backward) but it's "hardware".
There are terminating resistors if you really think there's a serious problem but your car overall seems working so they likely are fine.
You're generally OK unplugging modules but best to have the key OUT when doing so. I suppose ideally you'd have the battery off but I suspect techs don't do that.
The following users liked this post:
aholbro1 (07-08-2013)
#9
07-07-2013, 10:20 AM
No "thanks" button on the mobile app? Thanks John, the old-school way. I thought SCP+ would be >SCP- but I guess what I measured is as it should be.
I suppose I'll have to go into that door-to-car loom, but I dread unwrapping/unmounting all that potentially creating a "gift" of broken wiring that keeps on giving a few years down the road.
I suppose I'll have to go into that door-to-car loom, but I dread unwrapping/unmounting all that potentially creating a "gift" of broken wiring that keeps on giving a few years down the road.
#10
07-07-2013, 10:56 AM
Veteran Member
The following users liked this post:
aholbro1 (07-08-2013)
#11
07-07-2013, 01:20 PM
#12
07-07-2013, 05:24 PM
Problem solved "in teary" as my former German colleagues would put it! However, "teary" doesn't wind the windows up... I've got +B on DD8-9 but zilch on DT8-10; Now to unwrap some harness...
Police666 called it, even though I'd rather it have been something else, maybe a bit more expensive part with less labor or something?
Broken Yellow wire with a red stripe right at the point where it enters the cabin bulkhead. I suppose it would've been "possible" to mend it with the door on...but not much room in there to work...I'll try to get some pics up.
Last edited by aholbro1; 07-07-2013 at 10:31 PM.
#13
07-07-2013, 11:07 PM
OK, I've got batt voltage on the YR Wire in the blue connector, but not in the gray one (not shown) to the upper left. So I'll start unwrapping at the blue one and follow the YR wire and see where I end up:

Up to here and no break, so I'm going to have to pull the harness out of the door:

Here's that hanger I mentioned earlier that increases the labor of removing the harness from the door:

I finally managed to get a pair of dykes under it and hoped I could pop it out, but in the very end, I just cut it:

Not too bad to pull it all thru the door after that.
Found one end of the broken wire, but looks like the other end is in a tough spot:

Right then, off with the door:

At last! Both ends:

The rest of the wires were perfect. No chafing, abrasions nor kinks. This one was a clean break, almost looks like someone cut it.
Took a bunch of pics of the solder repair, but the aluminum foil I wrapped the rest of the wires in must've thrown the auto focus off, best of the lot:

Beginning the excruciating re-wrap process:

Ready to reinstall the door:

I tested the solution by dragging the door and inner panel over and hooking it all up - put up the other three windows and cycled the sliding roof. Didn't test the global close on account I didn't want to smash my son's fingers while he was holding the door up!
The following 3 users liked this post by aholbro1:
#14
07-08-2013, 01:13 AM
Veteran Member
The following users liked this post:
aholbro1 (07-08-2013)
#15
07-08-2013, 07:52 AM

Join Date: Oct 2007
Location: PHX some of the time
Posts: 117,454
Received 6,323 Likes
on
5,510 Posts
The following users liked this post:
aholbro1 (07-08-2013)
#16
07-08-2013, 11:56 AM
Veteran Member
The following users liked this post:
aholbro1 (07-08-2013)
#17
07-08-2013, 12:06 PM
I appreciate it...but in all honesty, I reckon I wasted the better part of a full day by not listening to Police666 just cause it all looked good there....should've torn into the loom straightaway....
Still don't understand why the sunroof would open and close without an enable signal using the global function...but just as happy it works now....not to wonder why...
Guess I'll put the door back on today, should have trim panel fasteners Tue or Wed - no point buttoning it up with 4, then breaking who knows how many of them to add the other 4 in when they get here...

#19
07-09-2013, 08:58 AM
Veteran Member
#20
07-12-2013, 12:58 PM
Veteran Member
Zane that was a great job.
I don't know if the climate had anything to do with it in terms of the wire breaking, but these types of breaks are common on e36/e38/e39/e46 BMW's in the trunk loom that hinges up and down. You start to get random fuses popping, brake and parking lights not working or working intermittently. Its amazing that the break was ONE wire. The BMW ones look like the wires were chewed by rats, not only are some broken, but others have missing chunks of insulation.
The one thing I do with the BMW's is add a small length of wire - yes its double the soldering, but those wires don't have much play - which I suspect after years of use leads to the failure. Almost like taking a paper clip and repeatedly bending it back and forth. After stripping / twisting enough wire to solder, you are making the wire even shorter.
Sucks that you have to pull the door off to fix it.
Oh btw, buy a panel clip puller tool ~ 10 or less. Now that you know where the clips are slide the tool in and pop them one by one. You'll never break one again. They come out straight. its the off axis yank of the door panel coming off with a hard tug that breaks them. And Start at the bottom and work your way up the sides.
Take care,
George