When you click on links to various merchants on this site and make a purchase, this can result in this site earning a commission. Affiliate programs and affiliations include, but are not limited to, the eBay Partner Network.
As OB has said, don't condemn the valve block first until you've done all the available tests and checks on the integrity of electrical circuits of the braking system. There are 32 diagnostic continuity checks detailed in the Service Manual that you should run through first to try and pin down where your problem might lie. If you haven't done so already, it's really worth reading the brakes section in the Service Manual to understand how teh Teves system works and how to diagnose problems.
As OB has said, don't condemn the valve block first until you've done all the available tests and checks on the integrity of electrical circuits of the braking system. There are 32 diagnostic continuity checks detailed in the Service Manual that you should run through first to try and pin down where your problem might lie. If you haven't done so already, it's really worth reading the brakes section in the Service Manual to understand how teh Teves system works and how to diagnose problems.
If you decide to do this, you will probably need a New Gasket to go between the Actuator and the Car and the ideal thing to use for this, is first to make a Pattern out of Cardboard and then Cut a Gasket out of a Brand New Smooth sided Hot Water Bottle!
Its the perfect thickness to do the job and has also proven to be very heat resistant.
Gentlemen,
1st post
1990 xjs coupe/not too many miles
My name is Don in NC. I have been having the same problem with the ABS since last fall.
I will not get into everything I changed on the car before we figured out what the problem is.
Been reading over this thread and the one by djinaustin now for several months. I am impressed with both threads, and would never been able to diagnose the problem as dj did in his driveway. My hat is off to all who posted.
The master cyl/pedal all is out of the car. Abs module is on my bench.
Before any testing starts I have a few questions, items I am not too sure of.
-The testing of each solenoid for operation or strong click. Do I really need a 12v battery or can I run 12v through my elect. tester with its 9v battery?
-Which are the in valves and which are the out valves. Three have cylindrical **** on top and three don't have the ****.
-When I take out each solenoid to remove screens and then clean with ultrasonic tub? How much fluid should I put in tub to not damage coils. Or, should I put them in tub with the small end up or down?
Please point me in the right direction. Been wanting to ask about above items before I go any further.
Been welding and soldering pipes my whole life, but will get someone proficient in soldering electric items to put in the new wire for me..
Please point me in the right direction.
Thank you for your help and all the info. everyone has posted,
Don
I've never Tested the Valve Block, with anything but 12v so do not know if 9v will work, although I can't see any harm in giving it a try to see if you are able to hear what I think I'd describe as a satisfying 'Click' from the Valves that open
The Flat Top Valves are the Outlet Valves
The Top Hat Valves are the Inlets and they are NOT Interchangeable
The Chances are that one of the Ribbons inside the Valve Block is Broken as they are very Fragile and go 'Crispy' in the Heat where going over something like a Pothole may be enough to break them after nearly 20 years!
Be extremely Careful when you remove the Cover from the Valve Block, as the Weight of a Valve is more than enough to break its Ribbon Connector, where as such you could have one or more fall out on your Work Bench
So be sure to take a Photo of everything you do and also do a drawing of how they are all Wired together, so that your Soldering Expert will know what goes where
Anyone thinking of doing this should always get an Expert to do the Soldering for you, as one dry joint or something like that could Spin you off the Road and so for a few dollars, it isn't worth taking that chance
So basically what you are doing is substituting those Fragile Ribbons for High Temp Silicone Wire, which again your Soldering Expert could advise you on
Before you take the Valve Block along to be Soldered, just screw the Cover on Finger Tight so that you are able to open it at your Soldering Shop and Show them what is inside and what you want them to do
Just in case they have never done one of these before and ask then to put the Cover on Finger Tight when its Fixed so that you can Double Check they've done it right when you get Home
As for Cleaning if the Valves are looking nice and shiny on a Visual Check then Ultrasonic Cleaning the Small end 'may' be enough but that's a call you are going to have to make
Though if they look like the ones in this Photo then they are going to be headed for the Bin!
Just make sure everything then goes back the same way it came out and then you 'should' be ok
Or better still you could send the Valve Block to a Shop for Professional Reconditioning, which could include NEW Valves
None of this is a guaranteed fix but guys like 'Davedental' have done it and once he showed me what to do I just copied him
If your Valves look as bad as this, they are probably too far gone and will need replacing!
Last edited by orangeblossom; 06-28-2018 at 09:23 AM.
Orange Blossom...what a great post, as all of yours truly are very informative and take the mystery out since you have pioneered the way for us.
Thank you so much. I have yet to do a resistance check on my sensors but will do so soon.
Gentlemen,
Thank you so much for your quick reply, help, input, direction.
I have not done anything over the weekend, but plan to this week.
I will be in touch.
Don
Gentlemen,
Thank you so much for your quick reply, help, input, direction.
I have not done anything over the weekend, but plan to this week.
I will be in touch.
Don
Hi Don
I'm not sure how far you've got with this but after a bit of R&D there is now an even easier way to do it!
As working on the assumption, that your 'Professional Soldering Shop' is OK with it, there is no real need for you to take the Valve Block off 'The Master Cylinder Actuator'
And in fact it is much better if you don't, as then you won't be breaking the Seal, or running the risk of losing or damaging the 'O' rings
You could remove the 'Master Cylinder Actuator' (including the Valve Block on the Side all in one piece) which even if you have never ever done it before, can be very easily done in under an hour
So after that all you need to do is First Test the Valves with 12 Volts to see if they are all Clicking where in the event that one is not (or maybe more than one is not)
'Carefully take off the Cover Plate' and look to see what is wrong, which is very often down to a Broken Ribbon Connector on one of the Valves, all of which are going to now be rewired by your 'Professional Soldering Shop'
It would also be a good idea to just loosen the Screws on the Plug to make it easy for them to take the Plug out to Solder the New Wires on and then once having done so, take some photos and make a little drawing of how its all wired up
Then give your 'Professional Solder Shop' a Copy of the drawing and the Photos:
(1) So they know what to do and what goes where
(2) So that you can Check they've done it right
Then put the Cover Plate back on 'finger tight' and then take it along to their Shop, or you could take the Valves out first if you want to clean them in an Ultrasonic Cleaner
But when you or they put the Valves back in, Remember the Input and Output Valves are NOT the same and are therefore NOT interchangeable
Everything then has to go back in exactly the way it came out and so a Sketch of the Wiring is absolutely essential as are the Photos
If NONE of the Valves 'Click' on the 12 Volt Test, then it could be that the 'Common Wire' is the one that is Broken and make sure they know to Solder the Common Wire back onto the Correct Terminal.
Which is easy to get wrong if they are looking at the Valve Block the Wrong Way Round, which is one of the reasons why you need the diagram and also the Photos to show them how it goes
Then when you get it back from the Shop. Check it against your diagram just to make sure that they have done it like you asked them to and then Test it again before you tighten up the Cover Plate (Tight but not 'Stupid Tight'@G.F)
After which you can then put it back in the Car being Careful not to damage the Brake Light Switch, where removing and refitting the Master Cylinder Actuator can all be done from under the Bonnet/Hood with no need to get in the Car
And while it is not a Guaranteed Fix and may need a Professional Rebuild with all New Components, providing there's nothing wrong with the Valves, it worked for me and others who have tried it
And although it may not need saying, cover all the Paintwork with Towels and don't let any Brake Fluid drip on the Paintwork, or else the Brake Fluid will strip it all off in an instant
Good luck with the Fix
Last edited by orangeblossom; 07-02-2018 at 10:56 PM.
Thanks so much. I took a real test run Sunday 170 mile round trip. Near the end I experienced what you described. While stopping, the car took a hard turn left (I was already almost stopped thank god). I could hear the solenoids clicking. The curious thing is that the ABS light, which had been steadily on all day, went out. All seemed ok, but then it happened again and the light stayed illuminated. I tried a short drive yesterday and it happened again. I've only driven this "new to me" car about 250 miles. So I guess I have to delve into the ABS repair as you've outlined. My delemia may be finding a shop to do the "Sonic cleaning". Is this essential? Is there a safe product/solvent to soak them in? Before disassembly, I will do the individual 12V testing to listen if they all click. Do you now recommend just removing the actuator, or still to remove the entire pedal assembly? Don't you have to remove the reservoir, and in your previous post you said it is much easier just to take it all out as a unit. I want to start today...so what do you suggest/recommend?
Whenever I've done it on my Cars, I've always taken the whole thing out in one go, which includes the Reservoir, while it is still attached to the Brake Master Cylinder Actuator
After draining out as much Brake Fluid from the Reservoir as I can, which can either be syringed out or drained out of one of the Calipers (or both)
Then when you take the Braided Hose off the Reservoir, plug it up with something, to minimize any spills but even though the Reservoir may look empty, there will still be plenty of Brake Fluid left in there
Which will still very likely start to run everywhere, so cover all the paintwork with towels and stuff plenty of rags everywhere inside the Engine Compartment
No need to take the Air Boxes off, just undo one end of the Stiffening Strut nearest to the Rad, then undo the Cable Ties and push it out of the way, then if you haven't already done so, take out the Electric Plugs
Not forgetting the Earth Wire that is bolted on the Front, then again on the assumption that the 4 Mounting Bolts are out, then lift the whole thing out in one piece, although you may have to jiggle it about to get it out
Where you may also find that the unit is stuck to the firewall, so you may have to use a small paint stripping scraper to break that seal in some way
When you have got it out of your Car and over to your bench, do the 12 volt Test to see if all the Valves are clicking like they should be, then come back and tell me what you find
But before you get into doing all that, the Master Cylinder Actuator 'May' Not be the problem, it could be a Sticking Caliper or a Sticking Brake Pad
Make sure everything is ok in that area first, as a Sticking Caliper would seem a lot more likely.
Taking out the Master Cylinder Actuator, has to be the last thing you should try
You might even be Bleeding the Brakes Wrong, are you bleeding the Rear Brakes with the ignition on?
If you are able to let me know exactly how you are doing this, then either myself of Ptjs will be able to tell you whether or not you are are bleeding the Brakes the right way
I haven't got a Manual, so don't know how they describe the process in there, also haven't got time to run through it now as I'm in the middle of fixing my own Car, so hope that you can be understanding of that for the time being
While I do understand your frustration and the hope of a miracle fix, its never quite that simple to try and diagnose a fault on someones else's Car that you've never seen or ever driven
And just because it pulls to one side, doesn't necessarily mean that it is a problem with the Master Cylinder Actuator
A lot depends on how it feels and how often it happens and even how hard or how fast you are pushing the Pedal when it happens, its one of those things you sort of get to know, if it has happened to your Car as often as it has happened to mine
Now while it 'could' be the Master Cylinder Actuator, if you have done the 12 volt test while it is still on the Car and all the Valves are 'Clicking' as you say, then there is a very good chance, that it isn't that
So don't waste your time in pulling that out at the moment, not at least until you have 100% eliminated all the other suspects. where the first one on the list, is a Sticking Caliper
This is a very common problem on an XJS if it has been standing unused for some time, so see if the offending Wheel is getting Warm and also are the Brake Pads wearing evenly
Next Check the Front Brake Pads: Do they slide in and out of the Caliper nice and easy? or would it take a Hammer and Chisel to get them out?
If they are a very tight fit, then you may need to shave a few thou of the edges of the metal backing plate, I will try and put a link in later of how you do that after the 'Big Match'
Not all Brake Pads are created equal, a lot depends on the Country where they have been made and I have had to do this with every set of Pads I've ever fitted in these Cars (and its not just me either)
The Brake Pads must be a very nice fit not a tight fit! and the Calipers should also work like a Charm
But! and there's always a 'But' Never force the Caliper Pistons back into the Calipers, without having the Bleed Nipple Open, or if the Brake Fluid is getting pushed back up the Tube that it came from, then you could do untold damage to the Master Cylinder
If that doesn't Fix it (and it might not) then Next Clean the Wheel Speed Sensors and try that
Big Match Starting gotta go, will try and 'Catch you later'
But as you will see if you read on, even for me it wasn't over, which resulted in me having to fit New Calipers and it shows how I took the old Calipers off and put the New Calipers on
Which as you will see was NOT a 'Walk in the Park'
So the Master Cylinder Actuator is not always to blame, so that is the very last link in the Chain I would tackle but should it eventually get to the point where nothing else works and this is the only thing left
Then do what Don is going to do and leave it to the Professionals
No Cutting Corners, No Bodge ups and No Quick Fixes, as it is essential that this is done properly by those who do this for a living
So thoroughly check through everything else, which in the long run could save you a lot of Hard Work
There are no Quick Fixes on these Cars, you have to work methodically and take things one step at a time
Last edited by orangeblossom; 07-03-2018 at 05:14 PM.
As England have finally won tonight whilst still keeping us on tenterhooks by going to penalties again, we're all feeling very relieved and upbeat!
OB has given you some great thoughts and input in your brake problem.. The most relevant comment is that you really shouldn't pull the valve block apart if you dont know that's where the problem lies.
As OB said, if the car "pulls" to one side under braking, I'd be checking for a stuck front caliper piston first. But if the car really "dives" to one side, that could be symptomatic of a jammed abs valve. This is because a jammed valve means you have no brakes operating on one front wheel, so the dive to the othe side is very severe.
On the drivers side, you have an actuation unit and an abs valve block. They are bolted together but quite separate elements. I've never heard of a problem with the actuation unit. It's the valve block that causes the problem as you've read about.
My suggestion: Go through the front brakes thoroughly checking caliper and pad movement. Then test the valve block in situ. Then test drive the car carefully.
{Just to clarify. It's not the brakes/calipers, which are all new. It only "jerked" to the left when I heard the Solenoids going nuts during very light braking. Based on the discussion below it makes sense that it jerked left, as the ABS/Valve Block disabled the Right Front caliper due to erroneous input.}
Hi gang. VERY STRANGE FAULT IDENTIFIED.
I appreciate the advice. I think I found the problem and I'm not happy.
I started the Teves diagnostic fault tests. It failed step 8; RH Front Ohm check at ABS ECM connector Pin 7 & 25.
Instead of .8-1.4 K ohms; I got 53 ohms(direct continuity)! So I undid the connector, tested the Sensor and got 1.15 K ohms...in range, so the sensor is good.
I have continuity from the 2 pin "Harness" sensor connector at front, to the ECM connector in the boot at Pin 7 & 25; neither is grounded to Pin 1 or chassis. BUT THEN I discovered there is continuity between Pins 7 & 25 (only 53 ohms resistance---a short)..... There is not suppose to be. (I verified this on the left side, and the parts car, and through analysis of the wiring schematic.) This means I have a short between the Green Wire terminating at Pin 25, and the outer shielding which terminates as the White wire going into Pin 7.
There are no bulkhead connectors in this harness. I believe it is continuous and may actually go through the sill? I noticed the ECM had been fiddled with before I think, as the mounting bracket was a little bent and the rubber bungee was missing. (I know this because I found one on the parts car.) With any luck, the short will be just before the ECM connector where the shielding is soldered to the white wire which is terminated with the pin. I will post some pics of this connection. If it's not on the back end, I don't know how I'll find the short between them. Just to be sure, I disconnected the Connector at the Solenoid Valve Block; no change. Note: All continuity tests were done without the ECM being connected, so it's not that. QUESTION. If I disconnect the Valve Block connector, I should be safe to drive with fully functional and pressurized brakes, but no anti-lock feature. By disconnecting the valve block connector, the solenoids won't try to prevent the right side from lock-up and thus no wonky ill effects,
Orangeblossom,
To give an update on work so far. We have tested each solenoid for the healthy sounding click. None would click , we took one out and saw it move with 12v applied. I figured they were gummed up, looked a bit nasty when pulled out of block.
Cleaned solenoids, screens and empty block with an ultrasound cleaner. Could not find new screens, or O-rings new anywhere. Hydraulic supplier could get O-rings but told me they would be no good for brake fluid. I am going to use the old ones they look pretty good.
Bought a roll of 16 ga stranded high temp wire. My problem today is, the fellow soldering says the 16 ga wire is too big. Looking at it and the module I agree with him.
I cannot find my operations manual. I have been searching the web.
Can anyone tell me what size fuse goes to the abs module or what size wire will carry the amp load on the wiring inside the module?
Thanks again,
Don
No one can tell you its Safe to drive with the ABS disconnected and its probably also illegal, as if a Car is fitted with ABS then it is supposed to be working
And if you had an Accident, then your fault or not your Insurance Company might well throw out your Claim, and so I wouldn't attempt to drive the Car until you've got her fixed
Wonderful guide to addressing the issues (and shortcomings) of the teves ABS module. I'm faced w doing this job myself after making the same mistake of winding the front brake Pistons back into the calipers as I thought the pulling to one side was due to a sticky piston or brake pad. Now have the abs warning light on all the time.
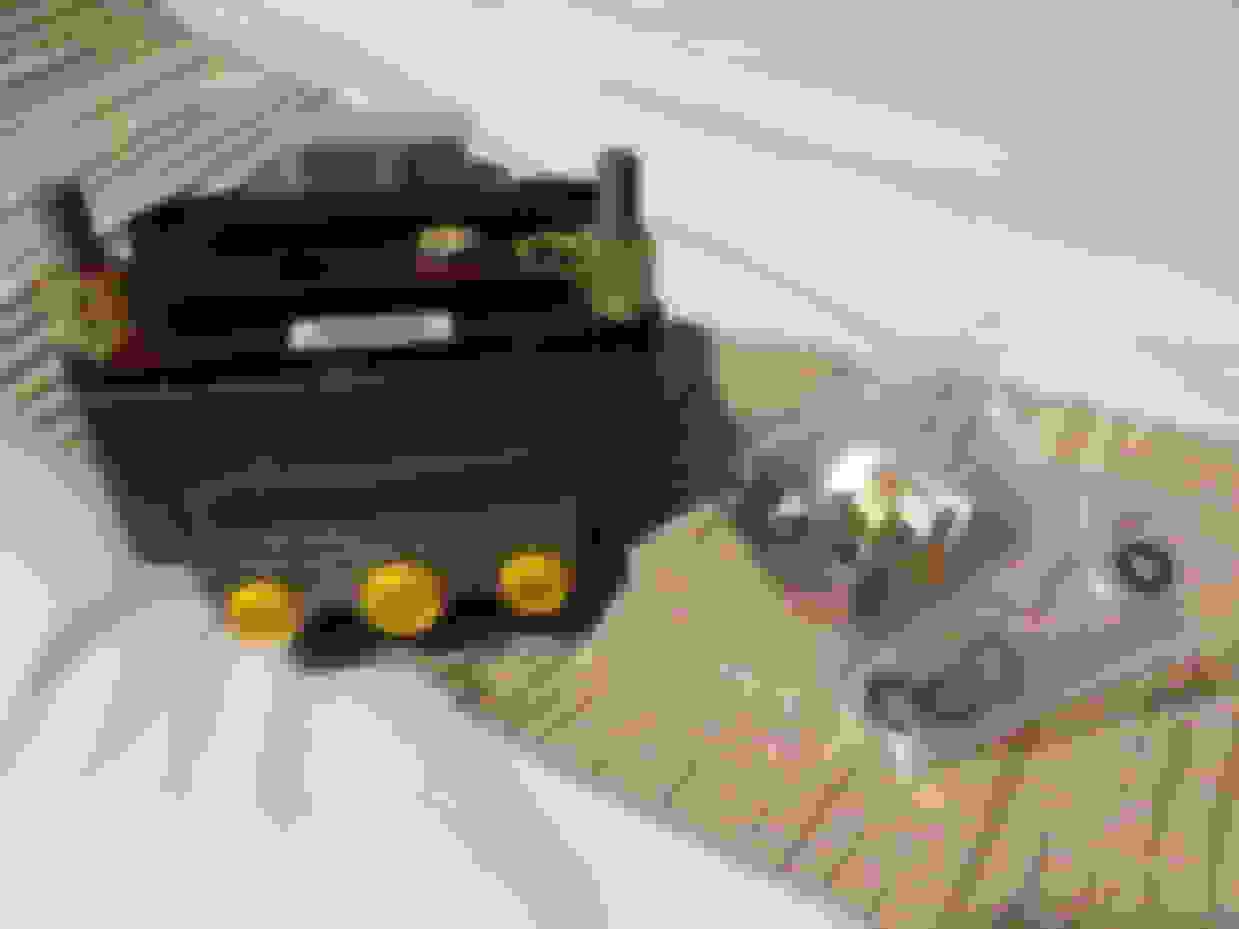
I contacted one of the XJS specialists who can source a reconditioned abs valve unit for my 1995 6.0 coupe at a cost of �1200. However, I have found a rare Jaguar repair/upgrade valve unit part number JLM11336 which was for the equivalent XJ6/XJ12 . Question is - would it work on the XJS? Does anyone know the difference between the XJS upgrade part JLM11337 and this one for the XJ6? Photo attached..
As you probably know, JLM11366 is the valve block that was fitted to late XJ40 cars. It differs very slightly from the equivalent XJS unit insofar as the front cover plate is a bit thinner. I've never known what was the difference between the two units or why Jaguar chose to have 2 different valve blocks on what should have been identical brake setups. I don't know if the different cover plate is a reflection of different valve sizes. We would need to take both blocks apart to really see the difference.
Will it fit an XJS? In my na�ve opinion, yes. You might have to put some small spacers on the end of the 3 mounting bolts as the XJS ones are slightly longer because of the increased thickness of the cover. And in theory, the 3 brake pipes might have to bent very slightly to compensate for the reduced thickness of the new unit. Alternatively, you could put small spacers where the brake pipe connector plate is attached to the valve block in order to keep the original distance of the brake pipes original.
Would I personally take a chance in fitting one? Yes, to the extent that I bought a new one of the XJ6 valve blocks a few years ago for the inevitable day that I might need it.
Thanks for your reply Paul. Your view is already what I had been thinking myself. I was going to swap over the cover plate from my existing unit and check the valve were similarly wired up the same - ie all pins in the same order but other than That, I couldn't see a physical difference between both units.
Whilst going ahead with the valve block replacement, I plan to renew both front calipers and flexible brake hoses at the same time. New discs were installed recently ( hence the issue of contaminated brake fluid pushed into the valve unit) any tips when it comes to purging the old fluid from the front brake lines and reservoir? I'm wondering whether I should remove the brake fluid reservoir at all or keep it in place to avoid disturbing the seals.. And then just to flush through with new brake fluid. Btw, does anyone use Dot 5.1 instead of Dot 4 to reduce the hydroscopic uptake?
Cheers Ian

 10-03-2016, 04:23 AM


 . However, I have found a rare Jaguar repair/upgrade valve unit part number JLM11336 which was for the equivalent XJ6/XJ12 . Question is - would it work on the XJS? Does anyone know the difference between the XJS upgrade part JLM11337 and this one for the XJ6? Photo attached..