A/C water drainage in passenger footwell fixed! RESOLVED "How To"
#61
 11-28-2016, 01:48 AM


Dang it, I have a 2010 XK and my vin number does not
fall in the range of the effected duck bill models, but I ended
up with a puddle in my passenger footwell today dripping
from the center of the blower motor...
Is it possible reach in from the top of the engine bay and cut this
bill with some compact scissors?
Thanks!
fall in the range of the effected duck bill models, but I ended
up with a puddle in my passenger footwell today dripping
from the center of the blower motor...
Is it possible reach in from the top of the engine bay and cut this
bill with some compact scissors?
Thanks!
#62
11-28-2016, 02:38 AM
Talking to my local nimble jaguar tech, I followed his advise and it worked. I also tried Denver DDs technique, only to have it fail.. With the black plastic engine cover off, from the left side of the engine, using your left hand inverted so your palm is facing upward, guide your hand upward toward the steering wheel. Your middle finger should feel the opening to the duck bill. once you become familiar with that opening, I used the thin metal wire that is used for the dog invisible fence flags to then send up into that hole. Jabbing as best I could, I then did the air vents closed, air sent to console setting, recirculate, on high. Water came gushing out. In the summer time, I keep the sound insulating material off the blower fan area to make it easier to see the water drip, in the event the duck bill is stuck. Once I see this, I do the vent trick and it works. I now, on the first hot summer day, I run the ac for a while as I am driving. once in a parking lot, I do the vent trick to force water through the duck bill drain. once I see that I am usually good for the rest of the season.
Could you please tell me a little bit more, i'd like to try this.
I'm wondering if i can get a pair of mini scissors down there
thanks
#63
11-28-2016, 07:33 AM
Veteran Member
Join Date: Jan 2015
Location: Naperville, Illinois USA
Posts: 4,649
Received 1,975 Likes
on
1,326 Posts
When you access from the top, you don't have to lower the transmission. I found it easier to access from the right hand side of the car with my right hand (more clearance on the right hand side).
There is another thread on this forum that has pictures of homemade tools used to cut the duckbill:
https://www.jaguarforums.com/forum/x...lution-149349/
There is another thread on this forum that has pictures of homemade tools used to cut the duckbill:
https://www.jaguarforums.com/forum/x...lution-149349/
Last edited by kj07xk; 11-28-2016 at 11:20 AM.
#64
11-28-2016, 10:24 AM


The link on this page you need to view is AC Drain Duckbill Fix: my solution.
Follow the advice and fashion your own tool and buy or barrow the camera they suggest. I found mine at harbor freight, and I have used it for other projects.
A number of us have had success following the advice on the above link..
Follow the advice and fashion your own tool and buy or barrow the camera they suggest. I found mine at harbor freight, and I have used it for other projects.
A number of us have had success following the advice on the above link..
The following 2 users liked this post by Stu72:
trkyam (11-28-2016),
Wayne Hayes (09-17-2019)
#66
07-15-2021, 10:25 PM

First of all I want to thank Hawaii for this ingenious idea. I take NO credit! This will save you lots of money and is a great inexpensive solution to the problem. I did the repair in about an hour and thought a few pictures would make it easier for some folks. Again thanks to Hawaii!!
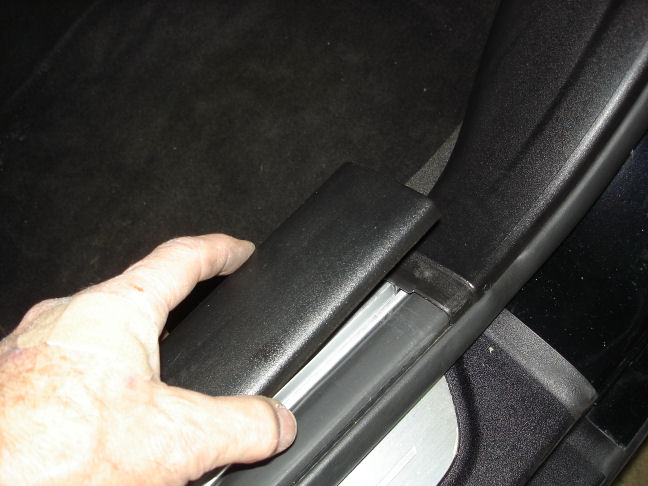
Start by pulling the door sill panel up with your hand. Then the side panel in the passenger footwell pulls back toward the rear of the car to remove.

then pull the carpet back to get access to things. It takes some effort as the carpet is stiff.

this is the view looking up at the plastic box which contains the condenser unit inside. It is slightly lower at the front of the unit, but its hard to drill a perpendicular hole in this area, so I targeted one with an X a little to the rear
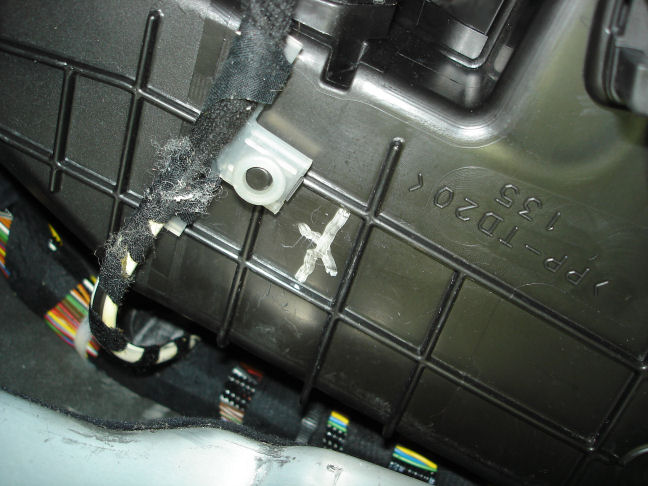
A right angle drill gives you more room to drill. You can see if I chose a site closer to the front, my drill would have to be angled preventing a perpendicular drilling approach. I drilled carefully as Hawaii recommended but after I broke through in this location there was nothing inside to damage.


This is the site I chose to drill through the floor. It worked out fine but you may want to go a little closer to the outside of the car (away from the transmission tunnel) The picture below shows where I exited beneath the car.
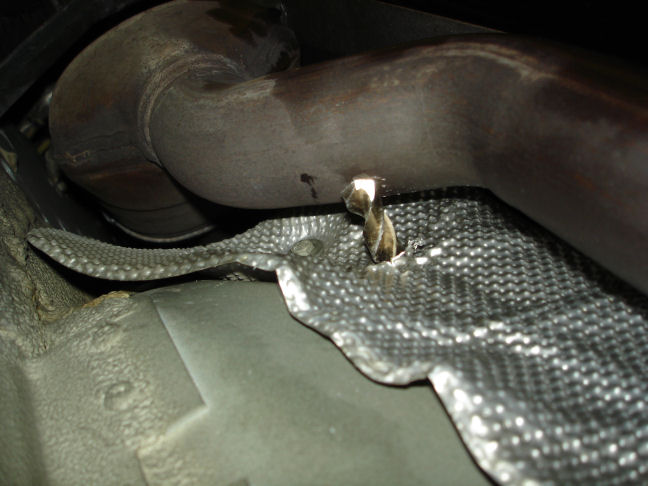
Because of the proximity to the exhaust pipe I decided to use a brass fitting. I was concerned the plastic tubing would melt and seal itself. I found some brass fittings in my "junk" drawer that worked out.
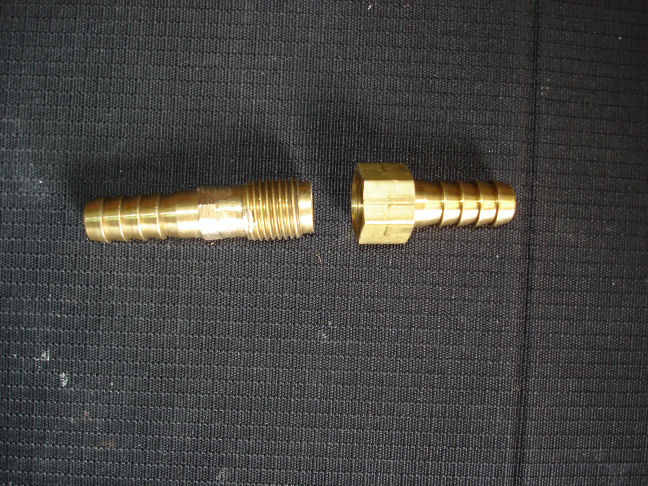
I assembled these parts and put the long end through the flow secured by some JB Weld


I put some JB Weld on the threads of another fitting I had and threaded it into the condenser box.
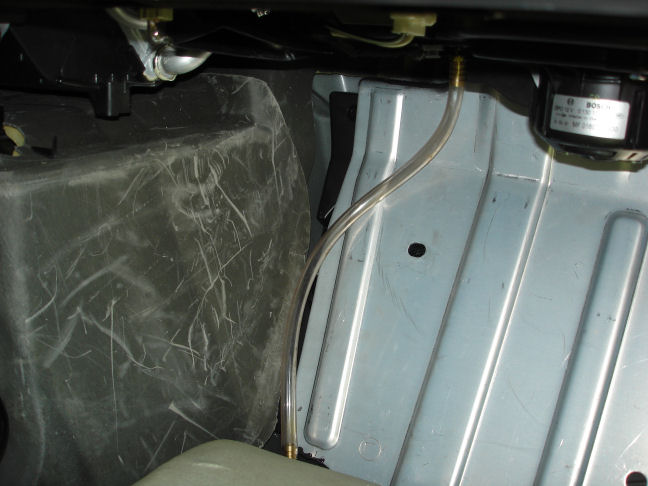
from there I just routed a plastic tube between the two brass fittings.

I tucked the carpet back in place and replaced the panels. Looks good!
My thanks again to Hawaii for this tip. PM me if you have any questions!
#67
07-16-2021, 09:55 AM
Veteran Member
#69
07-18-2021, 08:57 AM

Senior Member
i hate to tell you to pull your carpet back up, but i think a hose clamp is called for on that barb down at the floor, at a minimum. good on you for realizing the exhaust is a concern, but the heat will of course also heat that fitting up and conduct it upward to the hose. really, you may as well use hose clamps on both ends purely to account for vibration over time.
#70
07-18-2021, 10:27 PM
This attempted fix seemed logical to do & I tried it myself. Unfortunately it did not work for me or the Dentist who posted these pictures. He and I later discussed what we learned from this wasted effort. What works consistently for the XK plugged duckbill is the two home made cutting tools on this thread that cut open or off the duckbill. Before drilling into your Jaguar, do all you can to find the shop manual for your X type and look into how your A/C drains the condensation & where. The pictures shown above are an attempt to drain the overflowing condensate water before it reaches the “Blower Fan” & shorting it out. It was placed on the same plane as the fan, not the lowest point (where the stuck closed duckbill is located). This failed because the large volume of accumulated water condensate sloshed beyond that small drain and still
entered into the blower fan.
entered into the blower fan.
#71
09-25-2021, 08:09 AM
Member
I got the dreaded dripping in the passenger footwell this morning
I was reluctant to drill and fit a pipe so tried closing the vents with fan on max. To help it along I repeatedly opened and shut one of the vents to “surge” the pressure…. after about 10 minutes the water started dripping under the engine and stopped dripping inside the car so it certainly looks like it worked! I will keep my eye on it and repeat regularly!
I was reluctant to drill and fit a pipe so tried closing the vents with fan on max. To help it along I repeatedly opened and shut one of the vents to “surge” the pressure…. after about 10 minutes the water started dripping under the engine and stopped dripping inside the car so it certainly looks like it worked! I will keep my eye on it and repeat regularly!
The following users liked this post:
V7Sport (09-25-2021)
#72
10-05-2021, 10:15 AM
Member
Putting the fan on full and closing the vents seemed to work initially but only lasted a few days.
I needed a more permanent fix and read on another thread about cutting the end off the duckbill.
it seems to have permanently cured the problem�
Full details in this thread:
https://www.jaguarforums.com/forum/x...7/#post2449854
I needed a more permanent fix and read on another thread about cutting the end off the duckbill.
it seems to have permanently cured the problem�
Full details in this thread:
https://www.jaguarforums.com/forum/x...7/#post2449854
#73
02-13-2022, 03:41 PM
I read your post and thought this would be my final solution when all else fails, being a car guy and new to Jaguar I bought a 2010 XK last of my vin B36433 with 51k miles on it, super clean car. I was completely amazed that an engineer would design this duck bill and have it drain at the top of the transmission tunnel with no access. I called my local Jaguar dealer and they wanted to rip out the 12 year old dash and get to it that way� $195 per hour x 12 hours to do the job�. That was not an option to fix a $5 piece of rubber�.. So I started to read lots of people on this site were talking about lubricating the duck bill. I have very skinny arms I don�t see how they were able to do this. I also went and bought a borescope and I was able to see that sucker tucked in there�. So I started to think if water is to run out of this piece of rubber, and all these people are rubbing there finger with lubricant on the rubber , what if oil came out of the duck bill� Would the oil passing through pool enough to soften and lubricant this piece of rubber, and the answer is yes. I used olive oil since I didn�t want any oil smell coming out of my ac vents. I had to do it twice but it worked �. Remove the 3 screws that hold in the blower motor, no need to unplug it the wire is long enough, I took a paper cup and put about a 1/2 an inch of olive oil in the cup and cut off the rest of the cup with a scissor. You need to jack up the passenger side so the front wheel is an inch off the ground, take the cut cup with the olive oil put your hand up in the hole where your blower came out and push your hand towards the center of the car as far as you can get it and dump the cup�..let the car sit for ten minutes on the jack, put the blower motor back in and lower the jack � my first time nothing came out so I tried to close all the vents and motor on high and I got a sprinkle of water and oil, but driving around not enough to do it on its own. Parked it thinking this was not going to help, but I kept reading all these people talking about lubricating the duck bill by hand, but I can�t reach it�so I repeated my olive oil idea a second time after letting the car sit for two day but this time we I put in the oil when I took the car off the jack I had drops of oil on the floor, about a two inch circle�. I live in Florida and yesterday was 86 degrees so I took her out for a 4 hour trip and not a drop on the passenger carpet�. So this crazy idea worked�. I did change the original blower motor and relay before trying the oil trick�.So my thought is maybe this needs to be done once a year to keep the duck bill soft�..
#75
02-14-2022, 12:18 AM
Veteran Member
Join Date: Jan 2015
Location: Naperville, Illinois USA
Posts: 4,649
Received 1,975 Likes
on
1,326 Posts
Glad you�re happy with your solution, but it kind of makes me cringe. Purposely creating an oil leak, to leave drips of oil in my garage, on my driveway, and worse� on friend�s driveways.
Also, that oil will collect dirt and grime on the transmission bell housing, which is currently very clean. No, not for me, but then I was successful in slicing off mine.
Also, that oil will collect dirt and grime on the transmission bell housing, which is currently very clean. No, not for me, but then I was successful in slicing off mine.
#76
02-14-2022, 04:16 AM

#77
10-12-2023, 02:01 PM

First of all I want to thank Hawaii for this ingenious idea. I take NO credit! This will save you lots of money and is a great inexpensive solution to the problem. I did the repair in about an hour and thought a few pictures would make it easier for some folks. Again thanks to Hawaii!!
Start by pulling the door sill panel up with your hand. Then the side panel in the passenger footwell pulls back toward the rear of the car to remove.
then pull the carpet back to get access to things. It takes some effort as the carpet is stiff.
this is the view looking up at the plastic box which contains the condenser unit inside. It is slightly lower at the front of the unit, but its hard to drill a perpendicular hole in this area, so I targeted one with an X a little to the rear
A right angle drill gives you more room to drill. You can see if I chose a site closer to the front, my drill would have to be angled preventing a perpendicular drilling approach. I drilled carefully as Hawaii recommended but after I broke through in this location there was nothing inside to damage.
This is the site I chose to drill through the floor. It worked out fine but you may want to go a little closer to the outside of the car (away from the transmission tunnel) The picture below shows where I exited beneath the car.
Because of the proximity to the exhaust pipe I decided to use a brass fitting. I was concerned the plastic tubing would melt and seal itself. I found some brass fittings in my "junk" drawer that worked out.
I assembled these parts and put the long end through the flow secured by some JB Weld
I put some JB Weld on the threads of another fitting I had and threaded it into the condenser box.
from there I just routed a plastic tube between the two brass fittings.
I tucked the carpet back in place and replaced the panels. Looks good!
My thanks again to Hawaii for this tip. PM me if you have any questions!
#78
10-14-2023, 02:54 PM
Hi Jack H.
Denver DDS and I had corresponded on this same technique after we both implemented it and found IT FAILED. Please don’t go drilling holes in your XK like we did. Take a look at the picture with the “White X marks the spot”.. Next notice that that area is FLAT. Next notice how small the whole opening is for the brass fitting. By the time the water has filled the cavity above the closed DuckBill, imagine a full bucket of water sloshing around. This is what is happening in the XK. With a good bump, or sharp turn while driving, this sloshing water flows like a flood across the flat plastic “flood plane” in the ac box. It is flooding over, past, around, and a small portion down this brass fitting & plastic tube. Most ,unfortunately, will still flow into your blower fan & motor risking not only shorting out the fan but the control module next to it. (Back when it happened to me about $150 each to replace).
For me, Slicing the DuckBill has been a permanent fix with no ill effects years later. The XKR poses a challenge vs XK due to placement of Turbo/blower but I believe the XKR owners found a way to do the same.
Good Luck!
The following 3 users liked this post by Stu72:
#79
10-16-2023, 10:35 AM
Member
See my post here for a much simpler solution:
https://www.jaguarforums.com/forum/x...-135630/page4/
(#61, I think)
https://www.jaguarforums.com/forum/x...-135630/page4/
(#61, I think)
Last edited by fritzthecat; 10-16-2023 at 10:36 AM. Reason: Wrong number

Thread
Thread Starter
Forum
Replies
Last Post
shahuk
F-Type ( X152 )
11
03-05-2018 06:55 PM
Jaguar Forums Editor
Jaguar Press release
1
04-03-2014 02:08 AM
Currently Active Users Viewing This Thread: 1 (0 members and 1 guests)