When you click on links to various merchants on this site and make a purchase, this can result in this site earning a commission. Affiliate programs and affiliations include, but are not limited to, the eBay Partner Network.
Kicked the car outside. Makes me smile to see it out in the wild
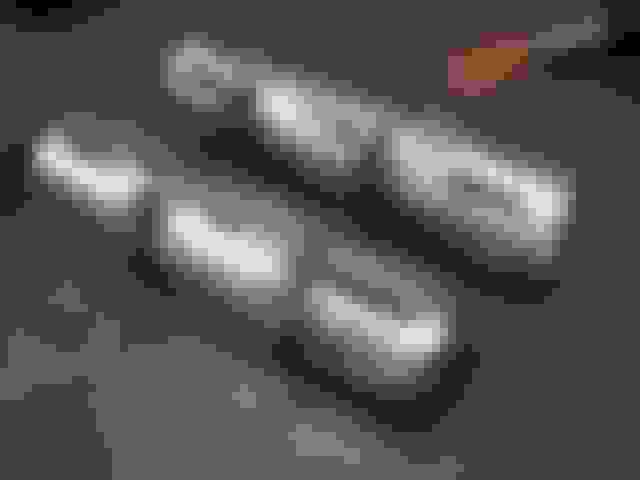
Some G-code and the CAD drawings to figure out the G code. Te plate to hold the transfer tube is on the left and the cap with holes is on the right. Hard to see but the red lines at the cute center line for a .250" end mill.
So, a couple hours later and I have accomplished nothing on the exhaust. My buddy called and said he had a round baler that needs some love so I had to jockey junk around to make room for it. The XKR took this moment to completely lose it's mind. Battery has pooped out pretty much completely. I had been getting a smart key battery low and the NAV wouldn't boot up this morning so I knew something was up. Ran it over to the local Battery One and they said they'd never seen a battery that would die with the slightest load like this one does. They had one shorter 800 cca AGM battery but it only had 140 minutes of reserve capacity. They were able to order a true 850 cca that has 170 minutes of RC for $1.98 more. Said it'll be a little taller and I'll need to wait until Wednesday to pick it up. $211 with tax. Hoping this'll take care of some other problems since the battery acts like a big shock absorber for the electronics.
So, while the car sat looking pretty with the charger trying to bring the old battery back to life I moved the dump trailer I'm working on, moved my '93 Mustang. Then I pulled my '68 Fairlane out (and had to take some pics) to put the engine hoist back away from working on the Chevelle.
Here's a couple pics of making the dummy pipe 'muffler' inserts. I milled the 1" x .250 slots in the 1.75" transfer tubing, the end caps and the divider plates.
It took a couple hours to figure out and make the parts. I spent a lot more time brainstorming what I could make with what I had on hand than actually doing it. What's almost scary is everything fit together really well.
Arrows show the direction of the pulses. The divider plates are arranged so there's some dead space for the pulse to dissipate itself into. I only welded the downstream end cap on so I can play with the tune. Fully built the gas will hit the front cap, go through it's 3 holes and around to the slots. Extra pressure will get caught in the chamber after the slots. What makes it into the transfer tube gets another chance to dissipate itself in the middle chamber. Finally what's left will hit the back cap and get pushed out to the tip. The cap is tacked on for testing and the insert will be held in the pipe with a set screw or bolt once done. I expect the resonators tone to change after a year or so of running them.
I don't know if it'll work well or not but it was an interesting mental exercise doing it.
For the most part they are OK but I did take one to court after he attacked me while I was pushing snow two years ago because he didn't like that the snow I pushed out of the alley got piled up by the red painted curb next to 'his' parking spot.
OK, car talk time. Exhaust is meh. I tried it as shown and it was still the same so I tacked the other end caps on and had an Einstein moment that the noise may be coming out the front of the pipes. I tied a pair of shop rags around the holes and now it sounds almost exactly how it did before I started messing with the 2nd pipe.
So, once it cools off I'll pull the assy out and weld up the front end. Then remove my insert and start over.
So, face palming here a little. Exhaust with the one cap inserts sounds amazing at idle and really amazing running it hard. At a cruise it's horribly horrible. It's not so much that one set of pipes is droning, but both sets drone. I was watching a quarter vibrate across the console at 80 mph on a dead flat stretch of road. It does sound oh so good but it's not workable. Fortunately I brought along my Allen wrench so I'll dig the inserts out and try it open pipe. I don't think it can get any worse.
Yes, Pacific can suck it just due to their prices. There's a place down in Bedford VA that lists a lot of wrecked XKR's so I'm going to call them eventually. I bet I could drone down there, pop and install the pancake in their lot and purr back home.
So, quick follow up, no insert / open pipe allowed mt to feel the little hairs in my eardrums vibrate back and forth at 2200 rpm. Nauseating and far worse than anything I've driven. I bailed at the next exit and shoved the damn inserts back in at a Walmart parking lot. I put them in backwards and they didn't make much difference in sound compared to the ride to work but they were oh so much better than an open pipe.
Once they cooled off I popped them back out and tacked the other end cap as well as put a little fiberglass mat between the divider plates. We'll see if that makes any difference. If not I'm seriously thinking about making an insert for the resonator to try and tone them down a notch or two. I know it's all about troubleshooting and tuning but I want to make a little progress here.
OK, I think I'm about as far into getting this exhaust to work together as it is currently. Ran the bike yesterday and back to the car this morning. Exhaust sounds good but it's been commented as being raucously too loud by a bunch of different folks. I've gotten the tone about where I want it but the drone is also still there. Car sounds great at 90+ but not so much at 70-85. I haven't contacted Chris a Mina as they are on the West coast.
Current plan is to enjoy the car, dig into the passenger headlamp and sort out the exhaust as I get different ideas. Should be getting the new battery in the morning.
So, silly rabbit time. Got home last night still not happy with the exhaust and noticed that the drivers side insert had walked 1/2 way out of the pipe. Slid the darned thing into the depth of the pipe and closed the set screw tighter and this morning's trip to work was blissfully less drony. So, methinks I need to drill and tap the old dummy pipe further in the bore and lock the inserts way in the back.
So, I think that worked. If not it sure sounds good just shoving the inserts deeper in the pipe.
Moving forward. Picked up my battery this afternoon. Nice to see it's a current manufacture, not something dusty off the shelf from 2013.
Pulled the old one out for some more WTF stuff. This is what the battery tray looks like. All the white stuff is acid fluff. I cleaned up most of it when I pulled the battery for testing. The aluminum hold down was a solid chunk of funky white stuff. No, I didn't lick it. I pulled the spare tire out and gave the whole damn thing a baking soda bath.
Finally, back in place. It's a little taller vs. the other one but worked out well. I do have to plug one of the vent ports bu that shouldn't be a big deal.
Oh yeah, when I put the spare back in I wrapped an old flannel sheet around the tire to act as a dampener in case part of my drone was actually the floor vibrating. I don't know if it made a difference but the tire well didn't thump when I tapped it with my finger once the tire was locked in place like it did before. Time will tell.
Someday, when you finish your car, I'm sure gonna miss the day to day updates; it's like reading a new chapter in a novel, everyday. Keep up the good work.
That Jag "bone yard" has some nice stuff!
Thanks for the link....
Thanks to "Ranchero50", I received this from his bone yard link. I've been looking for one for two years. Mine has a missing tab.
Was $54, a number that was reasonable to me.

 05-13-2017, 11:05 AM