When you click on links to various merchants on this site and make a purchase, this can result in this site earning a commission. Affiliate programs and affiliations include, but are not limited to, the eBay Partner Network.
On my 1995 XJ6VP (132K), the check engine light keeps throwing codes 1185, 1186, 1991 and 1992. I understand these are for the O2 sensors. I replaced all 4 brand new less than 100 miles ago. I replaced each one separately so not to get them mixed up! What else could cause the codes? Of course, the wires are new as are the sensors. The car runs absolutely perfectly with perfect idling when the light is on!
Any help sincerely appreciated!
Richard
Last edited by benzjag; 04-12-2018 at 07:51 PM.
Reason: Add info
The heaters are only on for short while in startup . After 3 faults detected the light will come on .
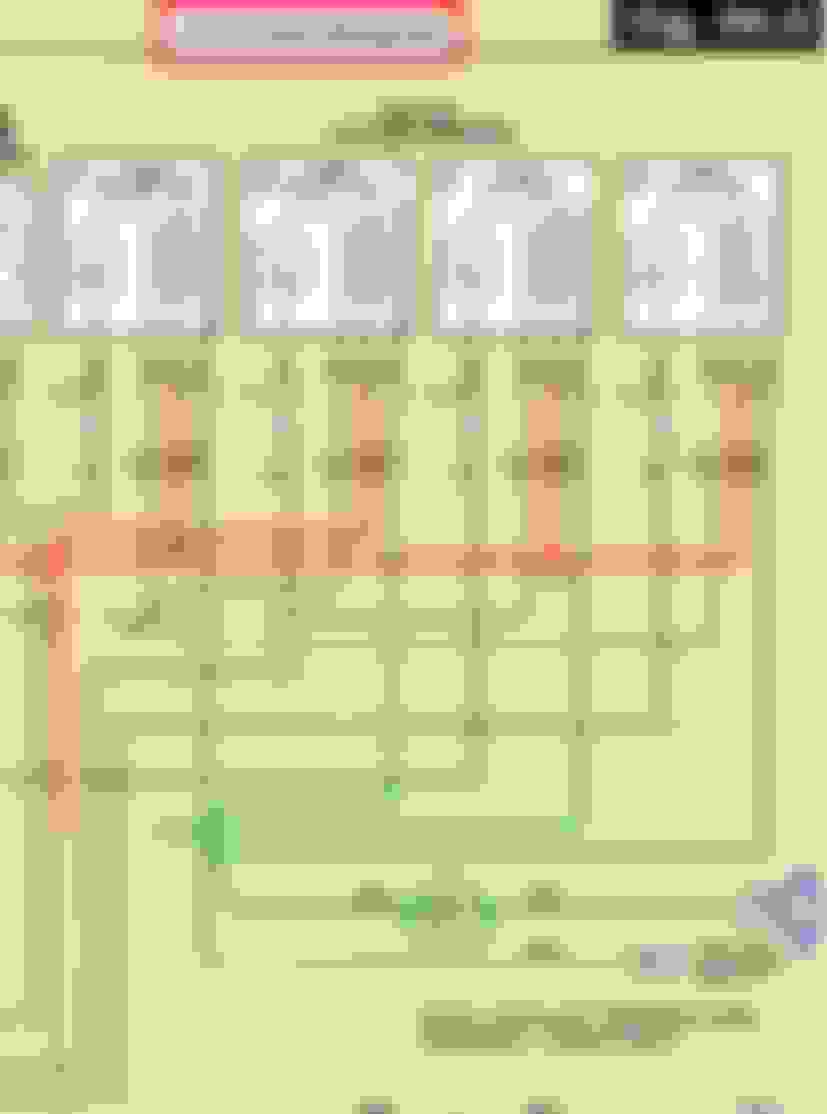
All 4 O2 sensor heaters come off fuse # 14 / 10 amp RH engine fuse box and run through the troublesome Papa Indy 61 connector . White / Green is the wire color . You can clean and spray 61 and 1 next to it and if you need to replace it post again for the link . Clean all the grounds along the engine firewall and the ones on the body rail just fwd of the 61 and 1 connectors , one on left rail also . The ECU also has a case ground through the aft lower screw .
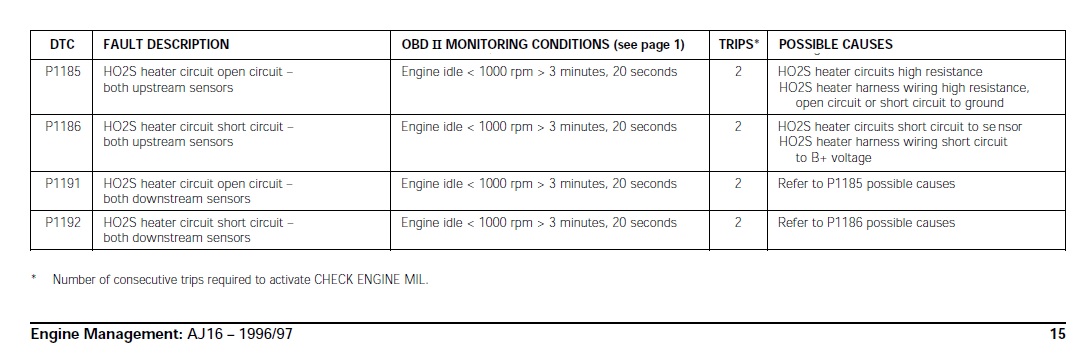
Here is the relevant extract from the Jaguar DTC Summary list for the four codes. See 'Possible' Causes' in the right hand column.
The MIL is illuminated because trigger values have been exceeded and not because the vehicle is about to grind to a halt.
As you have already replaced the HO2S, this takes a leap forward in the logical troubleshooting sequence but at 132k miles, replacement sensors is not a bad investment.
1. the chance of all sensors failing together is extremely low.
2. the four DTC's suggest a harness fault as the more likely cause.
3. The new sensors eliminate heaters or harness to connectors as possible causes.
4. the same multilock connectors are used by Jaguar in several applications on many models and are a frequent cause of harness faults. However, this is more likely to affect a pair of sensors rather than all of them.
5. a ground connection fault is more likely to affect all sensors.
Thanks Graham. As LP suggested, I cleaned 61 and 1 connector but they were pristine clean already. I cleaned the grounds and likewise, they were shiny & clean. Not surprising as the car has been garaged from new. How do I go about checking the wiring harness, short circuit, etc?
In this case the power is supplied at the fuse and the ECU provides a ground for a moment during starting , maybe a minute . So any wiring fault as a ground to car frame between the sensor and the ECU current sensor would be a bad thing as it robs the current sensor in a diverted path to ground . An open wire would be a bad thing , but all 4 at once being bad at once is not likely
On the other side of the sensors you would look for a bad open broken wire ( or interruption of power ) or the wire going to ground . This fault can accure anywhere between the fuse and any of the 4 wires to the 4 sensors . Is the fuse socket # 14 clean and have grip ?
Look underneath the RH fuse box and you will find a connector right one the box ( other then the lower 61 and 1 ) and inspect for a pushed back pin or socket on the connection . Get on the wire color mentioned before and with a needle meter ( hard to see on a digital meter ) on the resistance scale put the other test lead on each of the same points one at a time and massage the harness around . You don't want to see it bib to high resistance . The take one of the test leads to car frame ground and the other to that one wire as it comes out of the fuse box and massage all 4 wires as they lay it place and assure you go not see resistance go towards zero .
Any one of the 4 connectors could be internally shorting out .
Any further suggestions welcome
The below pick on the Black ECU connector and is needed and I think is really cool :
Last edited by Lady Penelope; 04-13-2018 at 06:53 PM.
1. Remove the exhaust manifold shield and see what�s doing with your exhaust manifold. They are known to crack, but I haven�t seen this trigger codes like what you�ve described, however, maybe your manifolds are in really bad shape?
2. Check the bolts on them too. There are 14 to check, but should be all relatively easy to access.
3. Perhaps a oxygen sensor reorientation is needed? It�s a simple step included in the WDS/IDS menus. Any shop with jag software could do it. You could as well with a Mongoose.

 04-12-2018, 07:48 PM