When you click on links to various merchants on this site and make a purchase, this can result in this site earning a commission. Affiliate programs and affiliations include, but are not limited to, the eBay Partner Network.
My drivers side sun visor was hanging down about an inch from the roof, in addition whenever I folded it down and then put it back up it made a loud snap sound. Very unbecoming a Jaguar. Something had to be done. Searching on the web showed new ones at about $300.00 bucks - ouch! And finding a used one in my color, on the drivers side and not broken was proving to be challenging as well. So it was time to try to fix it myself.
And I am happy to report it took all of ten minutes and the fix is perfect and permanent. Steps to follow:
1.Get a flat screwdriver and pry mirror out. Just put in under the mirror around the four corners and it pops right out. (There are no wires behind the mirror, just contacts.
2. Pop off the cover holding the sun visor to the roof and get a torx bit ready to unscrew the bolt. You will need a bit of an extension because the space is tight (see what I fabricated in my pic)
3. Once the screw is out, pull out the whole thing from the roof and disconnect the wire.
4. Pull back the fabric and you will see the problem. The clam shell plastic housing is separated and needs to be tightly held together. I simply put in a one inch flat head dry wall screw to bring it back together tightly. (Maybe Gorilla glue would have worked as well?). Once I drilled it though the plastic I then removed the screw and used a Dremel to shave off the excess and then put it back in. It does not pierce the fabric on the other side. Put a little red X in the last pic, this is where the screw needs to be.
5. Put it all back together and you will see the sun visor now closes right up to the roof - nice and snug.
6.If the light on the mirror does not go on, press all four corners of the mirror down again, I guarantee the top part was not snapped back all the way in. The light will now work.
I've lived with a floppy left side visor for a while. The problem is apparent when you remove the mirror and see that the plastic clamshell seam is separated.
I first tried super glue on the plastic seam but it wouldn't hold. I held my breath and drilled a hole and tapered the hole so the screw would be flush. I used a 3/4" screw and needed to shorten it slightly. 5/8" should be about right.
Looks like the problem is solved. Thanks for the simple and effective solution.
This reinforces my belief that no engineering time was expended on the interior.
↑ I am not so sure that 'no engineering time was spent on the interior'. I have 110,000 miles and this is the only issue my car ever had regarding the interior. Everything else is perfect. That says a lot about the build quality.
Repaired the two droopy visors on 2007XKR by following these instructions but instead of screwed, glued with Loctite Plastics Bonding System ($6). Clamped overnight and a permanent fix.
What a star you are. Recently bought a 2006 new model xk4.2 convertible.Everything was perfect except for the floppy driver side visor which dropped about an inch and made a horrible crack when you lift it up.
Like you I was staring a fortune in the face to replace it but I looked at your thread and photos, thanks for those.
It was so good, the mirror lifted the screws screwed in and now 10-15 minutes later I can’t stop lifting it up and down.
it works perfectly and I feel like I’ve just won the jackpot, anyone else with this problem follow the mans lead it’s a real easy fix.
Thanks again
I had tried the screw method - not enough "meat" (plastic) for the screw to get a good bite. Next tried "welding" / melting the halves together with a soldering iron - lasted only a day. Next attempt was JB Weld. Slathered it on, clamped it for a few days and now seems to be holding. Thinking the rough edges from the soldering experiment might've given the JB some tooth to hang on to. Do be careful getting past the fabric in whatever attempt you try.
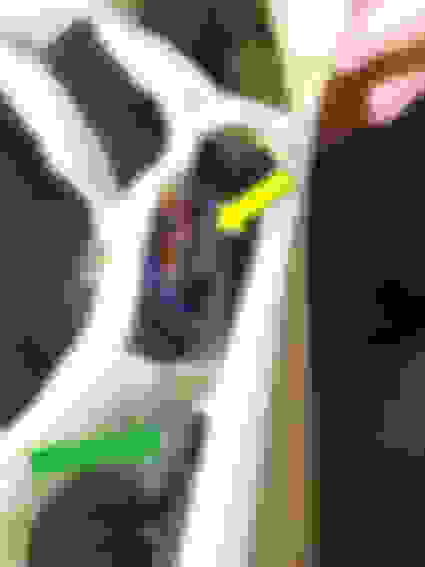
MichaelO - thank you! Love this fix. This literally took 15 minutes at the most. The dealership quoted me $300 to replace with a new one. I've attached a couple of photos. One shows the gap between the two clam shell pieces and in the same photo how they are supposed to be together. The other photo shows how it looks now after I fixed it. No annoying sag at all.
The yellow arrow shows the gap between the two pieces. The green arrow shows how they are supposed to be.
My drivers side sun visor was hanging down about an inch from the roof, in addition whenever I folded it down and then put it back up it made a loud snap sound. Very unbecoming a Jaguar. Something had to be done. Searching on the web showed new ones at about $300.00 bucks - ouch! And finding a used one in my color, on the drivers side and not broken was proving to be challenging as well. So it was time to try to fix it myself.
And I am happy to report it took all of ten minutes and the fix is perfect and permanent. Steps to follow:
1.Get a flat screwdriver and pry mirror out. Just put in under the mirror around the four corners and it pops right out. (There are no wires behind the mirror, just contacts.
2. Pop off the cover holding the sun visor to the roof and get a torx bit ready to unscrew the bolt. You will need a bit of an extension because the space is tight (see what I fabricated in my pic)
3. Once the screw is out, pull out the whole thing from the roof and disconnect the wire.
4. Pull back the fabric and you will see the problem. The clam shell plastic housing is separated and needs to be tightly held together. I simply put in a one inch flat head dry wall screw to bring it back together tightly. (Maybe Gorilla glue would have worked as well?). Once I drilled it though the plastic I then removed the screw and used a Dremel to shave off the excess and then put it back in. It does not pierce the fabric on the other side. Put a little red X in the last pic, this is where the screw needs to be.
5. Put it all back together and you will see the sun visor now closes right up to the roof - nice and snug.
6.If the light on the mirror does not go on, press all four corners of the mirror down again, I guarantee the top part was not snapped back all the way in. The light will now work.
10 minutes of work and no cost!
For anyone who wants to see the visa without the material and mirror on it here are some photos. As far as the cracking noise you heard I am assuming it is the first photo I am putting on here.
I will be using your method to seal it except I will be putting screws around this broken piece for extra support. This piece seems to be the mechanism which keeps the visor at the certain degree that you put it at. Where the cracking noise came from Side view Total unit Culprit section Angle view Undressed Easily broken after Numerous uses Both sides are very weak Open view Before clean up
My drivers side sun visor was hanging down about an inch from the roof, in addition whenever I folded it down and then put it back up it made a loud snap sound. Very unbecoming a Jaguar. Something had to be done. Searching on the web showed new ones at about $300.00 bucks - ouch! And finding a used one in my color, on the drivers side and not broken was proving to be challenging as well. So it was time to try to fix it myself.
And I am happy to report it took all of ten minutes and the fix is perfect and permanent. Steps to follow:
1.Get a flat screwdriver and pry mirror out. Just put in under the mirror around the four corners and it pops right out. (There are no wires behind the mirror, just contacts.
2. Pop off the cover holding the sun visor to the roof and get a torx bit ready to unscrew the bolt. You will need a bit of an extension because the space is tight (see what I fabricated in my pic)
3. Once the screw is out, pull out the whole thing from the roof and disconnect the wire.
4. Pull back the fabric and you will see the problem. The clam shell plastic housing is separated and needs to be tightly held together. I simply put in a one inch flat head dry wall screw to bring it back together tightly. (Maybe Gorilla glue would have worked as well?). Once I drilled it though the plastic I then removed the screw and used a Dremel to shave off the excess and then put it back in. It does not pierce the fabric on the other side. Put a little red X in the last pic, this is where the screw needs to be.
5. Put it all back together and you will see the sun visor now closes right up to the roof - nice and snug.
6.If the light on the mirror does not go on, press all four corners of the mirror down again, I guarantee the top part was not snapped back all the way in. The light will now work.
10 minutes of work and no cost!
I would think using a rivit or two would be a permanent and very flush solution.
I would think using a rivit or two would be a permanent and very flush solution.
I had gone through my own �I can do routine� before seeing the posts here which are superior to my solution particularly the riveting option which I think will be much neater.
I had to return the bulging piece to its resting position inside the clam shell first then holding the shells together tightly I tried welding the plastic where torn even reinforcing with melted hard plastic and copper wire. This didn�t hold as not strong enough. Then I had to apply black gorilla utility tape strategically but generously to give strength to the closure of the clam shell. Voila that held firm enough for the movements. Anyone with ideas for fixing the cloth problem. It�s the Morzine Cloth Canvas. I will be making this site my first port of call when next I have a problem with my car(XJ Rsport 2015) With visor in full open position. Bad sealing of the cloth looks unsightly and make the effort at the major problem less appreciated. Actual Sun visor function seem perfect. Sun visor in partial open position. Holds perfectly! Sun visor in full closed position. Also perfect hold. It�s a Jaguar therefore this fix is temporary as I have to figure how to get a more befitting cloth cover or may have to ultimately buy replacement when I have loose cash or win the lottery. 🤣🤣🤣
I have to figure how to get a more befitting cloth cover
An interior retrimmer would sort that out for you for a very low cost. I think it's a good idea to do both sides at the same time so they match, but that's up to you 🤷
An interior retrimmer would sort that out for you for a very low cost. I think it's a good idea to do both sides at the same time so they match, but that's up to you 🤷
Well done on the fix
Thanks, I�d probably just live with it for now to see if the fix lasts and if the passenger side goes too. I�ll have to take focus off the visor and think less of it and enjoy the car with the visor in closed position not looking too bad and the use in open position is for brief periods. Just glad I got the function back with little ingenuity
Excellent. I just bought my 2008 XKR roadster and the driver side sun visor has the same problem as you describe. Now I know what to do to fix it. Love this forum!
BD
I just did this with rivets over the weekend, which holds really well when I rotate the arm, but it now functions worse than before? It used to droop down an inch and not move, now it droops down slowly almost all the way vertical. Does anyone know how the mechanism works? Is there a cam that I had in the wrong position when I riveted this?
Glad I found do this thread. My new to me ‘15 XKR passenger (right side) visor droops a tad. The internal photos really help. I’ll being giving a fix a go.
Repaired the two droopy visors on 2007XKR by following these instructions but instead of screwed, glued with Loctite Plastics Bonding System ($6). Clamped overnight and a permanent fix.
This repair is now 4 years old. With recent conversation on droopy visors, I thought an update on current status might help. So I can continue to recommend the Loctite Plastic repair. A repair that is invisible.
This repair is now 4 years old. With recent conversation on droopy visors, I thought an update on current status might help. So I can continue to recommend the Loctite Plastic repair. A repair that is invisible.
Thanks, I just ordered the Loctite plastic bonder,
Glad I found do this thread. My new to me �15 XKR passenger (right side) visor droops a tad. The internal photos really help. I�ll being giving a fix a go.
I did - there was a clip underneath that rides on a metal rod that holds the clamshell to the roof. It's this clip that rotates and it had gotten out of rotation when I had the plastic apart. I fixed that and re-rivet'd and it's worked fine since.
I did - there was a clip underneath that rides on a metal rod that holds the clamshell to the roof. It's this clip that rotates and it had gotten out of rotation when I had the plastic apart. I fixed that and re-rivet'd and it's worked fine since.
Glad to hear that. I’m awaiting Amazon to delver my Loctite. I’m going to give the Loctite approach a try before trying screws or rivets.

 09-04-2017, 11:32 PM