When you click on links to various merchants on this site and make a purchase, this can result in this site earning a commission. Affiliate programs and affiliations include, but are not limited to, the eBay Partner Network.
I cant get any of the round hex screws out of the bottom of the middle bracket or the hose on the left. what in gods name is the key to freeing those up/ ive already taken the rear paneling out and that little canister deal is in the way bc i cant even get to the screw on rhe right side of it. UGGHHHH sick of it. the entire process wasn't bad until this. now im so mad im about to take it to a dealer.
Sorry was beyond frustration. There is a canister with lines coming out of it haven�t traced it to see what it is but it�s got a rubber hose that the kits have included so think I�ll cut that. But here you go I�ve already removed the 2 piece bulk head and I�m worried ill
never get it back in ha. . I think I just lack 3 bolts.
See pics Thank you.
kinda confused. one is the vacuum resonator you posted in another thread, lots of people delete it but you dont need to take it out to pull the charger?
The other I think is the rear pipe, again sits in place and connects the intakes to the heater core?
yea thats that large rubber hose that goes directly into the middle of the firewall. im gonna delete that vacuum resonator. so that is actually what they call the symposer and the entire thing gets junked ?
Well no problem because I was way beyond frustrated when working on this and cursed loudly the Engineers that designed it! And I am an Engineer!
Your picture shows where the symposer connects to the intake system on the back of the engine. That's also where the VAP block off plate goes. I removed the two large wire bundles right above that corrugated plastic tube in your picture. Follow them over to the passenger side and disconnect them. Now fold them back towards the drivers side of the engine. Not much help but every little bit helps here!
I had to remove or at least push out of the way that huge wire harness that is centered over the rear of the engine. I cut the zip ties off to get more room.
Here is my pile from when I removed the Symposer?
Might help to know what your trying to get out.
The S shaped hose goes to the firewall and is directly in the way! The vacuum line to mine was crispy and I either broke it or it was already broken in several pieces when I finally got it all out. You can see broken line sticking out of the vacuum elbow above.
Note those are Torx bolts holding everything together? T30.
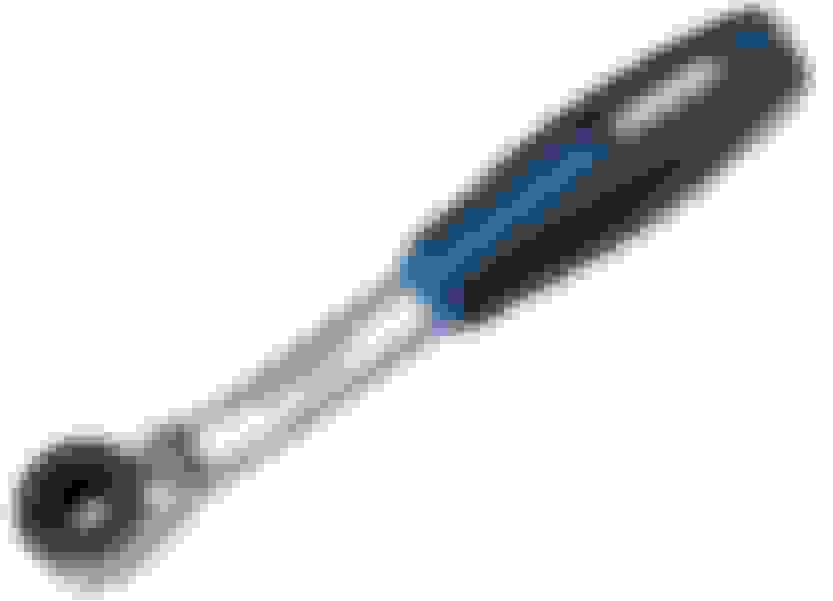
I have posted this several times before but I use a very small ratchet and have cut down T30 bits to make the assembly thinner.
This is a Vim HBR4 about $15-$20 plus the bits you need.
I do see you got those terrible secondary bulkheads out too!
Here is all that I left on the engine.
I reconnected the vacuum hose and electrical plug when I re-installed it.
I put a rubber cap on the firewall "trumpet".
I had to buy a pack of ten of these. If you want one for free send me a PM with your address.
.
.
.
Ok so you did pull that giant pipe out. Was making sure that didn�t go to some heater core or something. Yes I�d gladly take one I�m happy to send you a couple bucks for shipping sir. Finally got it all done. I�m sending off the SC to get rebuilt and ported. What a hassle this was. Had I known I�d never of done it.
im replacing everything I can plugs all lines oil cooler gaskets even the intercooler most likely. Never want to do this again.
ok so speaking of the wire harness in back I faught that thing and basically snapped off some of the plastic but didn�t give a **** haha.
funny thing I just went and bought a new ratchet like that this morning haha. Would have been nice and I did consider cutting some if I couldn�t find some low profile ones.
tell me is the install easier ? Bc I can�t fathom as hard as it was to remove them that it�s easier going back in. I can see the screws falling already. Thanks for the advice and the plug. I gotta find a delete cover or I may just make one on my mill.
Yes if you have access that will cheaper. This was posted back when we were still trying different things and the VAP plate had not yet been released. I have NOT verified any of the measurements! Since I got lazy and just purchased the plate.
Here is the factory plastic block off plate. This was real hard to find! Again too expensive for what it is. Note the part number is Land Rover and there is no corresponding Jaguar part as this was never used on any Jaguar only factory on certain Land Rovers!
I think it's kind of cheesy too. They just filled in the tube with plastic instead of making a new simple flat plate part. Basically they just ripped the corrugated tube off and filled the hole! That's why it looks like something should attach there. This was obvious when I got all my old stuff out and looked at how it was put together.
Be careful as there is a very similar block off plate sold for some small Ford engine that look real close but won't fit. More than one person purchased those!
This is the VAP plate if you have not seen it. I found the screws were longer than factory so I cut them down to match.
Oh I forgot? You mention how difficult getting the T30 bolts out and in? We had a member a long time ago and everytime he found those on his car he threw them away and put in regular hex head bolts with the same threads. What this does is let the head of the bolt raise up into the socket as it's loosened. Unlike the Torx which you have to fight into the head the whole way out. I just reused all the factory bolts.
Envious of the porting! I have talked to several porting companies. Which one did you go with? What are they promising for HP and TQ?
Close to doing it but that larger 2300 blower keeps calling my name? Just don't see any results yet but I have heard a few have been sold.
.
.
.
Last edited by clubairth1; 07-30-2024 at 02:45 PM.
Well I had seen that VAP one that�s where I originally heard of the concept of doing it but when looking back there I said nope. Not doing that. And then of course 3 weeks later all this happens.
So what about just taking the original cap there and filling the hole with jb weld or something similar?
so I ended up going with bob Stiegemeier. He said currently they are 3-7 days turnaround. I�ve read alot of good and bad things about him in the forum but mostly seems like they centered around communication problems. I didn�t really get into performance much bc I don�t ever believe people who are selling a performance product. It�s always gonna be inflated it seems. However he did mention in passing that we can see 5-7% but I didn�t push him on it or even care. It will be what it will be. I�ll let you know if I notice any difference when she is all back together.
Don't see why you can't make your own block off plate? Should work fine.
Well from my experience I wish you luck with Bob!
But do report back on how it turns out as we all need more information.
I will probably use Greg Kong at Kong Performance. Porting SC
I did not mention it but if I add the upper pulley I do want it to be Griptec machined. GripTec Pulley
Don't know if your going with the solid coupler or not? We had some great discussions on the forum about all the option's for couplers. I have the correct Eaton made one on the bench and ready to go! Eaton Solid SC Coupler
.
.
.
When putting the coupler on make sure it's a tight fit
I've installed on F-types/Xjs/Xfs and never go back to oem,I hope you've seen my Videos for tips ,Finally reliable and peace of mind
 07-28-2024, 08:11 PM