When you click on links to various merchants on this site and make a purchase, this can result in this site earning a commission. Affiliate programs and affiliations include, but are not limited to, the eBay Partner Network.
On my car the throttle cable works, but has become less smooth operating recently; hardly surprising as it is 39 years old. So I set about finding out if new ones were available.
During this search I found out that there are at least THREE different types fitted to HE engined pre- and post- facelift V12 RHD cars.
Most forum members will be familiar with the throttle capstan end of the cable: a barrel shaped endpiece on the inner cable slots into the capstan; while a threaded end to the outer is held by two nuts into a bracket: Blue circles: barrel shaped endpiece in capstan, adjustable threaded outer in bracket. Orange circle shows the kickdown mechanism which is part of the pre-facelift throttle cable.
However, the arrangements at the throttle pedal end of the cable are less well known. In fact the inner is fixed to the throttle pedal using a ball-shaped endpiece, which is common to all models of RHS V12s, pre- and post- facelift. However the OUTER at the pedal end of the cable has two different fixing methods:
Cars of my age and earlier: there is a bracket inside the car above the pedal to which the OUTER is fixed by means of a threaded endpiece and two nuts, just like that at the capstan end. This cable has the kickdown mechanism as shown in the photo above, and is illustrated in this photo:
At some point after my model was built, but before the facelift cars, this was changed to a "rubber-grommet-and-pressed-in-inner-piece" which anchored the pedal-end of the outer to a hole in the firewall (bulkhead). This cable also has the kickdown mechanism as shown in the photo above. The pedal-end outer bulkhead fixing is shown in this photo:
The later facelift cars - and I am not able to give the VIN numbers at which this change happened, so exactly when it happened I do not know - had a throttle cable with NO kickdown mechanism on it, the normal barrel fixing to the capstan, the normal bracket fixation for the outer at the capstan, the bulkhead fixation of the outer at the pedal end, and an unchanged fixing to the actual pedal.
It is important to understand I knew none of this when I started out!
So, as I did not need the pre-facelift kickdown throttle-cable mechanism, and as I saw a brand new facelift cable for sale for only 11 UKP, I bought it, assuming it would fit. Which it did not! Because it was too short overall and even if it had not been, when the outer at the pedal end was anchored to the bulkhead and attached to the pedal, there was no inner left to connect to the capstan!
So point 1: facelift RHD throttle cables will not fit pre-facelift cars, even if you do not need the kickdown mechanism.
Therefore I got searching for pre-facelift cables and Moss and SC Parts list them at a horrendous price: https://www.scparts.co.uk/en/accelerator-cable/210618/
However, even if I were to pay such a sum it would not have helped me as I needed one with the threaded fixing for the outer at the pedal end.
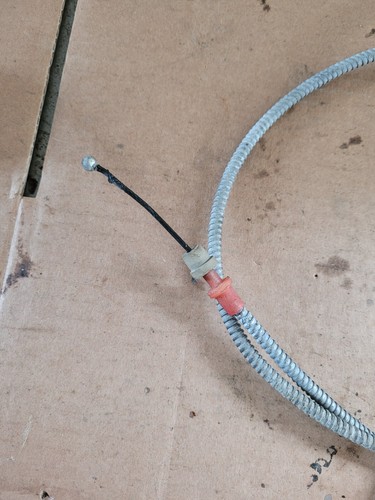
Then it dawned on me that as I did not need the kickdown mechanism, all I needed was a bespoke cable from a specialist. I ordered one up from Wicks and Martin, Bromyard, Worcester, UK, https://www.wicksandmartin.co.uk/ and after a brief phone call the spec was sent to them and 50UKP and 10 days later I had my cable! Inner length overall 120cm. Outer LOA 106cm. Therefore the INNER must have 14cm showing outside the outer.
Pedal end: ball fitting and threaded outer.
Capstan end: Barrel fitting and threaded outer. No cable-based kickdown mechanism needed, see link above.
Tomorrow I will fit it, somewhat of a pain as the shin trim under the dash and the ankle trim to the A pillar have to be removed. I will attach photos of the pedal end fixings for future reference for anyone having the same repair.
So while this post is limited in application to RHD pre-facelift cars, it does show, in conjunction with a capstan operated kickdown microswitch, that the problem of an NLA throttle cable can be inexpensively overcome. The exact spec of the cable as given to the maker is attached.
Last edited by Greg in France; 08-16-2024 at 09:49 AM.
Confusingly, the Jaguar parts diagram for pre-facelifts only shows the twin-nut type attachment at the pedal end, which MIGHT question whether the part number CBC5056 number is correct for late pre-facelifts, but I THINK it is.
The old cable has to be undone at the capstan end (easy) and at the pedal end (not easy).
remove the inner cable from the capstan and undo the outer of the cable from the bracket (1/2 AF nuts)
remove the under dash shin trim, and the A post ankle trim
this reveals the pedal, the inner cable to pedal fixing, and the outer cable fixing bracket: The outer bracket is easily seen, and the sleeve and split pin that secures the sleeve over the ball end of the inner, thus ensuring the ball stays in its detente in the pedal
remove the split pin and push the sprung sleeve back along the pedal to enable the ball end to be removed from it
undo the bottom fixing nut from the cable outer (the nut shown in point 3 above) using a 1/2 AF socket
tie a piece of string round the inner just above the ball and ask your helper to (a) pull the inner into the engine bay as far as it will go and then (b) SLOWLY pull the outer up through the bulkhead from the engine bay side, until the OUTER is JUST clear of the bracket, whereupon you shout "stop!"
the outer will spring rearwards a touch and you ask the helper in the engine bay to push the outer back into the cabin. This enables you to undo and remove the top nut of the two holding the outer to the bracket. At which point you are in this position (red ring shows the bracket, blue the string) with both fixing nuts removed and the string on the inner:
now you pull the outer and inner out through the bulkhead (firewall) into the engine bay. The you tie the string onto the new cable inner just above the ball and your helper feeds it through the bulkhead while you pull on the string. REMEMBER the topmost of the two fixing nuts of the outer HAS to go onto the outer BEFORE you thread the inner and outer through the bracket! Thus your helper has to push the new cable down rearwards of the bracket to enable you to do this. The cable naturally wants to go in this direction so with a bit of fiddling down it comes far enough for you with your head in the footwell to get at it. This is the old cable, but the point is that you MUST thread on the topmost of the fixing nuts BEFORE threading the cable through the bracket, The blue ring show about where the nut should be.
Now for the REALLY tricky bit: With the inner and outer of the new cable as shown in the above pic and with one of the fixing nuts threaded onto the outer about halfway up, your helper has to SLOWLY pull the cable back into the engine bay, while your finger is on the ball pushing it back towards the bracket hole, until the ball is JUST above the bracket, whereupon you shout "STOP". Then you push the ball/cable forwards to be right above the bracket hole and shout "PUSH". With luck and a bit of fiddling the end of the cable will come down through the bracket and you sigh with relief.
You then thread on the bottom fixing nut (1/2 AF) and do up the nut tight enough with a socket, engage the ball end in the pedal, pull back the sleeve and refit the split pin as shown here:
If the pedal end is fixed about halfway on the threaded outer, you should be able to adjust the cable using only the capstan end adjuster and Job Done:
No unsightly kickdown plate, all adjusted and ready to road test.
Road test:
You would not believe the difference! I had no real idea of how unsmooth the old cable had become! Even as we backed out of the barn I immediately noticed how smooth the accelerator pedal felt. Its operation was so much lighter, and the cruise control operated even more smoothly than before. VERY glad I did it.
Last edited by Greg in France; 08-17-2024 at 07:27 AM.

 08-16-2024, 09:04 AM