

Changing Accessory Belt, Headlight adjusters, flushing coolant, etc
#1
 03-26-2015, 06:29 AM


Hi friends
I am having some vacation days, so I am going to relax working on my Jag....
I will take this opportunity to try to take some pics and do some DIY guides to everything I change in the car
So, some advice needed before rolling up my sleeves
Accessory belt:
I know the best/only way is to jack up the car, remove the front right wheel and wheel cover and then pull the tensioner, remove the old belt and fit the new one, then release the tensioner.
Something puzzled me in the workshop manual were they say to undo a tentioner bolt ??? is this realy necessary? It wasn't for the water pump belt.
As for parts I think it is C2S24900 for Jag and 6PK2465 for Bando. Dayco gives the same PN as OEM (maybe they supply it ).
).
Headlight adjusters:
My left side is busted, so because I need to remove the bumper I will change them both...
Ordered this from ebay
Jaguar X-type headlamp repair kit adjuster 2 SETS + GEARS | eBay
and also this
Jaguar headlight washer X-Type S-Type cover cruciform (1x PAIR) | eBay
there are a couple of very nice youtube videos that give you a step by step howto change them.
Coolant flush:
So, tell me if something is wrong here.
take the cap from the expansion tank
take the " purge bolt" from the radiator, let the coolant out, put the plug in.
replace with new coolant WSS M97B44D, and put the cap on.
Run the car with AC on and max temp and then do it again a couple of times.
Is this correct ????
Also, having the front bumper off is there something I can do while it is out?
I appreciate any inputs
Regards
I am having some vacation days, so I am going to relax
working on my Jag....I will take this opportunity to try to take some pics and do some DIY guides to everything I change in the car
So, some advice needed before rolling up my sleeves
Accessory belt:
I know the best/only way is to jack up the car, remove the front right wheel and wheel cover and then pull the tensioner, remove the old belt and fit the new one, then release the tensioner.
Something puzzled me in the workshop manual were they say to undo a tentioner bolt
As for parts I think it is C2S24900 for Jag and 6PK2465 for Bando. Dayco gives the same PN as OEM (maybe they supply it
Headlight adjusters:
My left side is busted, so because I need to remove the bumper I will change them both...
Ordered this from ebay
Jaguar X-type headlamp repair kit adjuster 2 SETS + GEARS | eBay
and also this
Jaguar headlight washer X-Type S-Type cover cruciform (1x PAIR) | eBay
there are a couple of very nice youtube videos that give you a step by step howto change them.
Coolant flush:
So, tell me if something is wrong here.
take the cap from the expansion tank
take the " purge bolt" from the radiator, let the coolant out, put the plug in.
replace with new coolant WSS M97B44D, and put the cap on.
Run the car with AC on and max temp and then do it again a couple of times.
Is this correct ????
Also, having the front bumper off is there something I can do while it is out?
I appreciate any inputs
Regards
Last edited by amcastro1; 03-26-2015 at 06:40 AM.
#3
03-30-2015, 03:04 PM

#4
03-30-2015, 04:13 PM
#5
03-30-2015, 06:00 PM
#6
03-30-2015, 08:08 PM
You don't need to loosen any bolts to change the serpentine belt, aka, accessory belt. You simply rotate the spring-loaded tensioner to loosen and remove the belt (see #5 in attached pic).
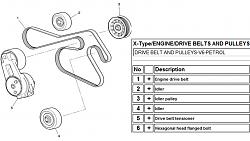
The tensioner spring is strong, so releasing the tension takes some leverage. Look for a square hole in the back of the tensioner arm. It's sized for a 3/8 inch drive to apply leverage, rotate the arm, release tension and change the belt.
Now for the trick: The space between the tensioner and right front wheel well is too narrow for your typical 3/8 inch socket wrench. Two options:
1) Use a 3/8 inch breaker with a skinny head (costs ~$10), or
2) Grind the spindle down on an old 3/8 inch socket wrench until it's skinny enough to fit between the tensioner and wheel well.
Good luck.
#7
03-31-2015, 04:34 AM
thanks dwclapp.
I noticed that the space is very narrow. I was thinking to pull the tensioner down with a high tension wire or a strap wrench while my friend removes the belt. I only have a 1/2 breaker bar and I believe that with the 3/8 adapter it wont fit. I believe someone on the forum mentioned he used a hack saw to do this (maybe I will give it a try)
I noticed that the space is very narrow. I was thinking to pull the tensioner down with a high tension wire or a strap wrench while my friend removes the belt. I only have a 1/2 breaker bar and I believe that with the 3/8 adapter it wont fit. I believe someone on the forum mentioned he used a hack saw to do this (maybe I will give it a try
Trending Topics
#8
04-10-2015, 09:45 AM
Well, managed to change my headlight adjusters.
I ended up removing the entire bumper and using my wife's hairdryer (instead of the oven) to remove the "glass" from the headlight.
Now let me do my part and share my findings:
-to remove the bumper you do not need to remove the 3 stubborn screws from the under liner. I had 2 struck and while hanging on to my cutter and wearing my safety glasses I decided to try to pull it out. It comes out very easy after removing all the screws from the edge of the bumper.
-the multiplug that you have to remove to take out the headlight is a b#tch. You have to PULL a small "lock" back and not push it like 99.99% of all multiplugs (thanks jaguar)
-if you have headlight washers like I do, there is a small clip where the hose attaches to the headlight. take it out with small needle nose pliers and pull the hose. Some fluid will drop but very little (protect the multiplug).
-managed to find inside bumper one w5w bulb and a small screw driver dropped several years ago
Now to the other part of my "vacations"
Took out the wheel well and tire to change the accessory belt.
From under the car I can see very clearly the belt and the tensioner. I managed to fit a breaker bar on the tensioner but I am unable to move it (I tried very hard)
Now for the questions:
-from under the car should I be pushing or pulling the tensioner (I�ve been pulling it).
-should I release the tensioner bolt to ease the tension?
- should I sign for gym and try harder
dwclapp I tried as you instructed but I was not able to move the tensioner. My breaker bar is small , so maybe I need a bigger one to apply more leverage
help needed fast...
thanks
I ended up removing the entire bumper and using my wife's hairdryer (instead of the oven) to remove the "glass" from the headlight.
Now let me do my part and share my findings:
-to remove the bumper you do not need to remove the 3 stubborn screws from the under liner. I had 2 struck and while hanging on to my cutter and wearing my safety glasses I decided to try to pull it out. It comes out very easy after removing all the screws from the edge of the bumper.
-the multiplug that you have to remove to take out the headlight is a b#tch. You have to PULL a small "lock" back and not push it like 99.99% of all multiplugs (thanks jaguar)
-if you have headlight washers like I do, there is a small clip where the hose attaches to the headlight. take it out with small needle nose pliers and pull the hose. Some fluid will drop but very little (protect the multiplug).
-managed to find inside bumper one w5w bulb and a small screw driver dropped several years ago
Now to the other part of my "vacations"
Took out the wheel well and tire to change the accessory belt.
From under the car I can see very clearly the belt and the tensioner. I managed to fit a breaker bar on the tensioner but I am unable to move it
(I tried very hard)Now for the questions:
-from under the car should I be pushing or pulling the tensioner (I�ve been pulling it).
-should I release the tensioner bolt to ease the tension?
- should I sign for gym and try harder
dwclapp I tried as you instructed but I was not able to move the tensioner. My breaker bar is small , so maybe I need a bigger one to apply more leverage
help needed fast
...thanks
#9
04-10-2015, 10:35 AM
Rotate the tensioner counter-clockwise to release tension and remove the serpentine belt.
My 3/8 inch breaker bar is short, only ~10 inches. So I extended the handle to ~18-20 inches with a short length of pipe. With the added length, it was relatively easy to rotate the tensioner counter-clockwise and release the tension.
Be careful that your fingers stay clear of pinch points between the serpentine belt and pulleys when removing the old, and install the new belt.
The following users liked this post:
amcastro1 (04-10-2015)
#11
04-10-2015, 12:59 PM
I found it easiest to do the A/C & Crankshaft pulleys last, while lying on my back under the car. Position the handle of the breaker bar towards the firewall, pull down with one hand to rotated the tensioner counter-clockwise, and with the other hand, loop the serpentine belt over the A/C & Crankshaft pulleys.
The following users liked this post:
amcastro1 (04-10-2015)

#14
05-11-2015, 05:23 AM
#15
05-11-2015, 07:38 AM

Thread
Thread Starter
Forum
Replies
Last Post
Currently Active Users Viewing This Thread: 1 (0 members and 1 guests)