Definitive "how to" for HIDs in the fogs
#1
 03-10-2008, 08:53 PM

Ok gang, here we go. I know there has been a lot of discussion about this subject (fitment, bulb sizes, etc) but I've installed HIDs in my foglights, and it really was quite easy. There is a little modification involved here and there, but nothing you guys aren't capable of, providing you have some basic hand tools and a decently equipped garage.
Things you'd like to have handy:
-Car jack & two stands
-HID kit of your choice, H1 in size.
-Basic hand tools
-Torx bit to remove the wide shield underneath the car
-A 5/16" socket with some extensions (Not necessary, will get to later)
-Wire cutters, soldering gun, heat shrink tube/electrical tape
-Silicone sealant or fast drying epoxy
-Power drill, with an array of bits ranging from 1/4" to 1/2"
-Dremel with a good metal burring tool
-Bench mounted vice
-Zip ties
-Acetone/Laquer thinner
-3M (or similar) adhesive pads/tape. GOOD stuff. Don't go cheap here.
Get the car in the air, removing the front wheels isn't necessary. Get it up enough to be able to wiggle around underneath it. If in doubt, put it up higher than you need.

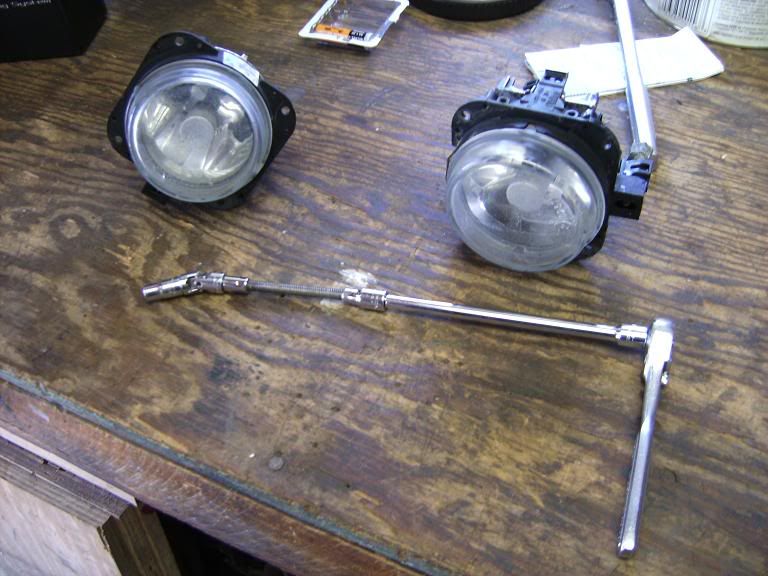
After removing the dozen or so torx bolts that hold the large plastic shield in place, you'll see the fog light assemblies on either side of the car. Each is held in by two small 5/16" bolts, and a series of clips molded into the bumper that are released by rotating the assembly with some force.
Passenger side. The two bolts on this side are at the 11 and 5 oclock positions, if viewing the assembly from the rear. You probably won't be able to see the top one, so you'll probably just have to feel around for it, and get to it with an extension or two on the ratchet.
Driver side - much more room to work over here. The bolts on this one are at the 1 and 7 oclock positions, again, if viewing from the rear.
Now, you don't *have* to remove the entire housings, but it will make the mounting of the ballasts much easier. So, it's probably a good idea to go ahead and take them out. They'll actually benefit you being out of the car in another way down the road.
After you've cussed a lot (see: upper screw on passenger side light), and have treated your eyes to a dirt and rust bath, you've got the lights out. Here are the housings out of the car, with a glimpse of the collection of extensions and swivel joints needed to get to the top screw on the passenger side light.
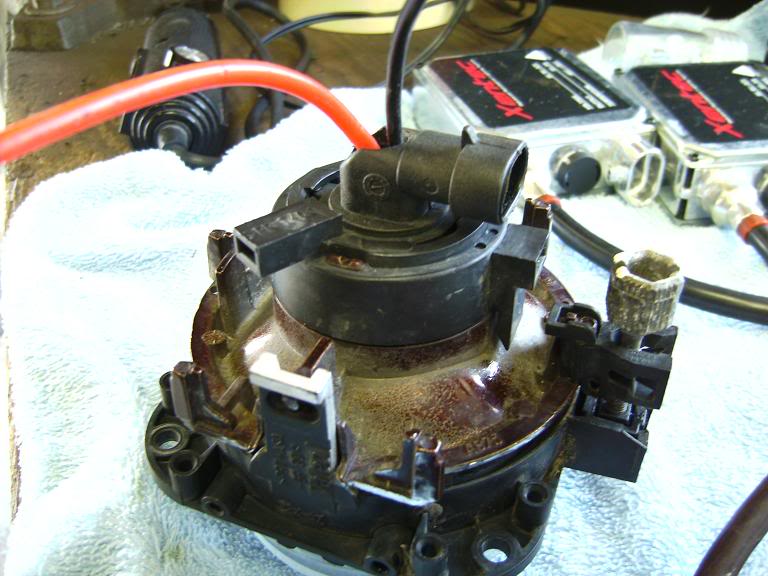
Rear of housing
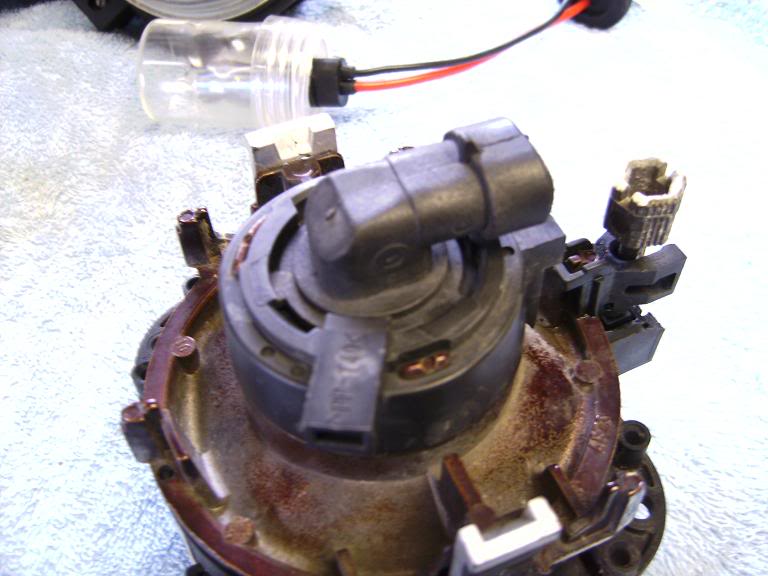
Removing the bulb from the housing is done as follows:
Rotate per red arrows
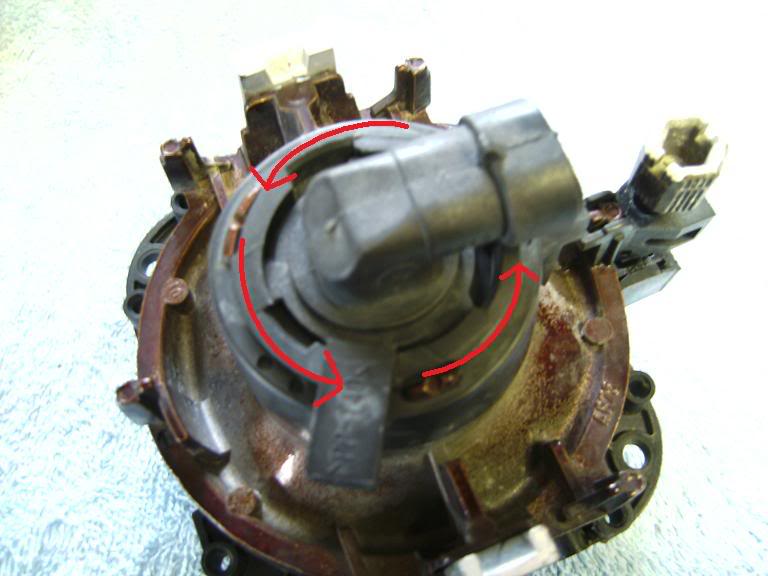
Remove bulb
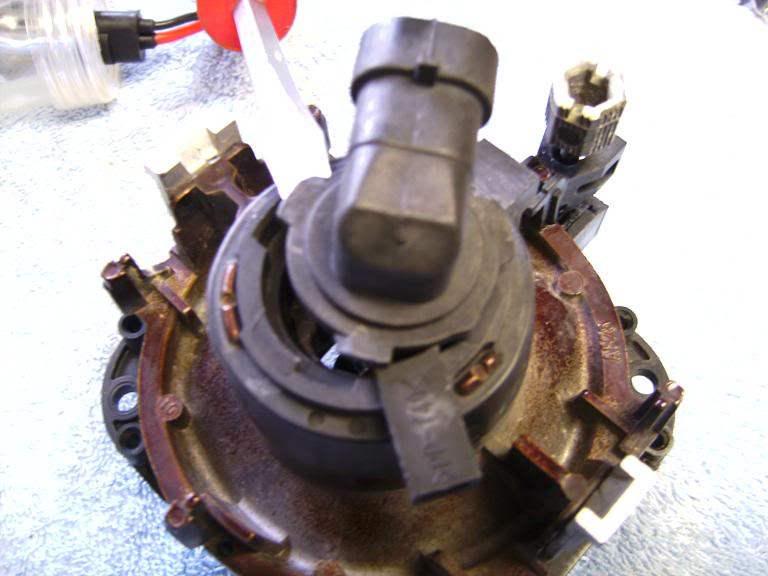
Here's what comes out
Which disassembles to this

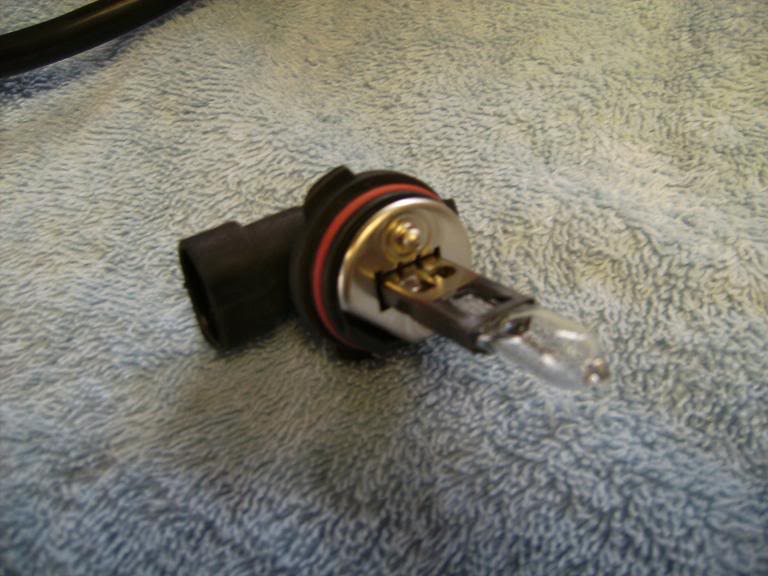
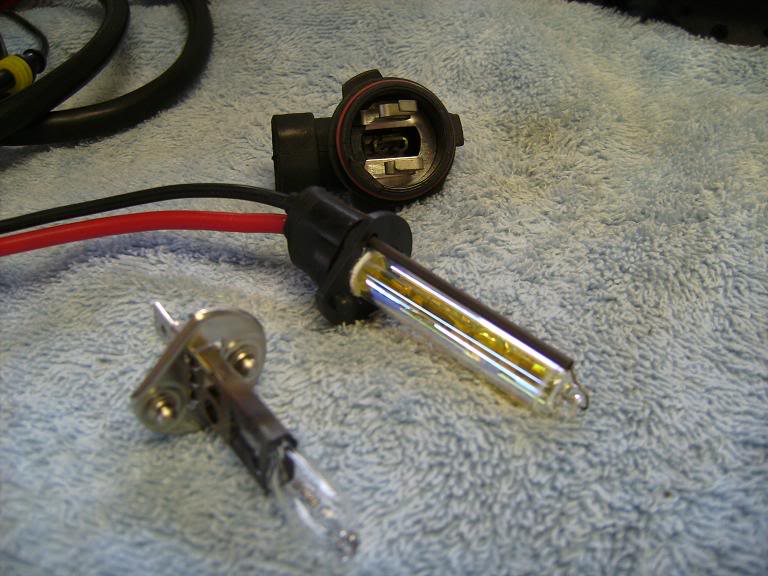
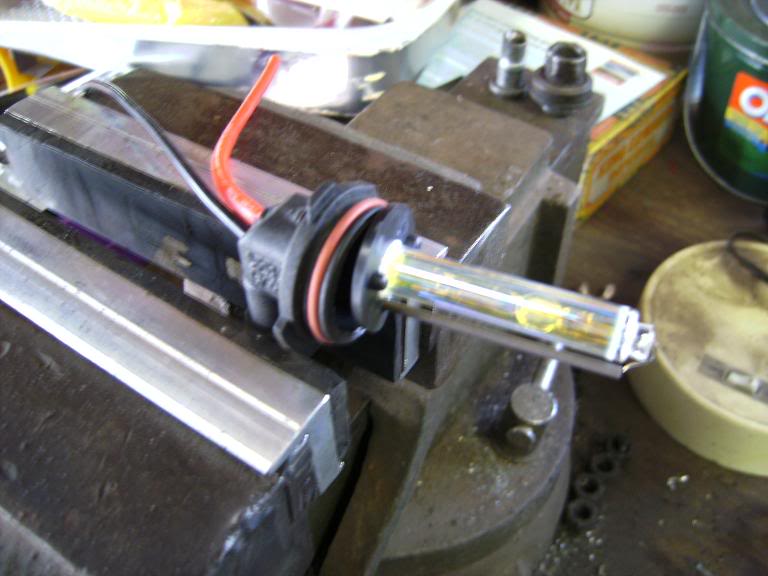
Here's where there's cause for confusion when ordering the correct bulb size. The bulbs are indeed H1s, but Jaguar uses these goofy black elbow connectors that have the electrical connection molded into them, making it impossible to install HID bulbs (with wires coming from the back of them), as the wires would have no where to go.
Comparison of stock H1 bulb to what you receive with an H1 HID kit
So here's what we do. Secure the black elbow in the vice, with the big round hole facing up. Use some needle nose pliers to snap off the springy connectors. Then, drill a 1/4" pilot hole in the valley between the edges that the two connectors were on. Drill the hole all the way through. Don't be shy.
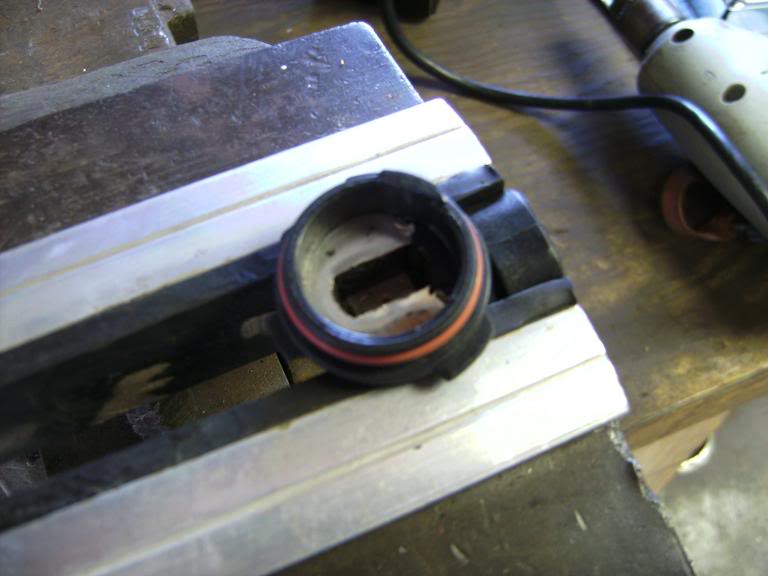
Using larger drill bits, work your way up to 1/2" or so, maybe a little less. You want to hollow out as much of the inside of this connector as possible. Now, take the dremel, and continue to hollow out the inside of the elbow. Take out as much of the material as you can, being careful not to chew all the way through. Any place that you slip and poke a small hole through will HAVE to be sealed up 100% waterproof. The plastic inside is pretty hard, and you'll run into some small metal bits that are molded into the plastic, which is why I recommend using a good metal (cone shaped) burring bit. They're only a few bucks if you don't already have one.
Now, take your HID bulb, and cut the connectors off about half way back on the wires. The connectors are too big to fit through the hole in the plastic elbow, so they have to be temporarily removed. Also, while they're cut off, remove the black rubber grommet that comes fixed to the wires. You won't need them. Feed the wires through the elbow, and test fit.
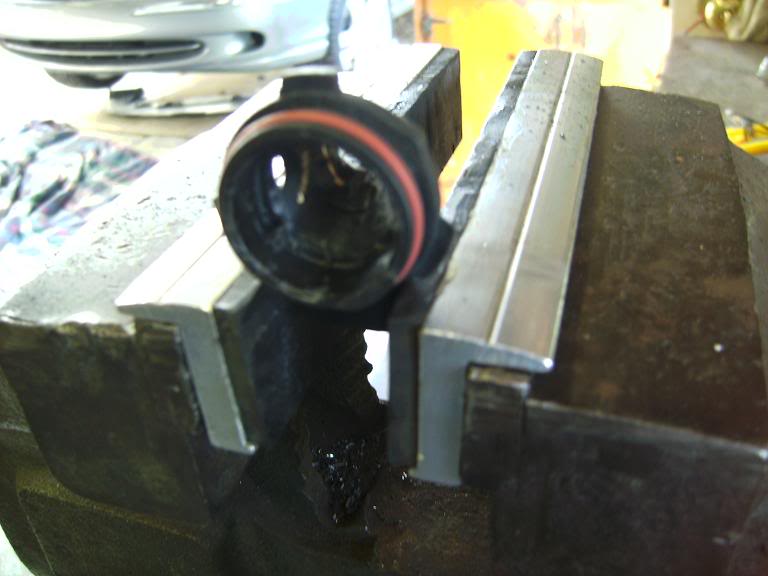
You want the flat base of the new bulb to fit as tightly as possible against the part of the elbow with the orange rubber O-ring. It doesn't have to be perfect, but it needs to be really, really close.

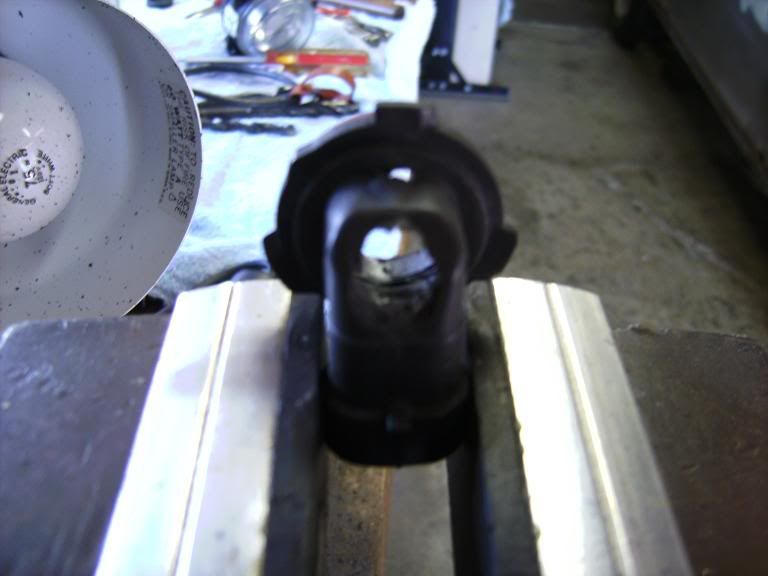
Once you have a good fit, reinstall the elbow/bulb assembly back into the housing by inserting and twisting.

By doing this modification to the existing elbows, you retain the factory water tight seal at the back of the housings. This was the easiest method that I could think of, but I'm sure there are other ways.
Now you want to reattach the connectors to the leads coming from the back of the bulbs. use shrink tube/electrical tape to ensure a waterproof seal.
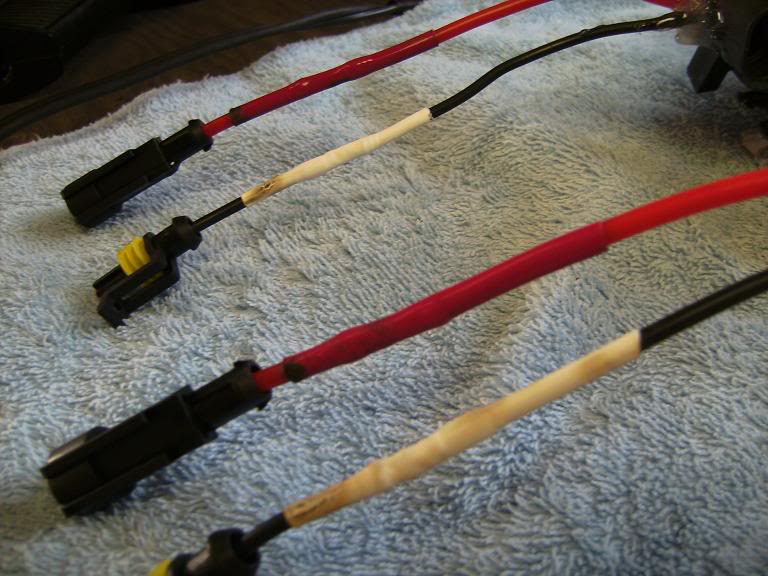
Use your silicone or 60 second epoxy to seal up the hole in the elbow where the wires come out of. I used 60 second two-part epoxy because it sets up almost instantly, where silicone take a while to cure. Be sure you have a good seal here. Otherwise, go ahead and order another HID kit...
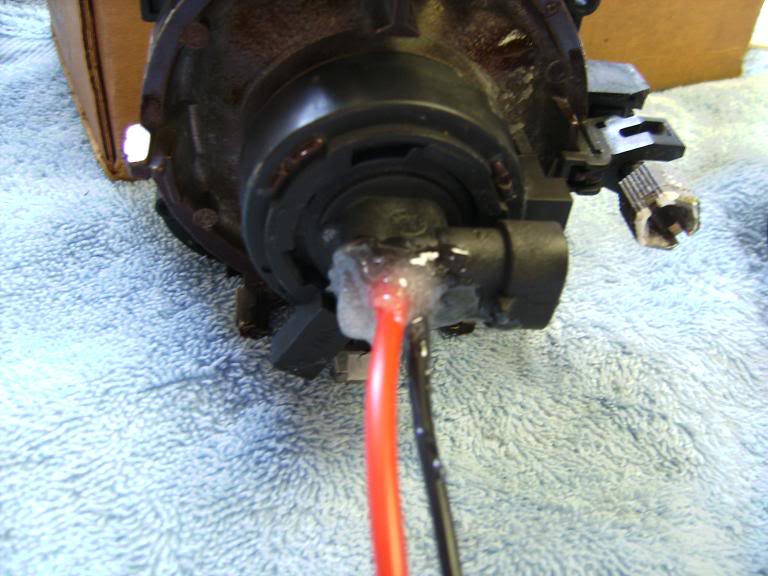
Completed assemblies, sealed with connectors reattached. You're done with these for now.
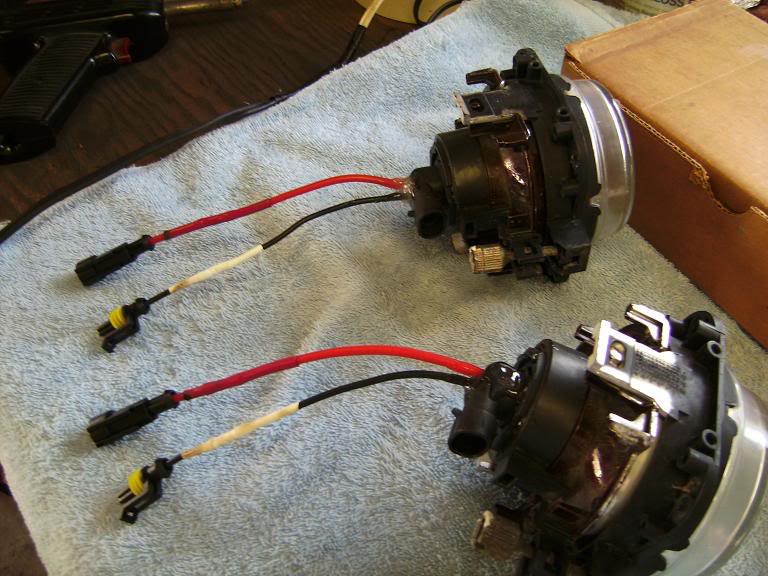
Note: By removing the housings from the car, you can use them as holders for the bulbs while the glue around the elbow/wires dries. Also, it give you a lot more room to work when mounting the ballasts, which we'll do next.
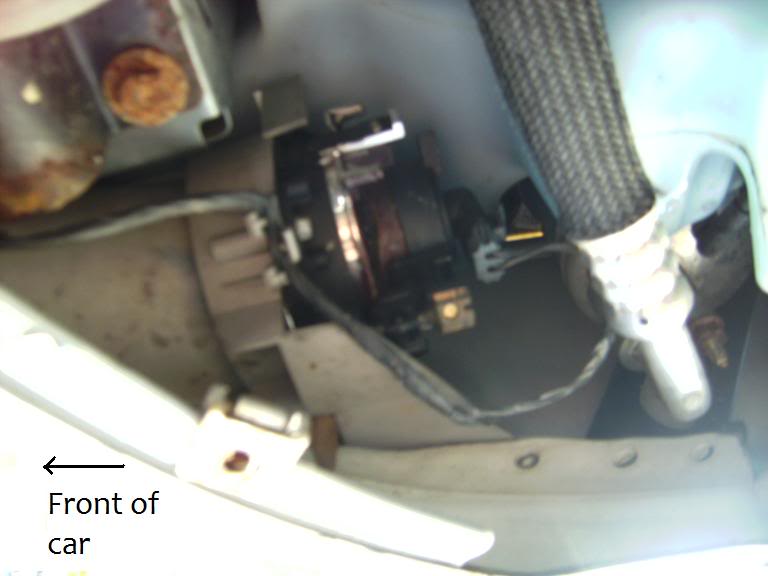
This is the simple part. Use acetone/laquer thinner to clean the back of the ballasts, and suitable flat mounting spots close to the fog light assemblies. Use the 3M sticky pads or a similar high strength double faced tape to mount them. These are the locations I used.
Driver side
Mounted
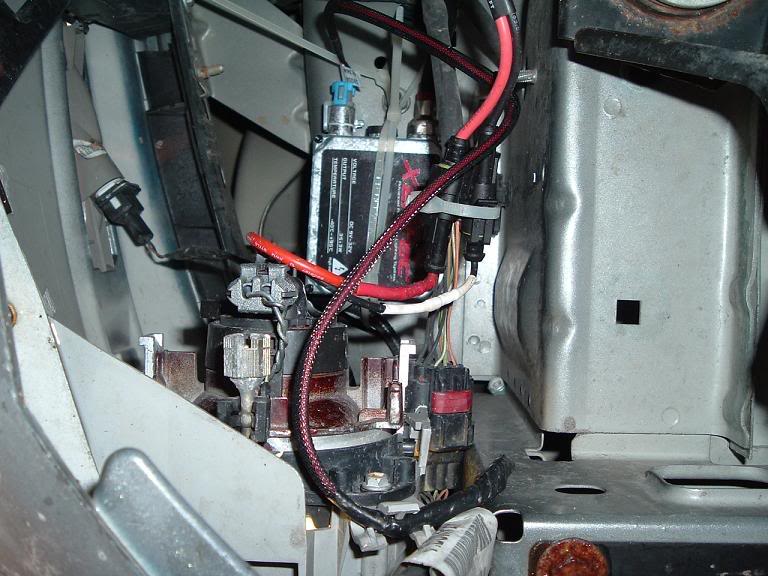
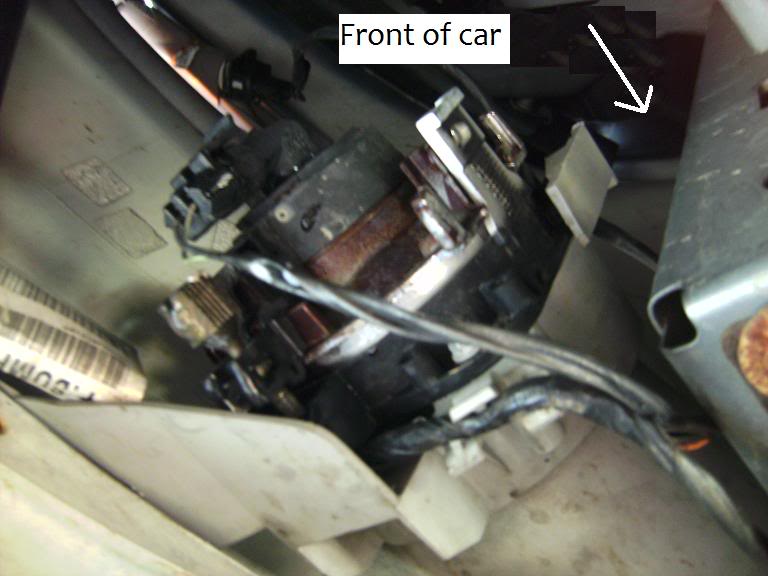
Passenger side, already mounted
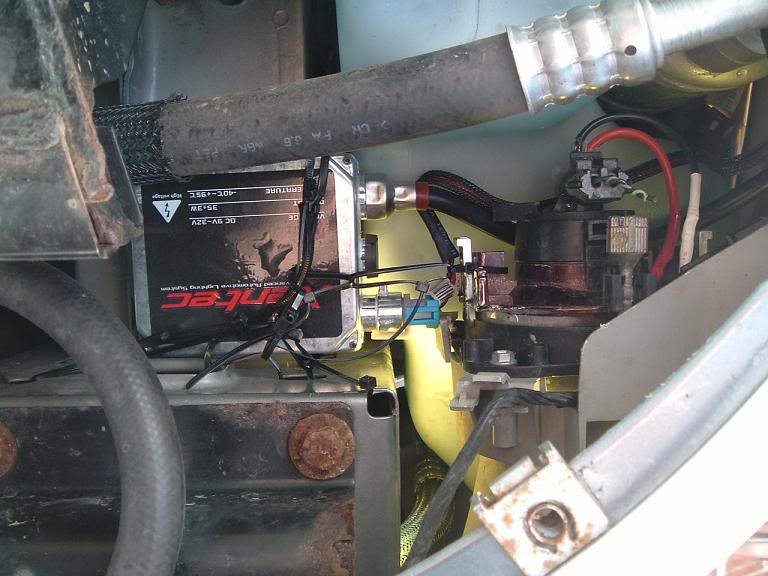
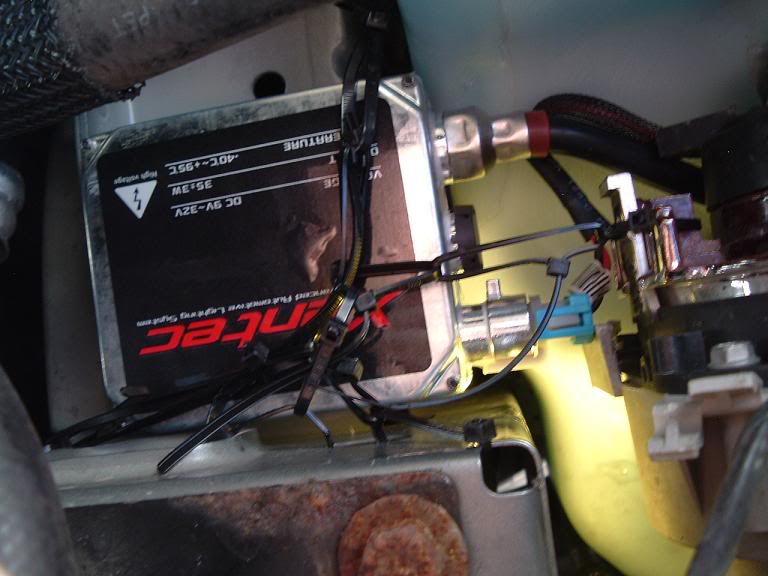
Now, just as a back up, I used zip ties to create a little net-like structure under each ballast in case the double faced tape should fail. If you use good stuff (3M), and prep the surface well, it should last a very long t
Things you'd like to have handy:
-Car jack & two stands
-HID kit of your choice, H1 in size.
-Basic hand tools
-Torx bit to remove the wide shield underneath the car
-A 5/16" socket with some extensions (Not necessary, will get to later)
-Wire cutters, soldering gun, heat shrink tube/electrical tape
-Silicone sealant or fast drying epoxy
-Power drill, with an array of bits ranging from 1/4" to 1/2"
-Dremel with a good metal burring tool
-Bench mounted vice
-Zip ties
-Acetone/Laquer thinner
-3M (or similar) adhesive pads/tape. GOOD stuff. Don't go cheap here.
Get the car in the air, removing the front wheels isn't necessary. Get it up enough to be able to wiggle around underneath it. If in doubt, put it up higher than you need.
After removing the dozen or so torx bolts that hold the large plastic shield in place, you'll see the fog light assemblies on either side of the car. Each is held in by two small 5/16" bolts, and a series of clips molded into the bumper that are released by rotating the assembly with some force.
Passenger side. The two bolts on this side are at the 11 and 5 oclock positions, if viewing the assembly from the rear. You probably won't be able to see the top one, so you'll probably just have to feel around for it, and get to it with an extension or two on the ratchet.
Driver side - much more room to work over here. The bolts on this one are at the 1 and 7 oclock positions, again, if viewing from the rear.
Now, you don't *have* to remove the entire housings, but it will make the mounting of the ballasts much easier. So, it's probably a good idea to go ahead and take them out. They'll actually benefit you being out of the car in another way down the road.
After you've cussed a lot (see: upper screw on passenger side light), and have treated your eyes to a dirt and rust bath, you've got the lights out. Here are the housings out of the car, with a glimpse of the collection of extensions and swivel joints needed to get to the top screw on the passenger side light.
Rear of housing
Removing the bulb from the housing is done as follows:
Rotate per red arrows
Remove bulb
Here's what comes out
Which disassembles to this
Here's where there's cause for confusion when ordering the correct bulb size. The bulbs are indeed H1s, but Jaguar uses these goofy black elbow connectors that have the electrical connection molded into them, making it impossible to install HID bulbs (with wires coming from the back of them), as the wires would have no where to go.
Comparison of stock H1 bulb to what you receive with an H1 HID kit
So here's what we do. Secure the black elbow in the vice, with the big round hole facing up. Use some needle nose pliers to snap off the springy connectors. Then, drill a 1/4" pilot hole in the valley between the edges that the two connectors were on. Drill the hole all the way through. Don't be shy.
Using larger drill bits, work your way up to 1/2" or so, maybe a little less. You want to hollow out as much of the inside of this connector as possible. Now, take the dremel, and continue to hollow out the inside of the elbow. Take out as much of the material as you can, being careful not to chew all the way through. Any place that you slip and poke a small hole through will HAVE to be sealed up 100% waterproof. The plastic inside is pretty hard, and you'll run into some small metal bits that are molded into the plastic, which is why I recommend using a good metal (cone shaped) burring bit. They're only a few bucks if you don't already have one.
Now, take your HID bulb, and cut the connectors off about half way back on the wires. The connectors are too big to fit through the hole in the plastic elbow, so they have to be temporarily removed. Also, while they're cut off, remove the black rubber grommet that comes fixed to the wires. You won't need them. Feed the wires through the elbow, and test fit.
You want the flat base of the new bulb to fit as tightly as possible against the part of the elbow with the orange rubber O-ring. It doesn't have to be perfect, but it needs to be really, really close.
Once you have a good fit, reinstall the elbow/bulb assembly back into the housing by inserting and twisting.
By doing this modification to the existing elbows, you retain the factory water tight seal at the back of the housings. This was the easiest method that I could think of, but I'm sure there are other ways.
Now you want to reattach the connectors to the leads coming from the back of the bulbs. use shrink tube/electrical tape to ensure a waterproof seal.
Use your silicone or 60 second epoxy to seal up the hole in the elbow where the wires come out of. I used 60 second two-part epoxy because it sets up almost instantly, where silicone take a while to cure. Be sure you have a good seal here. Otherwise, go ahead and order another HID kit...
Completed assemblies, sealed with connectors reattached. You're done with these for now.
Note: By removing the housings from the car, you can use them as holders for the bulbs while the glue around the elbow/wires dries. Also, it give you a lot more room to work when mounting the ballasts, which we'll do next.
This is the simple part. Use acetone/laquer thinner to clean the back of the ballasts, and suitable flat mounting spots close to the fog light assemblies. Use the 3M sticky pads or a similar high strength double faced tape to mount them. These are the locations I used.
Driver side
Mounted
Passenger side, already mounted
Now, just as a back up, I used zip ties to create a little net-like structure under each ballast in case the double faced tape should fail. If you use good stuff (3M), and prep the surface well, it should last a very long t
The following 2 users liked this post by 310jag:
00franky00 (08-10-2014),
Jah (12-24-2018)

#4
03-11-2008, 09:15 AM
Guest
Posts: n/a
nicely done.. it would not be my style to let one little thing slip by here...
ALL cars are designed, and Manufactured in METRIC.. there are no inch fasteners anywhere on the car. Just so happensthat 5/16" is very close to 8mm.
id like to do my fogs.. the factory bulbs dont project much light.
ALL cars are designed, and Manufactured in METRIC.. there are no inch fasteners anywhere on the car. Just so happensthat 5/16" is very close to 8mm.
id like to do my fogs.. the factory bulbs dont project much light.

#6
03-11-2008, 04:11 PM

AWESOME JOB 310!!! I've been wanting install some HID's in my fogs for the longest time now!
I sent this over to my install guy from Umnitza.com and he's gonna do the install for my X this month.
He also sent me this link for a HID kit thats new to the market: http://forums.bimmerforums.com/forum...d.php?t=946796
Seems pretty interesting.
I sent this over to my install guy from Umnitza.com and he's gonna do the install for my X this month.
He also sent me this link for a HID kit thats new to the market: http://forums.bimmerforums.com/forum...d.php?t=946796
Seems pretty interesting.
#7
03-11-2008, 06:20 PM
Veteran Member
Join Date: Nov 2006
Location: Glasgow, Scotland UK
Posts: 47,302
Received 9,007 Likes
on
4,113 Posts


Trending Topics
#8
03-12-2008, 01:10 AM

just curious what you are using for the illuminator lights in the hi beam lense. Also, how is it that they are wired that the relay does not kill the foglights when you it the highbeams (assuming that those are your highbeams on and not really bright marker bulbs).
#10
03-12-2008, 05:24 PM
Thanks guys, I had a lot of fun putting this together. I think the next thing the car needs is front shocks, so if/when I get around to it, I'll do a write up for those too.
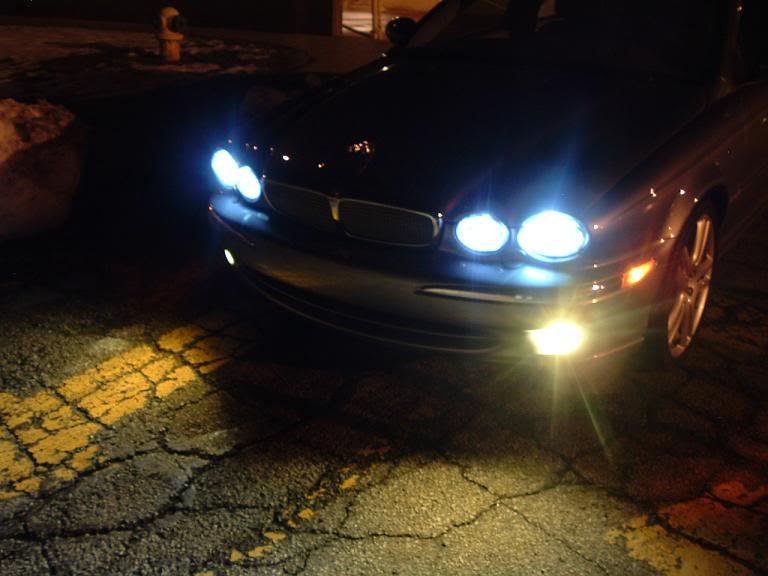
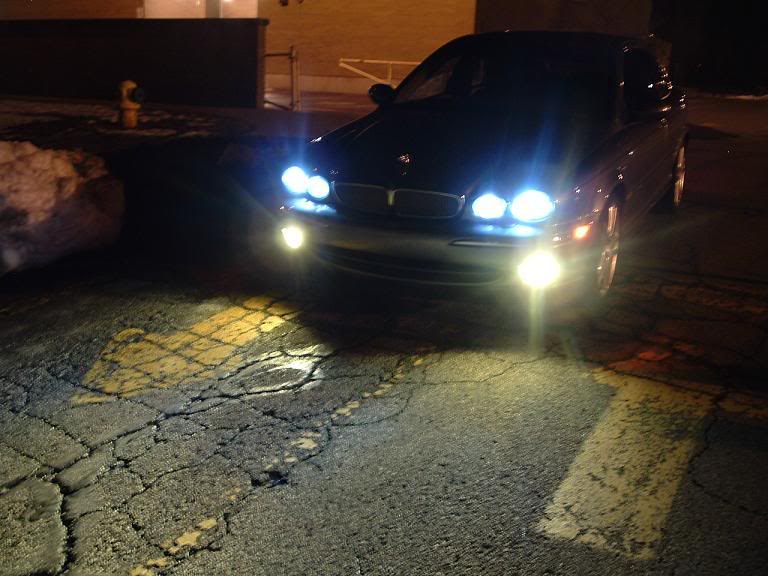
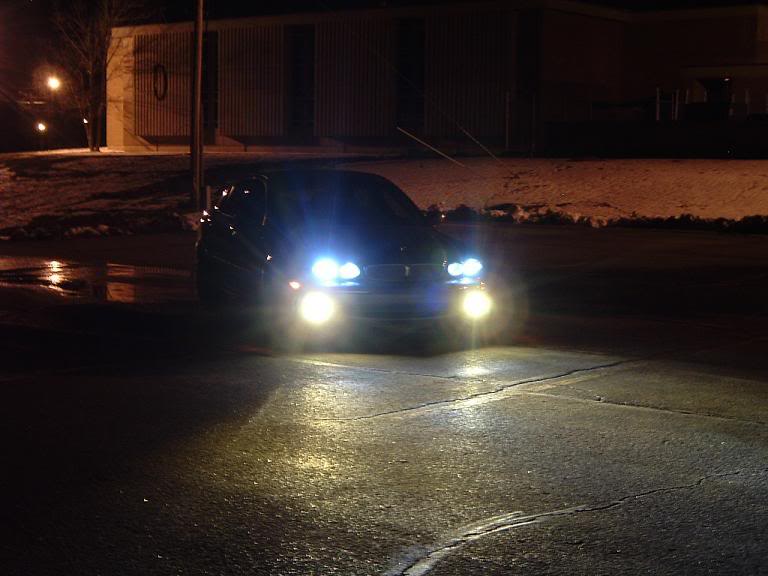
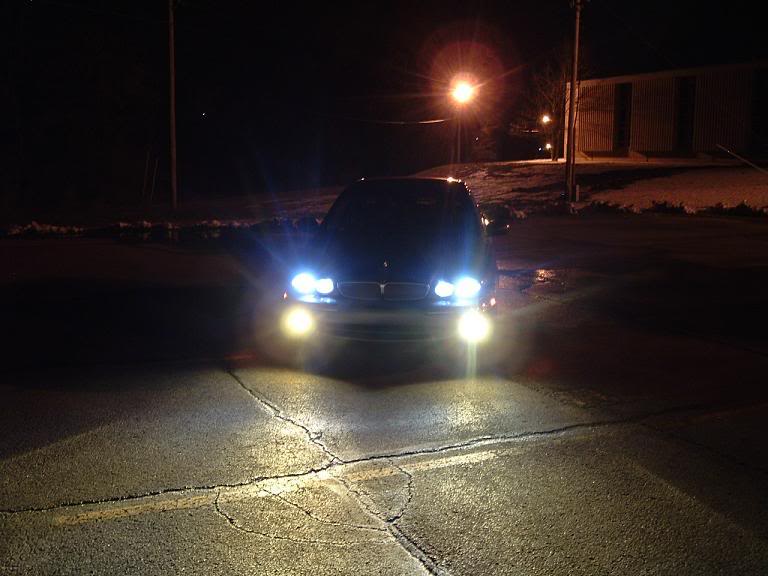
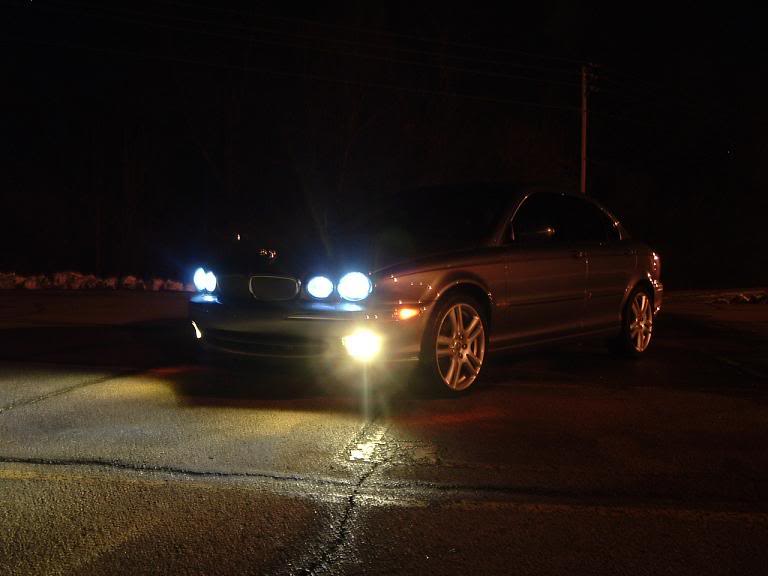
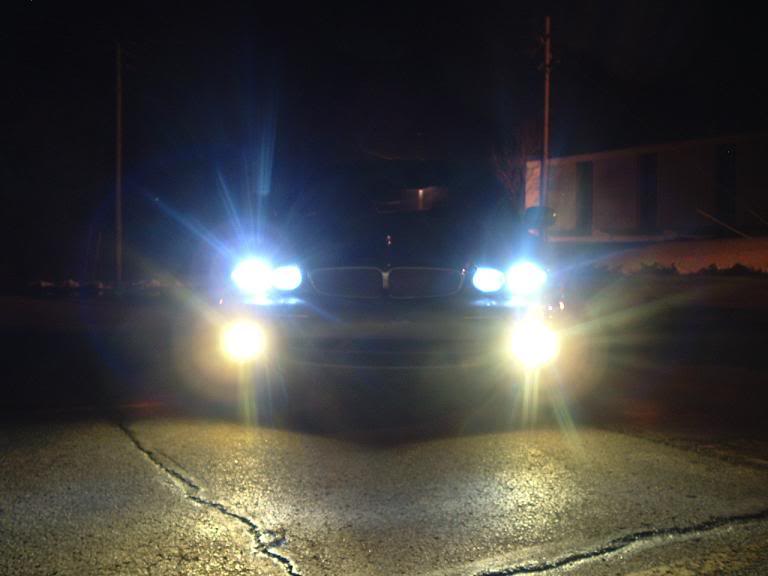
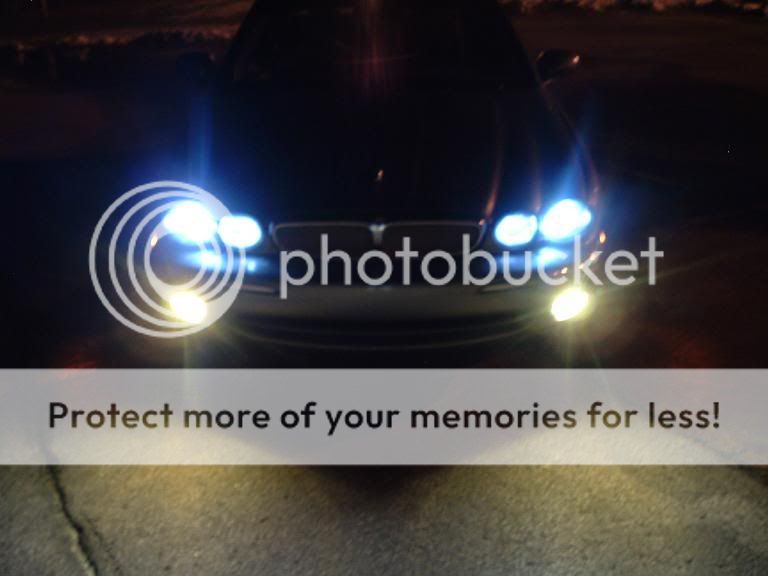
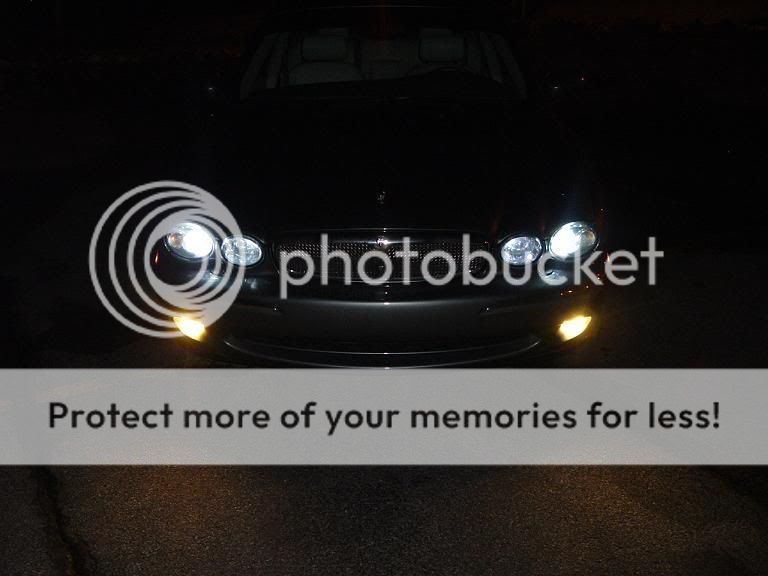
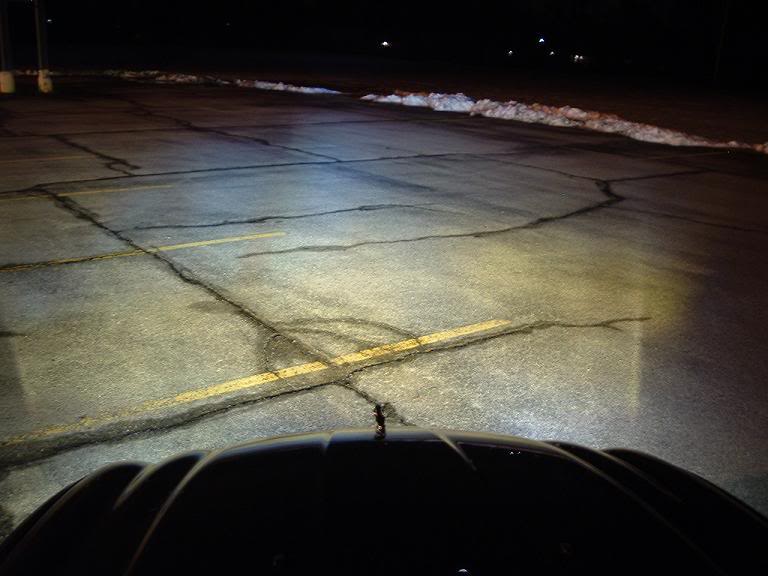
vegas- The headlights are 8000k, and the fogs are 3000k
h20- Close, but no cigar
bo- 5/16" fit, so that's what I used
gotti- Nice find on the slim kit. Being as slim as they are, I bet they're significantly lighter. This would probably help with the longevity of the double face tape used to secure them, as there would be less weight on them.
jim- Thanks for the faq tag! I hope someone down the road can make good use of this.
jagxtype- I had a friend of mine make some bi-directional LEDs with a base that plugs into the factory harness. They're quite bright considering how small they are. There are various places online that sell good quality led blubs (frickinbrite.com?) that would be comperable to what I've got.
#11
03-12-2008, 08:25 PM
Veteran Member
Join Date: Nov 2006
Location: Glasgow, Scotland UK
Posts: 47,302
Received 9,007 Likes
on
4,113 Posts
Hey 310, re your fogs
As I said, you did a great job, just one comment though, and its only my personal opinion.
Your car looks great and the sides and dipped / high beams look really ultra bright with the bluish tinge that I really love. I honestly think though that the yellowish tinge given off from the 3000k fogs take away from the overall appearance[&:]. Sorry mate, its just my own opinion, please dont take it personally.
I'd say that sumthin closer to 6000 would suit much much better! Unless of course you were goin for that yellowish look? I know some of you guys like that style.
Jim
#12
05-02-2008, 12:42 AM
Hey 310, where did you buy your HID Kit from? I installed HID's in my fogs but I did it a little different from you because the HID bulb housing wouldn't fit within the OEM foglight housing.
So what I did was remove everything but the o-ring that connects to the stock fog light housing. I used silicone sealant to adhere the HID bulb to the o-ring and then installed the bulb. It worked pretty well.
I know, I know...this thread is worthless without pics. I'll post up some pics of the fogs asap.
#13
05-02-2008, 05:59 PM
I got my kit(s) from ebay. The brand name on the ones in the fogs was Xentec, which are kind of crappy. They work and all, but the quality of the kit just doesn't seem to be as good as some others that I've seen.
I've got "Tenon" brand in the headlights, which I love. they came with great mounting hardware, and very secure packaging. The Xentecs came with double faced tape, and were pretty much thrown in a box.
Congrats on the install, though! They get a lot of attention, and really make the car look amazing at night.
I love the way mine looks at dusk with only the fogs and led city lights on. Very modern looking.


#15
05-05-2008, 11:20 PM
#16
05-30-2008, 01:39 AM
one thing maybe to change: When i did my HID upgrade to my headlights I used self tapping screws to hold the ballast in place. The sticky tape and zip ties might work loose over time? The self tapping screws seemed to hold the ballast in place very well. I plan on doing my fogs here in the next few weeks (ordered the ballast today) and i will try the screws and let you guys know if they work. Thanks for this how-to-do! I will be sure to have it next to me when i do mine

#18
06-01-2008, 08:37 PM