
DIY Headliner for my 2002
#1
 08-11-2019, 02:44 PM


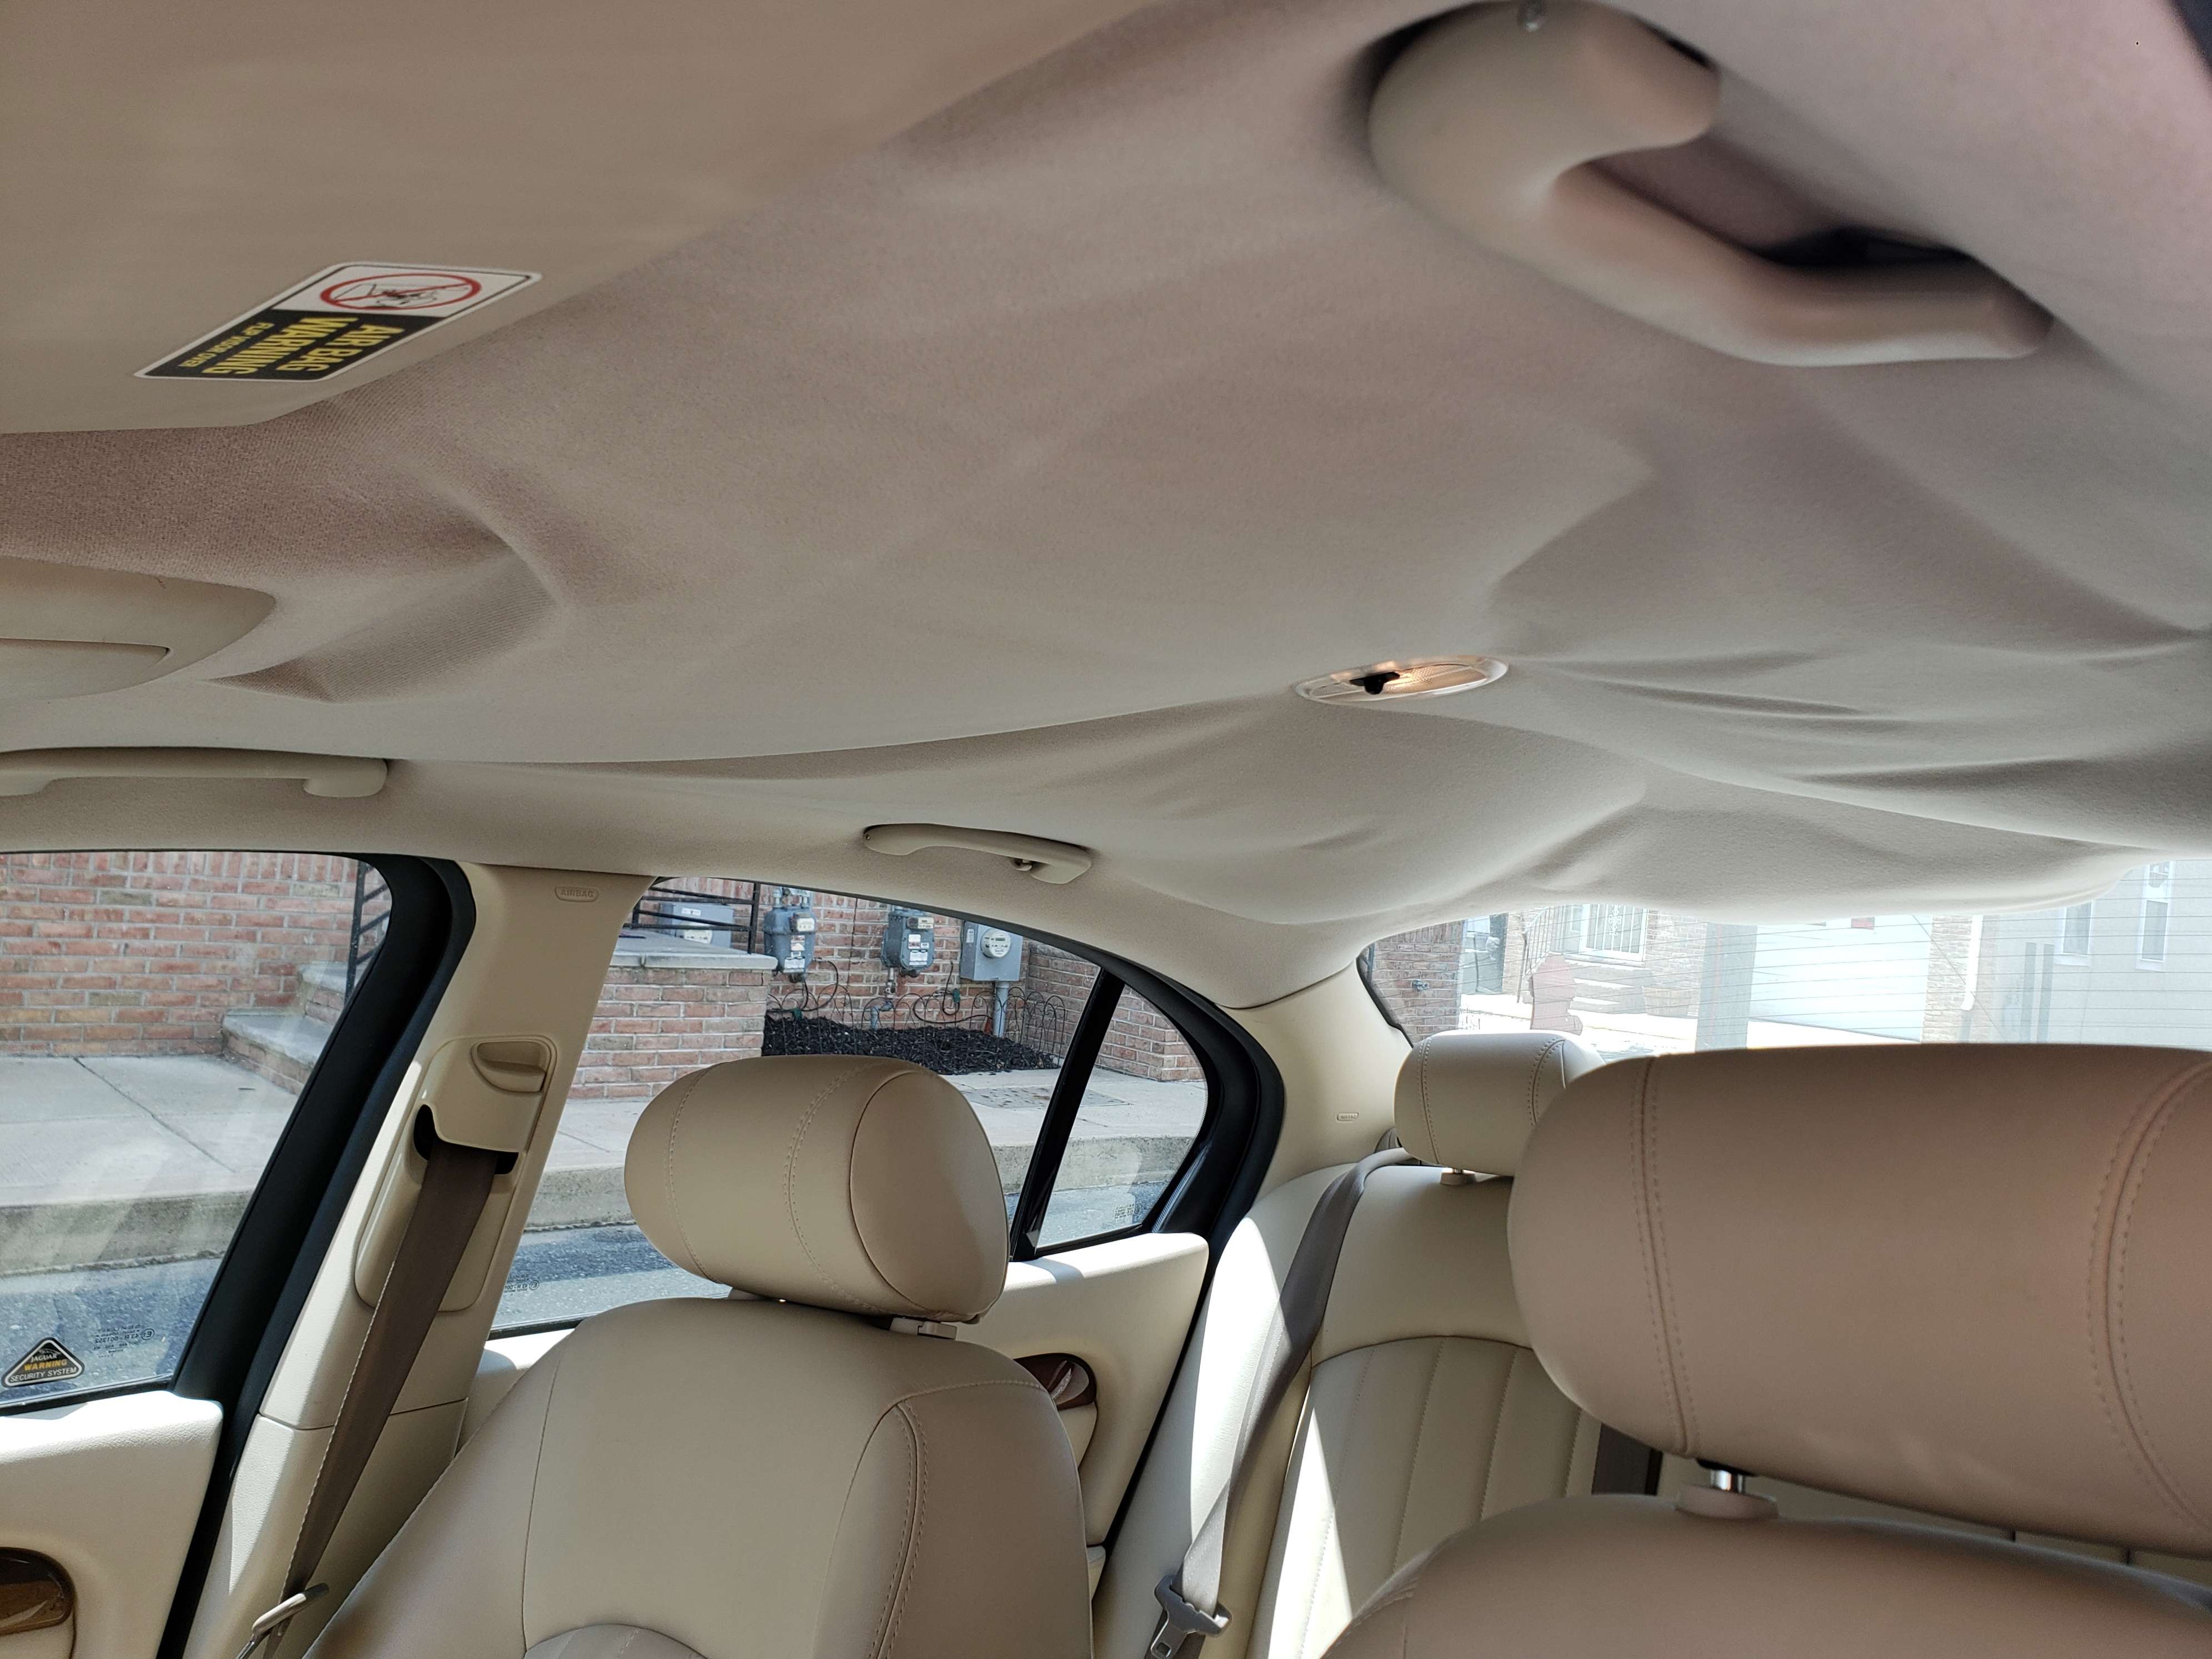
The headliner in the X-type gave up about this time last year. The handles and overhead light kept it in place until now but it was time to get this sorted.
I did a quick search and didn't really find a lot DIY info on redoing one in this car. For anyone looking to do this yourself, here's the bulk of the steps and some tips to help out.
Supplies
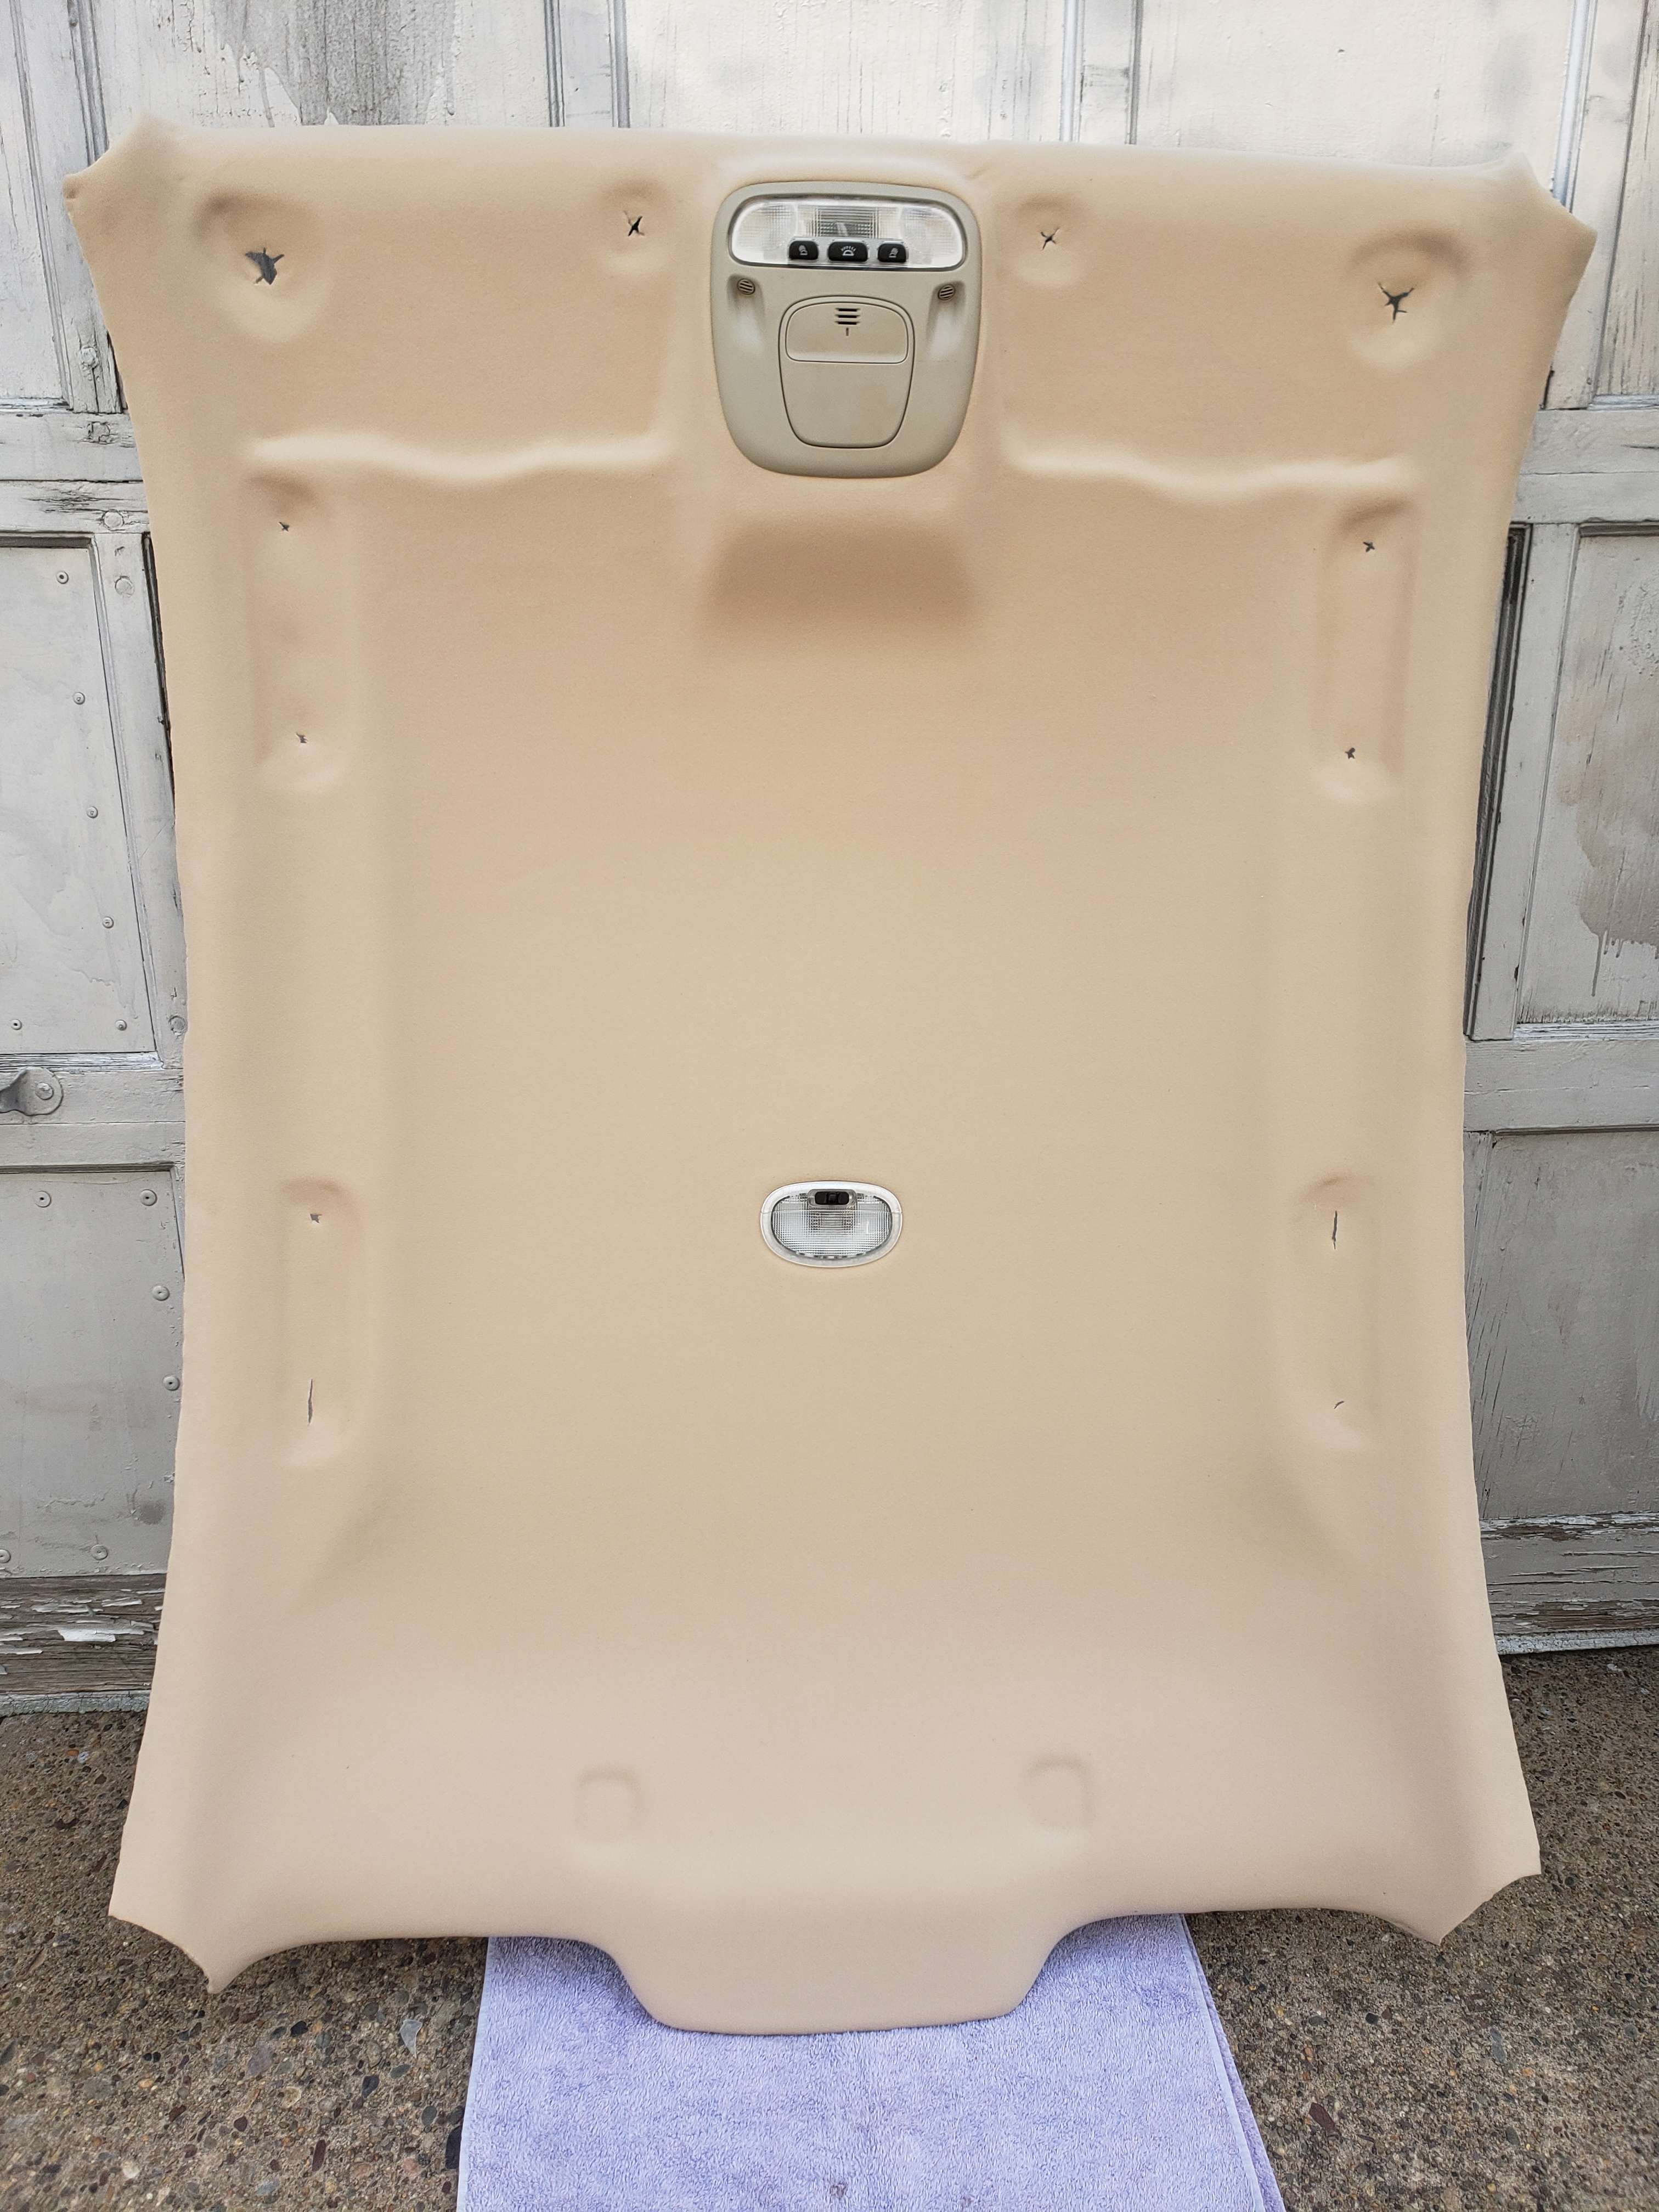
For material, I ordered the following foam backed headliner material from www.yourautotrim.com: Auto Headliner "Lt. Neutral" PH-2002, Quantity 2. That's 60x72" which is more than enough. It was about $30 shipped.
For the adhesive I've used 3M Super 77 in the past but went with 2 cans of 3M 38808 Headliner and Fabric Adhesive at ~$40 shipped.
Optional - Plaster or air dry clay and Gorilla glue.
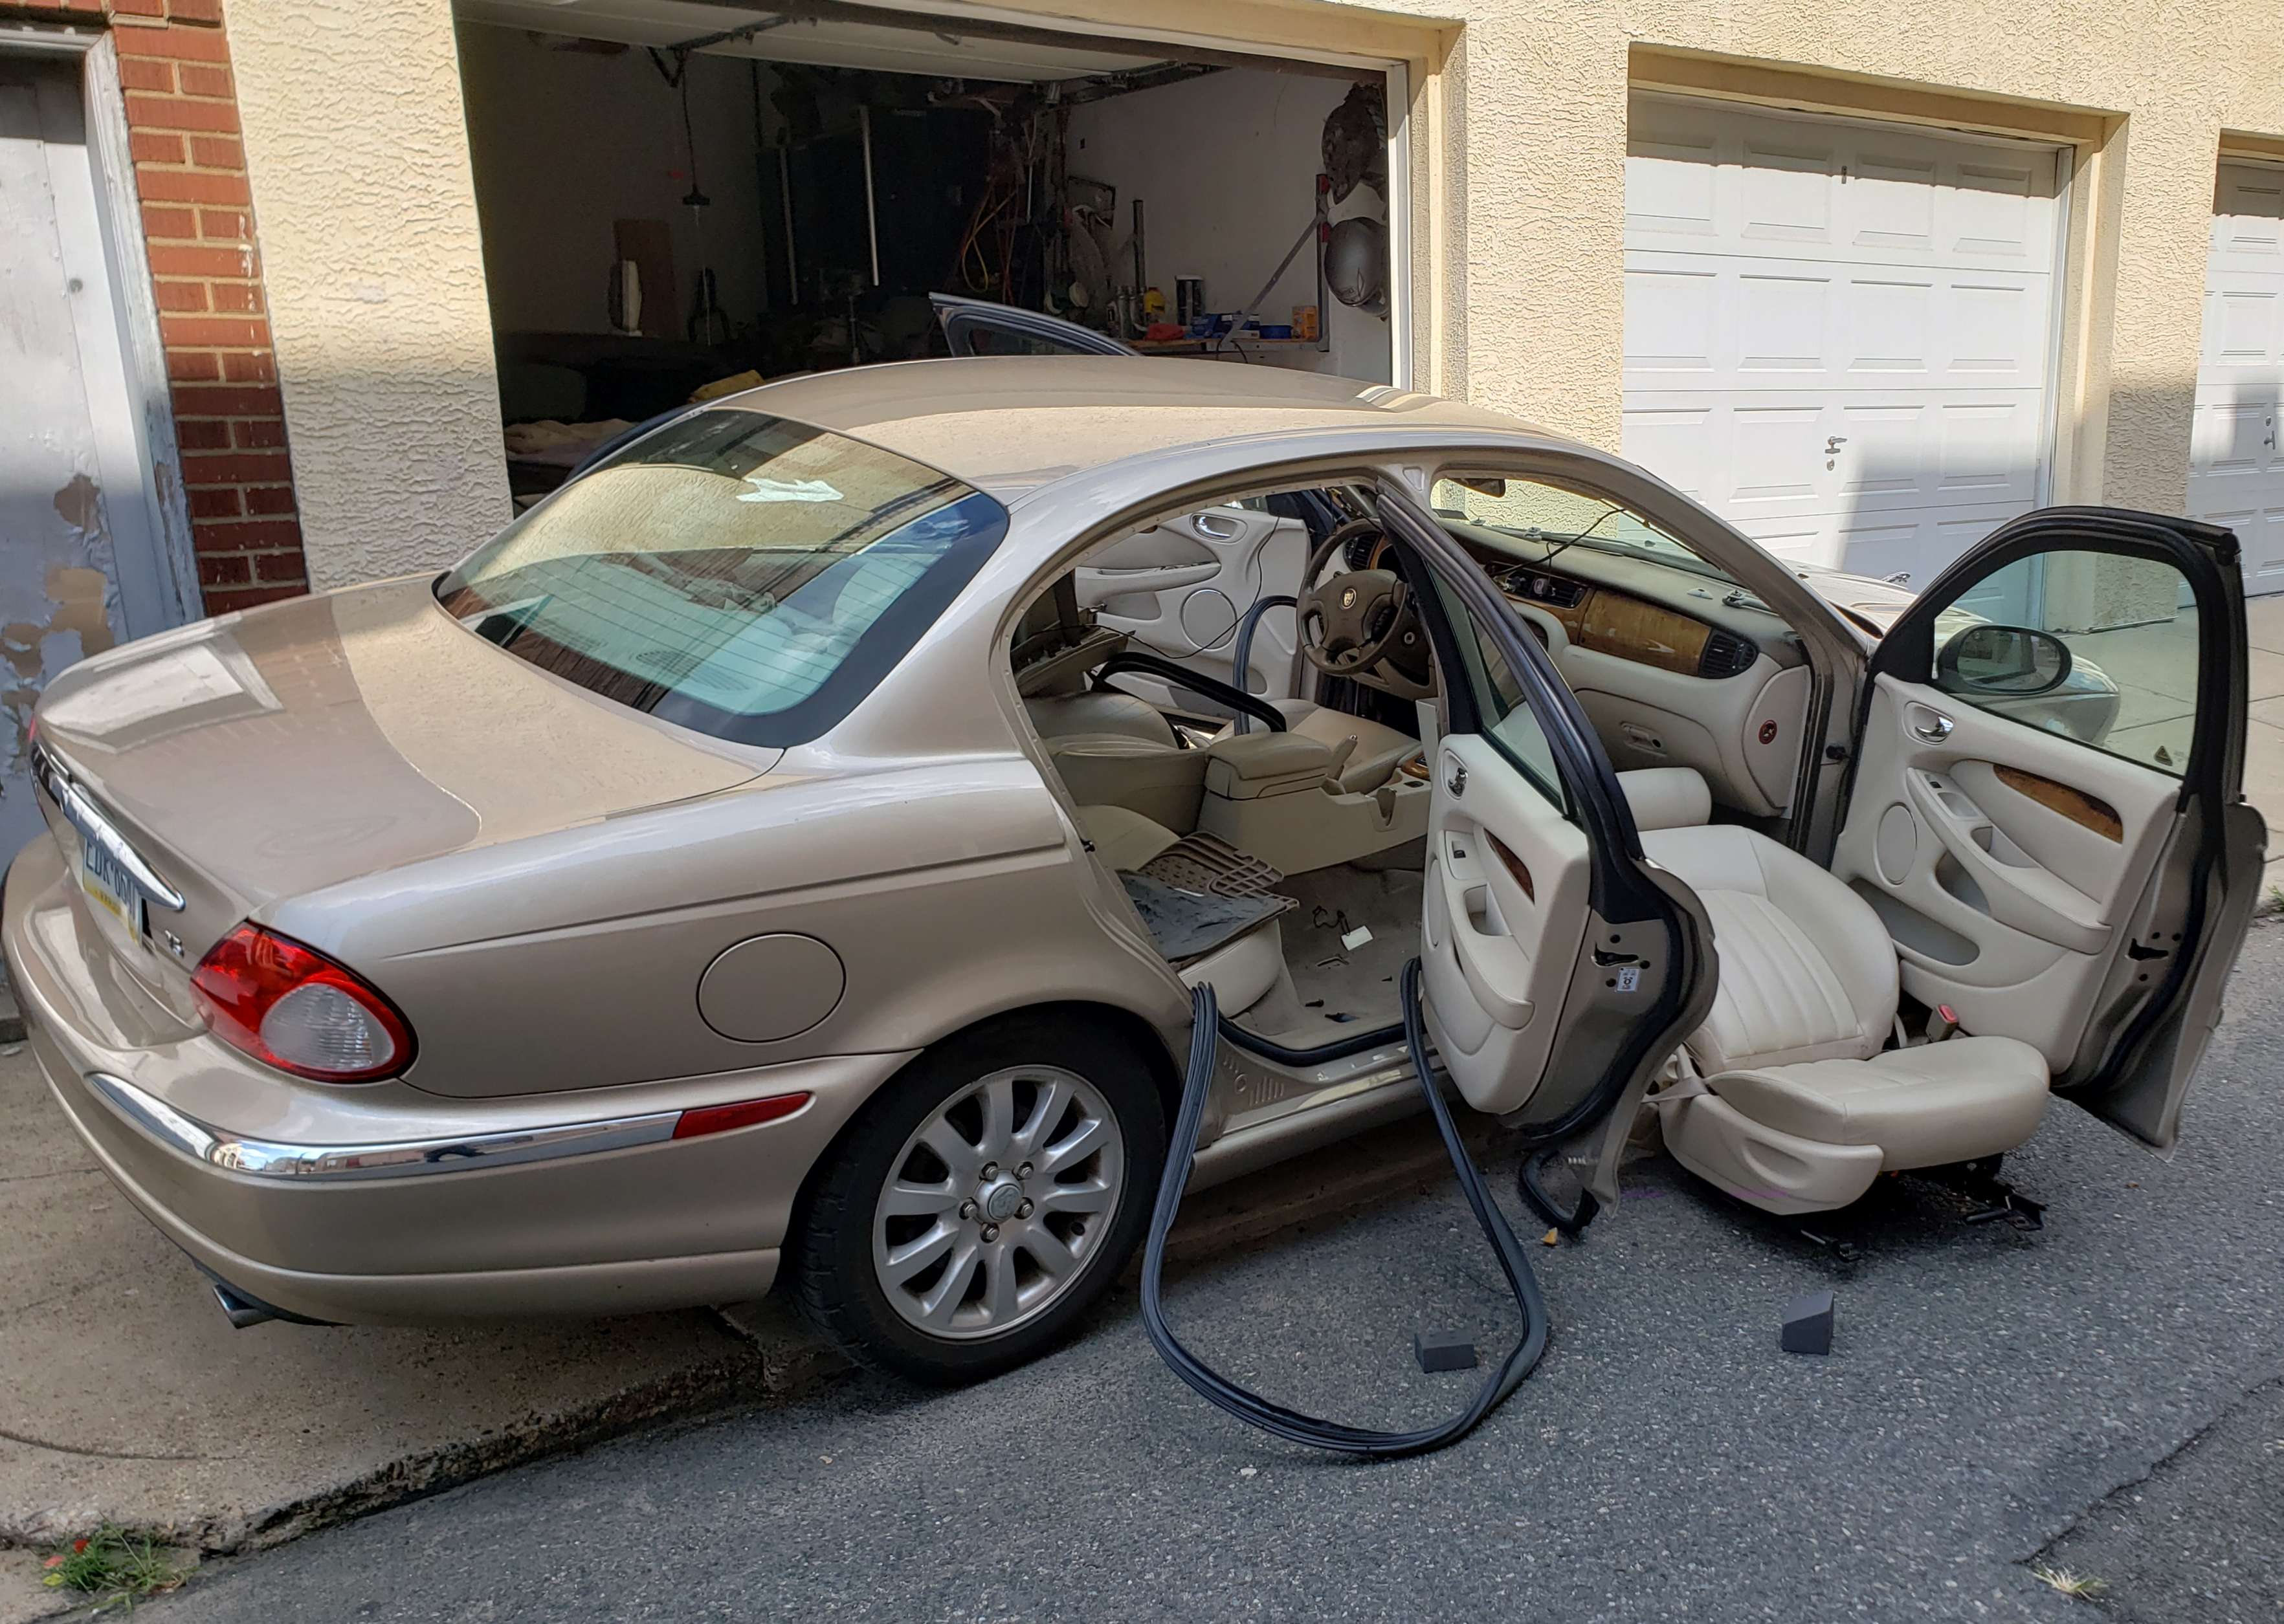
Removal
All 4 handles come down with a regular phillips screw driver once you ply back the reveal cover. The visors are T15 screws, with the outboard connections having a reveal cover as well.
The weather stripping in all 4 doors need to be pulled from the top and pushed out of the way.
The A pillar and top of the B pillar covers pull right out.
The C pillar covers will pull out from the top but the plastic retaining clip is connected to the C pillar it's self and needs to be slid out of the inside of the cover. You'll see when you do it, it's simple. I ended up leaving these covers in place and it helped position the headliner on the way back in.
You'll want to take the passenger seat out at this point. 2 10mm bolts up front, 2 plastic covers with phillips screws and 4 10 mm bolts in the back. There's and electrical connector to disconnect underneath, even if the seat is manual. You either have to disconnect the seat belt or you can just leave the seat next to the open passenger side door.
The forward dome light console is attached to the headliner and it'll pull straight down. I ended up putting my arm in between the liner and the sheet metal to reach closer and push down. The metal clips anchored in the sheet metal might get distorted but they're easy to get back into shape.
There's a single male plastic clip that's attached to the center of the headliner about 3/4 of the way back and it's pushed into the sheet metal. I used a longer forked door trim screw driver to reach back and pop it out without ripping it off the headliner.
Now the electrical wiring harness needs to carefully be cut out of the glue to get the headliner free.
Push the driver's front seat all the way forward and recline it all the way.
No you can let the passenger side of the headliner drop, twist it counter clockwise looking down at the car and pull it through the rear passenger side door. There should be little to no deflection required.
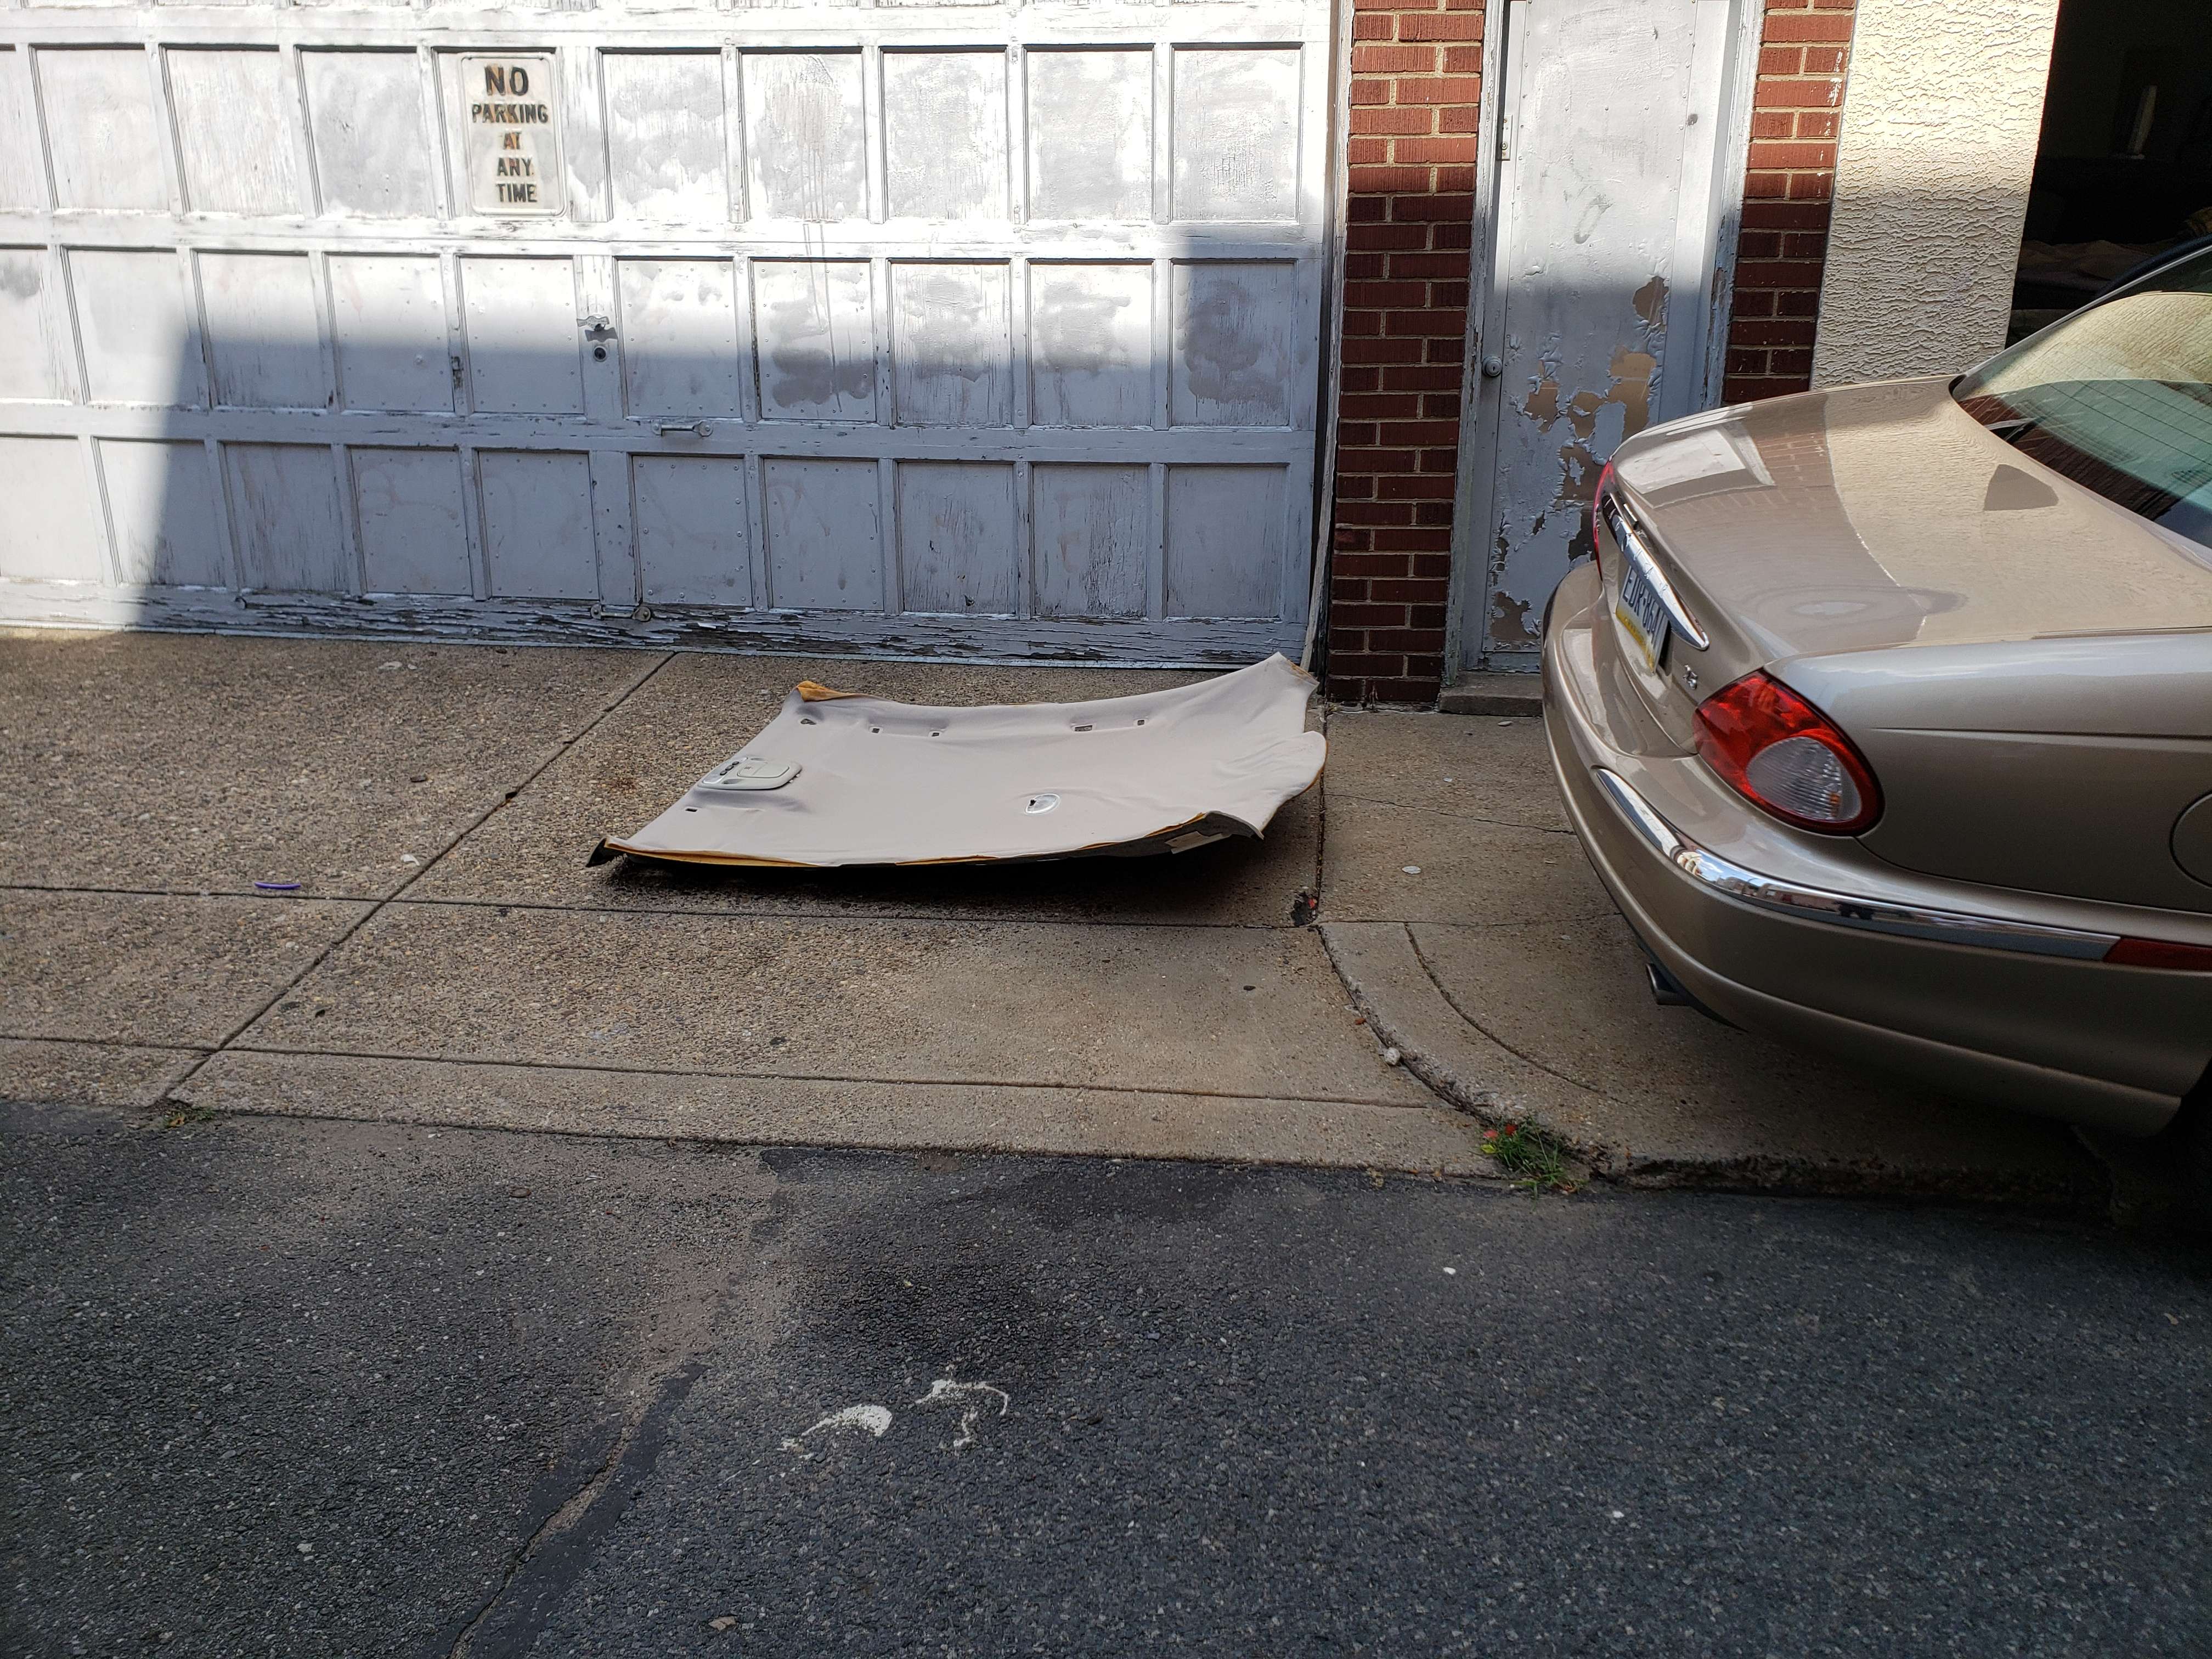
Preparing the headliner fiber board for new material can be a mess. The foam under the fabric is denigrated and sticky. After pulling the lights and old material, I like to use a metal bristle brush to more or less scrape off all the old foam. Just be careful not to start ripping the layers of fiber board.
Reupholstering
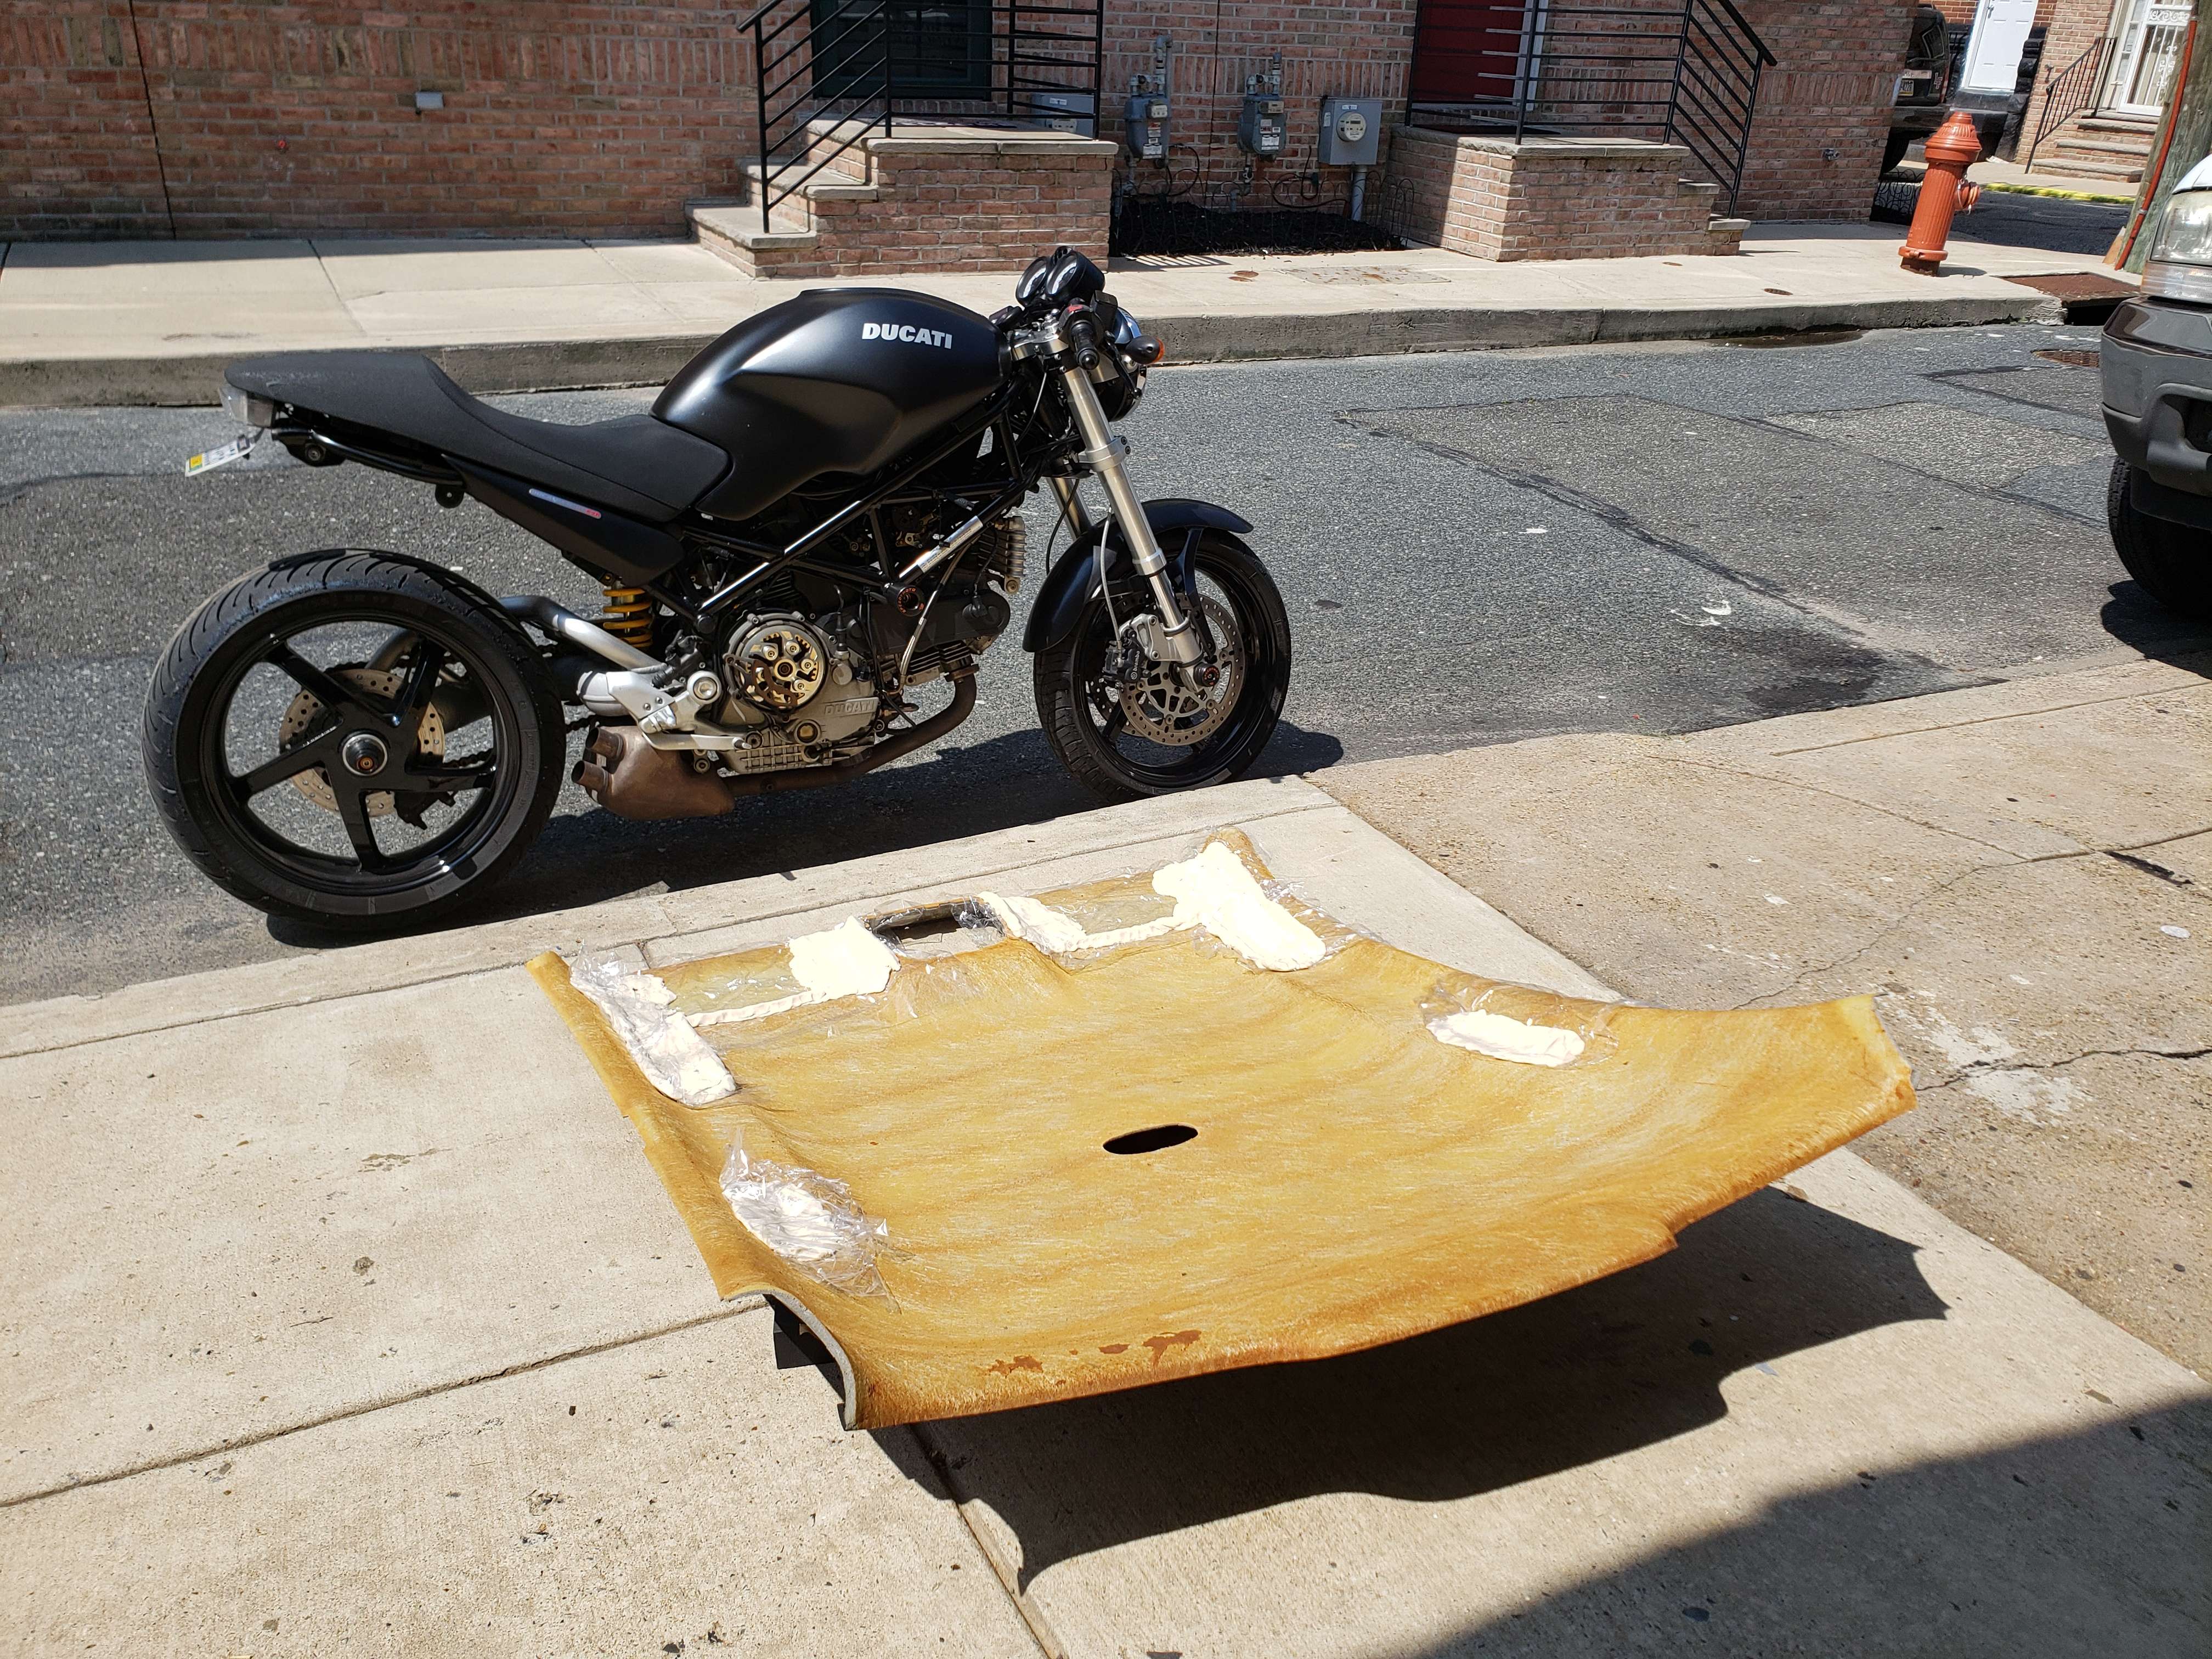
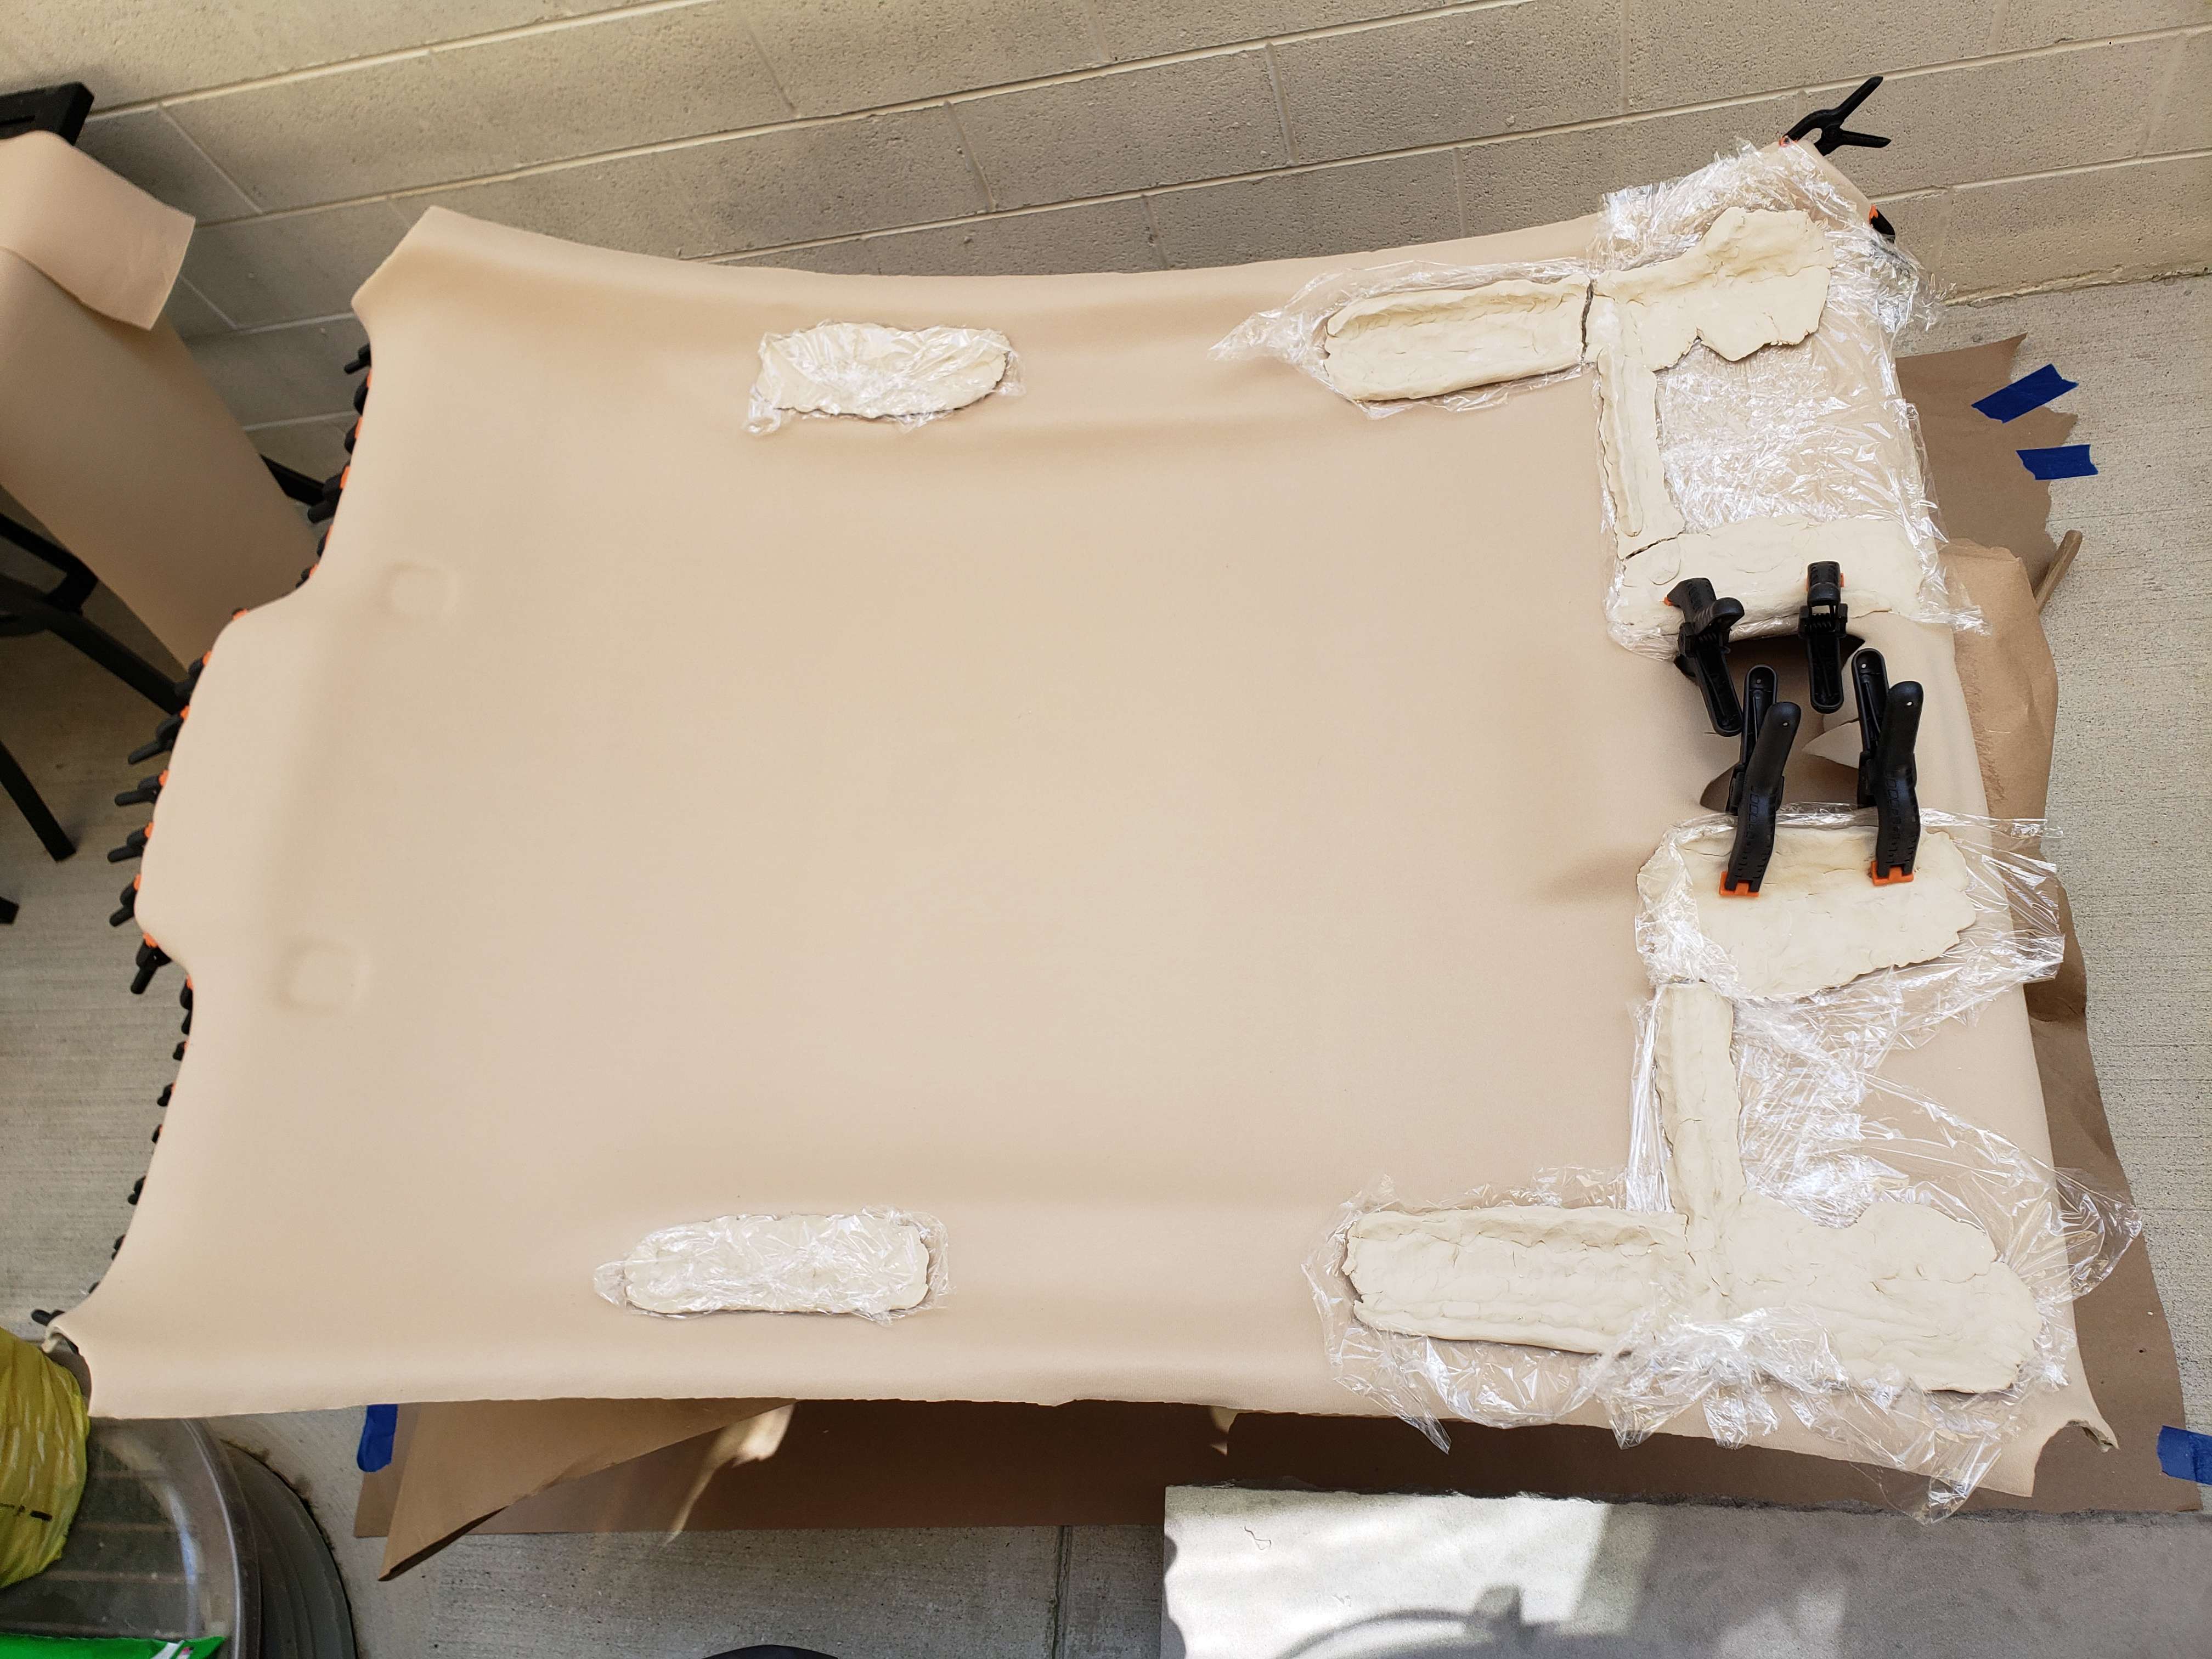
This next part is optional but has served me well the past two headliners I've done. The new fabric is only going to stretch so much into the tight areas surrounding the handles, visors and dome light console. Putting pressure on these areas is the only way you can get proper adhesion. In the past I've used cans and bottles to weigh these problem areas down while the new adhesive dries. On the last one, I used a plastic base and plaster to make molds for this purpose. This time I used saran wrap and air dry clay to make molds of these areas. The air dry clay is less messy and easier to work with by a large margin but it takes 2-3 days to cure.
The real tricky part is getting the fabric to do what you want once you go to lay it down for good. I know there's different schools of thought on this but I like to spay the adhesive on both the board and fabric in sections but still following the application directions on the can. I start with the flat sections first then move on to the header areas, ensuring I attach in such a way that I'm not shrouding the next area and I have full coverage. The manipulation of the material should be intuitive. You'll want to work the fabric into the deep spots before you get it to stick past that area. Making slits of the handles helps let the fabric lay a bit easier. The hardest part is the area just forward of the forward dome light. You'll have to cut the fabric where the light console goes to get the proper slack for the area going to the visors but this makes it hard to not have slack when you get to the very front. As you go, weigh down the handle, visor and light console areas for the adhesive to set. Take your time! I spent over 2 hours making sure I got it right.
This part is optional since the factory never does this. On the front and rear, I like to fold the material and glue (gorilla glue or similar) it to the back of the fiber board. My headliner initially let go in the rear and wouldn't have if it came this way. Be careful with how much pressure you clamp with because it'll leave marks if the headliner adhesive is still wet or there's too much pressure.
After that, trim up the sides and make holes as necessary. Note the factory locations for double sided tape and re-apply if desired. I didn't think it was necessary since it probably let go a decade ago.
I let my headliner sit for about 18 hours just to be sure. The adhesive says 60 mins but I figured it wouldn't hurt.
Reinstall
From here, it's just the opposite of the steps to take it out after you attach the lights. The only thing is, you should put towels down in the rear passenger door sill and in the C pillar covers to protect the new headliner. After the headliner is in, put the passenger seat back in and put the driver's seat back up to support it. It'll sit between the C-pillar covers and the headrests. You can do the electrical attachments and poke the visor plugs through at this point. Re-attach the front handles to center it, pop the rear center clip in, rear handles, visors, forward dome light console and re-assemble the interior. Be careful to line up the B-pillar sliders for seat belt adjustment correctly.
You're done!
Before and After
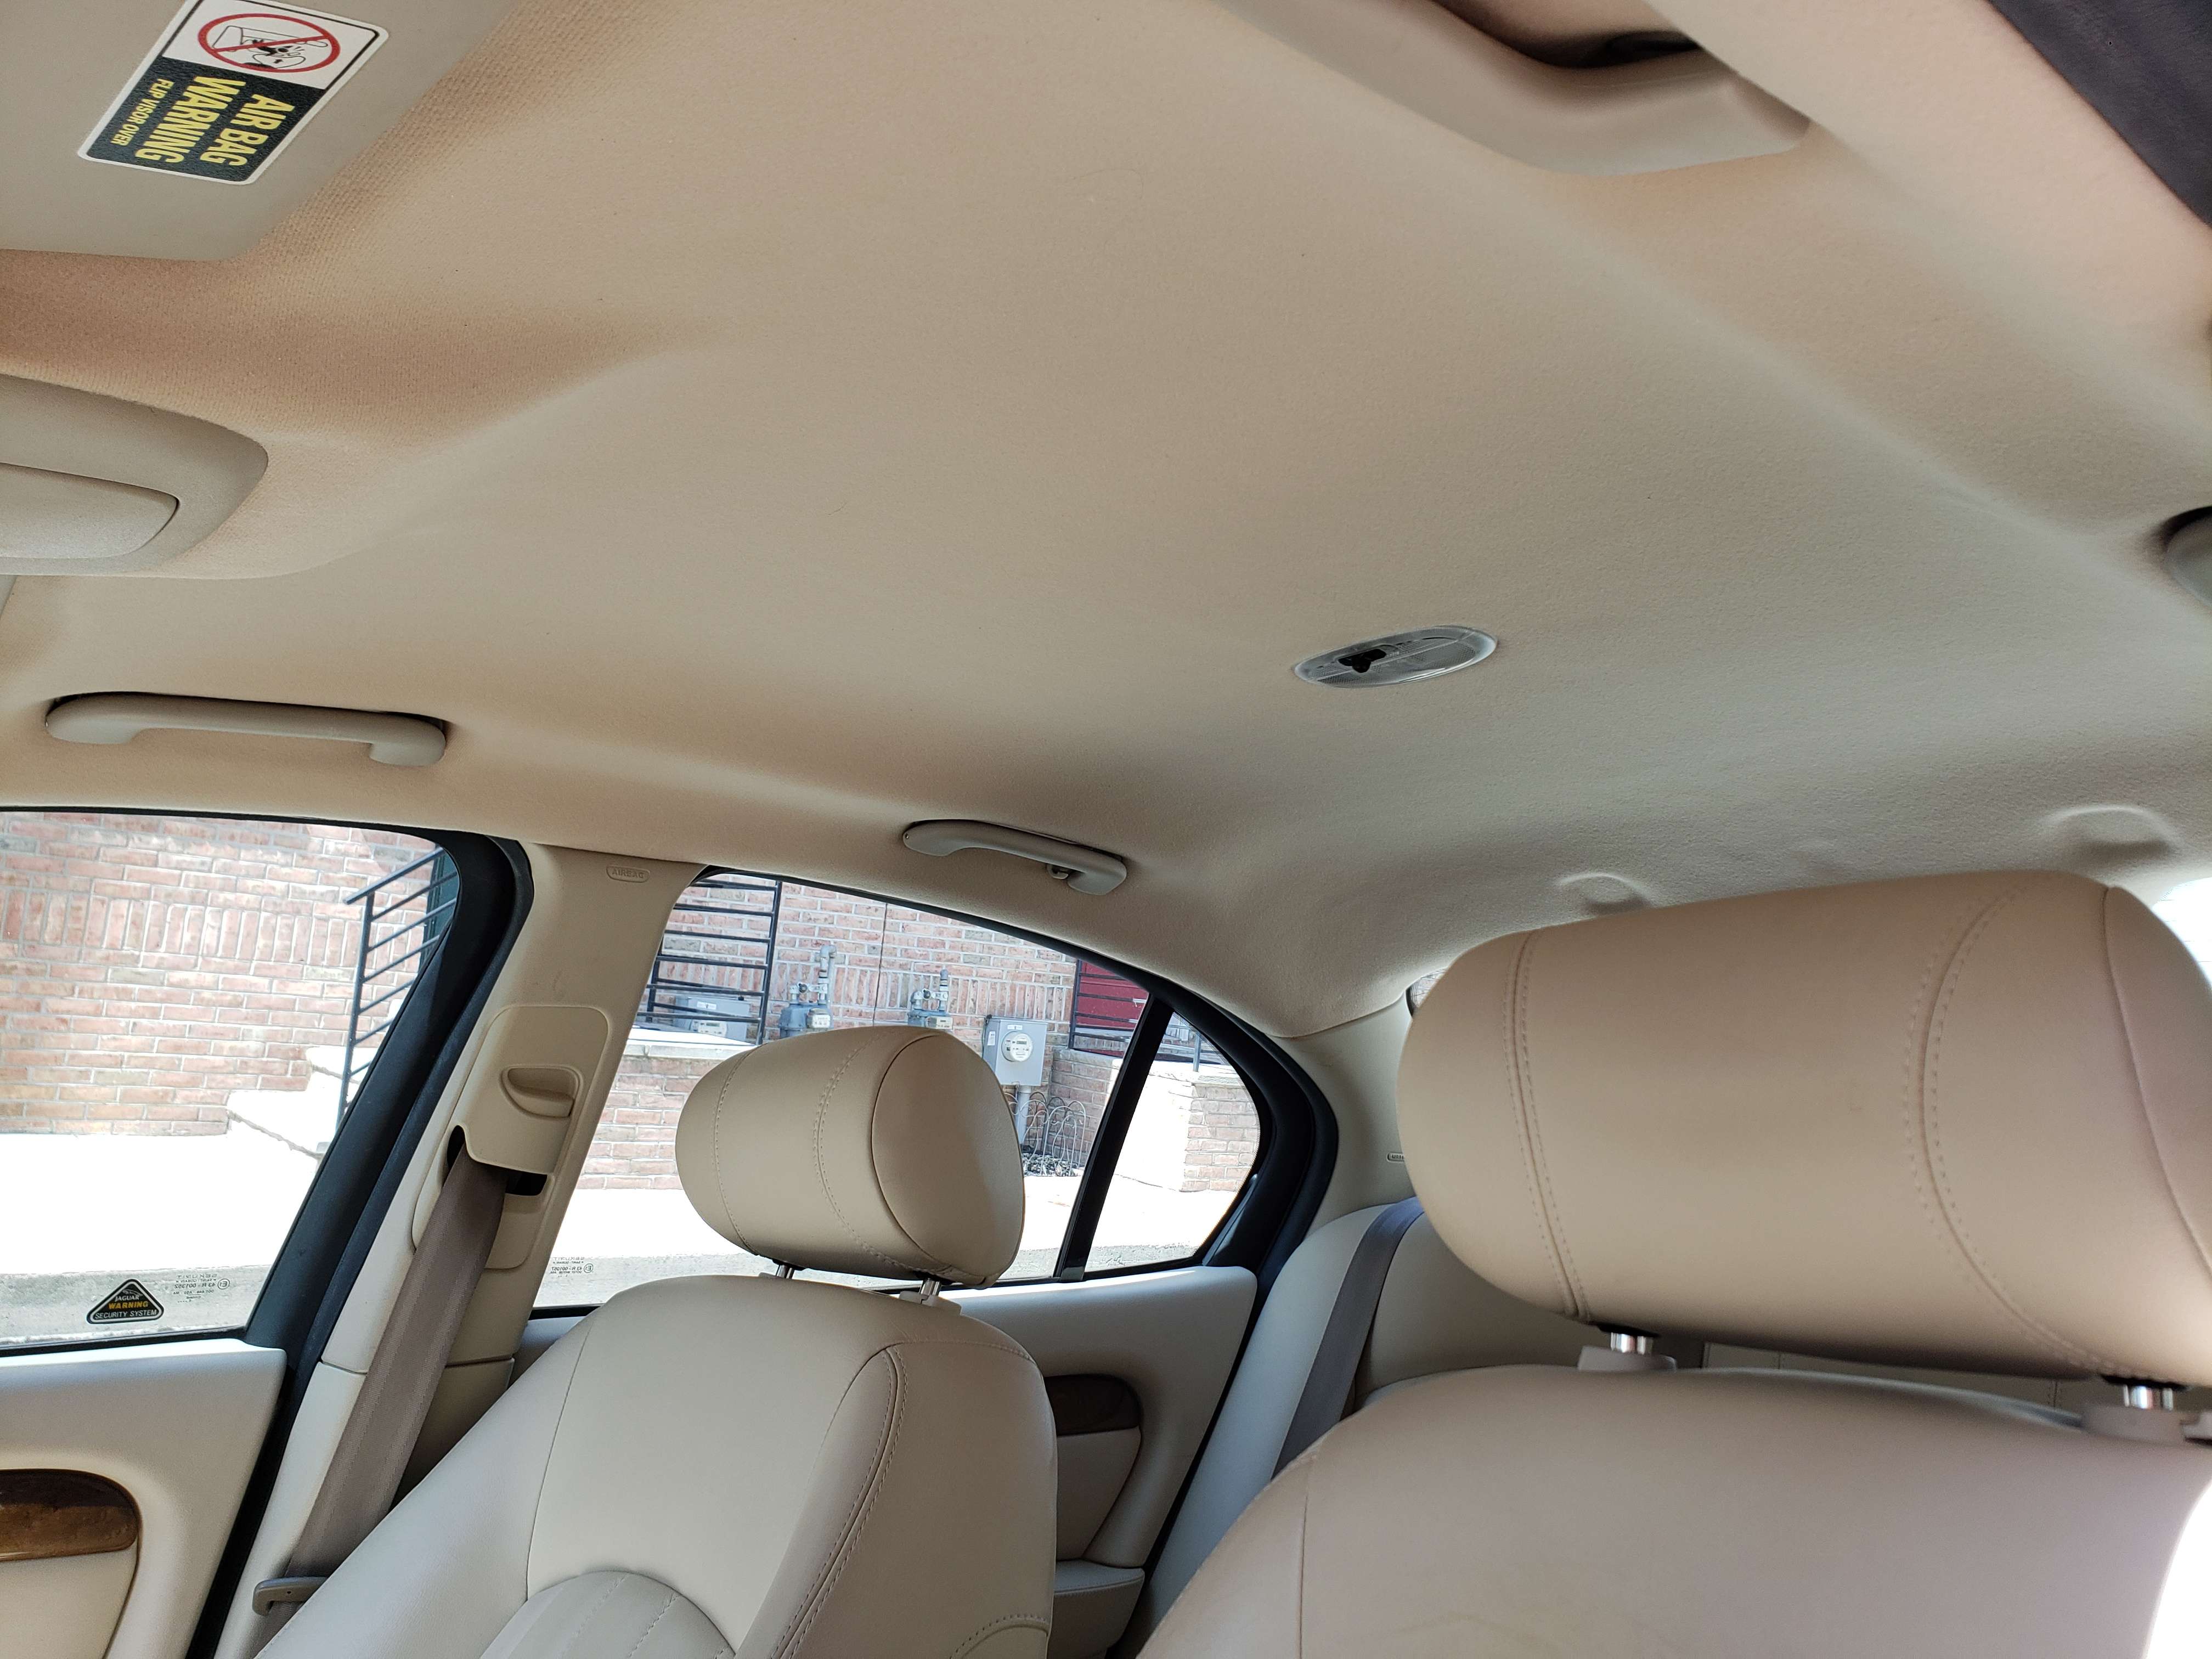
There are some imperfections here and there but none you can notice while installed.
I did a quick search and didn't really find a lot DIY info on redoing one in this car. For anyone looking to do this yourself, here's the bulk of the steps and some tips to help out.
Supplies
For material, I ordered the following foam backed headliner material from www.yourautotrim.com: Auto Headliner "Lt. Neutral" PH-2002, Quantity 2. That's 60x72" which is more than enough. It was about $30 shipped.
For the adhesive I've used 3M Super 77 in the past but went with 2 cans of 3M 38808 Headliner and Fabric Adhesive at ~$40 shipped.
Optional - Plaster or air dry clay and Gorilla glue.
Removal
All 4 handles come down with a regular phillips screw driver once you ply back the reveal cover. The visors are T15 screws, with the outboard connections having a reveal cover as well.
The weather stripping in all 4 doors need to be pulled from the top and pushed out of the way.
The A pillar and top of the B pillar covers pull right out.
The C pillar covers will pull out from the top but the plastic retaining clip is connected to the C pillar it's self and needs to be slid out of the inside of the cover. You'll see when you do it, it's simple. I ended up leaving these covers in place and it helped position the headliner on the way back in.
You'll want to take the passenger seat out at this point. 2 10mm bolts up front, 2 plastic covers with phillips screws and 4 10 mm bolts in the back. There's and electrical connector to disconnect underneath, even if the seat is manual. You either have to disconnect the seat belt or you can just leave the seat next to the open passenger side door.
The forward dome light console is attached to the headliner and it'll pull straight down. I ended up putting my arm in between the liner and the sheet metal to reach closer and push down. The metal clips anchored in the sheet metal might get distorted but they're easy to get back into shape.
There's a single male plastic clip that's attached to the center of the headliner about 3/4 of the way back and it's pushed into the sheet metal. I used a longer forked door trim screw driver to reach back and pop it out without ripping it off the headliner.
Now the electrical wiring harness needs to carefully be cut out of the glue to get the headliner free.
Push the driver's front seat all the way forward and recline it all the way.
No you can let the passenger side of the headliner drop, twist it counter clockwise looking down at the car and pull it through the rear passenger side door. There should be little to no deflection required.
Preparing the headliner fiber board for new material can be a mess. The foam under the fabric is denigrated and sticky. After pulling the lights and old material, I like to use a metal bristle brush to more or less scrape off all the old foam. Just be careful not to start ripping the layers of fiber board.
Reupholstering
This next part is optional but has served me well the past two headliners I've done. The new fabric is only going to stretch so much into the tight areas surrounding the handles, visors and dome light console. Putting pressure on these areas is the only way you can get proper adhesion. In the past I've used cans and bottles to weigh these problem areas down while the new adhesive dries. On the last one, I used a plastic base and plaster to make molds for this purpose. This time I used saran wrap and air dry clay to make molds of these areas. The air dry clay is less messy and easier to work with by a large margin but it takes 2-3 days to cure.
The real tricky part is getting the fabric to do what you want once you go to lay it down for good. I know there's different schools of thought on this but I like to spay the adhesive on both the board and fabric in sections but still following the application directions on the can. I start with the flat sections first then move on to the header areas, ensuring I attach in such a way that I'm not shrouding the next area and I have full coverage. The manipulation of the material should be intuitive. You'll want to work the fabric into the deep spots before you get it to stick past that area. Making slits of the handles helps let the fabric lay a bit easier. The hardest part is the area just forward of the forward dome light. You'll have to cut the fabric where the light console goes to get the proper slack for the area going to the visors but this makes it hard to not have slack when you get to the very front. As you go, weigh down the handle, visor and light console areas for the adhesive to set. Take your time! I spent over 2 hours making sure I got it right.
This part is optional since the factory never does this. On the front and rear, I like to fold the material and glue (gorilla glue or similar) it to the back of the fiber board. My headliner initially let go in the rear and wouldn't have if it came this way. Be careful with how much pressure you clamp with because it'll leave marks if the headliner adhesive is still wet or there's too much pressure.
After that, trim up the sides and make holes as necessary. Note the factory locations for double sided tape and re-apply if desired. I didn't think it was necessary since it probably let go a decade ago.
I let my headliner sit for about 18 hours just to be sure. The adhesive says 60 mins but I figured it wouldn't hurt.
Reinstall
From here, it's just the opposite of the steps to take it out after you attach the lights. The only thing is, you should put towels down in the rear passenger door sill and in the C pillar covers to protect the new headliner. After the headliner is in, put the passenger seat back in and put the driver's seat back up to support it. It'll sit between the C-pillar covers and the headrests. You can do the electrical attachments and poke the visor plugs through at this point. Re-attach the front handles to center it, pop the rear center clip in, rear handles, visors, forward dome light console and re-assemble the interior. Be careful to line up the B-pillar sliders for seat belt adjustment correctly.
You're done!
Before and After
There are some imperfections here and there but none you can notice while installed.


The following users liked this post:
F1Virginia (12-21-2021)

#4
08-14-2019, 09:13 PM
The following users liked this post:
Davenwalee (08-21-2019)

Thread
Thread Starter
Forum
Replies
Last Post
Currently Active Users Viewing This Thread: 1 (0 members and 1 guests)