
E-brake lever sticking - Fix +1
#1
 05-10-2012, 07:48 PM

Join Date: May 2008
Location: Great Mills, MD
Posts: 14,379
Likes: 0
Received 3,887 Likes
on
3,194 Posts
One of the other members talked awhile back about how to fix a sticking e-brake lever. Well, I have been suffering from these and I decided to take it one step further and dig into what is going on. When doing what I am going to say here, the only special tools that you are going to need is:
1) piston retractor tool/block ($10 or so at your local parts store)
2) a 14mm pentasocket (special socket that only has 5 points to it, can be had off the internet for around $20 unless you live in the UK, then you can probably get it for around $5 USD)
Start off by removing the caliper from the car. If you can do a brake pad change, you can get to this point. So, I am not going to go into a lot of detail of getting this far. Once the caliper is in your hand, start off by removing the spring that runs between the e-brake arm and the body of the caliper. Next, using a 27mm Torx bit, remove the screw holding the arm in place. Remove the arm by using a flat bladed screw driver and popping the arm off of the center post. Finally, using a small jeweler's screw driver, carefully remove the rubber seal that is around the shaft here. I found atleast on mine that if you start at the outer edge and run the screw driver around the outside edge, the screw driver will work its way under the rubber disc/seal. From there, slide the screw driver further under and pop the seal right off. You will find a fair amount of hardened grease here more than likely. Clean all of this grease up.
Next, flip the caliper around and locate the piston. Turn the piston clockwise for the drivers side (or counter clockwise for the passenger side). You will see the piston moving out towards you. Keep turning till the piston will not move outwards any more. Carefully stretch the rubber boot over the piston and then remove the piston from the caliper.
Once the piston is out, using a small jewelers screwdriver (flat blade), slide the screw driver in between the soft rubber seal (underside of the seal, known as the piston weather seal) and the raised lip inside the caliper. Gently pry up to remove the seal. Make sure to remain under the hard ring on the outside edge of the seal. You do not want to rip this seal or you will be force to buy a caliper rebuild kit (I bought one for $20 on e-bay, Centric Part Number 143.20008). Next remove the rubber piston seal inside the recess just below the piston weather seal. Slide the jeweler's screw driver between the seal and the metal of the caliper. Pry out gently and once the seal is partially pulled out, you can slide the screw driver between the seal and the caliper body and it will pop right out.
Next, using the pentasocket, remove the 14mm bolt on the underside of the caliper. Once the bolt is removed, note the slot that the adjuster has aligned to the bolt and then push on the shaft where the e-brake lever was mounted. The shaft will slide in and the whole e-brake adjuster will slide out. Pull this out through the opening where the piston normally sits. If you look up near where the e-brake lever sits, you may notice a little bit of corrosion or gunk. This is what was causing the e-brake to freeze up. Remove the o-ring and then using some rags or a "greenie" (aka, soft scouring pad), remove all the corrosion from both the shaft and from the body of the caliper. Use of sanding paper is not recommended here. You want to keep a very smooth finish here to allow the o-ring to seal. If you do use some sand paper, use of a rubbing compound to polish the metal back up is recommended.
Once you get this surface cleaned and looking good again, it is time to reassemble. You will want to grease the area between the o-ring and the splines for the e-brake lever with some hi-temp grease like you would use on your caliper pins. Do not forget to re-install the o-ring here.
The rest is pretty much reversing what you did to remove everything from the caliper. The only change I would recommend is to leave the piston weather seal off till the very end. This will make re-installing everything easier. You can reuse all the software unless you damaged it. If you do end up getting a rebuild kit, might as well put in all new software.
If you think that pics would be helpful, let me know. I still have the one caliper off of my car in preparation for when I need to install it. I can tear it back apart and show you the various stages of what is going on here. Once you tear it apart, you can completely dismantle the caliper, fix the corrosion issue and put it all back together in an hour. It took me a lot longer as I was having to figure out how everything came apart without a diagram of what the internals looked like.
One last note, when reassembling the caliper, do not forget to use a little bit of brake fluid to lubricate things. It will make reassembly a little easier and will also ensure you get the necessary lubrication inside of the caliper.
Last edited by Thermo; 05-11-2012 at 11:52 AM. Reason: Included part number for rebuild kit

Top Answer
05-12-2012, 03:19 PM
Join Date: May 2008
Location: Great Mills, MD
Posts: 14,379
Likes: 0
Received 3,887 Likes
on
3,194 Posts
Probably easier just to add the pictures here than to try and slide them in to the middle of the first post.

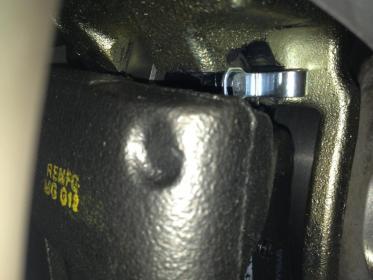
This is a top shot of the caliper. As you can see, the lever is pretty rusty. But the worst is under the lever. On a side note, you can tell this caliper is bound up because of the position of the e-brake lever. If you look, at the 4:30 position, you can see a little arm sticking out. That should be up against the bolt at the 6 o'clock position. Not to mention that you can not move that lever by hand. Once you are done, a little bit of effort with your thumb and you will be able to move the lever through the whole range of motion.

Underneath shot of the caliper. As you can see, there is that pesky pentabolt (14mm). You need a special socket for it. It can be found on the net for around $20 USD. But, you will be ordering it out of the UK unless a company like Snap-On or the like has something like this.

The piston has been backed out till it will not move out any more. Slip the weather boot up and over the piston and then pull the piston out. You need to pull the piston straight out. Pulling at any angle is going to cause the piston to fight you the whole way. Make sure not to puncture this boot. If you do, you will end up buying a rebuild kit.

I have removed the weather gasket. As you can see, the gasket sits on top of the lip there. Once the piston is out, you can use a flat tipped screw driver to slide between the rubber and the metal lip. A little twist of the screw driver and the rubber seal should pop right out. You can also see the black rubber seal between the body of the caliper and the piston. This can be removed at this time too. Make sure not to damage either one of these seals. Doing so forces you to get a rebuild kit.

I have removed the spring and e-brake lever. Here you can see the weather seal to the e-brake shaft. You can see a little bit of the rust that is under this seal. A small screw driver and that seal will pop right off. Go after the seal on the outside edge. Do not go in around the center of the seal.

You can see a brown ring in this picture. This is your problem. The shaft has rusted to the body of the caliper. All this rust needs to be removed to allow the shaft to move freely. The use of a greenie will handle most of what you need to do. For extreme cases, a wire brush like you would use for a battery terminal will finish the job. Just make sure not to scratch up the o-ring mating surface. Doing so will force you to get a new caliper. Another side note, I use the term "Greenie" very generically here. I am talking about the green scouring pads like you use in the kitchen for cleaning up. They sell them in the automotive section and a good store will carry 3 different colors of them; tan (fine), green (medium), and dark brown (course). If you use the course one, follow it up with the medium or fine.

Here is a shot of the pentabolt removed. Look inside the hole. You will need to position this slot at the bottom of the hole back in this position. If you don't, the bolt will not go back in properly. The center piece will slide in which ever way you want. But, there is only 1 proper way to position it.

Here is a shot after I have removed the e-brake actuator. You can see all the rust and whatnot there. All this needs to be cleaned up. You will know when you have cleaned it up enough as the actuator can be installed and turned by hand with ease.

Here is the surfaces cleaned up. The greenies should be all that you need to get things cleaned up nicely. If you must insist on using sandpaper, try to stick with say 400 grit and then use a little bit of brake fluid to help ensure a nice smooth surface. Remember, the courser the sand paper you use, the more likely you are to scratch the o-ring surface and cause a leak, leading to a new caliper. This is where a little bit of elbow grease is going to go a long way.
At this point, you simply reverse the order and put it all back together then fill the caliper with fluid. Do not forget to put some lube on the joint where you pulled the rust out of. The lube will help keep water from that spot and will prevent the lever from binding up in the future. Periodic lubing of the joint may be advisable if you have problems like I do.
This is a top shot of the caliper. As you can see, the lever is pretty rusty. But the worst is under the lever. On a side note, you can tell this caliper is bound up because of the position of the e-brake lever. If you look, at the 4:30 position, you can see a little arm sticking out. That should be up against the bolt at the 6 o'clock position. Not to mention that you can not move that lever by hand. Once you are done, a little bit of effort with your thumb and you will be able to move the lever through the whole range of motion.
Underneath shot of the caliper. As you can see, there is that pesky pentabolt (14mm). You need a special socket for it. It can be found on the net for around $20 USD. But, you will be ordering it out of the UK unless a company like Snap-On or the like has something like this.
The piston has been backed out till it will not move out any more. Slip the weather boot up and over the piston and then pull the piston out. You need to pull the piston straight out. Pulling at any angle is going to cause the piston to fight you the whole way. Make sure not to puncture this boot. If you do, you will end up buying a rebuild kit.
I have removed the weather gasket. As you can see, the gasket sits on top of the lip there. Once the piston is out, you can use a flat tipped screw driver to slide between the rubber and the metal lip. A little twist of the screw driver and the rubber seal should pop right out. You can also see the black rubber seal between the body of the caliper and the piston. This can be removed at this time too. Make sure not to damage either one of these seals. Doing so forces you to get a rebuild kit.
I have removed the spring and e-brake lever. Here you can see the weather seal to the e-brake shaft. You can see a little bit of the rust that is under this seal. A small screw driver and that seal will pop right off. Go after the seal on the outside edge. Do not go in around the center of the seal.
You can see a brown ring in this picture. This is your problem. The shaft has rusted to the body of the caliper. All this rust needs to be removed to allow the shaft to move freely. The use of a greenie will handle most of what you need to do. For extreme cases, a wire brush like you would use for a battery terminal will finish the job. Just make sure not to scratch up the o-ring mating surface. Doing so will force you to get a new caliper. Another side note, I use the term "Greenie" very generically here. I am talking about the green scouring pads like you use in the kitchen for cleaning up. They sell them in the automotive section and a good store will carry 3 different colors of them; tan (fine), green (medium), and dark brown (course). If you use the course one, follow it up with the medium or fine.
Here is a shot of the pentabolt removed. Look inside the hole. You will need to position this slot at the bottom of the hole back in this position. If you don't, the bolt will not go back in properly. The center piece will slide in which ever way you want. But, there is only 1 proper way to position it.
Here is a shot after I have removed the e-brake actuator. You can see all the rust and whatnot there. All this needs to be cleaned up. You will know when you have cleaned it up enough as the actuator can be installed and turned by hand with ease.
Here is the surfaces cleaned up. The greenies should be all that you need to get things cleaned up nicely. If you must insist on using sandpaper, try to stick with say 400 grit and then use a little bit of brake fluid to help ensure a nice smooth surface. Remember, the courser the sand paper you use, the more likely you are to scratch the o-ring surface and cause a leak, leading to a new caliper. This is where a little bit of elbow grease is going to go a long way.
At this point, you simply reverse the order and put it all back together then fill the caliper with fluid. Do not forget to put some lube on the joint where you pulled the rust out of. The lube will help keep water from that spot and will prevent the lever from binding up in the future. Periodic lubing of the joint may be advisable if you have problems like I do.
Last edited by Thermo; 05-12-2012 at 03:36 PM.

#3
05-12-2012, 03:19 PM
Join Date: May 2008
Location: Great Mills, MD
Posts: 14,379
Likes: 0
Received 3,887 Likes
on
3,194 Posts
Probably easier just to add the pictures here than to try and slide them in to the middle of the first post.
This is a top shot of the caliper. As you can see, the lever is pretty rusty. But the worst is under the lever. On a side note, you can tell this caliper is bound up because of the position of the e-brake lever. If you look, at the 4:30 position, you can see a little arm sticking out. That should be up against the bolt at the 6 o'clock position. Not to mention that you can not move that lever by hand. Once you are done, a little bit of effort with your thumb and you will be able to move the lever through the whole range of motion.
Underneath shot of the caliper. As you can see, there is that pesky pentabolt (14mm). You need a special socket for it. It can be found on the net for around $20 USD. But, you will be ordering it out of the UK unless a company like Snap-On or the like has something like this.
The piston has been backed out till it will not move out any more. Slip the weather boot up and over the piston and then pull the piston out. You need to pull the piston straight out. Pulling at any angle is going to cause the piston to fight you the whole way. Make sure not to puncture this boot. If you do, you will end up buying a rebuild kit.
I have removed the weather gasket. As you can see, the gasket sits on top of the lip there. Once the piston is out, you can use a flat tipped screw driver to slide between the rubber and the metal lip. A little twist of the screw driver and the rubber seal should pop right out. You can also see the black rubber seal between the body of the caliper and the piston. This can be removed at this time too. Make sure not to damage either one of these seals. Doing so forces you to get a rebuild kit.
I have removed the spring and e-brake lever. Here you can see the weather seal to the e-brake shaft. You can see a little bit of the rust that is under this seal. A small screw driver and that seal will pop right off. Go after the seal on the outside edge. Do not go in around the center of the seal.
You can see a brown ring in this picture. This is your problem. The shaft has rusted to the body of the caliper. All this rust needs to be removed to allow the shaft to move freely. The use of a greenie will handle most of what you need to do. For extreme cases, a wire brush like you would use for a battery terminal will finish the job. Just make sure not to scratch up the o-ring mating surface. Doing so will force you to get a new caliper. Another side note, I use the term "Greenie" very generically here. I am talking about the green scouring pads like you use in the kitchen for cleaning up. They sell them in the automotive section and a good store will carry 3 different colors of them; tan (fine), green (medium), and dark brown (course). If you use the course one, follow it up with the medium or fine.
Here is a shot of the pentabolt removed. Look inside the hole. You will need to position this slot at the bottom of the hole back in this position. If you don't, the bolt will not go back in properly. The center piece will slide in which ever way you want. But, there is only 1 proper way to position it.
Here is a shot after I have removed the e-brake actuator. You can see all the rust and whatnot there. All this needs to be cleaned up. You will know when you have cleaned it up enough as the actuator can be installed and turned by hand with ease.
Here is the surfaces cleaned up. The greenies should be all that you need to get things cleaned up nicely. If you must insist on using sandpaper, try to stick with say 400 grit and then use a little bit of brake fluid to help ensure a nice smooth surface. Remember, the courser the sand paper you use, the more likely you are to scratch the o-ring surface and cause a leak, leading to a new caliper. This is where a little bit of elbow grease is going to go a long way.
At this point, you simply reverse the order and put it all back together then fill the caliper with fluid. Do not forget to put some lube on the joint where you pulled the rust out of. The lube will help keep water from that spot and will prevent the lever from binding up in the future. Periodic lubing of the joint may be advisable if you have problems like I do.
Last edited by Thermo; 05-12-2012 at 03:36 PM.
The following 12 users liked this post by Thermo:
Bud Tender (01-30-2013),
cazber (06-14-2012),
Exclusif (01-07-2013),
felinex (08-23-2018),
JimC64 (09-19-2013),
and 7 others liked this post.
#4
05-12-2012, 06:03 PM
Veteran Member

#5
05-26-2012, 10:18 AM

Veteran Member
#6
05-26-2012, 10:55 AM
Join Date: May 2008
Location: Great Mills, MD
Posts: 14,379
Likes: 0
Received 3,887 Likes
on
3,194 Posts
Dennis, if you only need to remove the arm and grease the shaft, then yes, you are correct. In my case, I had some corrosion that was deep inside the caliper and the only way to get to the corrosion was to remove the piston assembly. To do this, you have to remove the caliper from the car as you can see. I guess living next to the ocean does have some side effects. Granted, I haven't seem to have any luck with any rear calipers on this car. But, it is a small price to pay as the work is easy to do and doesn't take all that long to do.
The following users liked this post:
Stuart Beattie (07-25-2013)
#7
05-26-2012, 02:15 PM
Veteran Member
Trending Topics

#9
01-07-2013, 10:49 PM


The following 2 users liked this post by Exclusif:
Lcgi (01-08-2013),
Stuart Beattie (08-11-2013)
#10
01-08-2013, 09:34 AM
Join Date: May 2008
Location: Great Mills, MD
Posts: 14,379
Likes: 0
Received 3,887 Likes
on
3,194 Posts
Exclusif, because you are going through a shop, what you paid is not too far off from what I would expect. Granted, for what you paid for the pads alone, for another $50 (USD), you could have gotten pads (ceramic) for all 4 wheels and cross drilled/slotted rotors. I paid right around $200 for rotors and pads for all 4 wheels. Installing them is easy. I would tell you that if you didn't mind a 5 hour drive, to stop on down to my place and we could have hooked you up. I'm down in southern Maryland (an hour south of DC).
Kinda like I have been able to find rebuilt calipers for around $125 each. But, I also have the time to do some looking around.
If you have the knowledge to work on your own car, I would say to spend the $20 now and get your hands on that pentasocket. I seem to go through a caliper a year on average. So, for me, this is going to easily pay for itself being able to rebuild my own calipers. If you look on e-bay, you can find the complete rebuild kit for the rear calipers for around $15 (enough rubber components to do 1 caliper). But, if you are careful in the dismantling process, you should be able to reuse all the rubber components. Worst case, you have to replace only the rubber o-ring for the e-brake assembly. This o-ring can be had at most auto parts stores or hardware stores (make sure to get the nytril o-ring so it can survive in the brake fluid environment).
The following 3 users liked this post by Thermo:
#12
01-30-2013, 07:56 PM
Join Date: May 2008
Location: Great Mills, MD
Posts: 14,379
Likes: 0
Received 3,887 Likes
on
3,194 Posts
Dennis, if you look around, you can find them. Some places call them pentasockets, others call them "brake sockets". Either way, you need a 14mm version of it. Here are a few links that I found to them:
Laser Tools 4149 Other Brake Servicing Pentagon Brake Socket 14mm Tool Garage | eBay WARNING, beware of the shipping on this one, socket is cheap, shipping, holy @#$%!!!!!!!
US Pro Pentagon Brake Adjustment Socket Bit Set AT199 | eBay This is more like it.
3 Piece 5 Sided Pentagon Socket Set for Girdling Bendix Brakes 1893ERA | eBay Not the cheapest, but not too bad either.
If you are looking at doing this, you may want to also consider something like this:
Centric Parts 143 20008 Rear Caliper Kit | eBay
I recommend this as your first time taking the caliper apart, you will be looking to figure out where things come apart and you stand a chance of ripping some rubber. Besides, when you think "oh, I won't need that" is when you will need it the most. If you buy it, you probably won't need it.

#14
02-02-2013, 08:38 PM
I ordered one through Amazon, $17.50 inc. shipping from the UK
It'll take a month to arrive, but a fair price
It'll take a month to arrive, but a fair price
The following users liked this post:
Bruce in North Dakota (09-19-2013)
#15
02-19-2013, 08:04 PM
The following 2 users liked this post by Kota62:
Bruce in North Dakota (09-19-2013),
Stuart Beattie (07-25-2013)
#16
07-25-2013, 03:24 AM
Veteran Member
Join Date: Dec 2012
Location: Skipton, North Yorkshire, England
Posts: 2,542
Received 210 Likes
on
172 Posts
Excellent post THERMO, thank you Chris, and thank you Gary!!! 
I had looked for this post and if I'd done the homework I would have saved!
My loss now, but thanks to this, I'll be able to be more careful and save in the future.
Chris, thank you for the time you permit us to learn more, I appreciate your sacrifice and hope I can HELP OU sometime in the future!
Cheers and worthy Regards, Stu
Last edited by Stuart Beattie; 07-25-2013 at 03:24 AM. Reason: addition to post, thanks!
#17
07-25-2013, 06:44 AM
Join Date: May 2008
Location: Great Mills, MD
Posts: 14,379
Likes: 0
Received 3,887 Likes
on
3,194 Posts
The following users liked this post:
Stuart Beattie (07-26-2013)
#18
07-26-2013, 05:10 AM
Veteran Member
Join Date: Dec 2012
Location: Skipton, North Yorkshire, England
Posts: 2,542
Received 210 Likes
on
172 Posts
Thank you Chris, I had an interesting chat with my mechanic after my car had passed the mot without any advisories although I'll be looking for new front discs shortly as I will need them!
Re my handbrake woes, earlier Gary the mechanic found an elasticated band around the handbrake under the console, I now have a dim view of the previous owners!
I now wish I had photographed the weird diy fix and posted it here for you guys to see! and I shudder to think of what some people do to their cars!
Potential owners beware, the previous owners can cost you a lot of money!!
Now, about that overdraft!!! Seriously though, that so called fix on my handbrake could have led to a dangerous outcome !!!
Be careful out there!!!
Regards, Stu
#20
09-16-2013, 10:32 AM
Senior Member
Dennis, if you only need to remove the arm and grease the shaft, then yes, you are correct. In my case, I had some corrosion that was deep inside the caliper and the only way to get to the corrosion was to remove the piston assembly. To do this, you have to remove the caliper from the car as you can see. I guess living next to the ocean does have some side effects. Granted, I haven't seem to have any luck with any rear calipers on this car. But, it is a small price to pay as the work is easy to do and doesn't take all that long to do.
Before you disconnected the brake fluid line (banjo-bolt) from the calliper, did you first clamp-off the flex-hose - to avoid/minimize fluid loss ?
Some argue this practice damage/collapses the rubber hose, whereas others say it has no lasting effects. What is your opinion ??
Thanks in advance....
Larry