

intake manifold bolts 2004 X Type 3.0L
#2
 05-02-2015 | 08:11 PM

Joined: Jan 2012
Posts: 5,680
Likes: 2,695
From: Newport Beach, California
#4
05-03-2015 | 01:16 PM
Senior Member
Joined: Oct 2007
Posts: 809
Likes: 287
From: Houston, TX
Try BoltDepot:
https://www.boltdepot.com/Metric_hex...m_x_1.0mm.aspx
https://www.boltdepot.com/Metric_hex...m_x_1.0mm.aspx
A dab of anti-seize compound on the threads will make it easier to loosen the bolts next time. But take care not to over-tighten them. It's easy to over-torque a bolt with anti-seize lubricating the threads.
https://www.boltdepot.com/Metric_hex...m_x_1.0mm.aspx
https://www.boltdepot.com/Metric_hex...m_x_1.0mm.aspx
A dab of anti-seize compound on the threads will make it easier to loosen the bolts next time. But take care not to over-tighten them. It's easy to over-torque a bolt with anti-seize lubricating the threads.
The following users liked this post:
jchowell (05-03-2015)
#6
05-03-2015 | 02:09 PM
Senior Member
Joined: Oct 2007
Posts: 809
Likes: 287
From: Houston, TX
I'd try the M6X50 in lieu of M6X47 (3 mm = 1/8th inch longer) and M6X100 in lieu of M6X94 (6mm = 1/4 inch longer). Use washers under the heads of these slightly longer bolts to distribute the load. The factory original bolts have flanges, i.e., wide heads to distribute the load.
If you prefer factory original replacement bolts at a higher price, three options:
1) PM Dr Dome; he parts out X-types
2) An auto recycler (formerly called a scrap yard)
3) Order from a dealer or OEM supplier such as SNG Barratt:
SNG Barratt - Product Search Results
SNG Barratt - The Ultimate Jaguar Parts Specialist
The following users liked this post:
jchowell (05-03-2015)
#7
05-03-2015 | 03:33 PM
Senior Member
Joined: Oct 2007
Posts: 809
Likes: 287
From: Houston, TX
Bolt Barn has M6X50 Flange Bolts. They don't list M6X100 Flange Bolts, but might if you contact them.
50 M6 1 0x50 Metric Hex Flange Bolts Grade 10 9 DIN 6921 | eBay
Also, doesn't hurt to ask eBay sellers of used X-Type intake manifolds if they'll sell you just the bolts.
50 M6 1 0x50 Metric Hex Flange Bolts Grade 10 9 DIN 6921 | eBay
Also, doesn't hurt to ask eBay sellers of used X-Type intake manifolds if they'll sell you just the bolts.
The following users liked this post:
jchowell (05-03-2015)
Trending Topics
#9
05-03-2015 | 07:48 PM
Joined: Jan 2012
Posts: 5,680
Likes: 2,695
From: Newport Beach, California
It may be best to purchase them from a Jaguar agency or one of the forum sponsors such as SNG Barratt.
Be sure you let the engine cold soak prior to removing the bolts, if you have not done so already. If the engine is warm, it is possible to have the brass threaded inserts break free of the inlet manifold.
Be sure you let the engine cold soak prior to removing the bolts, if you have not done so already. If the engine is warm, it is possible to have the brass threaded inserts break free of the inlet manifold.
The following users liked this post:
jchowell (05-03-2015)
#10
05-03-2015 | 09:02 PM
Senior Member
Joined: Oct 2007
Posts: 809
Likes: 287
From: Houston, TX
JC: The upper intake manifold is secured by 2 bolts on the firewall side (aka Bank 1), 4 bolts on the radiator side (aka Bank 2). The diagram below (page 585 of the pdf workshop manual) shows the seemingly random pattern of long bolts (M6X94) and short bolts (M6X47). Some folks mark the long bolt holes with a black marker. I prefer to insert long bolts first, short bolts last - you'll know before turning a long bolt that you guessed wrong if it sticks ~2 inches out of a short hole.
NB correctly cautions to let the engine cool before loosening the intake manifold bolts. They screw into brass inserts in the plastic of the lower intake manifold. Some members have stripped the brass inserts out of the plastic when trying to loosen stuck bolts. That's why it's also recommended to put a dab of anti-seize compound on the threads when re-installing the intake bolts.
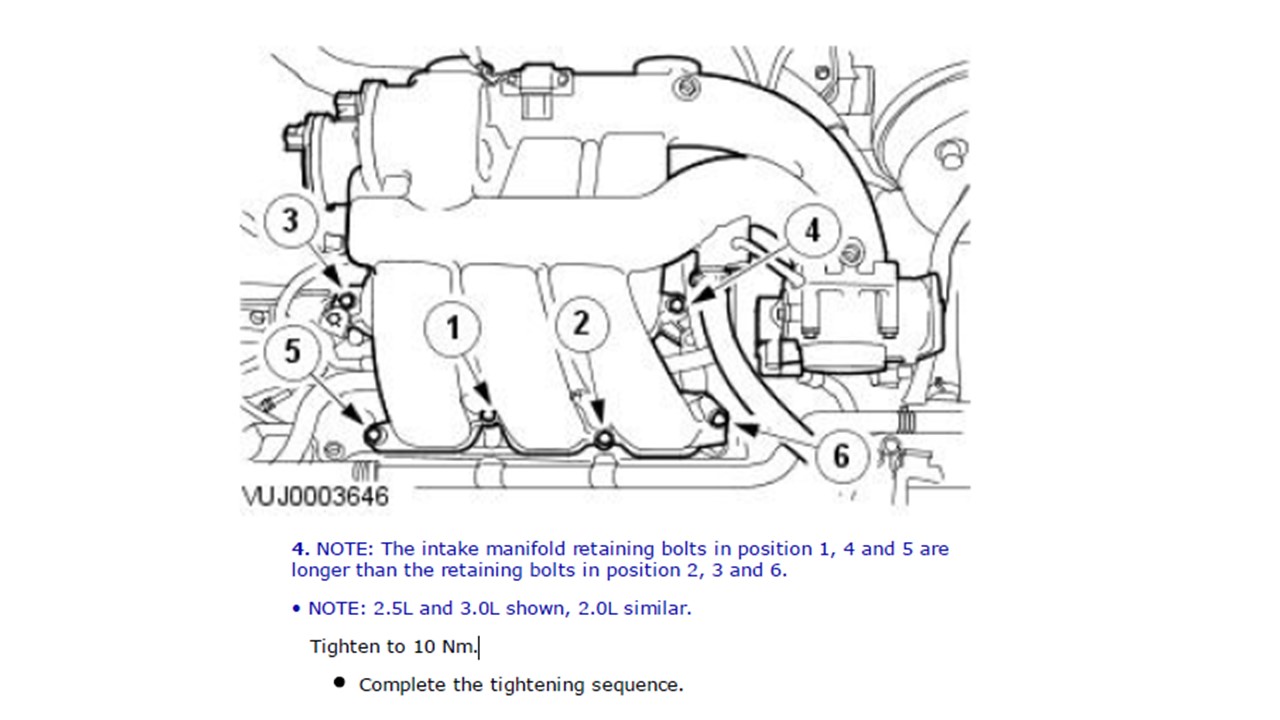
NB correctly cautions to let the engine cool before loosening the intake manifold bolts. They screw into brass inserts in the plastic of the lower intake manifold. Some members have stripped the brass inserts out of the plastic when trying to loosen stuck bolts. That's why it's also recommended to put a dab of anti-seize compound on the threads when re-installing the intake bolts.
The following users liked this post:
jchowell (05-03-2015)
#11
05-03-2015 | 09:31 PM
Senior Member
Joined: Oct 2007
Posts: 809
Likes: 287
From: Houston, TX
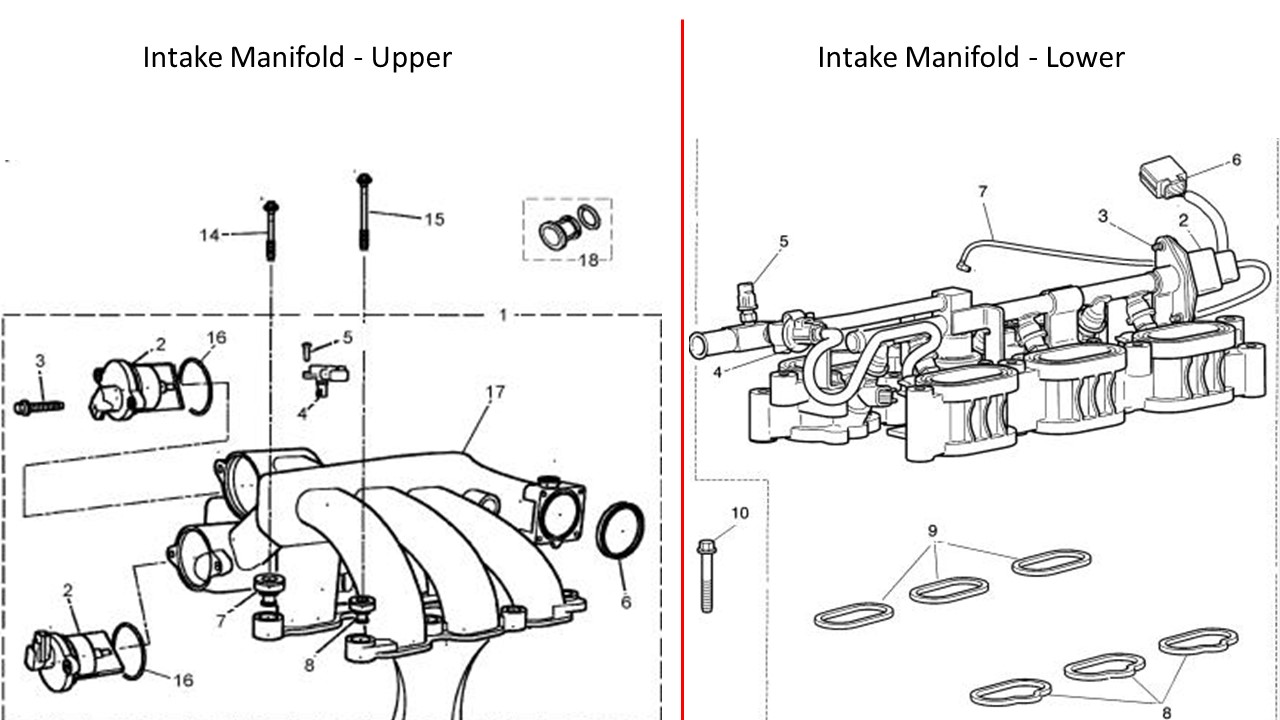
JC: Here's a picture of the lower intake manifold, aka, lower inlet manifold. The bottom of the picture is the firewall side. 6 intake manifold bolts screw into brass inserts in black plastic. NB cautions to remove the manifold bolts when the engine is cool, not hot, or you risk a brass insert breaking free and turning in the black plastic. Anti-seize compound on the bolt threads reduces this risk on future tear-downs.


#12
05-05-2015 | 02:57 AM
Senior Member
Joined: Nov 2012
Posts: 298
Likes: 36
From: Issaquah, Wa
I'm one of those unfortunate souls who stripped the brass inserts. Two to be exact. I don't recommend making the same mistake. It's unnecessary frustration.
Since ya'll seem pretty versed in the removal and replacement of the manifold parts, what would be the chances i could replace the lower manifold without having to remove or disconnect the fuel rail? Can I pull this off without going to the trouble? I have the lower manifold and gaskets, just need to do the swap. If not, what parts do I need to procure to make this a seamless and less agonizing process?
Since ya'll seem pretty versed in the removal and replacement of the manifold parts, what would be the chances i could replace the lower manifold without having to remove or disconnect the fuel rail? Can I pull this off without going to the trouble? I have the lower manifold and gaskets, just need to do the swap. If not, what parts do I need to procure to make this a seamless and less agonizing process?
#13
05-05-2015 | 06:41 AM
Joined: Jan 2012
Posts: 5,680
Likes: 2,695
From: Newport Beach, California
The lower inlet manifold houses the fuel injectors, so the fuel rail must be removed to allow removal of the manifold.
Refer to the JTIS Workshop Manual for the correct procedure and torque values.
The lower inlet manifold gaskets are VIN-specific. If you have not replaced them previously, it may be a good idea to also replace the injector seals and IMT valve seals as well.
Refer to the JTIS Workshop Manual for the correct procedure and torque values.
The lower inlet manifold gaskets are VIN-specific. If you have not replaced them previously, it may be a good idea to also replace the injector seals and IMT valve seals as well.
#14
05-05-2015 | 03:45 PM
Senior Member
Joined: Oct 2007
Posts: 809
Likes: 287
From: Houston, TX
ugotmale: If I understand your question, you'd like to replace the lower intake manifold because some brass inserts are loose. As NBCat says, you'll also need to move the fuel rail and fuel injectors from the old to the new manifold.
For parts, you'll need 6 pairs of O-rings for the 6 fuel injectors, in addition to 6 upper and 6 lower manifold gaskets. If you can't find the O-rings, RockAuto.com has them, or this thread says S-Type O-rings fit our X-Types:
https://www.jaguarforums.com/forum/x...o-rings-35979/
After you remove the upper intake manifold, it's not much additional effort to loosen the lower manifold and replace the lower manifold gaskets. Stuff 6 small rags into the intake ports to prevent dropped parts from falling in by accident.
I haven't transfer a fuel rail and injectors from old to new manifold, but the author of this thread says it's not difficult. It's for a diesel, but the pictures and procedure are helpful:
https://www.jaguarforums.com/forum/x...-change-72875/
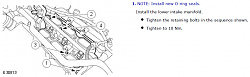
When you re-install the lower manifold, put anti-seize on the 4 bolts and tighten to 10 Nm in the order shown. That's just 7.4 Ft-Lbs, so go easy.
NBCat has a good suggestion to replace the IMT valve O-rings, if they're old / original. The lower o-ring is more easily replaced when the upper intake manifold is unbolted from the engine.
For parts, you'll need 6 pairs of O-rings for the 6 fuel injectors, in addition to 6 upper and 6 lower manifold gaskets. If you can't find the O-rings, RockAuto.com has them, or this thread says S-Type O-rings fit our X-Types:
https://www.jaguarforums.com/forum/x...o-rings-35979/
After you remove the upper intake manifold, it's not much additional effort to loosen the lower manifold and replace the lower manifold gaskets. Stuff 6 small rags into the intake ports to prevent dropped parts from falling in by accident.
I haven't transfer a fuel rail and injectors from old to new manifold, but the author of this thread says it's not difficult. It's for a diesel, but the pictures and procedure are helpful:
https://www.jaguarforums.com/forum/x...-change-72875/
When you re-install the lower manifold, put anti-seize on the 4 bolts and tighten to 10 Nm in the order shown. That's just 7.4 Ft-Lbs, so go easy.

NBCat has a good suggestion to replace the IMT valve O-rings, if they're old / original. The lower o-ring is more easily replaced when the upper intake manifold is unbolted from the engine.
#15
05-05-2015 | 11:27 PM
Senior Member
Joined: Nov 2012
Posts: 298
Likes: 36
From: Issaquah, Wa
I've replaced the IMT valve seals already and also broken down the Manifold 3 times now to replace Coils and Plugs, so I'm pretty comfortable there. It's the hope I might get off easy without having to remove the fuel rail and I could just slide the new Lower Manifold in where the old was. Not so lucky it appears. I read on a thread (that I can't find now) that I needed to release the fuel pressure, replace some pipes to the rail and swap out the injectors. So this is helpful, thanks! If I'm not mistaken 7.4 ft\lbs is essentially hand tightening, no?
P.S. I literally broke the brass nuts out of the lower manifold. Long story involving setting a torque wrench wrong. Ooops.
P.S. I literally broke the brass nuts out of the lower manifold. Long story involving setting a torque wrench wrong. Ooops.
#16
05-06-2015 | 08:46 AM
Senior Member
Joined: Oct 2007
Posts: 809
Likes: 287
From: Houston, TX
Yes, 7.4 ft-lbs is hand tight. It's 10 pounds twisting force at the end of a 9 inch handle. I like using a 1/4 inch socket wrench with ~6 inch handle on small bolts such as these.
The fuel rail has a port for testing fuel pump pressure, and for relieving residual pressure. Look for a small black plastic cap on top of the rail, near the rubber hose that supplies fuel to the rail. With the engine cold and safety glasses, remove the black plastic cap, cover the port with a rag, and gently depress the metal stem inside the port, like a Schrader valve on a tire. If the engine has been off for a while, the residual fuel pressure will be minimal.
Scotty Kilmer has some tips & tricks:
The following users liked this post:
ugotmale (05-06-2015)
#18
05-06-2015 | 09:09 AM
Senior Member
Joined: Oct 2007
Posts: 809
Likes: 287
From: Houston, TX
The following users liked this post:
jchowell (05-10-2015)
#19
05-10-2015 | 02:23 PM

Thread Starter
|
Member
Joined: Apr 2015
Posts: 47
Likes: 1
From: Minnesota
Thanks DW,
I have everything back together with the exception I have missed place the two bolts connecting the air filter reservoir and the Engine Cover front mounting Bracket, any idea as to the size of these?
I may add also when I got to the radiator side plugs all three had siting oil. Was also lucky all coils were in good shape.
Last edited by jchowell; 05-10-2015 at 02:27 PM.