
New X-Type Owner Fluid Change Questions
#1
 01-03-2014, 08:42 PM


Hi,
I am new to the forum and to my X-Type. It is a 2005 Sportwagon with 67K miles and I love it after just a couple of weeks of ownership.
I started in on my 'usual' routine when I get a new (used) car - changing all the fluids and filters. Gives me an excuse to get a poke around under the hood and get familiar with things too.
I have read several of the excellent FAQ threads on oil and fluid changes on the X-type and I would like some confirmations or warnings on the stuff I am planning to use before I dive in.
Here goes:
Engine oil and Filter: Mobil1 5w-30, Mobil1 Filter.
Trans fluid: Castrol Transmax Import Multi-vehicle
Transfer case: Royal Purple 75-140 gear oil
Propshaft bearing: Mobil1 synthetic grease
Differential: Royal Purple 75-140 gear oil ????? (not sure here)
Brake Fluid: ????? (not sure here)
Coolant: Prestone Extended Life or similar?
Steering fluid: ????? (not sure here)
Anything I have missed?
Any advice is much appreciated,
Eric
#2
01-03-2014, 09:35 PM
Junior Member
welcome. Not sure about engine oil, haven't had first yet since purchase but due soon. think ive read no syn for 3.0. Id skip grease for carrier bearing didn't work for mine owned for two mos and had to replace drive shaft. Did xfer case and rear diff with royal purple. Tranny with Castrol multi vehicle atf. Good luck.
The following users liked this post:
SaltyOne (01-03-2014)
#3
01-04-2014, 12:10 PM

Veteran member
Join Date: May 2008
Location: Great Mills, MD
Posts: 14,415
Likes: 0
Received 3,905 Likes
on
3,209 Posts
Saltyone, the rear diff uses the same fluid as the transfer case (full synthetic, 75W-140 gear lube). The brakes use full synthetic Super DOT 4 brake fluid. Just make sure that when you add more fluid, you do a complete flush of the system. If you need help with this, let me know. It is easy to do, even if you are by yourself. In short, you want to push enough fluid through the system that you see it go from a dark green to an almost clear state. As you do the fluid change, you will see what I am talking about.
As for the power steering fluid, you are looking at Mobil ATF/Dexron 3 fluid.
As for the power steering fluid, you are looking at Mobil ATF/Dexron 3 fluid.
The following users liked this post:
SaltyOne (01-04-2014)
#4
01-04-2014, 12:18 PM
#5
01-04-2014, 03:16 PM
Veteran member
Join Date: May 2008
Location: Great Mills, MD
Posts: 14,415
Likes: 0
Received 3,905 Likes
on
3,209 Posts
04xtype04, doing the brake fluid flush is pretty easy. To do it, you will need the following items:
-10mm wrench (preferably open end, but a box end works too)
-about 5 feet of 1/4" ID clear tygon tubing
-roll of masking tape
-catch container (I tend to use a glass jar like a mayonaise jar as it has some weight and are fairly common around my house)
-19mm wrench and jack/jackstands to remove the wheel
-1 quart of Super Dot 4 full synthetic brake fluid
To do this procedure, first start with the right rear tire and get it off of the ground and then remove the wheel. If you look at the top of the caliper, you should see a bleed port (may be under a rubber boot). Using the tygon tubing, attach one end of it to the bleed port and then run the tubing up to the top of the wheel well and off to either side, put some masking tape to support the tubing. Finally, run the other end of the tubing into the catch container. Using the 10mm wrench, open the bleed port about 1/2 to 1 turn. Finally, open the hood of the car, remove the cap off of the brake fluid reservoir and then pump the brakes about 4-6 times. You want to pump it enough that the reservoir gets nearly empty, but does not get empty. At this point, pour in some new fluid and pump the brakes again. At this point, check to see what color fluid is in the tygon tubing. Initially it should be a darker green color, but once you get new fluid there, it will become nearly clear. Also be looking for any signs of air bubbles. They will tend to collect at the very top of the tubing (hence why you tape to either side). Repeat the fluid addition/pumping the brakes will you get "clear" fluid and no air bubbles. Once you are complete, use the wrench to shut the bleed port and then remove the tygon tubing (if you can, place your thumb/finger over the end of the tubing to stop it from going everywhere and then put both ends in the catch container). Replace the rubber boot if needed and then reinstall the tire.
Repeat this process on the left rear tire, then the front right tire and finally the left front tire. In this order, you will minimize the likelihood of getting air into an area that you have already bled.
If you have a second person, they can keep an eye on the tubing and keep adding fluid so you know when to stop and be garanteed not to pump too many times and draining the reservoir.
Once you get into it, you will see how easy this is. There are some pumps out there that will draw a vacuum on the system and pull the fluid through. Never used them as a piece of clear tygon is about $5 and is good for many fluid changes.
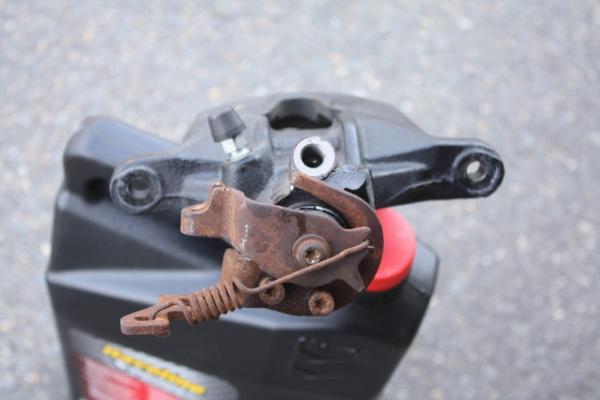
If you look at the below picture, you can see the hole (12 o'clock position) where the brake line will attach to the caliper. If you look at the 11 o'clock position, you will see a black rubber stopper there. That is the rubber boot I talk about and the silver piece underneath is the bleed port.
-10mm wrench (preferably open end, but a box end works too)
-about 5 feet of 1/4" ID clear tygon tubing
-roll of masking tape
-catch container (I tend to use a glass jar like a mayonaise jar as it has some weight and are fairly common around my house)
-19mm wrench and jack/jackstands to remove the wheel
-1 quart of Super Dot 4 full synthetic brake fluid
To do this procedure, first start with the right rear tire and get it off of the ground and then remove the wheel. If you look at the top of the caliper, you should see a bleed port (may be under a rubber boot). Using the tygon tubing, attach one end of it to the bleed port and then run the tubing up to the top of the wheel well and off to either side, put some masking tape to support the tubing. Finally, run the other end of the tubing into the catch container. Using the 10mm wrench, open the bleed port about 1/2 to 1 turn. Finally, open the hood of the car, remove the cap off of the brake fluid reservoir and then pump the brakes about 4-6 times. You want to pump it enough that the reservoir gets nearly empty, but does not get empty. At this point, pour in some new fluid and pump the brakes again. At this point, check to see what color fluid is in the tygon tubing. Initially it should be a darker green color, but once you get new fluid there, it will become nearly clear. Also be looking for any signs of air bubbles. They will tend to collect at the very top of the tubing (hence why you tape to either side). Repeat the fluid addition/pumping the brakes will you get "clear" fluid and no air bubbles. Once you are complete, use the wrench to shut the bleed port and then remove the tygon tubing (if you can, place your thumb/finger over the end of the tubing to stop it from going everywhere and then put both ends in the catch container). Replace the rubber boot if needed and then reinstall the tire.
Repeat this process on the left rear tire, then the front right tire and finally the left front tire. In this order, you will minimize the likelihood of getting air into an area that you have already bled.
If you have a second person, they can keep an eye on the tubing and keep adding fluid so you know when to stop and be garanteed not to pump too many times and draining the reservoir.
Once you get into it, you will see how easy this is. There are some pumps out there that will draw a vacuum on the system and pull the fluid through. Never used them as a piece of clear tygon is about $5 and is good for many fluid changes.
If you look at the below picture, you can see the hole (12 o'clock position) where the brake line will attach to the caliper. If you look at the 11 o'clock position, you will see a black rubber stopper there. That is the rubber boot I talk about and the silver piece underneath is the bleed port.
Last edited by Thermo; 01-04-2014 at 03:19 PM.
#6
01-07-2014, 10:01 PM
Oh wow, thanks for the write up Thermo. Sounds do-able. Need some of the 1/4" hose, you say 5 feet? Would this be a good time to change the calipers? My brakes feel fine at the moment but maybe I will tackle the fluid change later in the year. Never done brakes before. They seemed complicated but with your how-to, it doesn't sound that bad. Thanks
#7
01-08-2014, 08:46 AM
Veteran member
Join Date: May 2008
Location: Great Mills, MD
Posts: 14,415
Likes: 0
Received 3,905 Likes
on
3,209 Posts
04xtype04, the brakes on this car are not any more complicated than on a Honda, Chevy, or a Ford. Once you get the wheel off, you undo 2 more bolts and the caliper comes off. May need to use a large screw driver (or other suitable pry bar) to get the caliper loose as it does like to stick to the rotor and doesn't tend to remove easily. The only other thing is to release the e-brake cable. But that is easy. You use the screw driver to move the e-brake lever and then slide the cable out the bottom of the lever.
The only "complication" that you need to be aware of is the rear calipers require to be turns specific ways to get the piston to retract into the caliper. So, to get the piston in, the way that I do it is to open the bleed port slightly, then using a socket wrench and the special twisting block (available at your local auto parts store), twist the piston as you push the piston into the caliper. If the piston move outward, then turn the piston the other way. Push the piston in till it is flush with the inside edge of the caliper. Once the piston is pushed all the way in, close the bleed port (do not forget to vent the caliper once you are done). Keep in mind that one side turns clockwise, the other side goes counter clockwise.
The only "complication" that you need to be aware of is the rear calipers require to be turns specific ways to get the piston to retract into the caliper. So, to get the piston in, the way that I do it is to open the bleed port slightly, then using a socket wrench and the special twisting block (available at your local auto parts store), twist the piston as you push the piston into the caliper. If the piston move outward, then turn the piston the other way. Push the piston in till it is flush with the inside edge of the caliper. Once the piston is pushed all the way in, close the bleed port (do not forget to vent the caliper once you are done). Keep in mind that one side turns clockwise, the other side goes counter clockwise.

Thread
Thread Starter
Forum
Replies
Last Post
rusty37
XJ6 & XJ12 Series I, II & III
10
06-07-2016 04:43 PM
Currently Active Users Viewing This Thread: 1 (0 members and 1 guests)