When you click on links to various merchants on this site and make a purchase, this can result in this site earning a commission. Affiliate programs and affiliations include, but are not limited to, the eBay Partner Network.
Haven’t had issues with my car in a while. Today in short sequence:
-1-Car started stuttering at low speed
-2-light came on code P0191. No other codes
-3-turned car of, went into target, car came on again
-4-on way out of target car lost almost all power and eventually dies at light
-5-Able to restart giving gas after a few tries and car resumed driving normally all the way home. 2 miles
what does this sound like? I did have to replace the fuel rail pressure module in my old X type, very easy, but I am worried this may be a fuel pump.
Thanks, I just changed it this morning....Car ran well for a while, but eventually stuttered, but no codes today. Stuttered into the gas station and put some gas (it had 1/4 tank, filled it to 3/4) and car performed well after that.
In my original post, I forgot to mention that yesterday the temperature reached 92. It was hot . First hot day of the year here. Failing pumps do not like heat.
Based on my past experience this has to be the fuel pump. This is my daily driver and I occasionally have my grandmother riding in this car. I can not have it break down randomly.
Is replacing the pump a job any mechanic can do, or are there any X type eccentricities that would warrant me paying more for a “specialist”? I will not be cutting holes under the seat unless the labor is 10 hours. But if it’s a matter of a mechanic lowering the gas tank like in any other car, then I will go that route.
Kindly let let me know what to watch out for when having the tank lowered and pump replaced...
I see that that it is in fact a 10 hour job to drop the tank. I was prepared to pay, but not that much. Also, I hate the fact that rear suspension and exhaust parts have to be removed.
If the car is still running tomorrow, I will go to a body shop and ask if they can cut the hole according to the specifications on the video. I don’t want to get in and make a mess, I would like a clean cut, plus I don’t have the tools necessary nor the patience to make perfect cuts.
Spike, I have a very comprehensive thread on replacing my fuel pump by cutting an access hole with really good contributions by other members. It has instructions, pictures, tool used, measurements. Doing it yourself is really not too hard. I went this route because dropping the tank is so expensive. The LOL, is I just had to pay to do just that to replace the rubber hose on the gas tank to fix an Evap Leak, smfh! The snag originally was taking off the fuel pump ring. You really do need to have the removal tool that makes it slick. And the first lose of my ordering the gasket was a hiccup. If I had all that in place before starting the project, I´d say it's a 3 hour job.
In my thread there is also member's post to buy just the actual cylinder pump and be able to replace it in the existing assembly. If mine goes again, I'll go that route, but mine had more wrong with it than just the pump (sensor, float).
Hi gents- it has been 4 months since the original incident occurred, and it has never occurred again.
I have since bought a pump that has not been installed, and my routine has been small local trips thru the week (1 mile or less) , Sundays 16 miles for Mass, and I did take a trip to the airport that was 64 uninterrupted miles (32 miles each way, but I just dropped of a friend and never shut the car down). The code, the stuttering, the stalling, never occurred again. Also the heat has been upper 90’s - 100.
As I have posted in another topic, I will be taking a 6 hour, 300 mile trip soon. I have never driven such a long distance in this car, or in my life , for that matter. I am in Houston and I will fly to Dallas (3 hour drive) when I need to.
I an not sure if it would be best to replace the pump at this point or just leave things unmolested. What do guys think?
I nursed mine for months, but when it died, it died 5 miles from my home (see: "my kitty died today" thread with experience, fix, and pics). I'm a bit of a gambler, no recent problems? I'd go with the pump and tools (just in case) in the trunk.
And enjoy getting the kitty purring out on the freeway. I love driving mine each month on a lotto run to a neighboring State. Fun around town too, but way fun on the highway.
it is extremely simple , dont go on any trip till you do this...when you get that code its a matter of time before your pump goes
1-go to the back seet and push in with your nees and pull up ,and pull it out
2 -get some metal cutting shears drill a 3/8 inch hole
3-on the passenger side,the right in the usa ....cut a hole and bend it back
4 make sure car has been sitting four a while so theres no pressure
5-theres 2 differant pumps for the x-type mines is 2005 on up
unplug electrical connector and fuel ilne
out it comes
in the picture you see the tool with black handle ,use that to get the ring of (harbour freight)
Well the thought of being left stranded in some small town in Louisiana was enough to get part of this started. The seat is in the garage and I am going to start the cutting process once the next couple of days. This is certainly the most daunting part. I know others have done and it’s documented it, but I am still reluctant to cut sheet metal, not as reluctant as I am to pay for 10 hours of labor to drop the tank, however. Fortunately the car is running, so I can go slow.
it is extremely simple , dont go on any trip till you do this...when you get that code its a matter of time before your pump goes
1-go to the back seet and push in with your nees and pull up ,and pull it out
2 -get some metal cutting shears drill a 3/8 inch hole
3-on the passenger side,the right in the usa ....cut a hole and bend it back
4 make sure car has been sitting four a while so theres no pressure
5-theres 2 differant pumps for the x-type mines is 2005 on up
unplug electrical connector and fuel ilne
out it comes
in the picture you see the tool with black handle ,use that to get the ring of (harbour freight)
then seal it up
Dennis, I was reading thru a post you made earlier on another topic and also this one above, and you mention “metal shears” on both posts: is this correct? Am I understanding that you basically made a hole and then used manual metal shears instead of a machine? I would prefer to go this route myself. Like I said, the car is running fine, I can take my time doing it. Could you please share what kind of shears you used and how long it took you? I have seen people cut sheet metal with aviation tin snips
Spike you should use the "nippers" I used. Real cheap at harbor freight and there is nearly zero chance of cutting something you don't want to and it's wicked fast (with the additional "cutting" of the asphalt tile like stuff). Here's my thread with pics =
I know some stuff may seem obvious, so please bear with me.
I am replacing simply the pump itself:
(1) This is all I have, plus I will get the tool to undo the ring. I imagine this is all I need, correct?
(2) Also, since I am replacing just the pump itself, I imagine it all happens “in place” ....meaning I won’t be disconnecting any internal lines, but rather disassembling the pump after lifting it out as unscrewing the screws and replacing the pump unit
(3) I am guessing anything under 1/4 tank is probably the ideal fuel level?
I don't think you can replace the pump in situ. I'd pull it out disconnect the electrical and lines and tear it down on a bench. I have tons of exterior pictures of the pump if you want me to post them for you to look at. Plus remember the bare pump attachment is slightly different than the OEM one and needs a little changing.
Last edited by Dell Gailey; 08-06-2019 at 04:19 PM.
I don't think you can replace the pump in situ. I'd pull it out disconnect the electrical and lines and tear it down on a bench. I have tons of exterior pictures of the pump if you want me to post them for you to look at. Plus remember the bare pump attachment is slightly different than the OEM one and needs a little changing.
Dell, if you look at post 37, it seems to me (maybe I am wrong here) that he did his on the spot to avoid disconnecting the fuel lines. He is doing the same thing I am by just replacing the internal pump
I fear cheap parts. Sometimes they are a great deal, sometimes not so much. The pump I got is a genuine Ford I picked up for 40 dollars. Hopefully it works well.
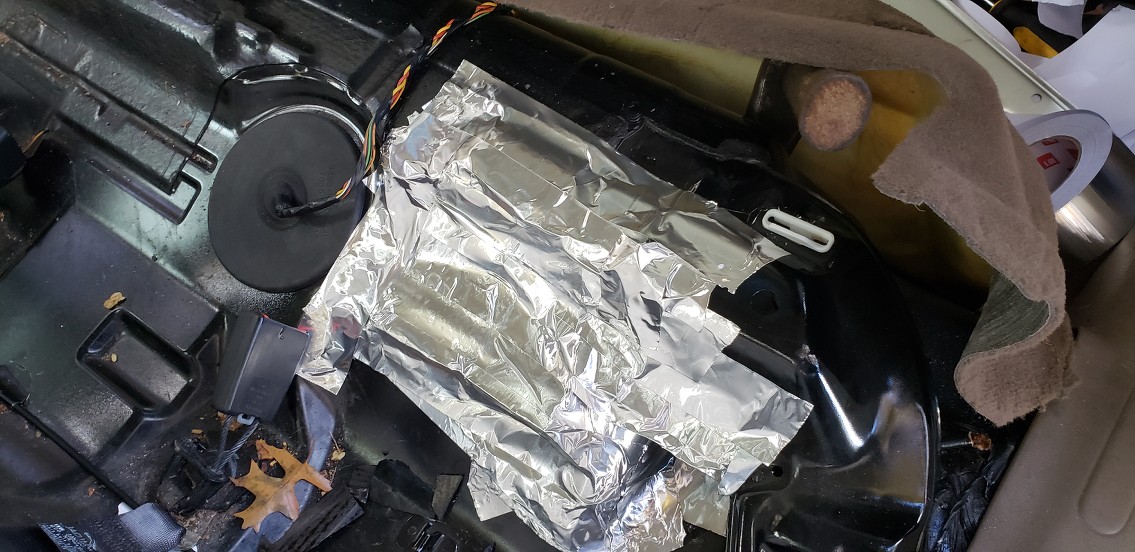
Well, the hole is complete. Right now it’s just a waiting game to consume all the gas in the tank. I also need to pick up the tool to remove the ring and the materials to patch up the hole.
Does anyone know how low I should let this thing get? Reason I ask, is in my XJS convertible, I was able to change the fuel sender in 20 minutes with a 1/2 a tank. Just because of the design on that car, it was easy and simple, except for the odor; so for those of you who have done this X type pump swap from above, should I just let it get to 1/2 or 1/4 to avoid fuel spilling everywhere?
i didnt care how low the gas was when i did mine , because it was super clean, i just yanked the old one out abd droped in the new one.....i didnt bother with the little pump like you guys have.,at the salvage yard they had a pump with 47,000 miles on it for $75 i got 2 of them one for back up,dropped it in and away i went
Well I got everything installed and car seems to be working fine. Only thing that has me worried is the locking ring is not in the same position as before
The circled part was higher up by about 2 inches, but I can seem to tighten it further

 04-09-2019, 10:35 PM