

Plasti dipped my xtype and so glad i did!
#1
 07-28-2013, 12:26 PM

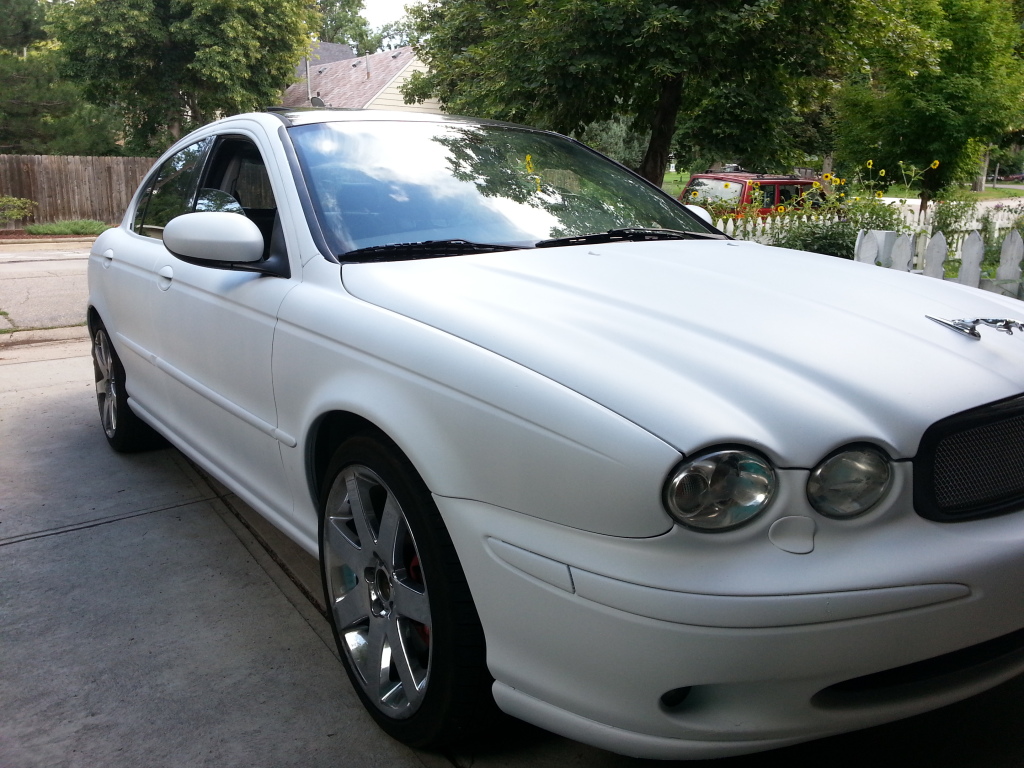
I used three gallons of white and spent probably 11 hours of straight prep, spray and tear down. I still have to remove the dip from some areas and ill take better pictures then, but here is a teaser for all of you out there.

EDIT: new pics!


EDIT: new pics!
Last edited by disguay; 07-30-2013 at 05:06 PM.
#2
07-28-2013, 12:34 PM

Veteran Member
#3
07-28-2013, 07:56 PM
Veteran Member
Join Date: Nov 2006
Location: Glasgow, Scotland UK
Posts: 47,302
Received 9,011 Likes
on
4,114 Posts
#5
07-29-2013, 02:50 AM
Veteran Member
#6
07-29-2013, 01:16 PM
Well that was the "teaser" picture, so there are still places on the car that need to have the dip peeled off. I was worried that there was too much white on the front, so I pulled the dip off of the bar on the lower grille. I also pulled the dip off of the lower valence/park sensors in the rear so that it would blend a little more together.
I really wish I had more pictures, but the issue is that it has been raining for four straight days and the dip is still curing, so right now she is the biggest garage queen ever and I would rather not take more pictures in my cluttered garage.
Many people always ask about the process of dipping your car. This is my first time ever plasti dipping ANYTHING and just decided to go big or go home . I ran into a few issues where the dip clogged the spray gun and sent chunks of rubber out onto the coat, but plasti dip is so forgiving that you can just re-spray any place that you messed up and after about two to three additional coats on the screw up, it seems to hide from the naked eye. The biggest screw up that I had was all of the freaking small trim and rubber pieces on the xtype. I'm actually still dealing with this issue and it took me about 30 minutes per door to cut them out. Yes, I did have to actually cut my doors out with an exacto knife because the dip on the doors fused with main dip. It looks fairly obvious and I'm trying to take more measures to fix it. If I had to recommend anything, I would HIGHLY recommend to tape off all of the little spaces in the windows. They show in the videos that you can spray the dip without the windows masked off, but this gets plasti dip in ALL of the little areas around the windows and I still cant find a way to get the dip out of there.
Overall, I am very impressed and would recommend this process to anyone, because if you ever need to fix where you screwed up or want to repaint it, then you just shoot another gallon on it. I was getting discouraged thinking that I had to peel everything perfectly, but then I realized that you can spray another coat of dip over the original coat whenever you feel like it (could be two years later.)
I really wish I had more pictures, but the issue is that it has been raining for four straight days and the dip is still curing, so right now she is the biggest garage queen ever and I would rather not take more pictures in my cluttered garage.
Many people always ask about the process of dipping your car. This is my first time ever plasti dipping ANYTHING and just decided to go big or go home
. I ran into a few issues where the dip clogged the spray gun and sent chunks of rubber out onto the coat, but plasti dip is so forgiving that you can just re-spray any place that you messed up and after about two to three additional coats on the screw up, it seems to hide from the naked eye. The biggest screw up that I had was all of the freaking small trim and rubber pieces on the xtype. I'm actually still dealing with this issue and it took me about 30 minutes per door to cut them out. Yes, I did have to actually cut my doors out with an exacto knife because the dip on the doors fused with main dip. It looks fairly obvious and I'm trying to take more measures to fix it. If I had to recommend anything, I would HIGHLY recommend to tape off all of the little spaces in the windows. They show in the videos that you can spray the dip without the windows masked off, but this gets plasti dip in ALL of the little areas around the windows and I still cant find a way to get the dip out of there.Overall, I am very impressed and would recommend this process to anyone, because if you ever need to fix where you screwed up or want to repaint it, then you just shoot another gallon on it. I was getting discouraged thinking that I had to peel everything perfectly, but then I realized that you can spray another coat of dip over the original coat whenever you feel like it (could be two years later.)
#7
07-29-2013, 01:29 PM
Oh man. I can't even express how good this looks. It really freshened up and made the X Type look more modern. I bet it even looks better in person too. I've showed this teaser pic to a couple of my friends and their first reaction has always been "whoa! is that factory matte paint?" Perfect time to join the matte paint bandwagon especially since manufacturers are making matte paint more available (like the e92 M3 in frozen grey matte paint).
Nicely done. Now I'm tempted
Nicely done. Now I'm tempted
Trending Topics
#8
07-29-2013, 04:45 PM

Junior Member
#9
07-29-2013, 05:05 PM
Veteran Member
#10
07-29-2013, 05:14 PM
It sure is the mina grille. I really wish I could take it outside and get some better pics of it! I think the matte really brings out the curves of this body. Its incredible how quickly my car went from looking like a "falling apart jag" to a very refined vehicle. And its all because of the matte paint!

#12
07-30-2013, 05:08 PM
#13
07-31-2013, 01:21 PM

#14
07-31-2013, 03:11 PM
#15
07-31-2013, 03:45 PM

#16
08-04-2013, 12:17 PM

#17
08-05-2013, 01:43 AM
A week into it, and I screwed up and took it out into rain before it was done curing. So I'll have to re apply in some places, but I'm not too worried. Still no yellowing and there is a rumor that the new rubber dip s has a uv blocker in it to prevent from the yellowing. Also, the tires have thrown some crap onto the sides, but one wipe of a microfiber and it was gone. Once the white starts to stain, I'll have to figure out better cleaning techniques, but for right now I haven't seen any clues of the dip failing prematurely except for where it got wet because I was an idiot
Anyways, I think I'll continue to add gallons of dip to this white base coat once I get tired of cleaning the white, but until then it'll stay. I really love how you can always add to the dip at any time. I know it'll get dirty because its a flat color, but I'll just order another gallon and respray when that time comes.
Anyways, I think I'll continue to add gallons of dip to this white base coat once I get tired of cleaning the white, but until then it'll stay. I really love how you can always add to the dip at any time. I know it'll get dirty because its a flat color, but I'll just order another gallon and respray when that time comes.
#18
08-14-2013, 04:32 PM

That looks SICK!! I'm looking at doing mine, as well. You beat me to the white, but I'm glad I get to see how it'll look when done. I'm planning on throwing some pearlizer on it to set it off.
I'm a bit concerned with the issue of it getting messed up by the rain after a week of curing. Being in Florida, that's all we get...no way to stay inside for weeks on end. I'll need to look into that.
Great looking car, thanks for pics. Keep the pics coming.
I'm a bit concerned with the issue of it getting messed up by the rain after a week of curing. Being in Florida, that's all we get...no way to stay inside for weeks on end. I'll need to look into that.
Great looking car, thanks for pics. Keep the pics coming.

