
X-type RH half shaft seal...... how to?
#1
 02-12-2008, 08:07 PM
Guest
Posts: n/a
JTIS says I have to remove everything excepth the sunvisor to do this..
JAG GENIUS OR FJT..... Can you tell me what shortcuts I can take?
can I get to the seal witout removing the entire T-case?
It seems to say that I can pull the shaft out of the case without taking the RF suspesnion apart.. is that so?
JAG GENIUS OR FJT..... Can you tell me what shortcuts I can take?
can I get to the seal witout removing the entire T-case?
It seems to say that I can pull the shaft out of the case without taking the RF suspesnion apart.. is that so?
#2
02-12-2008, 08:11 PM


Jack up the vehicle. Take out the 50 torx bolt holding the lower ball joint in place and pop it loose. This will allow movement of the whole right side suspension and hub. Put prybar between t-box and axle and gently pop it out. Then replace seal and put it back together.
Unless I am forgetting something, real simple job.
Unless I am forgetting something, real simple job.
#3
02-12-2008, 09:42 PM
Guest
Posts: n/a
there are two seals. the one between the inner CV joint and the shaft... and the one right up against the transfer case.
the JTIS says to never pull that shaft out of the transfer case more than 7 inches.. or damage to inner seal (whatever that is)
am I missing something? or are you talking about the driver side?
the JTIS says to never pull that shaft out of the transfer case more than 7 inches.. or damage to inner seal (whatever that is)
am I missing something? or are you talking about the driver side?
#4
02-14-2008, 08:59 AM
Guest
Posts: n/a
hmmm.. silence is killing me..
I decided to just de-grease the area and try to see where the oil is coming from.
There is a slight possiblity that it is coming from the vent, but I really cant see up on top of the driveshaft. There is oil all around the shaft, but not on the shaft itself. the oil is only on the TC case and not just at the bottom, so it could be coming from above.
Again the JTIS is super cautious about removing the linkshaft from the TC.
"To prevent damage to the transfer box internal seal, make sure that the link shaft is not retracted further than 200 mm from the transfer box casing."
and then in another place..
" To prevent damage to the transfer box internal seal, make sure that the link shaft is not retracted further than 200 mm (7.87 inches) from the transfer case.Using the special tool, retract the transfer case link shaft."
Can you tell me why on one hand it say "make sure the shaft is not retracted.." and then in the same instruction it says "retract the shaft"
the special tool is sort of pictured but it is nto clear how it helps to remove the shaft safely.
#5
02-14-2008, 07:10 PM
Sorry Bo, this kind of skipped by me.
It says make sure it is not retracted more than 200mm. So you can retract it, just not more than 200mm. LOL
Which seal were you asking about? The one on the side of the t/c where the half shaft goes in or the one on the other side of the t/c between t/c and trans?
I wouldn't mess with it until you know where it is leaking. I don't go changing those seals ***** nilly personally. You did exactly what I would....clean it and make sure where it is leaking from.
Once you know where, we will get into what you need to do to replace the seals if that is what is needed.
#6
02-14-2008, 08:34 PM
Guest
Posts: n/a
the half shaft is just snapped into the "link shaft" as the JTIS calls it. and there is some sort of seal there.
then the link shaft has a seal at the RH side of the TC. and apparently another one internally.
The joint between the two shafts that is easy to change is not leaking. It is wet with oil between the link shaft and the RH side of the TC.
then the link shaft has a seal at the RH side of the TC. and apparently another one internally.
The joint between the two shafts that is easy to change is not leaking. It is wet with oil between the link shaft and the RH side of the TC.
#7
02-15-2008, 05:06 AM
Trending Topics
#8
02-15-2008, 07:45 AM
Guest
Posts: n/a
I have not driven since cleaning.. btw I have a 5 speed manual. so the tranny oil is the same colour as the TC oil... For sure it is not motor oil. It has the funny gear oil smell to it. and no sign of dark colour.
I am still wondering if I can pull the link shaft out or not. It has to come out to change the RH seal... but with all the cautions and special tools, I wonder what the reason is.
I am going on a long trip this weekend, so more to tell on Tuesday.
we have a new day off here in Ontario called "Family DAY". The idea is to make life better for familes during the long stretch between new years day and easter.
#9
02-16-2008, 09:49 PM

You can not pull the link shaft out with the transfer box attached to the transmission. Here is the reason: the transfer box has an internal oil seal to keep the transmission oil and the transfer box oil seperated. If you have ever had them seperated, it is easier to understand. If you pull the link shaft out, the snap ring will cut the seal and the fluids will mix- effectively destroying the transfer box. In the end you will have to replace the transfer box. I've tried to fix several for customers, but it did not work out. One of the local independent shops did not have this information, or just flat out ignored it. This is a bit more critical for the automatic cars than the manual cars. But, to be safe, follow the directions.

#11
02-18-2008, 06:36 PM
#12
02-19-2008, 11:40 AM
Guest
Posts: n/a
ORIGINAL: jag_genius
hey bo you have to remove the transfer case to replace that seal.. as spanner said it will destroy the seal internal.. and you cannot get that seal.. anywhere.. and i have 1 tire for you already 225/45/17 conti 3 more to go.
hey bo you have to remove the transfer case to replace that seal.. as spanner said it will destroy the seal internal.. and you cannot get that seal.. anywhere.. and i have 1 tire for you already 225/45/17 conti 3 more to go.
I guess I need to wait until summer so I can pull the TC and deal with it properly. In the summer I have other cars to drive, while the X is "under the knife"
#13
03-18-2009, 11:17 AM
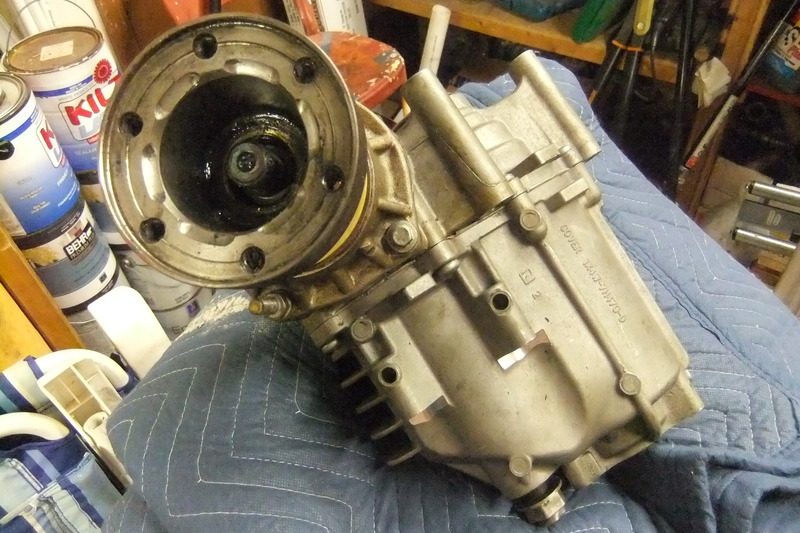
This thread is just what I am experiencing right now. I have my TC removed and was careful NOT to allow the shaft to come out more than 2" just to be on the safe side, I had pulled off the "snap ring" on the half-shaft before separating the T/C from the Transmission. I have drained the fluid over several days.
Last night I carefully removed the shaft. I cracked the case open and washed the gears and bearings. I wiped the sludge form the inside of the case and now I am ready to replace the outer seals.
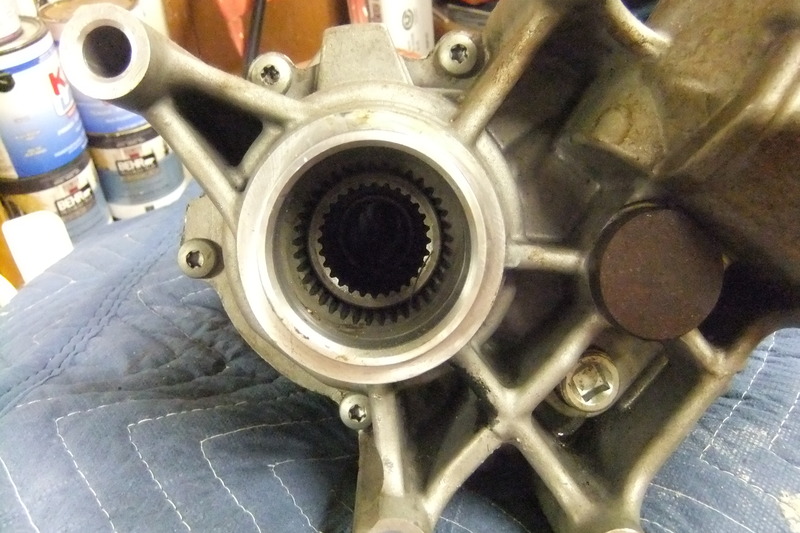
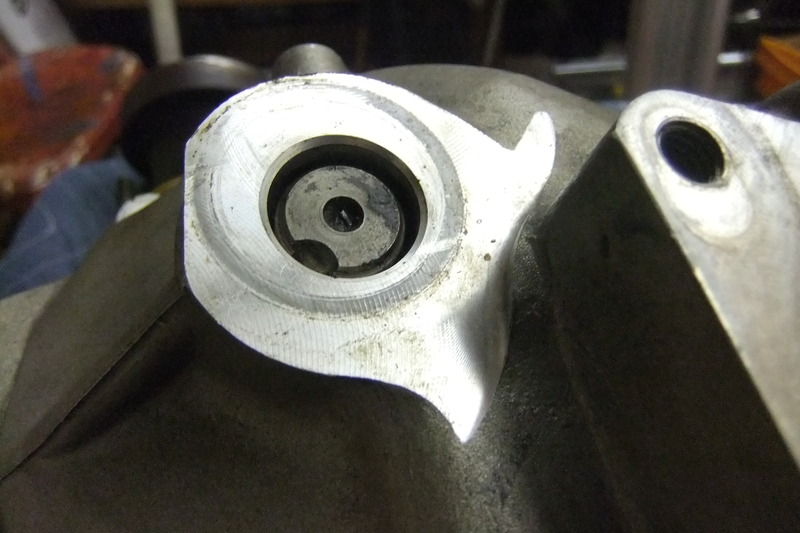
Inside the T/C there is a "gear stack" that the half-shaft slides through. There are bearings that this stack rides on and a race that is pressed into the case. Under this race, on the Rear Wheel output end of the TC, are 2 opposing rubber seals, very much like shaft seals. The "stack" has a snout that the Transmission slides inside. This snout is sealed by these 2 opposing seals. These do not look replaceable, only for the assumption that the parts themselves cannot be had. However I have seen several Gear Shops that say they Rebuild Jaguar Transfer Cases, so maybe there are parts. At this point it is unknown to me.
Inside the Transmission, where the output shaft connects to the TC, there are a couple of o-rings that can be seen. There is an outer seal on the opposite side. There is also one on the TC itself.
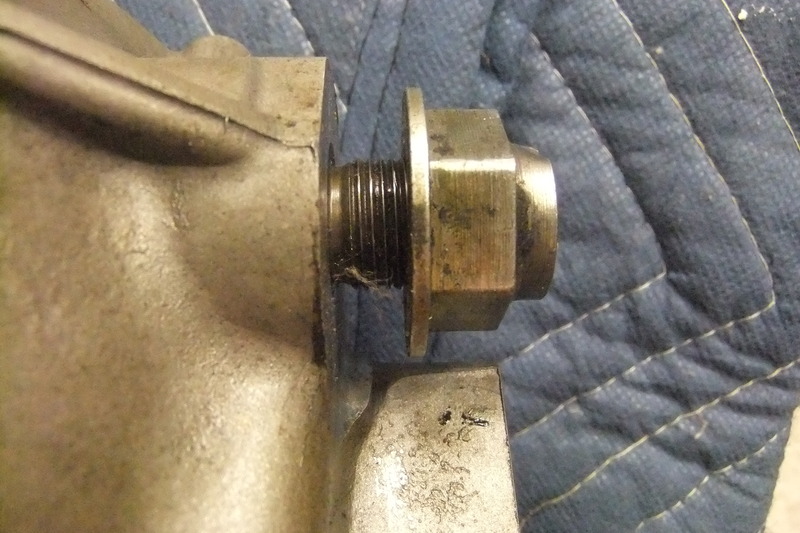
The seal in question says "inner" Transfer Case. I'm not positive but I think the "inner" seal may be the 2 opposing seals inside the Transfer Case. If you slide the shaft out more than 7" than these seals are supporting the weight of the "gear stack" and this is probably too much for the seals. If you turn the TC on it's end that has the "vent" you will allow the weight to rest on the bearing race at the other end of the �gear stack�. Before you do that you will need to remove the large nut on that end also. The rear wheel output coupling would be up in the air at a 90 and you would be able to look down the half-shaft hole. If you then remove the bolts holding the shell together and as you do you will see two tabs that are part of the casing. One tab on each half. Use an appropriate tool to use as a lever between these two tabs so as to separate the casing. Gently lift off the "thinner" half of the TC as the seals are inside this piece.
If photos would help I can certainly upload a few.
Last night I carefully removed the shaft. I cracked the case open and washed the gears and bearings. I wiped the sludge form the inside of the case and now I am ready to replace the outer seals.
Inside the T/C there is a "gear stack" that the half-shaft slides through. There are bearings that this stack rides on and a race that is pressed into the case. Under this race, on the Rear Wheel output end of the TC, are 2 opposing rubber seals, very much like shaft seals. The "stack" has a snout that the Transmission slides inside. This snout is sealed by these 2 opposing seals. These do not look replaceable, only for the assumption that the parts themselves cannot be had. However I have seen several Gear Shops that say they Rebuild Jaguar Transfer Cases, so maybe there are parts. At this point it is unknown to me.
Inside the Transmission, where the output shaft connects to the TC, there are a couple of o-rings that can be seen. There is an outer seal on the opposite side. There is also one on the TC itself.
The seal in question says "inner" Transfer Case. I'm not positive but I think the "inner" seal may be the 2 opposing seals inside the Transfer Case. If you slide the shaft out more than 7" than these seals are supporting the weight of the "gear stack" and this is probably too much for the seals. If you turn the TC on it's end that has the "vent" you will allow the weight to rest on the bearing race at the other end of the �gear stack�. Before you do that you will need to remove the large nut on that end also. The rear wheel output coupling would be up in the air at a 90 and you would be able to look down the half-shaft hole. If you then remove the bolts holding the shell together and as you do you will see two tabs that are part of the casing. One tab on each half. Use an appropriate tool to use as a lever between these two tabs so as to separate the casing. Gently lift off the "thinner" half of the TC as the seals are inside this piece.
If photos would help I can certainly upload a few.
#14
10-08-2016, 10:11 PM

I've found myself struggling with a leaky internal seal after needing to remove the front right internal shaft. As mentioned earlier in this thread, it would have been better not to have removed the shaft. However, my inner shaft was integrated with the rest of the CV axle and was impossible to separate. After it was out I even tried to separate it with a bench vise and a full size sledge hammer, wedges, chisels, you name it. No dice. I eventually had to find an axle with an integrated internal shaft as one piece to replace the old one.
In previous comments in this thread you've mentioned removing the entire Transfer Case in order to get to the damaged seal. However, it has also been mentioned that that particular seal is not available.
So, my question: In the years between these posts has the seal become available? And if not, am I looking at replacing the entire Transfer Case in order to fix my problem?
Unfortunately, I bumbled into this repair thinking I could make a simple repair to a wheel bearing. After damaging the CV boots and deciding to just change the CV axle out, which appeared to go well at the time, I found I was leaking fluid from around the shaft. Now it seems I have a major problem.
I don't trust my local repair shop because Jaguars are pretty sparse here in Montana and they never really know what they are getting into and change their tactics midstream a lot.
I am new to forums in general and if I've been confusing or haven't supplied enough information, let me know.
Thanks,
jknable
2008 X-Type AWD
Last edited by jknable; 10-08-2016 at 10:36 PM.
#15
10-09-2016, 12:49 PM
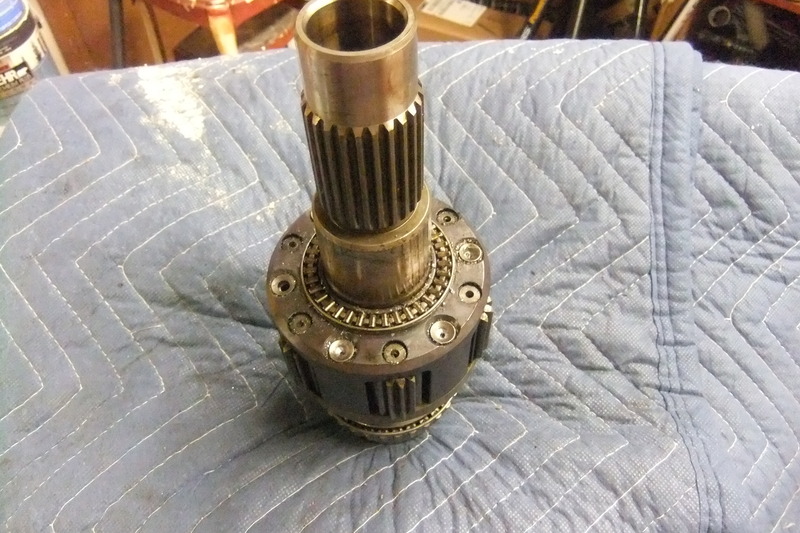
JK, I have my old transfer case from my 02 that I removed many moons ago. It has the bad inner seals. In the years since it's removal I have on occasion toyed around with it and attempted to prove out drainage techniques and get to those "inner" seals. They are encased in a heavy gear housing with several heavy duty rivets holding the two pieces together. This is a VERY MAJOR component of your drive train and much skill, finesse and caution are required to remove, install and or repair. In my simple opinion, currently, this is the MOST difficult tedious component in the entire car. I would rather chase down electrical gremlins than have to deal with the TC.
Just for you, I went into the garage this morning and dismantled my old TC I keep around, just in case they discover a way to successfully thaw out the cryo frozen people and come up with a way to deal with this particular element of this vehicle, and I took some pictures for you in order to make you fully aware of what you will be getting into. So here they are:
Transfer Case by James Fenley | Photobucket
Some of the photos are from the Haines TC project
I present you with this to start. After you successfully remove the TC ( my entire sub-frame and wheels where removed to gain easy access and little frustration and more comfortable working conditions) from the vehicle

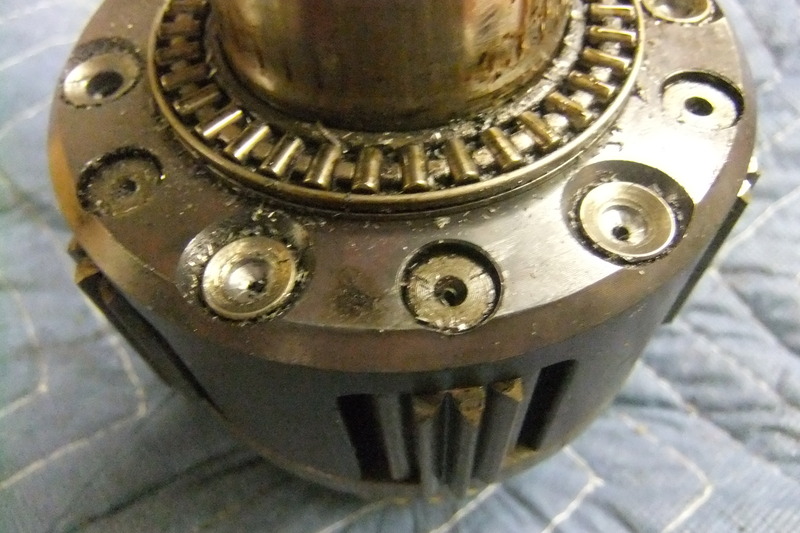
Now lets' open it up...note the torx screws, they are on this side of the 2 piece main body of the case and on the opposite side.
Once you have successfully removed the Torx bolts holding the casing together you will need to release the pre-load/guide shaft nut on the housing.

Now you have to separate the case pieces, Not Easy! I recommend some heat, not soo much that you melt rubber but enough to soften the seal compound holding the case together. You will definitely need a mallet. DO NOT PRY on the gap the begins to open, you could gouge or mar the sealing surfaces.

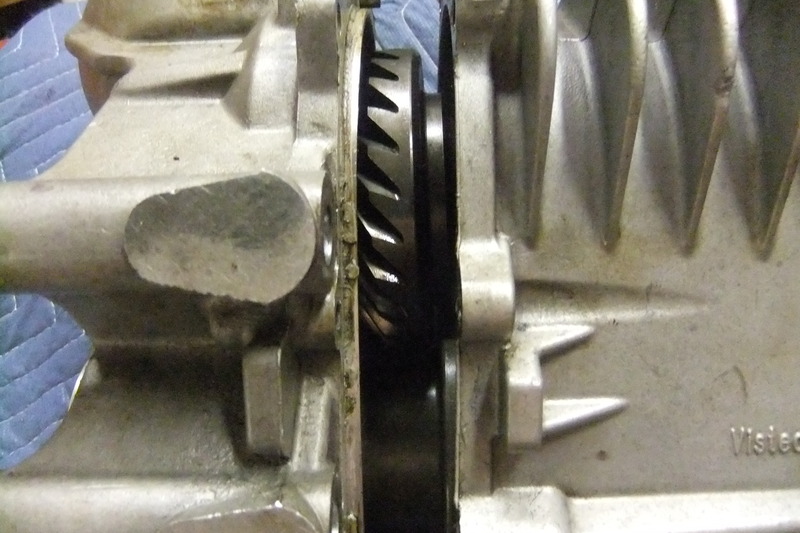

So now you have the pieces beginning to separate, notice on the large section that the per-load/alignment shaft is beginning to go inside case. BE extra gentile and careful as you slide the case off. There is ALOT of WEIGHT on the inner section of gears and you are about to remove the one thing that keeps them stable and in position.

LOTS more seals to replace,,,, not just those hidden inner seals

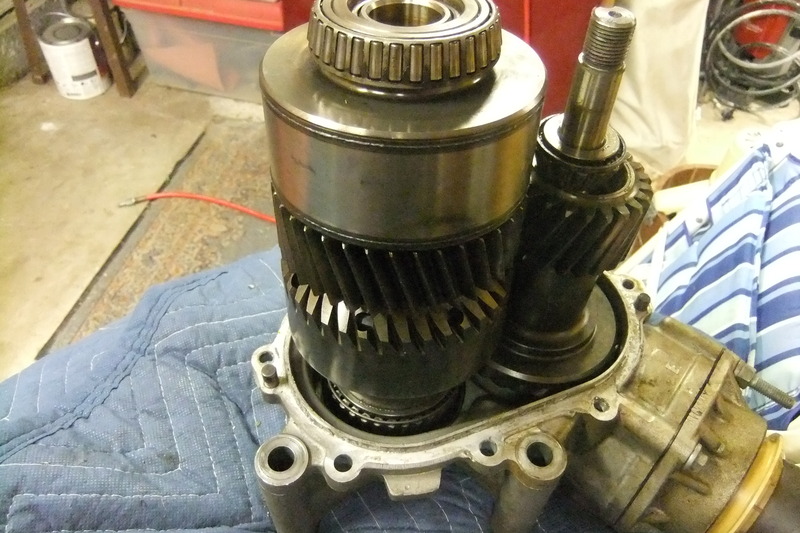
Are you ready? lift out the large synchronies section: CAUTION! It is not one piece, it is actually 3 pieces stacked on top of one another with meshing gears.


Are you ready? Here is the prize. The seals are inside this syncro housing. In the past I wanted to get to those seals so I attempter to remove the hardware holding the housing together. After a bit, I decide against the idea. I did not want to DESTROY the housing forever, so I abandoned the idea. Maybe someday there will be an answer.
Oh yes, those inner seals. They are buried inside the housing.
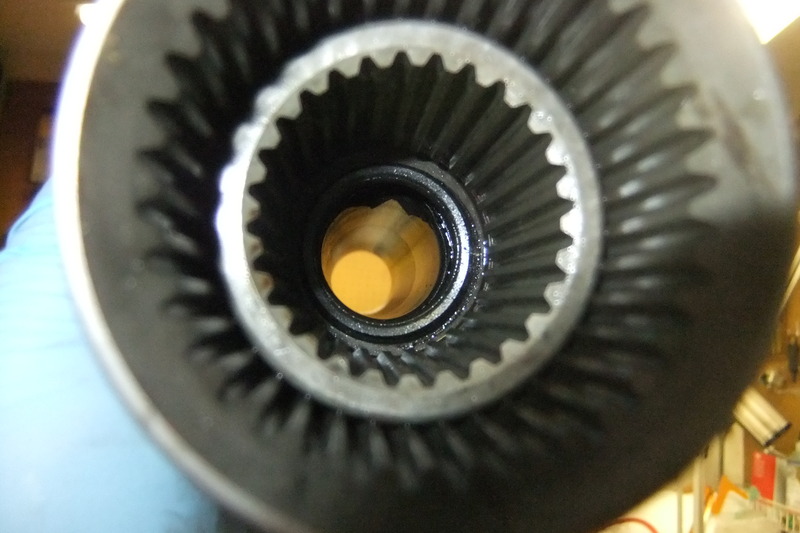
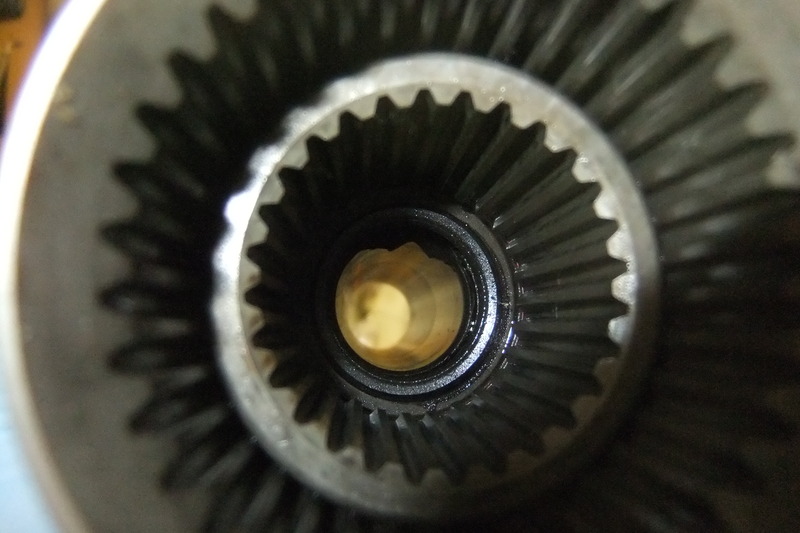
Now that you can see the scope of getting to those "inner shaft seals" I hope you realize the tremendous task involved in attempting to replace those seals.
Smart MONEY is to purchase a new TC from a senior tech on this forum for half the cost from a dealer. Then you will need time and skill to install new TC. decide in-place or complete sub-frame removal. Even if you have a lift things will still be very challenging with in-place removal and replacement, especially if this is your first time.
My recommendation is to drop entire sub-frame intact with wheels and all and undo CV joint and hoist engine and transmission onto a bench, At this point everything is accessible and much easier to work on without so much breakage and modifying/cutting/drilling to remove obstacles. And while it is out you might as well drain the Tranny and pop off the oil pan and re-seal.
It takes ALOT of patience, finesse, and gentleness to work on these cars. MUST ALWAYS USE TROQUE wrench when replacing bolts.
Hope this helps.
JF
Just for you, I went into the garage this morning and dismantled my old TC I keep around, just in case they discover a way to successfully thaw out the cryo frozen people and come up with a way to deal with this particular element of this vehicle, and I took some pictures for you in order to make you fully aware of what you will be getting into. So here they are:
Transfer Case by James Fenley | Photobucket
Some of the photos are from the Haines TC project
I present you with this to start. After you successfully remove the TC ( my entire sub-frame and wheels where removed to gain easy access and little frustration and more comfortable working conditions) from the vehicle


Now lets' open it up...note the torx screws, they are on this side of the 2 piece main body of the case and on the opposite side.

Once you have successfully removed the Torx bolts holding the casing together you will need to release the pre-load/guide shaft nut on the housing.


Now you have to separate the case pieces, Not Easy! I recommend some heat, not soo much that you melt rubber but enough to soften the seal compound holding the case together. You will definitely need a mallet. DO NOT PRY on the gap the begins to open, you could gouge or mar the sealing surfaces.


So now you have the pieces beginning to separate, notice on the large section that the per-load/alignment shaft is beginning to go inside case. BE extra gentile and careful as you slide the case off. There is ALOT of WEIGHT on the inner section of gears and you are about to remove the one thing that keeps them stable and in position.


LOTS more seals to replace,,,, not just those hidden inner seals


Are you ready? lift out the large synchronies section: CAUTION! It is not one piece, it is actually 3 pieces stacked on top of one another with meshing gears.


Are you ready? Here is the prize. The seals are inside this syncro housing. In the past I wanted to get to those seals so I attempter to remove the hardware holding the housing together. After a bit, I decide against the idea. I did not want to DESTROY the housing forever, so I abandoned the idea. Maybe someday there will be an answer.


Oh yes, those inner seals. They are buried inside the housing.


Now that you can see the scope of getting to those "inner shaft seals" I hope you realize the tremendous task involved in attempting to replace those seals.
Smart MONEY is to purchase a new TC from a senior tech on this forum for half the cost from a dealer. Then you will need time and skill to install new TC. decide in-place or complete sub-frame removal. Even if you have a lift things will still be very challenging with in-place removal and replacement, especially if this is your first time.
My recommendation is to drop entire sub-frame intact with wheels and all and undo CV joint and hoist engine and transmission onto a bench, At this point everything is accessible and much easier to work on without so much breakage and modifying/cutting/drilling to remove obstacles. And while it is out you might as well drain the Tranny and pop off the oil pan and re-seal.
It takes ALOT of patience, finesse, and gentleness to work on these cars. MUST ALWAYS USE TROQUE wrench when replacing bolts.
Hope this helps.
JF
Last edited by jfenley; 10-09-2016 at 01:03 PM.
#17
10-09-2016, 01:17 PM
Holy Shnikeys! Wow am I glad you explained it so well jfenley! I have some contemplating to do now. I'm leaning towards a new TC as you've recommended and am trying to decide on logistics.
Maybe I'm not in as bad a shape as I think. (hoping for a ray of light here.) My symptoms are: when I drive, I know I'm leaking some type of fluid from around where the axle enters the TC. When I stop, it drips a small amount and stops.
Is there any way to tell if the inner seal is damaged, or if it's just an outer seal? I don't know how to differentiate if the tranny fluid is mixing with the TC fluid or not.
I've gained access to a repair manual and diagrams, but am having difficulty finding information for inside the TC.
#18
10-09-2016, 01:31 PM
JK, in-place gently remove the axel. ALWAYS KEEPING IT PERPENDICULAR to TC. DO NOT pull hard or tug. Slowly and Gently remove offending axel, it helps if you turn it a little each time you make headway as you remove it. The "inner seals" are opposing spring seals ( they have a spring around the rubber lip) and are easy to foul. Use a seal puller to remove the outer seal and install a new one. Re-install shaft with the same motion as the removal, turning it as you install. The re-grease the CV joint and clip the boot closed.
Sounds simple, but it will take some patience and effort.
JF
Sounds simple, but it will take some patience and effort.
JF
The following users liked this post:
jknable (10-09-2016)
#19
11-01-2016, 04:54 PM

The inner seals are available for $5 each and can be replace3d using a hydrallic press to separate gears drive from the inner shaft. Check: https://www.jaguarforums.com/forum/x...e-93353/page2/
I did thid a few months back and have driven 7500 miles since without leaks or any other problem with the transfer case.
I did thid a few months back and have driven 7500 miles since without leaks or any other problem with the transfer case.
#20
11-13-2016, 12:32 PM
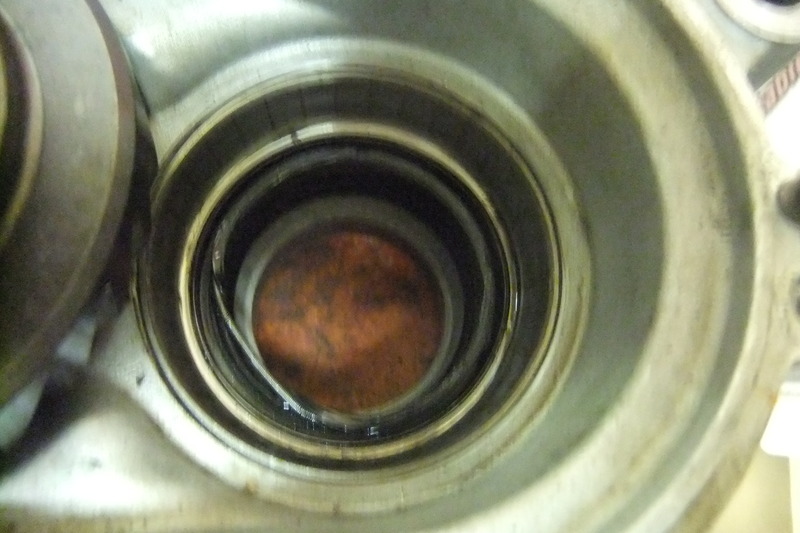
I attempted removing the shaft again to check/replace the outer seal. I worked carefully on it for awhile and made some gentle headway through the resistance of the inner seals, however I didn't feel comfortable tugging through the last barrier so I put it back together. Outer seal seemed to look ok. I then decided to drain the tc to check the color of the fluid and refill. I removed the large bolt that has the internal 3/8 square drive on the side of the tc. The fluid that drained out was dark brown/black and smelled horrendous. I put the bolt back in before it all drained out. Was that the correct drain plug?? Any thoughts on the fluid that came out? The local shop is who worked on this last and they tried to fill it unsuccessfully. I'm thinking that if they did fill some, it was with this fluid. When I first pulled the inner shaft out in my first adventure into this problem, the fluid was clearish and looked like clean oil.
Last edited by jknable; 11-13-2016 at 03:21 PM.