When you click on links to various merchants on this site and make a purchase, this can result in this site earning a commission. Affiliate programs and affiliations include, but are not limited to, the eBay Partner Network.
OK, the alternator is out.
The idler pulley is not a LH thread. With the idler removed, it's easy to get the top mounting bolt out. Then the alternator just drops out. Need to remove the LIN bus connector and of course the alternator to battery positive cable.
Now I have to hope that my local O'Reilly's has an alternator test bench that can drive the LIN connector, otherwise I don't know what open circuit on this control pin will tell the alternator to do? MAybe O/C means "don't charge"?
p.s,.
Of course, O'Reilly's didn't have the appropriate LIN bus connector so couldn't test the alternator. I imagine the Jag dealer would check it for a couple thousand dollars...................
Thanks for the video on using a multimeter. Yes it could test normal at idle and still have problems. The charging system is variable and fairly complex compared to run of the mill alternator testing. Many people have had dead batteries prematurely.
Thanks for the video on using a multimeter. Yes it could test normal at idle and still have problems. The charging system is variable and fairly complex compared to run of the mill alternator testing. Many people have had dead batteries prematurely.
Not so far. It's a bit late for this party but I just ordered an Innova 5410 "Car scan diagnostics" OBD2 unit which claims to do charging system testing - among many other things of course. I know many of the cheap units don't do much on many Euro/Jap brands despite their claims, but according to Innova's compatibility chart this one will do most stuff including ABS and SRS on a 2011 XF. Innova does have a much cheaper Amazon only unit - 6100p - which looks to have all the same features except the compatibility chart shows no ABS or SRS or BM reset for the XF. Well I'm going off on a tangent I guess........
I tested the old alternator on the bench, battery (I discharged it to around 12v to encourage the alternator to charge) connected to alt, DVM across battery, Lin bus connector obviously open circuit. No charging when turning the alt at nearly 2K rpm with my drill. I FIGURE that the lin bus open circuit condition in a properly designed system would set the alternator to full charge. Why would anyone design a system that with a broken wire would default to no charging?
Anyway, I get another alternator from a crashed car and there is no improvement! Still no charging on the bench. WTF!
Anyone KNOW what the alternator does with the LIN bus open circuit?
OK, the alternator is out.
The idler pulley is not a LH thread. With the idler removed, it's easy to get the top mounting bolt out. Then the alternator just drops out. Need to remove the LIN bus connector and of course the alternator to battery positive cable.
Now I have to hope that my local O'Reilly's has an alternator test bench that can drive the LIN connector, otherwise I don't know what open circuit on this control pin will tell the alternator to do? MAybe O/C means "don't charge"?
p.s,.
Of course, O'Reilly's didn't have the appropriate LIN bus connector so couldn't test the alternator. I imagine the Jag dealer would check it for a couple thousand dollars...................
Any alternator/ starter rebuild shop should be able to test your alternator.
Rebuilding your alternator will be way less expensive than buying a new one, it will fit perfectly and it can be rebuild to a higher amperage.
The only left hand threads on the XF are possibly the crank pully bolt and definitely the diff ring gear. Dave T and I have no problem helping, my alt removal was referred to early in your post, YOU need to be willing to do some research?
yes
and don't get yourself in my position at the moment
it is a must that the Denso output pins match your existing alternator
take your alternator to be rebuilt is it can't be then get the auto guy to write down the output configuration
before you purchase the replacement make sure it corresponds with the old existing wiring system
Just pulled the alternator from my 2011 XFR last night (as well as the crank pulley, thermostat, etc.), so thought I'd share a few thoughts. Since my alternator is eleven years old, although not giving me any issues, I'm having it rebuilt for $160 and possibly adding a little more power for some of the accessory power I draw for various toys (current and future), but I'm mostly having it rebuilt as a preventive measure while I have easier access. As always, I reserve the right to be completely wrong, but I thought this might help a few folks, especially taken in conjunction with other available information.
Pulling the alternator off was moderately easy for me, but ONLY because I already had the undertrays, belts, and a lot of hoses off due to the cooling work I'm doing (replacing water pump, thermostat, plastics; adding in a 2nd auxiliary radiator, ala the XFR-S; etc.). I'm also doing a crank pulley upgrade while I'm at it (more on that later).
For those who don't know where the alternator is located, it's at the bottom left front of the engine, if you're standing outside of the car and facing the engine.
Above Picture: Alternator, or, as the Workshop Manual Refers to it; "Generator"
I was able to pretty much get at the alternator from several directions, including top, bottom, and side. But, if I didn't already have the hoses and belts off, and I wanted to remove the alternator, I probably would've gone at it primarily from the bottom and side, by removing the front passenger wheel arch plastic, in addition to the undertrays. Behind that wheel arch, there's a small black plastic trim piece which is held in with black nylon push rivets (easily removed with a trim tool, exactly the same way a lot of the push rivets are removed from the underbody, etc.). It basically blocks access to the alternator from the side. I'd previously removed it while recently swapping in PowerFlex front sway bar bushings, so was familiar with how much easier it made access to that area, as I was able to slide my arm though there, once it was removed. Above Picture: Black plastic piece blocking alternator side access - Removed, but still in general area (it tucks up in there)
Above picture: Black plastic piece blocking alternator side access - Completely removed
But, even with all of that surrounding "stuff" removed, including the hoses and belts, it was still a bear to get the power cable off of the alternator, mostly because the protective cap was tough to hold back from covering the bolt (13mm hex) on the back top of of the alternator, and my cable had some kind of dried gunky adhesive (likely applied during assembly) which had oozed out of the cable and onto the nut itself, so I had to scrape that off with one hand, while holding the protective cap with the other. In retrospect, I should've zip-tied the cap back while I scraped off the goo, and then removed the nut. Above picture: Black Rubber Protective Cap Covering Alternator Power Cable
Above picture: Black Rubber Protective Cap Pulled Back from Alternator Power Cable - Goo on nut is visible (sorry for quality - I had to screen shot it from a blurry video)
Still though, the hardest part for me, was releasing and removing the the plastic electrical clip for the "LIN bus connection between the regulator and the ECM (from the useless workshop manual)" on the back of the alternator. My main problem with this wire connector is that the single wire seemed very thin (probably because it had no other wires around it to create a mass), and I know how easy it is to break the brittle plastic electrical connections on these car (as well as all the rest of the aged plastic throughout my car). Removing the connector seemed fairly straight forward; push down the top of the clip and simply slide the plastic connector off. But, without much visibility to the connector, I wasn't really sure what exact part slid off of what other part, etc. Plus, it wasn't exactly clean, and I couldn't really feel any decent seam gaps. So, I fiddled with it from pretty much every angle, applying a decent amount of pulling force, while still trying to be very careful not to damage it. I didn't want to risk pulling the alternator off, then trying to disconnect it, as there wasn't much slack in the wire, and I was afraid that the weight of the alternator might snap the wire.
What ultimately worked for me was using a trim removal tool (a flat head screwdriver would also work) to prise the two plastic pieces apart from the side (where I had previously removed the aforementioned plastic trim piece from behind the wheel arch). Apparently, having tried to push the release tab down with my fingertips with a lot of pressure so many times and trying to wiggle it somewhat had actually kept the release tab depressed, so I was able to wedge the small trim tool between the alternator housing part of the connector and the wired-end of the connector, and then I used the alternator housing side as placement leverage to gently slide the wire-end of the connector back and out, as the wired-end of the connector piece slides inside of the connector housing located on the alternator. Even with the trim tool, the wired plastic connector piece didn't slide out very easily, and took several placement resets, so it's doubtful that I would've just been able to pull it off/out with my fingers alone without damaging it in such cramped quarters. It might not be as difficult to remove on other vehicles, as mine has eleven years of dirt and grime on it, which definitely made it harder, but even with about as good of access as one could get, it still sucked to figure out.
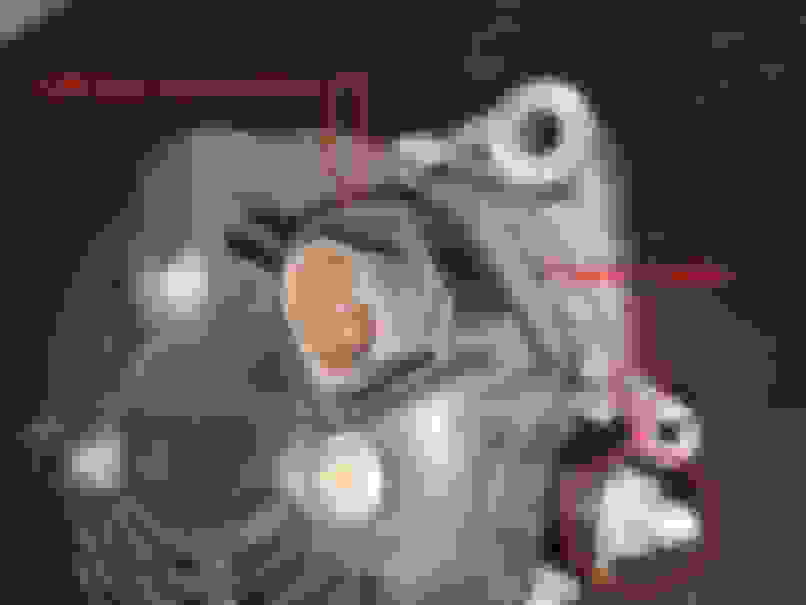
Above Picture: Connection Points on Removed Alternator
Above picture: Inside of the LIN bus connector housing on alternator
Above picture: LIN bus connector - Angle 1
Above picture: LIN bus connector - Angle 2
Above picture: LIN bus connector - Angle 3
Above picture: LIN bus connector - Angle 4
Anyway, once the LIN bus connector was removed, it was cake. Just remove the three bolts and the alternator comes right off.
Above picture: Here's where the alternator would go, but it's now been removed - I put the three bolts back into place for the picture. Keep in mind that this picture also has various hoses and belts already removed, so the area would look different with them in place.
I hope that helps someone who might not have such easy access. Good luck.
Hard to believe a guy on another thread here can get 42 responses on how to change out his battery which is almost like "How do I put gas in my car? , and yet no one has any idea how to remove the upper bolt when removing their alternator and navigate it around a pulley?
I've seen guys here rebuild their S/C motors, so an alternator swap should be like eating breakfast for them?
Looking back, after having done so much work across the whole car, it all seems so simple now. But unless you've done it, it seems like scientific witchcraft - or at least it did for me. Ha-ha!
 12-28-2019, 12:07 PM