HELP! Water pump front outlet hole leaking and it's not what you think
#1
New GENUINE pump fitted in April this year (number 4 or 5 now, lost track).
New GENUINE hose assembly also fitted at the same time (number 3 or 4).
Since the previous plastic connectors seems to disintegrate every 2 years (true), at this time I decided to try the brass version, removing the OEM plastic pipe from the new hose assembly. No issues with this for 4 months nearly, until yesterday. Noticed the joint was leaking and gently pulling on the hose, it slid out with no effort. Picked up a new pump and hose and reassembled (with original plastic this time). It immediately leaked. Reinstalled the brass version and nice and snug, no leaks. Pressurised the system with my tester, no leaks overnight. Went for a 30 minute drive, no leaks. Drove home for 30 minutes and smelled coolant. Checked, and it was leaking again.
Anyone else encounter this?
Last edited by jahummer; 08-07-2024 at 05:45 PM.
#2
#3
#5
How did you install the plastic and /or the brass connector? The brass connector instructions were different to the way the original plastic connector was fitted on my water pump. In the end I fitted the small o ring into the pump first, then the plastic locking piece and then the brass fitting. It does feel a little looser than the original plastic fitting but it does not leak so far after just over 10k kms.
#6
I left the plastic fitting on the pump and did not use the one that came with the kit as the one with the kit did not hold the brass pipe at all. It worked for over 10K miles before it started leaking. I've received a new kit I'll try in the morning. Appears they've redesigned the brass pipe and added a detente which allows the metal teeth on the plastic fitting to lock on to the the pipe quite tightly, perhaps too tightly as it seems it might be a one time use piece now and will take some force if ever needed to remove (not really a problem, the only time I've ever taken it apart was for pump replacements and the plastic pipe replacements). The plastic fitting included also appears to be tighter than OEM.
#7
How did you install the plastic and /or the brass connector? The brass connector instructions were different to the way the original plastic connector was fitted on my water pump. In the end I fitted the small o ring into the pump first, then the plastic locking piece and then the brass fitting. It does feel a little looser than the original plastic fitting but it does not leak so far after just over 10k kms.
Last edited by jahummer; 08-08-2024 at 08:23 AM.
Trending Topics
#8
Compared new kit to GENUINE. Brass pipe on the old and the new are both shorter and thicker than JLR. The plastic fitting in the kit has a larger diameter opening. Removed original o-ring on new pump and used the new one supplied with the kit and installed the supplied plastic fitting. Tried using the OEM plastic pipe but it's too loose. Used the new brass pipe. It does grab quite well.
BUT!!!!! Once reassembled, the new parts are VERY loose, don't pull out, but LOOSE.
Pressurised to 17psi and no leaks but now having an issue with air trapped the airlift vac fill can't seem to resolve (and no heat) which I had no issue with 2 days ago when I did this repair.
Once I'm able to actually drive to operating temp, fingers crossed no issue with leaking again. What a nightmare.
#9
Despite being loose, it's not leaking.
It was a massive challenge to refill the coolant for some reason, even with an air lift.
Keep in mind I've done drain and fills on this engine several dozen times now (multiple radiators, multiple pumps, pipes, coolers, hoses, etc) so I've encountered all sorts of weirdness, from perfectly flawless refills to all sort of bizarre experiences.
At the moment, whilst driving, ECT A is running cooler than usual 191-197F (after last water pump 199-226) and ECT B is running warmer than normal 140-170F (previous to this repair 99-120F). And coolant level's very strange, whilst driving I frequently am alerted to low coolant level but when cold coolant level's nearly overflowing. I've tried bleeding and using the airlift but no air comes out, only coolant.
And the bad news, it appears there's a leak at the back of the pump, possibly from the metal cooler tube which was replaced at the same time the pump was replaced 4 months ago. Seeing a bit of wetness net to the new aluminum crossover pipes (they're dry).
Ugh....
#10
Despite being loose, it's not leaking.
It was a massive challenge to refill the coolant for some reason, even with an air lift.
Keep in mind I've done drain and fills on this engine several dozen times now (multiple radiators, multiple pumps, pipes, coolers, hoses, etc) so I've encountered all sorts of weirdness, from perfectly flawless refills to all sort of bizarre experiences.
At the moment, whilst driving, ECT A is running cooler than usual 191-197F (after last water pump 199-226) and ECT B is running warmer than normal 140-170F (previous to this repair 99-120F). And coolant level's very strange, whilst driving I frequently am alerted to low coolant level but when cold coolant level's nearly overflowing. I've tried bleeding and using the airlift but no air comes out, only coolant.
And the bad news, it appears there's a leak at the back of the pump, possibly from the metal cooler tube which was replaced at the same time the pump was replaced 4 months ago. Seeing a bit of wetness net to the new aluminum crossover pipes (they're dry).
Ugh....
It was a massive challenge to refill the coolant for some reason, even with an air lift.
Keep in mind I've done drain and fills on this engine several dozen times now (multiple radiators, multiple pumps, pipes, coolers, hoses, etc) so I've encountered all sorts of weirdness, from perfectly flawless refills to all sort of bizarre experiences.
At the moment, whilst driving, ECT A is running cooler than usual 191-197F (after last water pump 199-226) and ECT B is running warmer than normal 140-170F (previous to this repair 99-120F). And coolant level's very strange, whilst driving I frequently am alerted to low coolant level but when cold coolant level's nearly overflowing. I've tried bleeding and using the airlift but no air comes out, only coolant.
And the bad news, it appears there's a leak at the back of the pump, possibly from the metal cooler tube which was replaced at the same time the pump was replaced 4 months ago. Seeing a bit of wetness net to the new aluminum crossover pipes (they're dry).
Ugh....
The sealing between the Coolant water pump body brass bush and the brass fitting is by the O ring seal on the brass fitting. The is held in by the stiffness of the coolant hose and the plastic fitting bush friction on the brass fitting leg to push the O ring seal into the CW pump brass bush.
Try selecting a (thicker) O ring between the brass fitting and the CW pump bush, to aid (increase) sealing between the two brass surfaces CW pump bush and the Brass fitting leg. I use the word thickness but play around with the i.d and the O ring thickness to get an O ring which fits and gives greater sealing surface, and better material. I went for a Viton O ring.
The water pump bush O.Dia being 7.8mm, the Brass fitting leg being O.dia 6mm. the O ring supplied being O.D 10.5 x Th2.6 x i.d 5.2mm.
Have a play around with your favourite O ring suppliers catalogs to give you the available sizes, materials etc.
For those of an enquiring mind, How does one fit a 10.5mm O.D, O ring or Greater into a O.D 7.8mm bush opening?
By that old bed room trick of lubrication!
With Coolant or washing up liquid. Install O ring, then plastic bush, and then insert the Brass fitting.
The tapered end of the brass fitting forces the O ring out and compresses, forming the seal between the CW pump brass bush and the inserted Brass fitting.
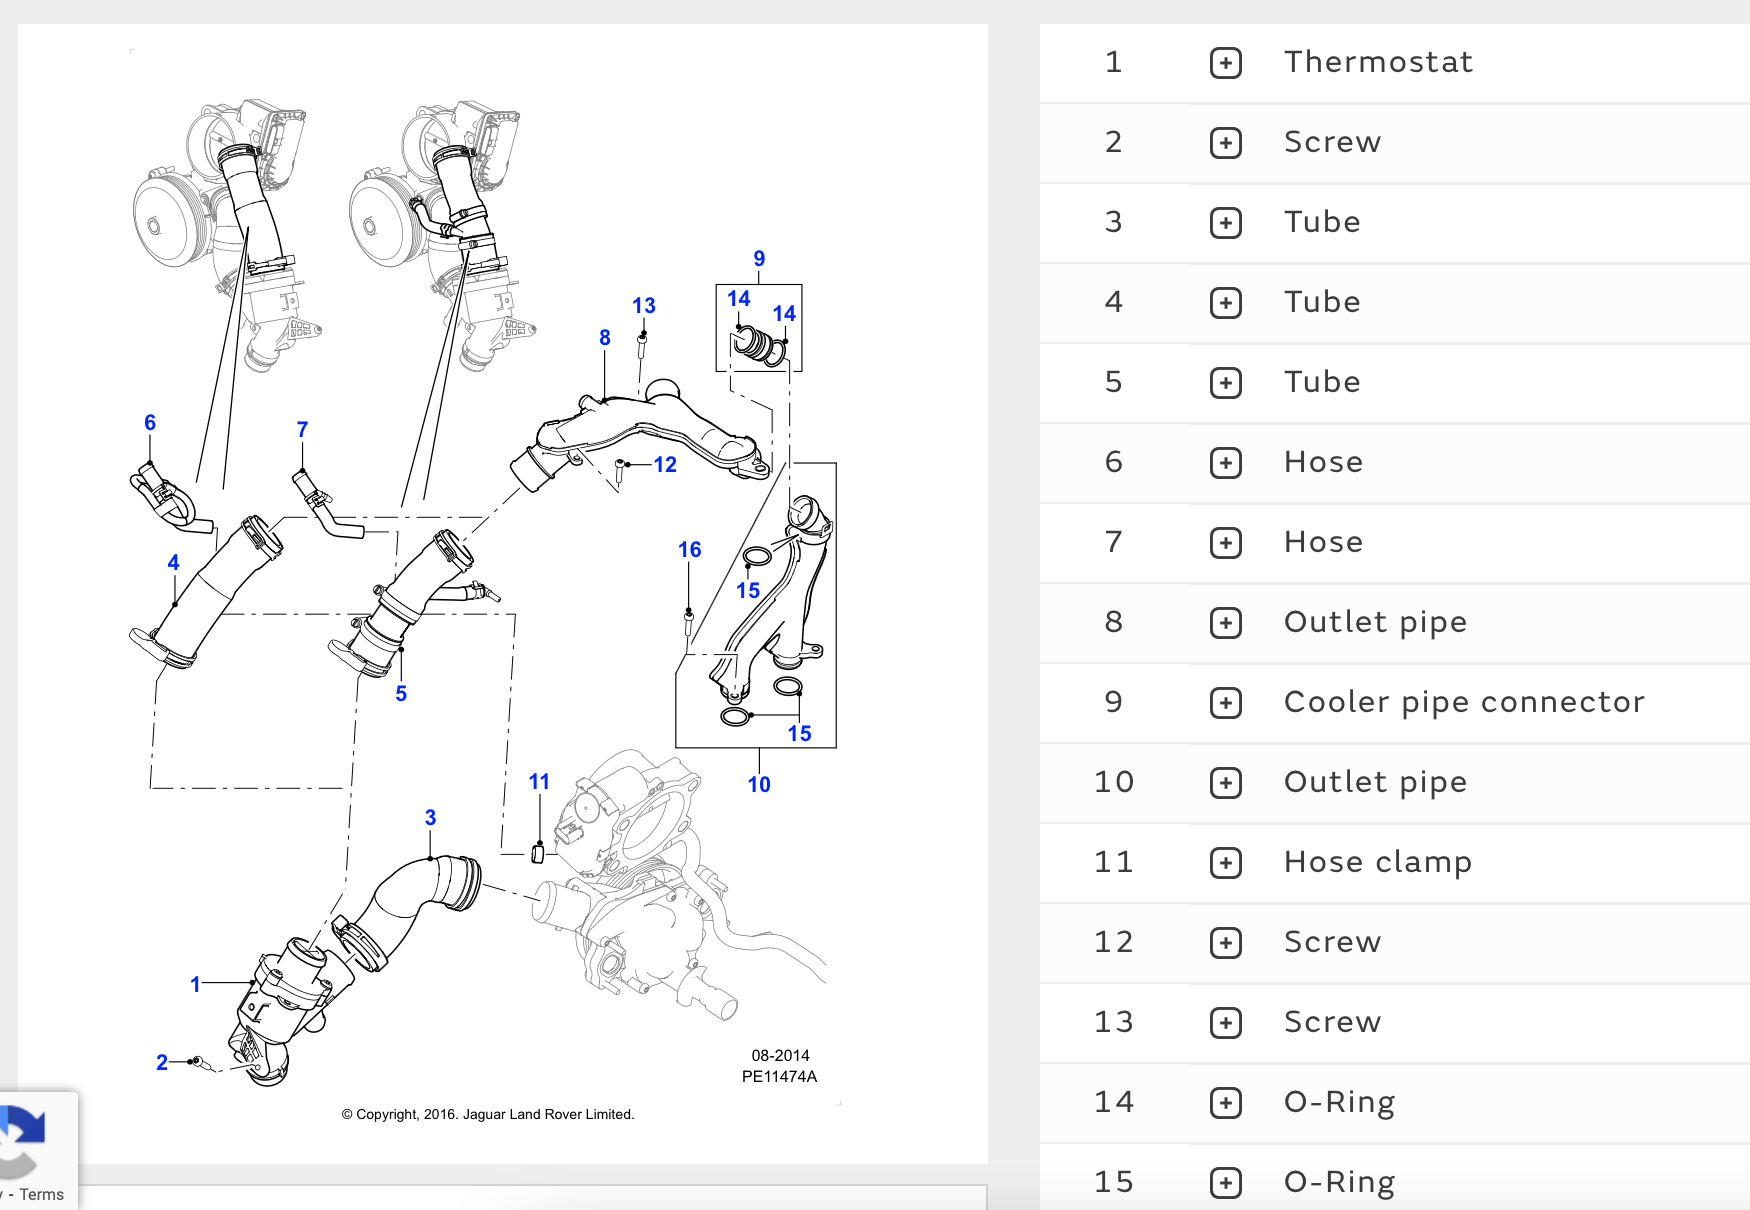
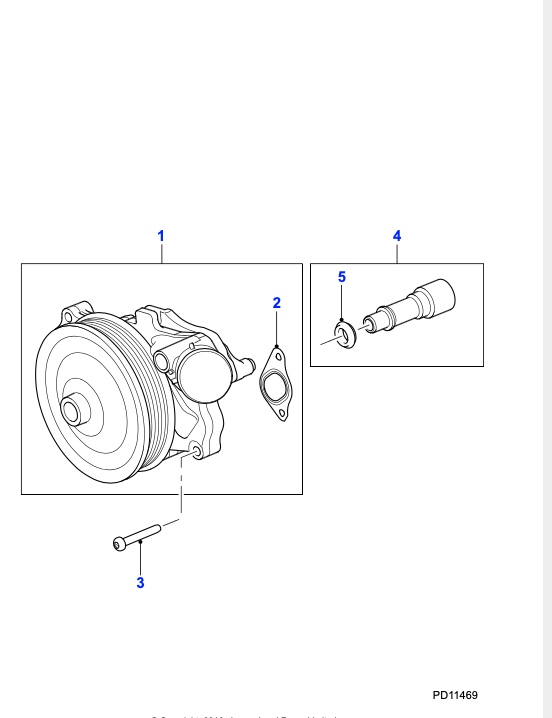
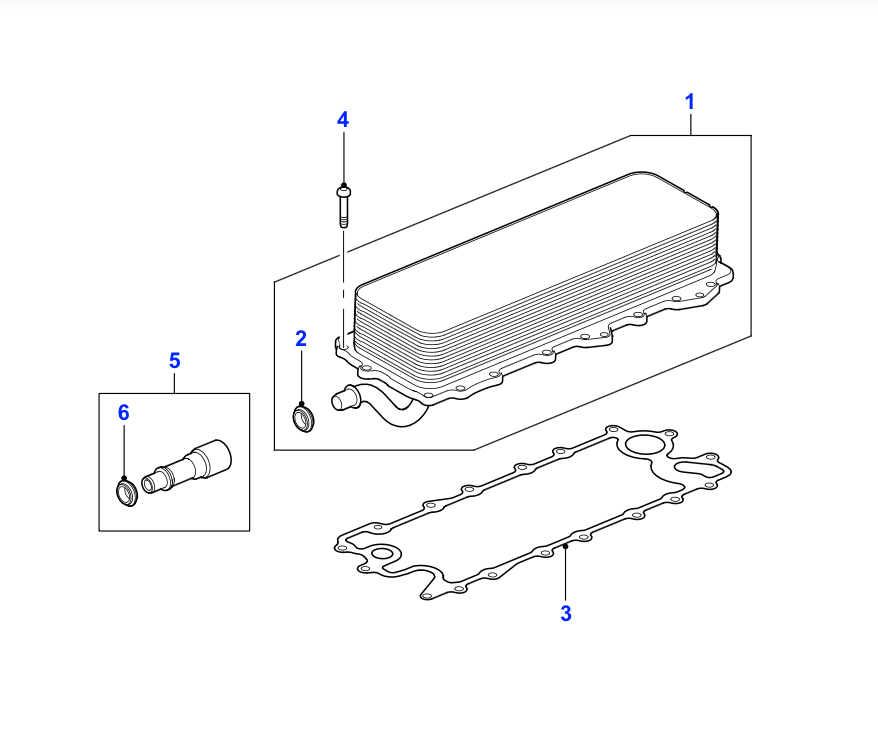
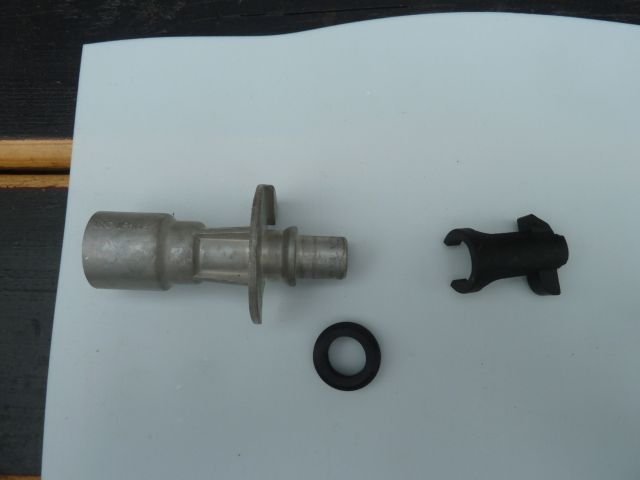
For the benefit of anyone not know what we are talking about above some diagrams, and snaps.

Item 5 new later rev hose with plastic fitting installed to end of small bore pipe. Usually changed out with the brass non JLR fitting after you have broken this one during removal.

Item 4 the connector between the CW pump and the Oil cooler, what is not shown is the plastic holder, or the second sealing ring on the oil cooler side.

The connector item 5 showing both seals, but not the plastic holder/locator on the oil cooler.

The Alloy connector between the CW pump and the Oil cooler. With the back seal to oil cooler, and the plastic locator to line up the connector to oil cooler pipe and gauge the location between the two.
The plastic holder/locator between the Alloy connector and the oil cooler. One of the seals could be leaking, or not located correctly.
Changing Coolant Level.
Air in the system sounds likely.
Have you opened the CW bleed screw on the right hand side pipe near the CVV or Trapped air pocket at the top of the supercharger air coolers?
Air expanding more than liquid.
Have you tried bring the CW upto temperature with the expansion cap removed and squeezing repeatedly the larger CW hoses. Burping and pulsing the CW system to move the air pocket.
The following users liked this post:
jahummer (08-12-2024)
#11
The sealing between the Coolant water pump body brass bush and the brass fitting is by the O ring seal on the brass fitting. The is held in by the stiffness of the coolant hose and the plastic fitting bush friction on the brass fitting leg to push the O ring seal into the CW pump brass bush.
Try selecting a (thicker) O ring between the brass fitting and the CW pump bush, to aid (increase) sealing between the two brass surfaces CW pump bush and the Brass fitting leg. I use the word thickness but play around with the i.d and the O ring thickness to get an O ring which fits and gives greater sealing surface, and better material. I went for a Viton O ring.
The water pump bush O.Dia being 7.8mm, the Brass fitting leg being O.dia 6mm. the O ring supplied being O.D 10.5 x Th2.6 x i.d 5.2mm.
Have a play around with your favourite O ring suppliers catalogs to give you the available sizes, materials etc.
For those of an enquiring mind, How does one fit a 10.5mm O.D, O ring or Greater into a O.D 7.8mm bush opening?
By that old bed room trick of lubrication!
With Coolant or washing up liquid. Install O ring, then plastic bush, and then insert the Brass fitting.
The tapered end of the brass fitting forces the O ring out and compresses, forming the seal between the CW pump brass bush and the inserted Brass fitting.
For the benefit of anyone not know what we are talking about above some diagrams, and snaps.
Item 5 new later rev hose with plastic fitting installed to end of small bore pipe. Usually changed out with the brass non JLR fitting after you have broken this one during removal.
Item 4 the connector between the CW pump and the Oil cooler, what is not shown is the plastic holder, or the second sealing ring on the oil cooler side.
The connector item 5 showing both seals, but not the plastic holder/locator on the oil cooler.
The Alloy connector between the CW pump and the Oil cooler. With the back seal to oil cooler, and the plastic locator to line up the connector to oil cooler pipe and gauge the location between the two.
The plastic holder/locator between the Alloy connector and the oil cooler. One of the seals could be leaking, or not located correctly.
Changing Coolant Level.
Air in the system sounds likely.
Have you opened the CW bleed screw on the right hand side pipe near the CVV or Trapped air pocket at the top of the supercharger air coolers?
Air expanding more than liquid.
Have you tried bring the CW upto temperature with the expansion cap removed and squeezing repeatedly the larger CW hoses. Burping and pulsing the CW system to move the air pocket.
Trapped air's likely the issue, but the heat works perfectly and there's no overheating, just running a bit cooler than normal. I've bled and burped/bled multiple times, no help. I'm going to drain the expansion tank and re-vacuum the circuit yet again and see if I can get any more air out.
I changed to the rear metal cooler tube 4 months ago with new genuine o-rings of course. No idea where the leak is, but it's quite small as the circuit holds pressure (both overnight and via tester) and it's just damp. Previously over the years I've replaced the tube at each pump replacement with the original plastic and have never had one fail.
More to come.
#12
I changed to the rear metal cooler tube 4 months ago with new genuine o-rings of course. No idea where the leak is, but it's quite small as the circuit holds pressure (both overnight and via tester) and it's just damp. Previously over the years I've replaced the tube at each pump replacement with the original plastic and have never had one fail.
More to come.
The leaks and weeps on this cw system can be exceedingly difficult to find. Pressure leak testing the system alone will usually fail to reveal them without max working temperature and pressure attained. Which ends up tracing down cw staining and coolant weeps.
The cell phone mounted endoscope may be useful to visually inspect this area.
#13
Decided to run the airlift again and removed the overflowed coolant from the tank. Let it sit with all hoses collapsed.
refilled with the vacuum to the top cold
fill line. Tragically the problem is still there. Running the engine the tank empties and of course the low coolant warning. Turning the engine of and the tank refills to the cap. Turn the engine on
ane the tank empties. Using the vacuum flattens all
thr hoses again. Heater works just fine.
remember Iíve done the airlift procedure dozens of times.
Completely perplexed considering how many hoses, pipes, pumps etc have been including replacing this fitting just days ago with no issue and now replacing the fitting again and the circuits doing all this. Ugh.
PS valley has been staying clean and dry.
#14
#15
What happens to the level in the header tank if you pressurize it with your leak tester? Presumably it should lower the level in the tank just as if the engine was running. The other approach would be to drain coolant from the bottom of the radiator (as in the service manual) then try a refill as per Big Will's procedure. (sorry I don't have the link handy)That is how I filled mine when I did the water pump I also jacked up the passenger front side so that the vent was clearly the highest point of the cooling system.
#16
Pressurising the tank does not lower the level.
Draining from the bottom's not likely to remove air pockets, as air rises. An airlift's the proper tool for the job and it's rare to have issues vacuum filling, though they have indeed happened.
I reckon air's trapped somewhere the vacuum can't release.
The heater works fine.
What's new though is ECT A has been staying below 200F even on very long drives and ECT B's much higher than typical by around 50 degrees.
Over the years I've replaced 3 radiators, multiple pumps, all of the hoses and pipes, some more than once, etc. I've just now collected all new hoses for everything and in the next few weeks going to replace all, at the same time. We'll see what happens after...
Thread
Thread Starter
Forum
Replies
Last Post
Joe Gandalf
S-Type / S type R Supercharged V8 ( X200 )
3
09-27-2018 05:44 PM
Currently Active Users Viewing This Thread: 1 (0 members and 1 guests)


