When you click on links to various merchants on this site and make a purchase, this can result in this site earning a commission. Affiliate programs and affiliations include, but are not limited to, the eBay Partner Network.
Firstly, many thanks to the likes of Bigg Will, Brutal, Riverman, Dave Tibbs and all the others who have contributed technical information which allows us ordinary folk to repair and maintain these wonderful cars. Some background. I'm the original owner of my 2012 XF Supercharged (purchased in January 2013) and the car was always serviced at main dealers in Houston until the warranty expired and then I did my own routine servicing. The car had a new water pump fitted by Jaguar under warranty in 2014 and a supercharger snout replaced in 2017 IIRC. I've been losing a very small amount of coolant for a while now so decided to do some investigating. I had found a small leak from one of the "T" pieces going to the auxiliary radiators last summer but after changing the hose assembly there was still some coolant loss. Poking around the usual suspects I found a small amount of coolant under the water pump so I ordered the latest revision of the pump along with the new pipework that has been upgraded and the various gaskets etc. I decided to document the process I followed to help others if they decide to do the job themselves. During the repair I found something interesting so bear with me and see what you think.
I did follow the manual for most of this but as most of you know, the document is lacking detail in certain areas so this is how I got it done. My biggest worry with this type of job is not really knowing what to do with the various clips or fasteners so I've added some details that might help those doing this job in the future.
The first thing I did was remove the front undertrays so I could access the radiator drain screw and to avoid coolant leaking everywhere. Then I used a large syringe to pull out the coolant that was in the reservoir in the reservoir and went under the car to remove the radiator drain screw. I did this once before when I did a coolant drain and refill and found it quite nerve racking. The screw is plastic and accessed directly from below the radiator, drivers side bottom corner. As you unscrew it, it feels very stiff and I though it was going to strip it, or snap it off in the radiator requiring a radiator removal to add to the task. This is what it looks like:
It's not easy to see in the picture but under the head of the screw is a fat rubber washer that provides the seal. I suspect this is what causes the resistance when unscrewing it. Here is another pic:
I used a large flat bladed screwdriver to undo this, just make sure it's a good fit as the material is easy to chew up. Once you've started to slacken the screw and coolant is running down the screwdriver (and your arm probably), you'll notice that the screw doesn't actually seem to want to come out. Just leave it there while the coolant drains and then you can go back and using a small flat bladed screwdriver, lever it out. The fat rubber washer is what's holding it in place in the radiator along with the small protrusions at the end of the screw.
Now you have a most of the coolant removed you can move on the pump. Remove the air boxes on each side and the ducting going to the throttle body. Now you have better access to everything and should be able to see the tensioner for the supercharger belt. The tensioner uses a 3/8 square drive to provide a leverage point and I used a 3/8 drive torque wrench but note it takes quite a bit of force to remove the tension. Also, once the belt is off, the tensioner wants to return to a point quite a bit past where it started so make sure you have enough room. You can also access this from below but I'm too old to go grubbing about on the floor unless it's really necessary.
Since I was going to be draining the cooling system I also decided to change out the small pipe that goes from the coolant reservoir down the upper coolant manifold and throttle body. This piece:
Removing it is pretty simple, a spring clamp on the reservoir nipple and two plastic clips on the other ends. These can seem a little confusing and it's not easy to describe how they function but I'll give it a go. The pipe pushes into the receiving end and is held in place with a plastic cage shown below in the locked position:
If you push up gently on the two "ends" of the cage, it will slide off the connector, releasing the hose. In the released position it looks like this:
If the cage comes off, don't worry, just slide it back on the pipe in the same direction in came from. There is a groove that the cage slides into and this is what locks the hose in place. More detail in the pic below:
Since I was changing to the new design of hose routing (it's the only option now since the old parts are obsolete), I removed the main hose going to the water pump and the hose going to the upper plastic manifold. If you have a pre 2012 car this will be made of metal, later cars use a plastic part. Nothing particularly interesting at this stage but I did find the hoses very hard to remove because of their diameter and short length. I didn't want to put too much strain on any of the other parts so I removed the thermostat housing bolt and this gave me a bit more wiggle room. Below is a picture of the old and new hoses. Old on the left and new on the right:
With the hoses off, you can now remove the small plastic pipe that goes into the check valve in the water pump body shown below, sans pipe:
The trick to removing the pipe that goes in the hole is to push the black circle into the body of the pump. If you do that, you can pull the plastic pipe directly outwards. If it won't come out, make sure you are only pushing on the black circle and not on the pipe as well. I usually use a small screwdriver to do this but I've noticed that sometimes the blade also pushes on the pipe preventing it coming free.
Now with most of the fragile stuff safely out the way you can remove the auxiliary drive belt that runs over the water pump. Similar deal to the supercharger belt but this time you'll need to remove the tensioner once the belt is off to provide access to the water pump. With the tensioner removed, and using the appropriate Torx driver, remove the 4 screws that retain the water pump to the block and with the screws removed, pull the pump away from the block. It should come forwards freely with just a little resistance from the oil cooler pipe seal.
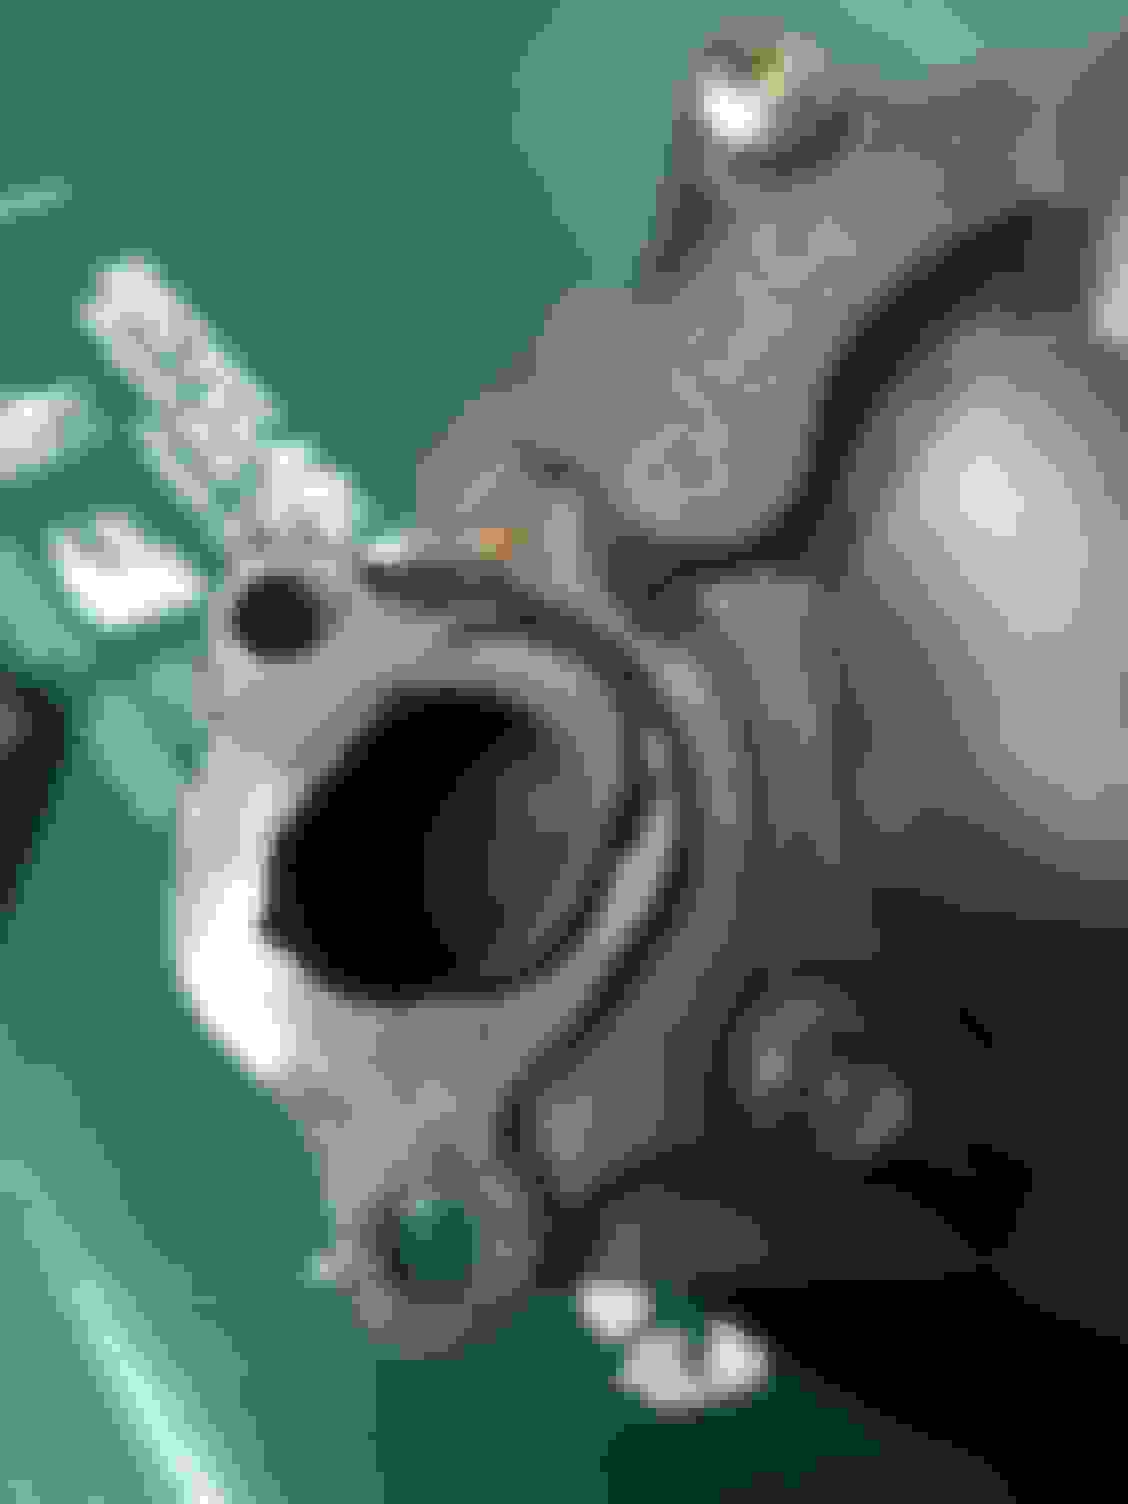
Now for the "interesting find" bit. With the pump removed I saw something "interesting" on the left hand side gasket:
Ah, I hear you say, the gasket slipped when I removed the water pump! Well I actually left the bolts in the pump body when pulled the pump. Both gaskets were stuck to the pump so the location didn't change. When I removed the gasket, you can see the outline it left on the pump flange:
Now those of you paying attention will recall that the car has only ever been serviced at the Jaguar main dealer and that the main dealer replaced the water pump about 4 years ago. The actual pump itself is fine, the only issue was the misplaced gasket which eventually decided to start leaking. I've seen lots of posts on this forum about water pump failures and leaks from the cooling system and the blame is generally directed at Jaguar. In this case, If I had returned to the dealer, I suspect I would never have know this was a maintenance induced failure caused solely by human error when refitting the pump and duly paid my $1000. If the technician had discovered the actual cause, I doubt I would have been informed and the error corrected at the dealers expense. Anyway, mistakes do happen but still disappointing given the $150-$200/hr charge out rate we end up paying
I will continue with the rest of the install post tomorrow.
My main piece of advice with the water pump is: don't be tempted, like I was, to use the water pump bolts to pull the pump straight on - turn the bolts in a few turns and then push the pump fully home along the bolt shafts before tightening the bolts. These are small bolts with tiny threads in an aluminum block, and I paid for my recklessness by having to install helicoils in all four holes. Seems not to leak so I'm happy but don't be me
Thanks for the advice Dave but the pump is fitted and sealed up tighter than a ducks ****. I ran out of time documenting the rest of the install but will add to the post tomorrow. I actually did use the bolts to pull the pump up to the block but I also had a borescope checking that the oil cooler connecting pipe was located correctly. I was able to watch it slide in (oh err) in real time as the bolts tightened up. I also used a 1/4 drive ratchet so little danger of stripping. All in all I found it to be an easy job 2-3 out of 10 (10 being what you did on your motor). After the pump was finished I went on to pull the supercharger because I was also concerned about the Y pipe and anything else the dealer might have touched given that they had installed the waterpump incorrectly.
>I've been losing a very small amount of coolant for a while
Ok, now you guys have me worried. How did you know you were loosing coolant? Did you smell something, did you see wetness under the car, did you do visual inspections and see evidence on or around the water pump, or did you notice having to add antifreeze?
Thanks
================================================
Jaguar - it's not an automobile, it's a Motorcar
Current: '15 XF (X250) Portfolio AWD 3.0 (it's aubergine...)
Past B: '08 S-Type 4.2 "Satin Edition" (250.06 whp / 259.67 torque)
2015 JCNA Class M Slalom Champion
Past A: '05 X-Type 3.0/auto Jaguar Racing Green
If you knew the pressure the mechanics at the dealer are put under to rush through jobs, you would be surprised they didn't screw more things up on your car as they cut corners left and right.
How did you know you were loosing coolant? Did you smell something, did you see wetness under the car, did you do visual inspections and see evidence on or around the water pump, or did you notice having to add antifreeze?
Thanks
All of the above in my case. When the auxiliary coolant "T" was leaking, I could see coolant on the large undertray after a decent drive. With the waterpump, I could reach under the pump and feel the coolant. I could always smell coolant to some degree. The amount of coolant in the reservoir would drop but very slowly (My car only has 30K miles so I don't use it much) and it varied with the ambient temperature and the type of driving. More noticeable loss in the summer, almost unnoticeable in the winter (Bear in mind I'm in Houston). I usually fill to some reference point on the reservoir or make a mark with a sharpie but even then the change could be very slow.
If you knew the pressure the mechanics at the dealer are put under to rush through jobs, you would be surprised they didn't screw more things up on your car as they cut corners left and right.
I completely understand how it works. The quicker the jobs gets done, the more hours the techs can book in a day so more earnings for them (and the dealership I guess). I don't blame the technicians though, the dealerships should pay them properly regardless of the time they take to do a job. When I serviced military aircraft there was an allocated number of hours for each task and it was reasonable. If it took longer then it took longer - you still got paid 8 hours for a days work. If people dragged the job out they got a talking to from the boss. I can't begin to imagine what would have happened to the accident rate if you could have earned more each day by doing the jobs quicker.
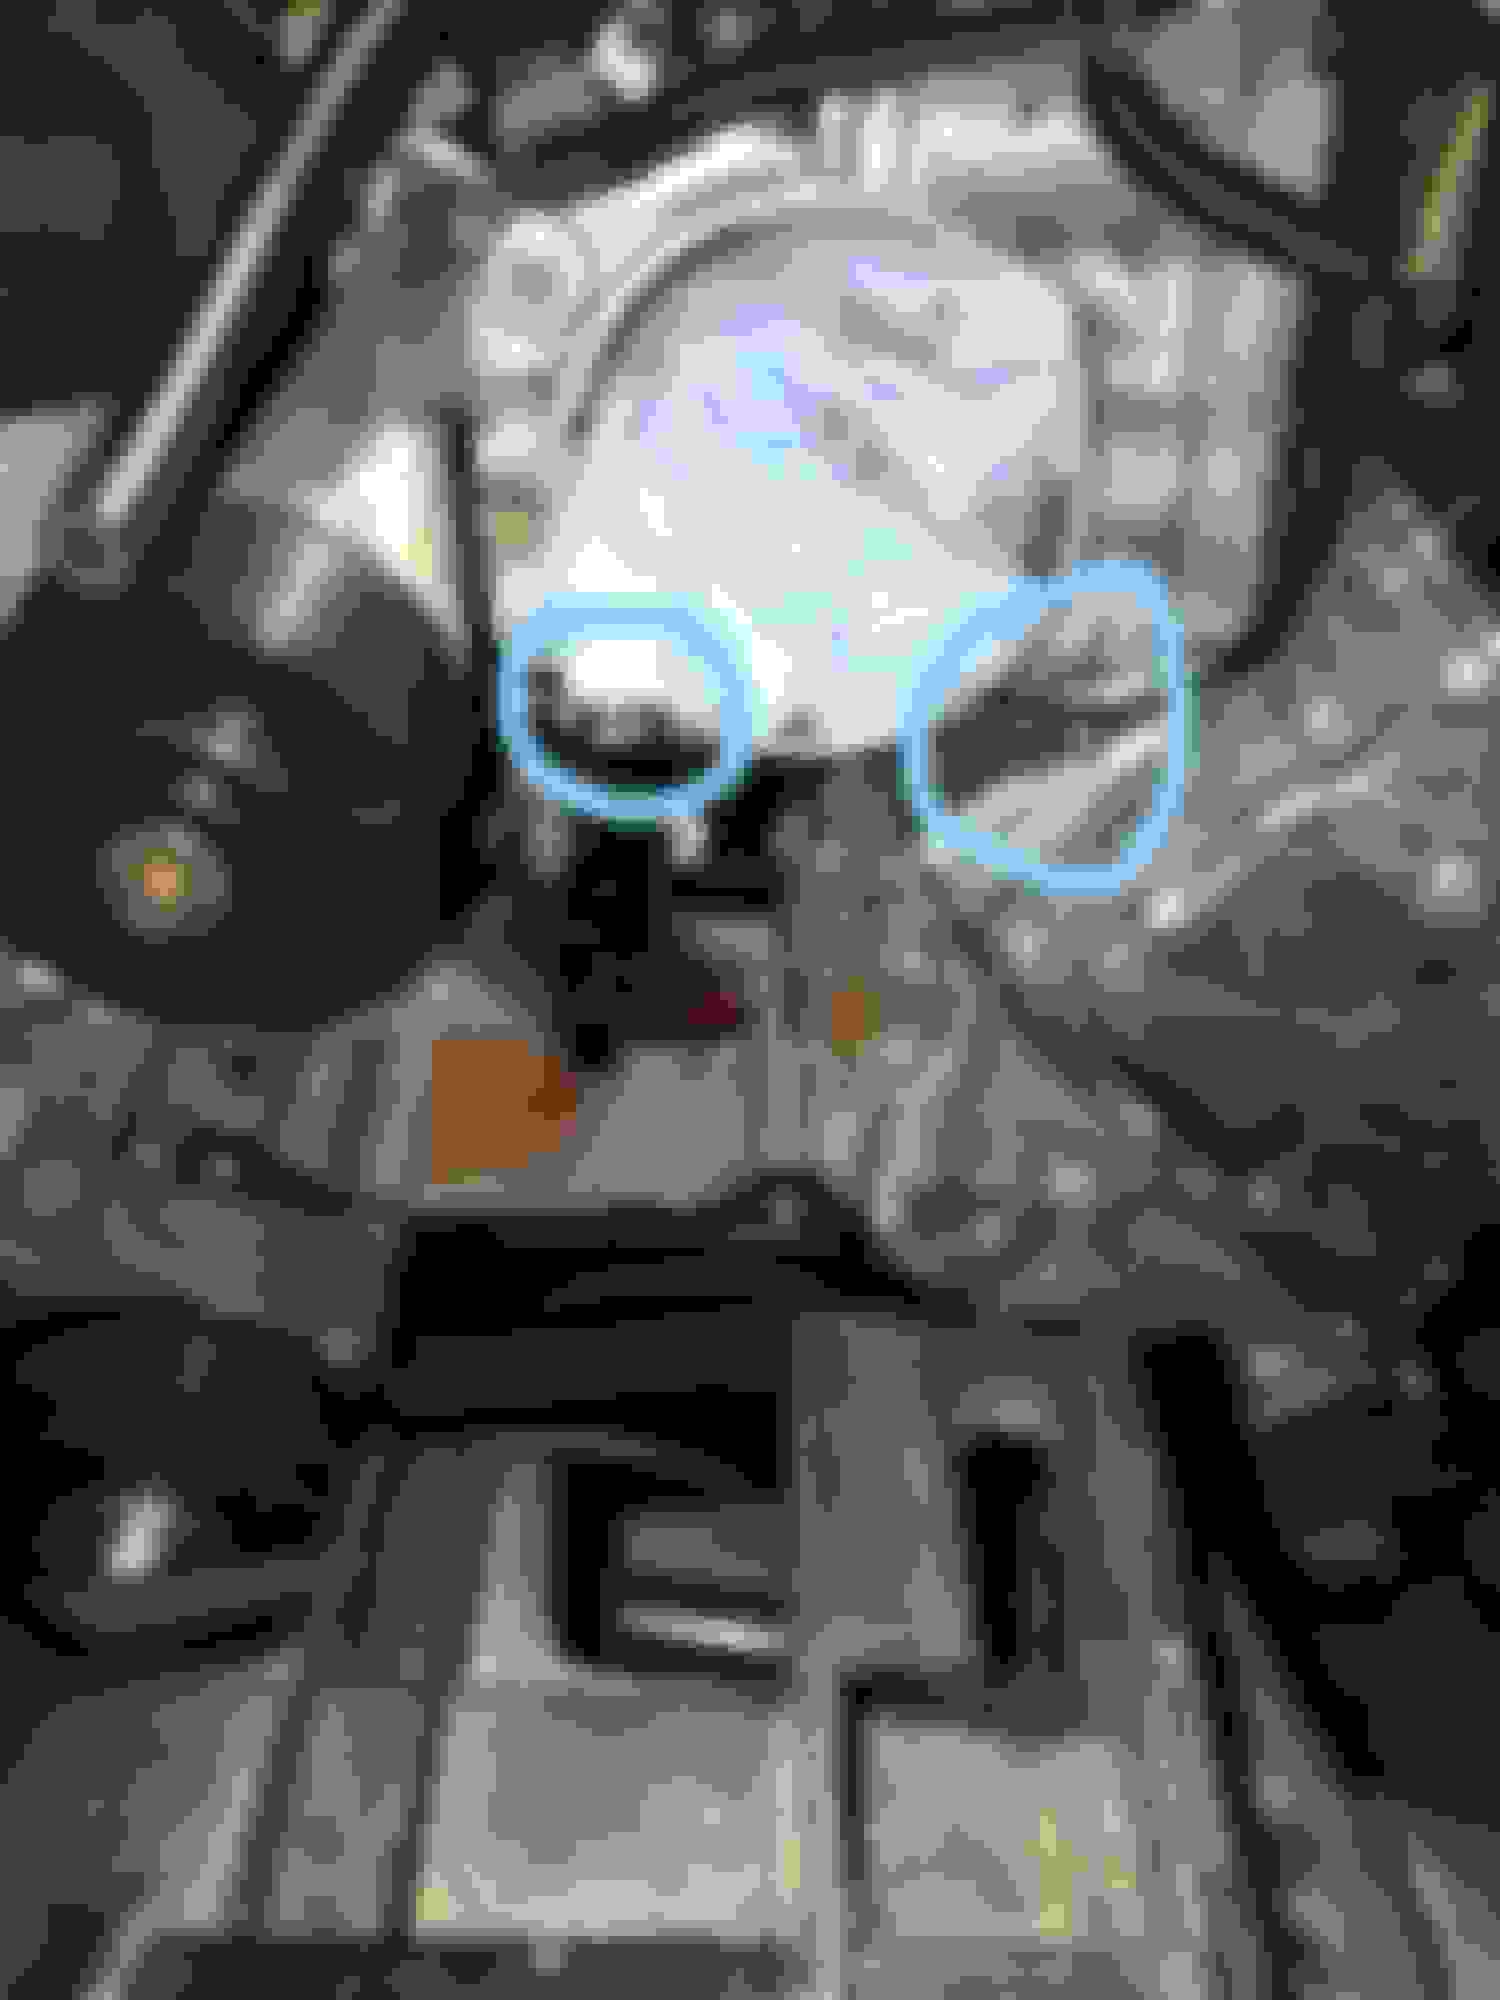
Continuing with the pump install. Now that the pump has been removed, hopefully the short tube that connects the oil cooler to the rear of the pump has remained in place but if it has changed position, or you're worried that it has, don't fret, it's pretty easy to get it located in the right place. If you look at the picture below, you'll see how the tube sits with the pump installed (supercharger removed for clarity):
As you slide the tube into place, maintain this orientation and you'll be good to go. The partial disk feature at the pump end of the tube acts to keep the tube at roughly the correct height and should keep the tube from moving forward as it sits against the seam on the block Here's another view of the tube waiting to receive the pump:
A couple of points to note. When you purchase the pump and short tube, make sure you have 2 of the special o ring seals. One comes with the tube but you'll need a second so make sure you have enough for the job. I chose to slide the oil cooler side seal onto the stub first and then slide the tube over it. Then slid the pump side seal over the tube stub ready to receive the pump. You could probably do it the other way around but I worried that the o ring might get snagged by stub. Also, there have been a few people on the forum who have had problems getting everything located and the seals staying where they should. For lubrication, I found that the Jaguar approved coolant is particularly slippery and makes a good lubricant for these seals. Just add a little around the seals and everything should slip into place. Now you're almost ready to install the pump but one last job you'll need to do is to attach the new design of hose to the right hand side of the throttle body. The original hose was attached using an "ear: type or "Oetiker" clamp. You can see it in the picture below but on the left side. The stub awaiting the new hose is on the right:
I found a kit of similar clamps on Amazon fairly cheap but you could use a regular hose clamp if you'd prefer. I wanted to stay with the original concept but the downside of these clamps is access is very limited and you need a tool like this to squeeze them down. Make sure the tool is not too long otherwise the cooling fan will get in the way:
Now, finally you're ready to install the pump but before you do, blow out the 4 threaded holes in the block used to mount the pump to remove any coolant that as gotten in there. The technique I used to fit the pump was to place the gaskets (included with the pump) in place and then thread the bolts (also included with the pump) through the gaskets all the way. The gasket holes for the bolts are small enough that the bolts need to be threaded through them which helps to keep the gaskets in place and the bolts from dropping out. With all 4 bolts and gaskets in place, offer the pump up to the block using the tube as the primary guide, start threading in the bolts. I have a cheap borescope which I placed down past the Y pipe and which allowed me to confirm that the tube was correctly located and that the pump was pulling up the block square as shown below. Just remember to watch the torque on the bolts. They are not very tight and the last thing you want is a stripped thread in the block:
I also used the borescope to check the gaskets had remained in place by looking at the front on the pump around the mounting points.
Now the pump is home and tight against the block, the last thing to do fit the new hose from the thermostat housing up to the plastic crossover tube and connect it's small side hose to it's corresponding part. Double check your work and then add coolant and bleed the system using the bleed screw on the pipe on the left hand side of the block (or vacuum bleed the system). I chose to run a pressure test and the system held 15psi for 12 hours with no loss. Hopefully this will add to the help already available on the forum but if anyone has any questions, PM me or post up and I'll do my best to help.
>I've been losing a very small amount of coolant for a while
Ok, now you guys have me worried. How did you know you were loosing coolant? Did you smell something, did you see wetness under the car, did you do visual inspections and see evidence on or around the water pump, or did you notice having to add antifreeze?
Thanks
================================================
Jaguar - it's not an automobile, it's a Motorcar
Current: '15 XF (X250) Portfolio AWD 3.0 (it's aubergine...)
Past B: '08 S-Type 4.2 "Satin Edition" (250.06 whp / 259.67 torque)
2015 JCNA Class M Slalom Champion
Past A: '05 X-Type 3.0/auto Jaguar Racing Green
In my case at first I added antifreeze, noticed the low coolant due to a crack on the reservoir, then with time a leak showed wetness under the car so I looked to the water pump since the leak I saw was dripping from it behind the pump pulley and serpentine belt so I knew I had to replace it. I really drive my jag sometimes for 12 hours straight and he takes it easy that is why I needed to start replacing hoses. Jaguars are really reliable cars when you keep up with the maintenance but of course if you buy a used one and the prior owner did not take care of it for ten years the next owner will pay the price.
Thanks TXFireblade all your pics and description have been very informative and helpful. Now would you mind completing the guide with all the part numbers
I know the small tube goes btw water pump and oil cooler is C2Z18658 and the extra special o ring seal is AJ811539. But I don't know the rest just by looking at pics.
So:
Hose - goes between water pump and oil cooler - C2Z18658
Special o ring seal - AJ811539
With part numbers it would be a perfect guide for everyone to DIY!
Below are listed the parts I used when I removed/refitted the supercharger. The parts are the upper chargecooler gasket, the two inlet manifold to head gaskets, the rear heater manifold (bolts to the back of the engine and includes the temperature sensor and the two O rings, the throttle body gasket and the hose that runs from the heater manifold, under the supercharger to the throttle body.
Part Number Part Name Price Quantity Total
AJ811948 Manifold Gasket $79.20 1 $79.20
AJ811576 Manifold Gasket $9.65 1 $9.65
AJ811590 Manifold Gasket $9.95 1 $9.95
AJ814007 Water Pipe $90.67 1 $90.67
C2Z28265 Gasket $23.69 1 $23.69
AJ813614 Hose $20.18 1 $20.18
I got the parts from Jaguar Columbia (OEMDiscountCarParts.com) as they had the best prices I could find plus their parts guy was very helpful. I'll post the parts for the water pump and front water pipes/manifolds and hoses later when I track down that invoice. Please bear in mind that this was for my 2012 XF Supercharged so check if you have a different model/year.
Last edited by TXFireblade; 07-21-2019 at 01:32 PM.
My simple hose replacement and coolant drain/refill has turned into a full-on debacle. The push-fit plastic crap on the water pump broke and since there's no replacement available, I've had to replace the entire water pump. And when I pulled that out, the plastic crap part shown below broke: (using TXFireblade's photo)
It's actually not part of the oil cooler tube. It snaps on to the block pipe just behind where the o-ring goes. Does anybody have any idea what part this is and if it has to be replaced? I don't see how it would be integral to keeping things leak-free but what do I know.
Did you ever find out what this part was? I'm dealing with this now
Ok after taking off the pump now 6 times. It appears to continue leaking from under the pump. I know 1 O-ring goes behind the oil cooler, but do I add two on the front part of that the pump connects to the blk plastic thing?
Originally Posted by TXFireblade
Continuing with the pump install. Now that the pump has been removed, hopefully the short tube that connects the oil cooler to the rear of the pump has remained in place but if it has changed position, or you're worried that it has, don't fret, it's pretty easy to get it located in the right place. If you look at the picture below, you'll see how the tube sits with the pump installed (supercharger removed for clarity):
As you slide the tube into place, maintain this orientation and you'll be good to go. The partial disk feature at the pump end of the tube acts to keep the tube at roughly the correct height and should keep the tube from moving forward as it sits against the seam on the block Here's another view of the tube waiting to receive the pump:
A couple of points to note. When you purchase the pump and short tube, make sure you have 2 of the special o ring seals. One comes with the tube but you'll need a second so make sure you have enough for the job. I chose to slide the oil cooler side seal onto the stub first and then slide the tube over it. Then slid the pump side seal over the tube stub ready to receive the pump. You could probably do it the other way around but I worried that the o ring might get snagged by stub. Also, there have been a few people on the forum who have had problems getting everything located and the seals staying where they should. For lubrication, I found that the Jaguar approved coolant is particularly slippery and makes a good lubricant for these seals. Just add a little around the seals and everything should slip into place. Now you're almost ready to install the pump but one last job you'll need to do is to attach the new design of hose to the right hand side of the throttle body. The original hose was attached using an "ear: type or "Oetiker" clamp. You can see it in the picture below but on the left side. The stub awaiting the new hose is on the right:
I found a kit of similar clamps on Amazon fairly cheap but you could use a regular hose clamp if you'd prefer. I wanted to stay with the original concept but the downside of these clamps is access is very limited and you need a tool like this to squeeze them down. Make sure the tool is not too long otherwise the cooling fan will get in the way:
Now, finally you're ready to install the pump but before you do, blow out the 4 threaded holes in the block used to mount the pump to remove any coolant that as gotten in there. The technique I used to fit the pump was to place the gaskets (included with the pump) in place and then thread the bolts (also included with the pump) through the gaskets all the way. The gasket holes for the bolts are small enough that the bolts need to be threaded through them which helps to keep the gaskets in place and the bolts from dropping out. With all 4 bolts and gaskets in place, offer the pump up to the block using the tube as the primary guide, start threading in the bolts. I have a cheap borescope which I placed down past the Y pipe and which allowed me to confirm that the tube was correctly located and that the pump was pulling up the block square as shown below. Just remember to watch the torque on the bolts. They are not very tight and the last thing you want is a stripped thread in the block:
I also used the borescope to check the gaskets had remained in place by looking at the front on the pump around the mounting points.
Now the pump is home and tight against the block, the last thing to do fit the new hose from the thermostat housing up to the plastic crossover tube and connect it's small side hose to it's corresponding part. Double check your work and then add coolant and bleed the system using the bleed screw on the pipe on the left hand side of the block (or vacuum bleed the system). I chose to run a pressure test and the system held 15psi for 12 hours with no loss. Hopefully this will add to the help already available on the forum but if anyone has any questions, PM me or post up and I'll do my best to help.
only one "o-ring" on each side !
Maybe your oilcooler inlet pipe is leaking caused by corrosion or the
surface of the tube is damaged badly so the "o-ring" can't seal anymore.
When changing my ftype waterpumpe the tube broke off together
with the pastic tube although my allover coolant leakage before changing
the pumpe was minimal !
Consider replacing the factory plastic oil cooler brick pipe with the after market Aluminum version?
Much better part. Oil Cooler Brick to WP Cooling Pipe
Also consider getting a new radiator drain plug a they are common to Ford cars and even Dorman makes a replacement part. It's too cheep not too!
Dorman #61138. I found this out by accident when I fouled up the cross screw head on the factory one.
As you can see there is no difference between the Jaguar part and the Dorman part. Cost maybe about $8 and it's available nearly anywhere.
I have been running mine for several months with no problems.
.
.
.
 03-12-2019, 08:51 PM