XF and XFR ( X250 ) 2007 - 2015

Radar detector/ cigarette lighter question

Thread Tools
 
Search this Thread
 
  #21  
Old 02-13-2014, 12:25 PM
RoswellJAG's Avatar
Senior Member
Join Date: Sep 2012
Location: Roswell, GA
Posts: 108
Received 22 Likes on 13 Posts
Default

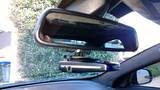
Ok, for those this may help. I just finished this little project. I mounted my Audi Blendmount which works for the XFR along with their 12" Mirrortap for power. Remove the shell behind the mirror. Unplug the connector in order to handle it more easily. You will tap the black wire for ground. I did not have a brown/yellow like Chuck so I had to look for the switched power. It turned out to be the wire next and to the left of the black when the connector is plugged in. Sorry but I forgot to write down the color of the wire and realized it after all was put back together. In any case it took a couple of minutes to find it via trial and error. You can also try a voltmeter.

By the way, this is much easier and quicker than fiddling with the overhead console as long as you use one of these power tap-type wires.

Good luck!
 

Last edited by RoswellJAG; 02-13-2014 at 01:18 PM.
The following 2 users liked this post by RoswellJAG:
chuckh007 (02-13-2014), RodTee XF (03-11-2014)
  #22  
Old 02-13-2014, 02:02 PM
chuckh007's Avatar
Senior Member
Join Date: Mar 2012
Location: California, USA
Posts: 333
Received 43 Likes on 34 Posts
Default

Hey….good work…..can you send me a photo of the Blend-mount so I can see how it compares to what I have ? I did send you a photo of my mount but I guess you lost that too. I wish I could attach jpg to these messages…..but can not figure it out.
 
  #23  
Old 02-13-2014, 03:07 PM
Darren2012's Avatar
Junior Member
Join Date: Aug 2013
Location: Middle Europe
Posts: 6
Likes: 0
Received 1 Like on 1 Post
Default Well done

If you can share more info on how did you take it apart without making damage to the whole thing.
The more info the better.
Thanks.
 

Last edited by Darren2012; 02-13-2014 at 03:36 PM.
  #24  
Old 02-13-2014, 03:31 PM
RoswellJAG's Avatar
Senior Member
Join Date: Sep 2012
Location: Roswell, GA
Posts: 108
Received 22 Likes on 13 Posts
Default

Originally Posted by Darren2012
If you can share more info on how did you get it apart without making damage to the whole thing.
The more info the better.
Thanks.


You just squeeze it at the seams and it literally flies apart. It doesn't break but be ready to catch it. LOL!
 
  #25  
Old 02-13-2014, 03:52 PM
RoswellJAG's Avatar
Senior Member
Join Date: Sep 2012
Location: Roswell, GA
Posts: 108
Received 22 Likes on 13 Posts
Default

Originally Posted by chuckh007
Hey….good work…..can you send me a photo of the Blend-mount so I can see how it compares to what I have ? I did send you a photo of my mount but I guess you lost that too. I wish I could attach jpg to these messages…..but can not figure it out.


Attached Images     
The following users liked this post:
chuckh007 (02-13-2014)
  #26  
Old 02-13-2014, 06:45 PM
chuckh007's Avatar
Senior Member
Join Date: Mar 2012
Location: California, USA
Posts: 333
Received 43 Likes on 34 Posts
Default

Thanks…….by clicking on the "Original Link" the image is better and clearer and larger. I did not have that much room on the stem between the mirror and back mount, so I figured any Blend-mount would not work…..saw that you used the Audi model.
 
  #27  
Old 02-13-2014, 07:24 PM
RoswellJAG's Avatar
Senior Member
Join Date: Sep 2012
Location: Roswell, GA
Posts: 108
Received 22 Likes on 13 Posts
Default

Originally Posted by chuckh007
Thanks…….by clicking on the "Original Link" the image is better and clearer and larger. I did not have that much room on the stem between the mirror and back mount, so I figured any Blend-mount would not work…..saw that you used the Audi model.


Yeap, its their mount for Audi, aud-002/bbe-2025. Very thin at the mounting point.
 

Last edited by RoswellJAG; 02-13-2014 at 07:35 PM.
  #28  
Old 03-12-2014, 10:00 AM
RodTee XF's Avatar
Senior Member
Join Date: Apr 2012
Location: San Antonio, Texas
Posts: 212
Received 57 Likes on 36 Posts
Default

Thanks Chuck & Roswell I installed my Safe-n-sound stealth cord 2 days ago with you guys help from this post. My ignition switched +12v was brown & yellow but as stated the "needle" connections made this very simple to do. Thanks again!
 
The following users liked this post:
chuckh007 (03-13-2014)
  #29  
Old 03-12-2014, 08:39 PM
RoswellJAG's Avatar
Senior Member
Join Date: Sep 2012
Location: Roswell, GA
Posts: 108
Received 22 Likes on 13 Posts
Default

Originally Posted by RodTee XF
Thanks Chuck & Roswell I installed my Safe-n-sound stealth cord 2 days ago with you guys help from this post. My ignition switched +12v was brown & yellow but as stated the "needle" connections made this very simple to do. Thanks again!

You are quite welcome. Glad I was able to give back to our community.
 
Related Topics
Thread
Thread Starter
Forum
Replies
Last Post
redgear
XJS ( X27 )
11
09-18-2015 10:05 AM
SeanU
XK / XKR ( X150 )
4
09-18-2015 08:09 AM
cyber3d
XK8 / XKR ( X100 )
2
09-15-2015 02:37 PM
DustysSon
X-Type ( X400 )
1
09-13-2015 04:17 AM
jagent
XJ6 & XJ12 Series I, II & III
10
09-12-2015 01:40 AM

Currently Active Users Viewing This Thread: 1 (0 members and 1 guests)


Quick Reply: Radar detector/ cigarette lighter question


All times are GMT -5. The time now is 08:48 PM.