Retrofit XFR Rear Diffuser
#21
 12-04-2013, 03:09 PM

Member
#22
12-04-2013, 04:28 PM

Yes, I just swapped the xfr panel with the old one. It was fairy easy to do, maybe 20 minutes tops.
I had to pull down on bottom edge of the old panel a bit to get the screw push pins to unscrew. Then I started popping the tabs on the sides first. Reaching behind and pushing them down so they slipped out of the holes. After the side tabs were free, you just kind of yank straight back on the upper tabs and it comes right off. No scratches.
You will see how the tabs work clearly with the replacement panel in hand. That was what I used for guidance. There were no instructions included.
The diffuser is painted. Much nicer than the flat black color of the old panel. The feel in the rear is much more solid with the diffuser. I was amazed at the difference those little fins add to the rear stability when driving.
I can take a picture of the back of the old panel if you would like to see the tabs before buying.
#23
12-05-2013, 12:01 AM
Member
#24
12-05-2013, 05:05 AM
That is a decent price. I paid 196.
Jaguar C2Z16212 Valance Valance Panel | eBay
Looks like he is selling another at this price.
Jaguar C2Z16212 Valance Valance Panel | eBay
I'll get you a picture later today.
Jaguar C2Z16212 Valance Valance Panel | eBay
Looks like he is selling another at this price.
Jaguar C2Z16212 Valance Valance Panel | eBay
I'll get you a picture later today.
The following users liked this post:
ddanielcigars (12-26-2013)
#26
12-05-2013, 12:34 PM

The holes at the top are the forward most part of the panel. They are where the screw push pins go through.
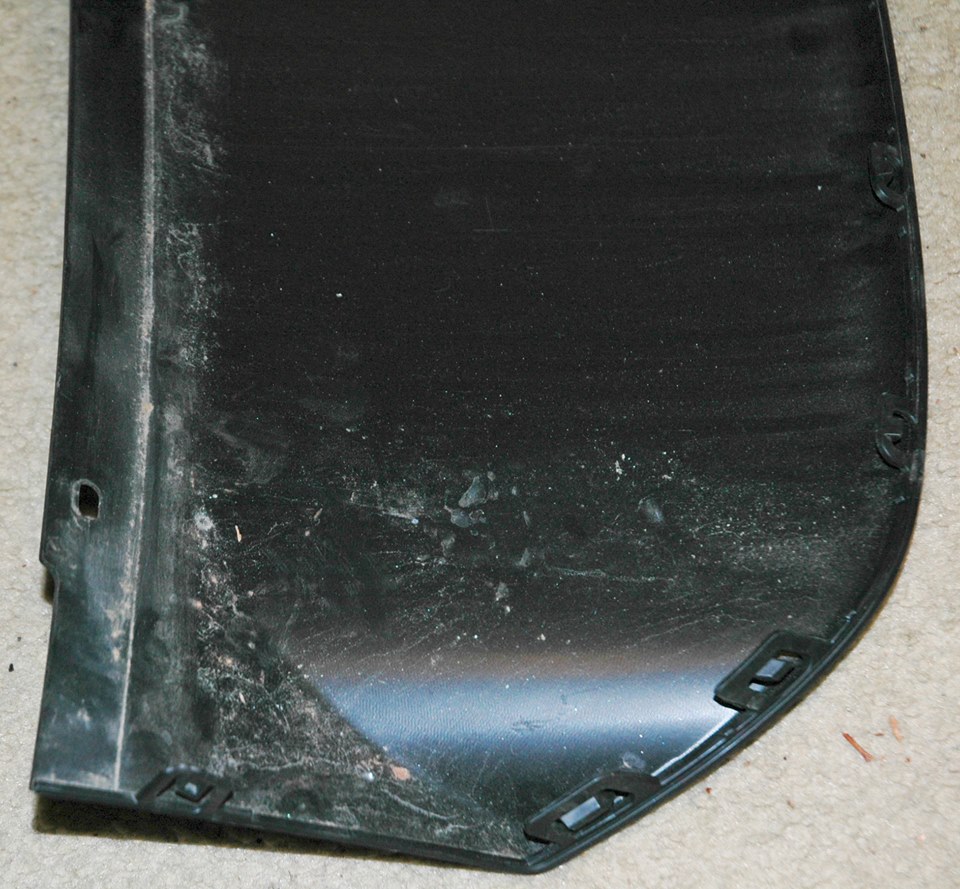
A picture of the three different tabs.

A close up of the lowest side tab. It is very flexible. you just need to reach around and push it for the tab to slip out.
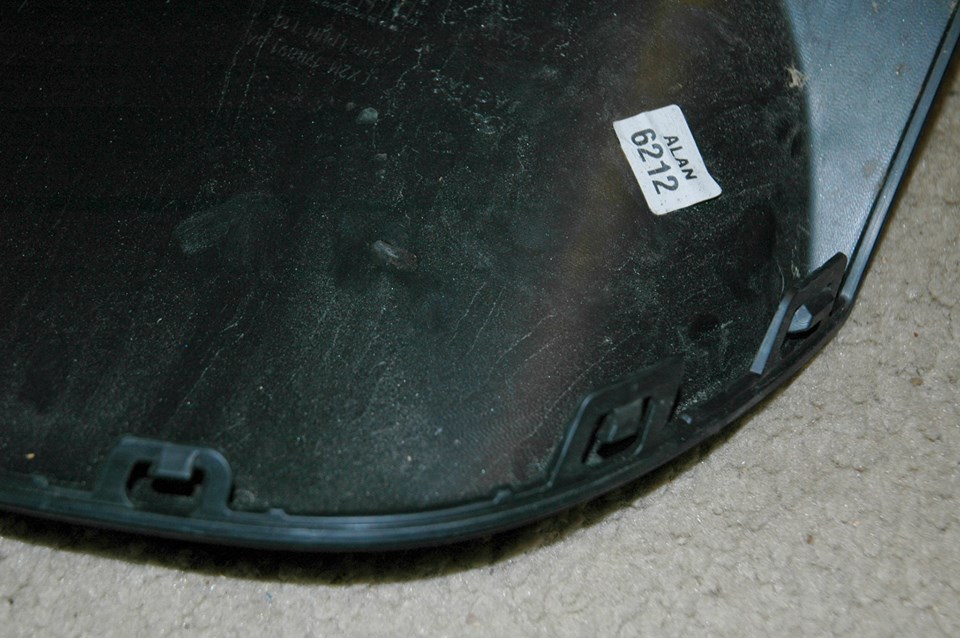
The upper side tabs and the top tab. All of the side tabs should be disengaged from the bumper before attempting to remove the upper tabs from the bumper.
The following users liked this post:
ddanielcigars (12-26-2013)
#27
12-05-2013, 09:51 PM
Member
#28
12-09-2013, 08:53 AM
Senior Member
What are everybody's thoughts on this project? I have seen many people over in the UK are doing this. I know there is some work involved but nothing crazy, all you have to do is make new slots for the tabs of the new valance. A dremil tool would do the trick. There is a guy on you tube who does a video on it. I know Mina offers the the Diffuser and I sure it's top notch. I called there and they said it comes in one piece and I was a little worried about how that looked considering I would want it two toned. The factory set comes in two pieces and the finned underplate already comes in gloss black, the top valance is all that needs to be painted. Finned underplate - C2Z16212 ($182.40) Top surround - C2Z16211 ($60.38) so that's a huge savings and to have OEM parts. Has anyone done this?
#29
12-09-2013, 10:17 AM

#30
12-10-2013, 09:31 PM
jlocc619
I'm curious, on a scale of 1-10 with 1 being easy breezy and 10 being oh Sh*t that was a pain.. how would you rate the install of the Mina diffuser and exhaust?
I ask, because I suckered my buddy into helping me do this same project a couple of weeks ago and it took the 2 of us about an hour and some degree of cursing.. I would rate it a 6.5-7.0 on the scale because 1. it does take two people and 2. It didn't seem it was going to go on until we muscled it into place. I felt sure I was going to break a tab or have it pop off when I hit the first bump.
Wish I'd known you were doing this we could have had a diffuser party.
JW
 I tried at first by myself and I was worried I would crack the carbon fiber. The exhaust is just a bolt on, so not much to it there except for the need to maneuver the bolts/hangars so the tips don't vibrate.
On another note I see you did your tune and exhaust with Eurocharged. I was down there last October and I was the first Jaguar they had seen. It was him and his partner who lived in Boston (who had a 1,000 hp Porsche on the dyno). Anyhow, I had some issues after my first dyno run(smoke, which Jag later identified the root cause) and never finished...or ended up going back. Long story short, are you pleased with it and what did you pay? I was going to pay $975 out the door last October for pulley, tune, and before/after dyno. I see they were offering a group buy for $800 not too long ago. What did you pay?
#31
12-26-2013, 01:50 PM
Member
#32
12-26-2013, 01:55 PM
Veteran Member
The following users liked this post:
ddanielcigars (12-26-2013)
#33
12-26-2013, 03:32 PM
Member
Here is the eBay store I puchased from:
http://stores.ebay.com/RUSNAK-Pasade...p2047675.l2563
the part numbr is: C2Z16212
The outside (area that shows) came painted gloss black (matches my front grill since I have the Sport Pkg.) the back or inside is standard black plastic, but is ready to install.
Once out of the package, be sure not to lay it on a rough surface, as it will easily scratch. Contact them and I'm sure they'll take good care of you. Great communication and customer service. Good luck.
#34
12-26-2013, 07:56 PM
The following users liked this post:
ddanielcigars (12-29-2013)
#35
12-27-2013, 09:43 AM
Senior Member
Here is the eBay store I puchased from:
http://stores.ebay.com/RUSNAK-Pasade...p2047675.l2563
the part numbr is: C2Z16212
The outside (area that shows) came painted gloss black (matches my front grill since I have the Sport Pkg.) the back or inside is standard black plastic, but is ready to install.
Once out of the package, be sure not to lay it on a rough surface, as it will easily scratch. Contact them and I'm sure they'll take good care of you. Great communication and customer service. Good luck.
http://stores.ebay.com/RUSNAK-Pasade...p2047675.l2563
the part numbr is: C2Z16212
The outside (area that shows) came painted gloss black (matches my front grill since I have the Sport Pkg.) the back or inside is standard black plastic, but is ready to install.
Once out of the package, be sure not to lay it on a rough surface, as it will easily scratch. Contact them and I'm sure they'll take good care of you. Great communication and customer service. Good luck.
#36
12-27-2013, 11:21 AM
It does, but the tabs won't match up. You would buy both pieces and dremel new slots. I started this thread explaining all this and a member was kind enough to put up a video on how too. Another option we have is Mina, the tabs match up so no cutting into to the bumper. Go to the start of the thread.
The following users liked this post:
WRXtranceformed (12-27-2013)
#37
12-27-2013, 05:20 PM
It does, but the tabs won't match up. You would buy both pieces and dremel new slots. I started this thread explaining all this and a member was kind enough to put up a video on how too. Another option we have is Mina, the tabs match up so no cutting into to the bumper. Go to the start of the thread.
I went with the Mina on my 2011 and it was a very simple install. They shipped it to my door completely painted to make things even easier. I would not hesitate to recommend them to anyone.
#38
12-27-2013, 10:04 PM
Senior Member
It does, but the tabs won't match up. You would buy both pieces and dremel new slots. I started this thread explaining all this and a member was kind enough to put up a video on how too. Another option we have is Mina, the tabs match up so no cutting into to the bumper. Go to the start of the thread.
Last edited by WRXtranceformed; 12-27-2013 at 10:07 PM.
#39
12-28-2013, 12:08 AM
Just give them a call. It seems they offer a lot of services and parts that do not make it to the website. I too was considering the CF version but thought it might not be the best fit aesthetically for this car and me.
#40
12-29-2013, 10:07 PM
Member