When you click on links to various merchants on this site and make a purchase, this can result in this site earning a commission. Affiliate programs and affiliations include, but are not limited to, the eBay Partner Network.
It says in Topix to remove the supercharger. Once you start taking it apart you might be able to get access to all the bolts for the snout. If not, then most likely you will have to take it out, but I'm pretty sure I've seen a Land Rover tech do this job without removing the supercharger.
REMOVAL AND INSTALLATION
Loading...
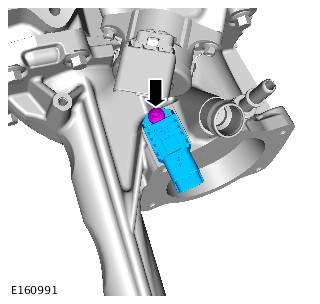
Removal
CAUTION:
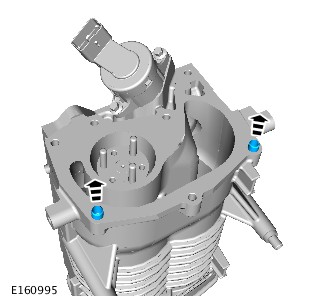
Make sure that all open ports are covered to prevent any foreign material ingress.
NOTE:
Some variation in the illustrations may occur, but the essential information is always correct.
WARNING:
Make sure to support the vehicle with axle stands.
Raise and support the vehicle.
Refer to: Supercharger (303-12C Intake Air Distribution and Filtering - V8 5.0L Petrol/V8 S/C 5.0L Petrol, Removal and Installation).
CAUTION:
Make sure that all open ports are covered to prevent any foreign material ingress.
CAUTION:
Make sure that all open ports are covered to prevent any foreign material ingress.
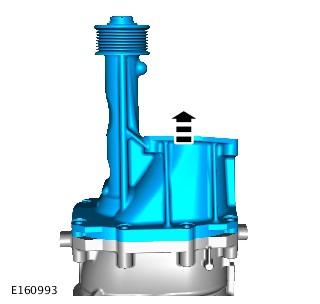
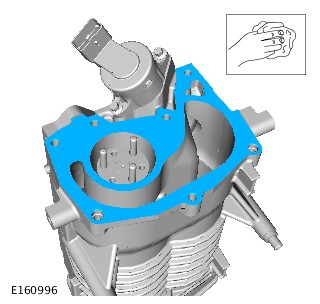
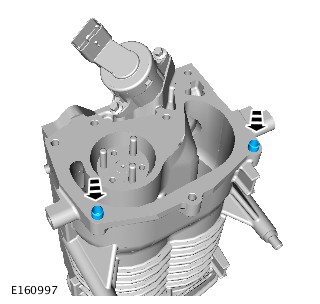
Installation
CAUTION:
Make sure that all open ports are covered to prevent any foreign material ingress.
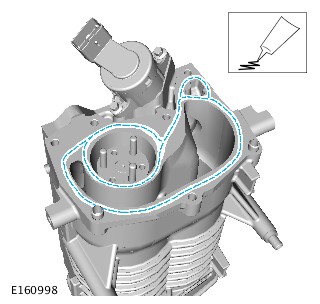
CAUTION:
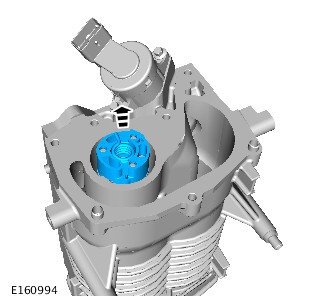
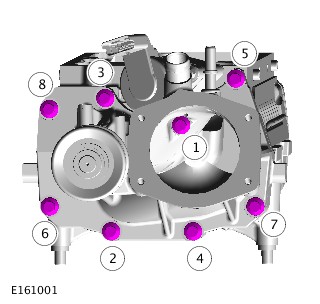
Apply a continuous bead of gasket sealant as shown on the illustration. The application of the sealant must be 1mm diameter. Install the component immediately after applying the sealant without smearing the sealant.
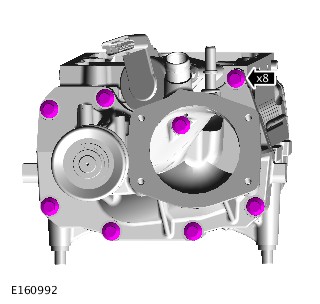
Torque: 27 Nm
Torque: 5 Nm
CAUTIONS:
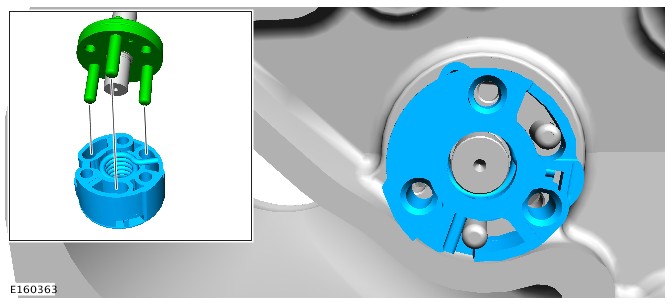
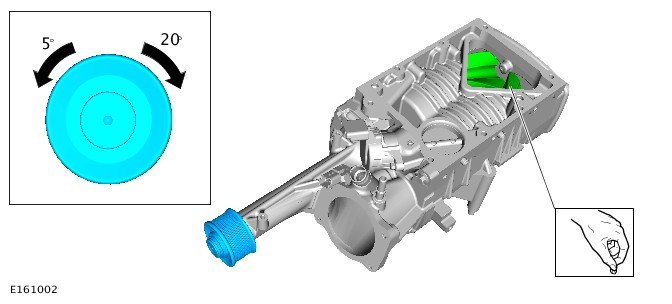
Make sure that spring resistance is felt in both directions of the pulley as shown.
Make sure that all open ports are covered to prevent any foreign material ingress.
NOTE:
Supercharger rotors will appear polished, this is normal
I speak from experience that anything rear of the supercharger, even with all the scuttle panels removed, is a complete pain in the *** to get to. There's a wiring connector for the sound symposer, one for the IAT sensor on the other side, and these wiring looms have almost no slack in them. Furthermore, I found the plastic casing around the engine wiring loom at the back to be pretty much impossible to open and remove the wiring loom from.
The workshop manual is as useless as always with this, going no further than "Simply remove X"
And that's before you even get to remove the supercharger, which for me was a job in itself. There are two locating dowels underneath the supercharger which are interference fit, requiring me to buy and drill some metal bar section, thread some rod (M8 if memory serves) through it, and a strong friend to help me rock it off the engine. We tried without the bars and it was just impossible to get the supercharger to move at all.
I also found removal of the snout was ..... interesting. The technique that I found to work in the end was to back out all the snout bolts 1/2", hold the supercharger by the snout and then and then smack the sh*t out of the joint with a rubber mallet. The weight of the supercharger should break the seal, and the bolts stop it crashing to the ground. Might be worth putting something soft underneath it in case you drop it anyway. Based on how much it took to break this seal I really question how easy replacement would be with the supercharger still on the engine, but I'm sure it's possible.
Consider replacing the isolator with a solid one, they're available on eBay. Important: if you do go with a solid one, don't make the mistake I made - make sure the solid coupler slides freely onto the hubs before putting the supercharger back together/ - I needed to spend a good 30 minutes going at the holes on the coupler with a small round file to achieve this.
Do you think it's possible to remove the snout without removing the supercharger?
Do you think it's possible to remove the snout without removing the supercharger?
Personally, given the amount of effort I had to put into smacking the joint between the snout and the supercharger with the bolts backed out as described above, I'd say no. I'd be surprised if you could get the leverage to break the seal with the supercharger in place - that sealant is tough.
Nevertheless, it was definitely a PITA to remove the supercharger, and since it's advisable to replace the inlet manifold gaskets (and if you're being strict, the upper inlet manifold chargecooler gasket which runs at about $70) you may as well at least try to get the snout off with the supercharger in situ. If you can't get it off, it's time to yank the supercharger off.
If you do get the solid coupler, this is the one I went for. To be honest, I think it's worth it - I don't want to take the snout off again and we're only having to replace these sprung couplers because they fail - why swap it out with another part that will do the same thing? Just take the time to file the holes out so they slide on freely.
If you do get the solid coupler, this is the one I went for. To be honest, I think it's worth it - I don't want to take the snout off again and we're only having to replace these sprung couplers because they fail - why swap it out with another part that will do the same thing? Just take the time to file the holes out so they slide on freely.
The S/C also needs to come off if you want to change the oil in it, correct? The fill/drain is in the back?
The S/C also needs to come off if you want to change the oil in it, correct? The fill/drain is in the back?
Yes sir! Major service was done to mine (Bearings, couple and oil change) by the dealer I bought the car from at 52k mi. It had been the sales managers demo and he felt the supercharger was getting noisy. Spoke to the tech that pulled and installed mine and he confirmed "it's a bear" to do..lol
Dave Tibbs is spot on when he says both removal of the SC and the snout are a bitch. The sealant used in securing the snout to the body is very tenacious and I don't think I would have been able to pry and beat it enough to remove without SC removal from the engine bay. Sure would save a load of grief if you can.
I also chose to use a solid coupler to avert the future replacement as well. I was working on a 2013 3.0 so I did not experience the overhead engine wiring harness issues and only had problems during removal with the stuck pins. I believe that the main reason for them being stuck is the accelerated corrosion due to the manifold being aluminium and the guide pins being steel. I made sure to lube it up well upon replacement.
I think we can call this the "Tibbs technique" now
A few notes:
Removing the snout while in the car is not possible... easily.
You won't have access to one of the front bolts, without removing passenger side intake. You won't be able to remove passenger side intake without removing driver's cylinder head. Bolts in the wrong places is all I can say.
Removing supercharger is tough even with more access to rear engine in the XKR.
I was surprised by my isolator spring break, but I had prepared to replace it anyways.
Breaking the snout free of the sealant connection is best by using the pry location on underside of supercharger, which of course requires the entire supercharger with intakes removed.
A friend nearby to help you lift, is a nice to have, but not a must. I was able to extract the entire supercharger using the "tibbs technique" and lots of blankets and padding.
Light tapping of the supercharger was helpful, while screwing on the cross member to break the supercharger free of the press fittings.
I'd recommend rebuilding at least the front snout since it's out. Bearings are available on ebay, for standard TVS1900
Does anybody have an idea how much this repair would cost?
some folks on forum have claimed as low as $900 if i remember correctly. I'd guess closer to 2k if you wisely have the other "while you're in there" items done. there's plastic under and behind the S/C that should be updated as the factory plastic has had 10 yrs of heat cycles and could crack and leak, requiring s/c removal
you have to remove 50+ fasteners and bolts just to expose the supercharger itself. i think 22 or 25 machine screws in the change cooler to remove it after draining of coolant.. the fuel line is above the charge cooler and has to be taken out of the way.
the s/c itself has a couple positioning dowels that make it seem "stuck" down. i used a prybar in the front and found an easy point of leverage and this became no issue at all.
if doing by self or bringing to an independent shop - do yourself a favor and study the workshop manual step by step and also the various details posts with pics on the forum.
there's a guy on ebay in NW pennsylvania called quality superchargers. i think his name is Ed. If you ship the S/C to him, he'll change the oil, replace the bearings and isolator and install a 7% increase boost pulley for about $600 plus return shipping. i had good experience with him.
My invoice has 8.5 hours labour on it when I had the snout changed on my '10 XKR.
It was done under warranty so I don't know what the final cost was but I purchased a solid coupler and got my mechanic to put that in while the snout was being changed.
You could actually just buy the solid coupler and not bother changing the snout which would save a lot of money but that assumes the bearing are OK.

 03-30-2017, 06:49 PM