When you click on links to various merchants on this site and make a purchase, this can result in this site earning a commission. Affiliate programs and affiliations include, but are not limited to, the eBay Partner Network.
also, seems that some feel the snout can "maybe" come off with the right wrenches or ... - no way no how. the S/C needs to be off and completely unbolted to remove the snout. i cut up wrenches to try and short cut - didn't help
so the parts are $30 or $300 or ... - all depends on what and how much you choose to do
it's the labor that gets you - probably $140/hr shop rate. if 8 hrs book rate then well over $1,200 with sales tax applied
i think it's wise for folks to plan on 2-3k budget once you need to do the inevitable "basics".
call it Jaguar tax or call it what you will, but if you're driving an originally 70k to 90k car, you'll have maintenance cost accordingly
the do it yourselfer has all the same costs - even with their "free" labor, as they've probably equipped themselves with all the tools and shop space to do the work
I work at a Indy shop and I�ve done at least 6 of these supercharger removals/rebuilds it does has to come out. No need to make the tool to get it off the dowels pry bar on each side wiggles it off. Also as far as splitting the snout off the unit a large cold chisel or wedge works perfectly to release sealant.usually have it off in about 2 hours. Any one attempting a diy feel free to message for tools and pointers.
Hello I read your info on the isolator replacement. Since I have the supercharger of I noticed you guys mention oil. When I took my supercharger of it had some oil in on the little reservoir/crevice next to the electric flap, I'll see if I could post some pics identifying the oil, anyway should that oil be there? And also you mention to replace the oil is there another location where the charger has oil? The yellow highlighted area is where I found some oil when I took off the charger, does anyone know if this is normal? When I stopped by a local shop they mention that there shouldn't be any oil in there
Hello I read your info on the isolator replacement. Since I have the supercharger of I noticed you guys mention oil. When I took my supercharger of it had some oil in on the little reservoir/crevice next to the electric flap, I'll see if I could post some pics identifying the oil, anyway should that oil be there? And also you mention to replace the oil is there another location where the charger has oil? The yellow highlighted area is where I found some oil when I took off the charger, does anyone know if this is normal? When I stopped by a local shop they mention that there shouldn't be any oil in there
there�s a little screw on the back of the supercharger that you have to take out to do the supercharger oil.
Jaguar XF 2013 supercharger. Good day anyone knows if the supercharger takes oil
[QUOTE=JBzXJ40;1649328]It says in Topix to remove the supercharger. Once you start taking it apart you might be able to get access to all the bolts for the snout. If not, then most likely you will have to take it out, but I'm pretty sure I've seen a Land Rover tech do this job without removing the supercharger.
REMOVAL AND INSTALLATION
Loading...
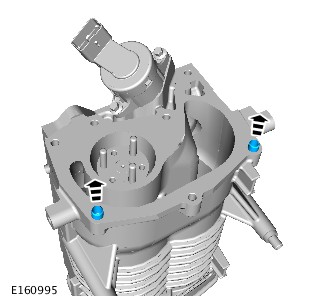
Removal
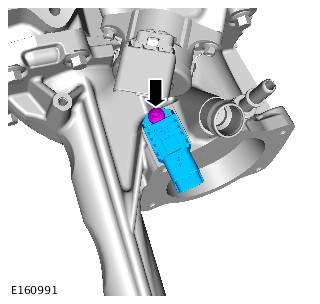
CAUTION:
Make sure that all open ports are covered to prevent any foreign material ingress.
NOTE:
Some variation in the illustrations may occur, but the essential information is always correct.
WARNING:
Make sure to support the vehicle with axle stands.
Raise and support the vehicle.
Refer to: Supercharger (303-12C Intake Air Distribution and Filtering - V8 5.0L Petrol/V8 S/C 5.0L Petrol, Removal and Installation).
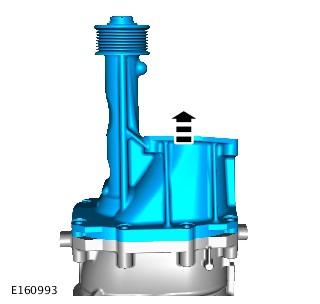
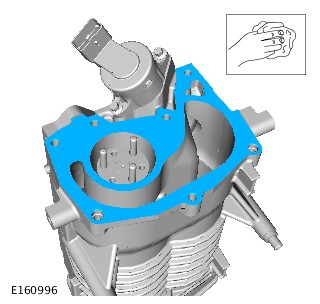
CAUTION:
Make sure that all open ports are covered to prevent any foreign material ingress.
CAUTION:
Make sure that all open ports are covered to prevent any foreign material ingress.
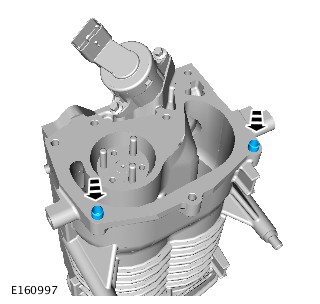
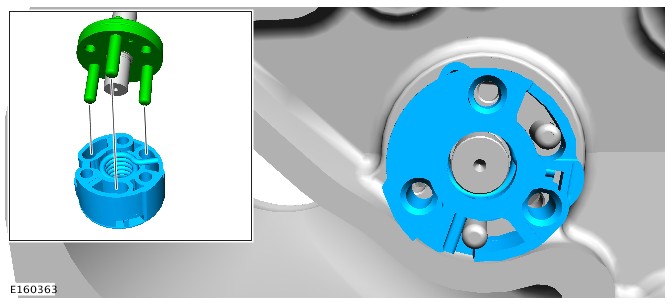
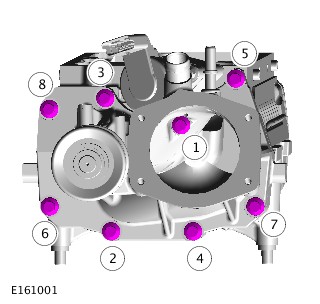
Installation
CAUTION:
Make sure that all open ports are covered to prevent any foreign material ingress.
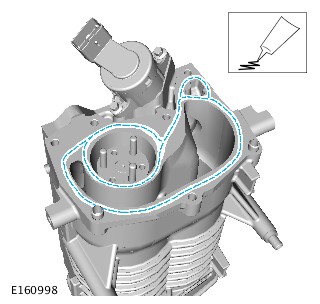
CAUTION:
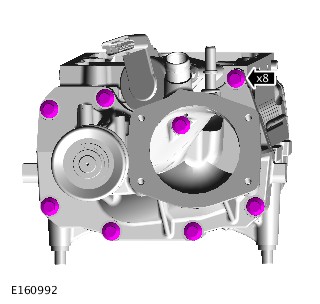
Apply a continuous bead of gasket sealant as shown on the illustration. The application of the sealant must be 1mm diameter. Install the component immediately after applying the sealant without smearing the sealant.
Torque: 27 Nm
Torque: 5 Nm
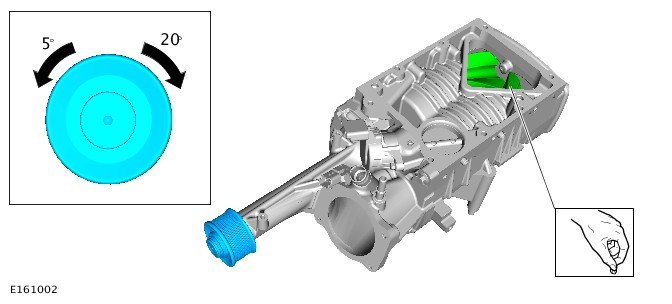
CAUTIONS:
Make sure that spring resistance is felt in both directions of the pulley as shown.
Make sure that all open ports are covered to prevent any foreign material ingress.
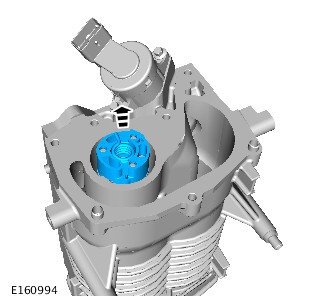
NOTE:
Supercharger rotors will appear polished, this is normal
I open my supercharger and there was no oil in the back does it take oil in it ?
I am in the process of changing the coupler in my s/c and have reached the stage of removing the snout and now trying to get the old coupler out. Assuming the new one goes back in easily I too wonder about oil. I know it needs oil but since I have the s/c open can I get the old oil out and new oil in without having to get at the drain plug at the back?
What's the thread size and pitch for the rods going into the SC?
Did you get the rods from Home Depot?
Originally Posted by davetibbs
I speak from experience that anything rear of the supercharger, even with all the scuttle panels removed, is a complete pain in the *** to get to. There's a wiring connector for the sound symposer, one for the IAT sensor on the other side, and these wiring looms have almost no slack in them. Furthermore, I found the plastic casing around the engine wiring loom at the back to be pretty much impossible to open and remove the wiring loom from.
The workshop manual is as useless as always with this, going no further than "Simply remove X"
And that's before you even get to remove the supercharger, which for me was a job in itself. There are two locating dowels underneath the supercharger which are interference fit, requiring me to buy and drill some metal bar section, thread some rod (M8 if memory serves) through it, and a strong friend to help me rock it off the engine. We tried without the bars and it was just impossible to get the supercharger to move at all.
I also found removal of the snout was ..... interesting. The technique that I found to work in the end was to back out all the snout bolts 1/2", hold the supercharger by the snout and then and then smack the sh*t out of the joint with a rubber mallet. The weight of the supercharger should break the seal, and the bolts stop it crashing to the ground. Might be worth putting something soft underneath it in case you drop it anyway. Based on how much it took to break this seal I really question how easy replacement would be with the supercharger still on the engine, but I'm sure it's possible.
Consider replacing the isolator with a solid one, they're available on eBay. Important: if you do go with a solid one, don't make the mistake I made - make sure the solid coupler slides freely onto the hubs before putting the supercharger back together/ - I needed to spend a good 30 minutes going at the holes on the coupler with a small round file to achieve this.
I work at a Indy shop and I�ve done at least 6 of these supercharger removals/rebuilds it does has to come out. No need to make the tool to get it off the dowels pry bar on each side wiggles it off. Also as far as splitting the snout off the unit a large cold chisel or wedge works perfectly to release sealant.usually have it off in about 2 hours. Any one attempting a diy feel free to message for tools and pointers.
Can anyone show me where you would place the wedge to seperate the snout? I've got a 2016 XF 3.0l SC. That sealant is really sealed pretty good and I can't get it to break free.

 07-06-2019, 08:58 AM