The Ultimate LED Q&A Thread
#21
 11-10-2012, 12:09 PM


Take the LED back out. Now look at the 2 tiny wire leads on the base. Just like Christmas lights you have to bend or move that tiny wire ver a tad to make sure it makes contact i nthe socket. Same way you do with the lights on your Christmas tree when 1 bulb wen out, you have to figet with the tiny wire to center it. Sounds lie a pain but it reallly isnt, just realizing what the cause is was a pita.
#22
11-10-2012, 12:26 PM
Take the LED back out. Now look at the 2 tiny wire leads on the base. Just like Christmas lights you have to bend or move that tiny wire ver a tad to make sure it makes contact i nthe socket. Same way you do with the lights on your Christmas tree when 1 bulb wen out, you have to figet with the tiny wire to center it. Sounds lie a pain but it reallly isnt, just realizing what the cause is was a pita.


Last edited by hlgeorge; 03-21-2013 at 04:24 PM.
#23
11-14-2012, 04:47 PM
My lamps finally came (from China) and I was ready to get started. Using BigCat09's photos gave me a very good reference to start.
The Front Panel:
I made two “pulling tools” from large paperclips. The small loops were inserted as shown and I kept a slight twist pressure until the loop turned freely and then pulled it down to catch on the panel edge on each side. A good grip and a firm pull deployed the front interior light panel. The twist and pull sockets made it easy to turn the lamp around if I didn’t get it in proper polarity. After checking that the lamps were working, snap the panel back into place.
The "pulling Tools":

The "Pulling Tools" attached to frame:

The Rear Panel:
I thought I was to just pull the panel from the sunroof side and it would easily snap out. WRONG! Using my fingers, I was pulling very hard and it was not coming loose. I was pulling on one corner and apparently torqued the panel enough to snap open one side of the clear lens. The Ah-Ha moment! I was supposed to remove the clear lens first. The lens has two large tabs on its hinge point that hold the whole panel in place. Lesson learned. The clear lens can be removed by prying it down from the rear of the car side of it. Pull it out and the panel will drop down. Replace the lamps, check for correct polarity, position the panel back into place and snap the clear lens back on.
Lens open:

Another view:

Back in place:

Lamps I used:

The Front Panel:
I made two “pulling tools” from large paperclips. The small loops were inserted as shown and I kept a slight twist pressure until the loop turned freely and then pulled it down to catch on the panel edge on each side. A good grip and a firm pull deployed the front interior light panel. The twist and pull sockets made it easy to turn the lamp around if I didn’t get it in proper polarity. After checking that the lamps were working, snap the panel back into place.
The "pulling Tools":
The "Pulling Tools" attached to frame:
The Rear Panel:
I thought I was to just pull the panel from the sunroof side and it would easily snap out. WRONG! Using my fingers, I was pulling very hard and it was not coming loose. I was pulling on one corner and apparently torqued the panel enough to snap open one side of the clear lens. The Ah-Ha moment! I was supposed to remove the clear lens first. The lens has two large tabs on its hinge point that hold the whole panel in place. Lesson learned. The clear lens can be removed by prying it down from the rear of the car side of it. Pull it out and the panel will drop down. Replace the lamps, check for correct polarity, position the panel back into place and snap the clear lens back on.
Lens open:
Another view:
Back in place:
Lamps I used:
Last edited by hlgeorge; 11-15-2012 at 12:41 AM.

#25
12-17-2012, 04:54 PM
I did the panel floor lamps today as done by BigCat09. They worked very well except they were a bitch to install. I couldn't get the plugs to fit into the lamp sockets and when I finally did, I had to remove them to bend the plugs wires to make contact with the socket contacts. The passenger side is still a little iffy. It kept going on and off when I wiggled the plug in the socket. I pulled it out slightly and it quit, so I left it alone, but I have a suspicion I will have to work on it more. Looks great though!! Waiting on the LEDs for the overhead lights to arrive.
Last edited by hlgeorge; 12-17-2012 at 04:57 PM.
#27
05-23-2013, 01:44 AM
It was a two week wait for them to arrive on this side of the pond:

8 pairs of the 5K 194 bulbs, 2 pairs of the amber 194s, lo beam bulbs, and reverse light bulbs.
Its the start of my weekend (Thursday is this regions Friday equivalent), so updates will be posted as I get it done. Photography-wise, I've already gotten the baseline "before" photos taken, and I'll be posting the "in-progress" shots as I go along, and then get a good set of "after" shots.
#28
05-23-2013, 01:57 AM
#29
05-23-2013, 12:21 PM
I am glad others are adding to this thread. I hope it is helping everyone find what they need instead of making lots of new threads. Thank you all for updating this.
Also, I hope those who have tried the VLEDs are happy. For another great company try autoillumination. Not cheap but they have lots of styles and types and the build is great!
Also, I hope those who have tried the VLEDs are happy. For another great company try autoillumination. Not cheap but they have lots of styles and types and the build is great!
#31
05-24-2013, 08:06 PM
Weekend started out busier that I expected, so I've only gotten the rear light assembly completed. These are the 194 5-LED units that have been recommended.

It appeared to me that there is enough room to put in a longer/larger diameter bulb with a few more LEDs in there with the same base if you wanted to go brighter than the 5 that have been recommended.

You can see the color difference in this shot:

Suns coming up, so let me see if I can get the front dome/map and foot well lights done before its too bright (and hot...)
It appeared to me that there is enough room to put in a longer/larger diameter bulb with a few more LEDs in there with the same base if you wanted to go brighter than the 5 that have been recommended.
You can see the color difference in this shot:
Suns coming up, so let me see if I can get the front dome/map and foot well lights done before its too bright (and hot...)
#32
05-25-2013, 11:34 PM
Got the headlight bulbs switched out as far as I'm going to go for now. I'm still on the fence about adding the LED turn signals because of the wire splicing involved...
Anyway, I swapped out the parking & high beam bulbs. Tool-wise, I used a 10mm socket, 6 inch #1 flat tip screwdriver, needle nose pliers, and a star bit, but I'll have to get back to ya on the size.
I found it was much easier to get to the headlight bolt in the wheel well if wheels were turned to the opposite side of the car, ie left hand assy, wheels turned to the right.
The plug assy clip lifted up with finger strength, and just wiggle it back off the headlight assy:

The parking light receptacle is shaped like a long pull tab. I pulled it out with a pair of small needle nose pliers. The bulb just pulls right out. I put the LED bulb in, but don't put it back in its well until after you test it. You have a 50/50 shot on getting the polarity right/wrong. I had it wrong the first time, so just flip it 180, and bam, it shone as advertised.


Anyway, I swapped out the parking & high beam bulbs. Tool-wise, I used a 10mm socket, 6 inch #1 flat tip screwdriver, needle nose pliers, and a star bit, but I'll have to get back to ya on the size.
I found it was much easier to get to the headlight bolt in the wheel well if wheels were turned to the opposite side of the car, ie left hand assy, wheels turned to the right.
The plug assy clip lifted up with finger strength, and just wiggle it back off the headlight assy:
The parking light receptacle is shaped like a long pull tab. I pulled it out with a pair of small needle nose pliers. The bulb just pulls right out. I put the LED bulb in, but don't put it back in its well until after you test it. You have a 50/50 shot on getting the polarity right/wrong. I had it wrong the first time, so just flip it 180, and bam, it shone as advertised.
#33
05-25-2013, 11:59 PM
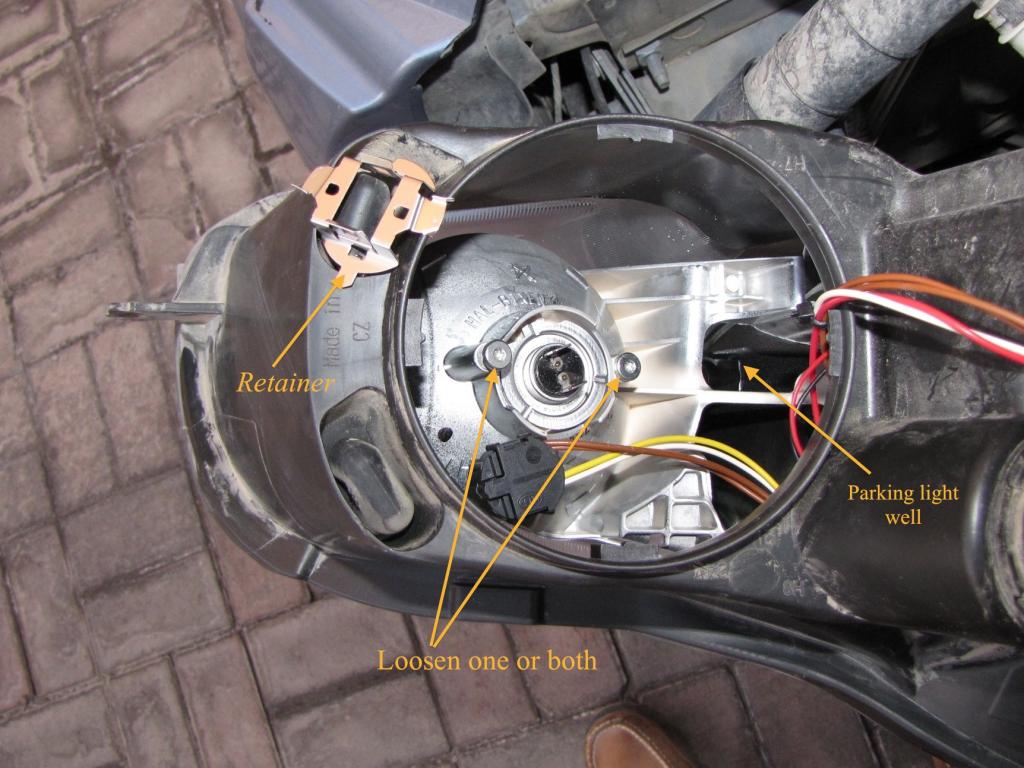
The hi-beams were done next.
The retaining clips for the hi-beam bulbs are metal, so I used the small flat tip screwdriver to lift up the tabs. Lift one clip with the screwdriver, wiggle the plug off a little so that the clip wont re-engage, and then lift off the other clip with the screwdriver, and pull the plug straight off.

Loosen one or both of the screws, and turn the retainer counter-clockwise to remove it if it hasn't fallen off by itself after you loosened the screws. NOTE the position of the retainer on the receptacle, as it makes it reassembly faster if its aligned the same way it came off.
The head of the screw is desighend for a star bit, but I just used the small needle nose pliers I had handy. If you dont have start bits handy, a flat tip inserted in the star recess would work also if the screwdriver blade can contact both sides of the screw head.
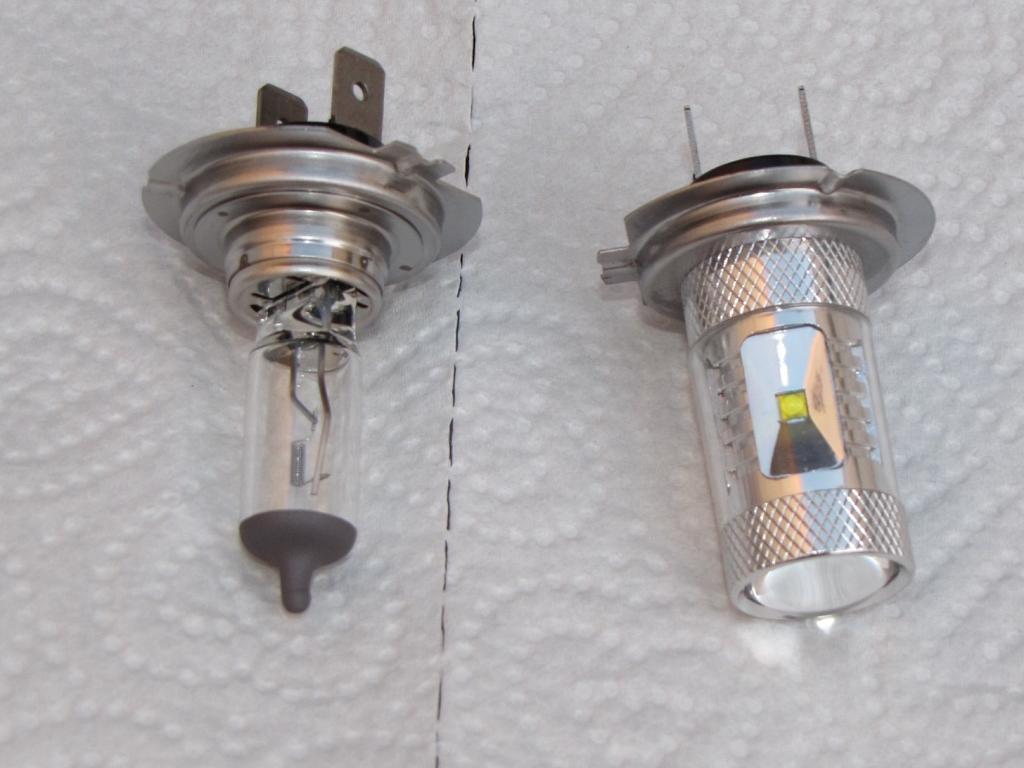
Old halogen, new LED.
Just reverse the process to re-assemble, but don't tighten the screws all the way until after you test it.
At this point, I plugged in the main plug, but don't push it down to where it re-engages the clip. Turn on the lights and you should have all the lights shinin'. Note that the parking light bulb is hanging above the assy on its wires:

If everything works, turn everything off, disconnect the main plug, tighten the screws for the hi-beams, push the parking light bulb back into its receptacle, RE-INSTALL the cover, then push the main plug all the way down on its receptacle till the clip clicks, reinstall the three 10mm bolts, test the lights again, and if everything works, move onto the other side.
It took me about 45 minutes to do this one side. The other side went a lot quicker because I knew what to expect.
The retaining clips for the hi-beam bulbs are metal, so I used the small flat tip screwdriver to lift up the tabs. Lift one clip with the screwdriver, wiggle the plug off a little so that the clip wont re-engage, and then lift off the other clip with the screwdriver, and pull the plug straight off.
Loosen one or both of the screws, and turn the retainer counter-clockwise to remove it if it hasn't fallen off by itself after you loosened the screws. NOTE the position of the retainer on the receptacle, as it makes it reassembly faster if its aligned the same way it came off.
The head of the screw is desighend for a star bit, but I just used the small needle nose pliers I had handy. If you dont have start bits handy, a flat tip inserted in the star recess would work also if the screwdriver blade can contact both sides of the screw head.
Old halogen, new LED.
Just reverse the process to re-assemble, but don't tighten the screws all the way until after you test it.
At this point, I plugged in the main plug, but don't push it down to where it re-engages the clip. Turn on the lights and you should have all the lights shinin'. Note that the parking light bulb is hanging above the assy on its wires:
If everything works, turn everything off, disconnect the main plug, tighten the screws for the hi-beams, push the parking light bulb back into its receptacle, RE-INSTALL the cover, then push the main plug all the way down on its receptacle till the clip clicks, reinstall the three 10mm bolts, test the lights again, and if everything works, move onto the other side.
It took me about 45 minutes to do this one side. The other side went a lot quicker because I knew what to expect.
The following users liked this post:
Cobalt (05-25-2014)
#34
05-26-2013, 12:05 AM


#35
05-26-2013, 12:09 AM
Some better shots taken around sunrise this morning with my other camera:
LED parking lights:

I like the color, but I'm going to see if I can find something brighter. There is plenty of room in the headlight assy for a longer bulb with more LEDs on it than the 5-LED 194 bulb used.
LED hi-beams:

Foot wells are next.
LED parking lights:
I like the color, but I'm going to see if I can find something brighter. There is plenty of room in the headlight assy for a longer bulb with more LEDs on it than the 5-LED 194 bulb used.
LED hi-beams:
Foot wells are next.
Last edited by Ish; 05-26-2013 at 12:12 AM.
#36
05-26-2013, 12:25 AM
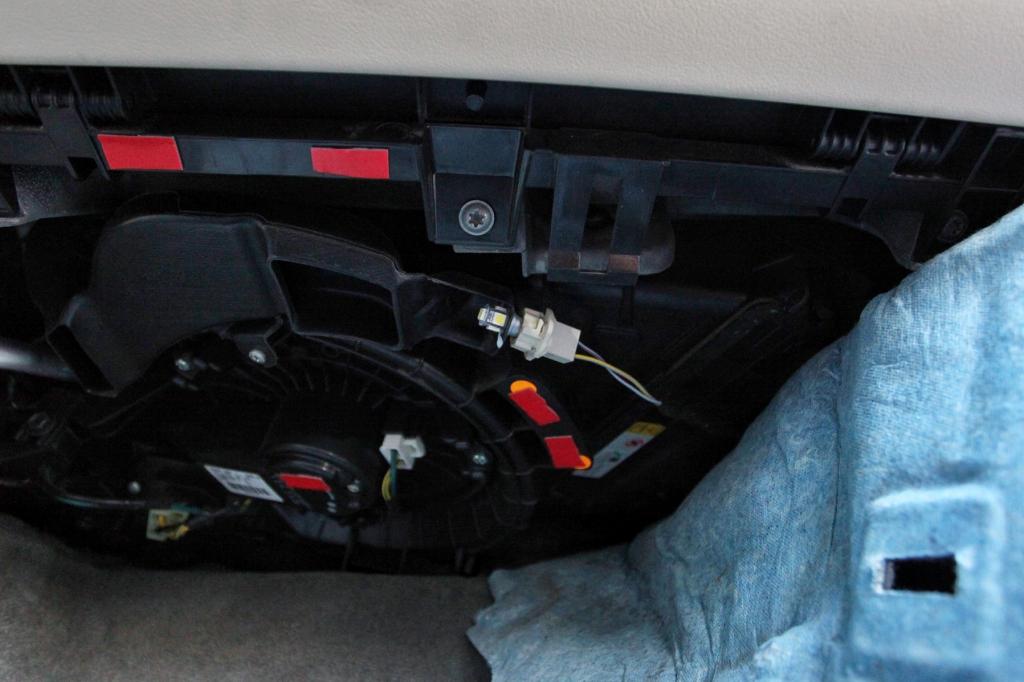
For the foot wells I used another pair of the 194 5-LED bulbs.
Squeeze the black, rectangular clips and pull them off. The foot well liners should come right off. Twist and pull the light receptacle back out off the bracket. Pull the bulb out of the socket, but it will be hot by this time. I used a pair of pliers I had handy on the bulb, but obviously, you cant squeeze very hard or the bulb will shatter. Put the replacement LED in and it should light up immediately IF the polarity is correct. If not, pull it out, turn it 180, put back in, should work this time. Put the socket back in the bracket, replace the liner and retaining clips. Shouldn't take more than 30 minutes to do both sides even if middle age has robbed you of a lot of flexibility from your youth...

Squeeze the black, rectangular clips and pull them off. The foot well liners should come right off. Twist and pull the light receptacle back out off the bracket. Pull the bulb out of the socket, but it will be hot by this time. I used a pair of pliers I had handy on the bulb, but obviously, you cant squeeze very hard or the bulb will shatter. Put the replacement LED in and it should light up immediately IF the polarity is correct. If not, pull it out, turn it 180, put back in, should work this time. Put the socket back in the bracket, replace the liner and retaining clips. Shouldn't take more than 30 minutes to do both sides even if middle age has robbed you of a lot of flexibility from your youth...
Last edited by Ish; 05-26-2013 at 12:27 AM.
The following users liked this post:
fabfive (02-02-2014)
#37
05-26-2013, 12:33 AM
#38
01-31-2014, 09:40 AM

#39
02-11-2014, 11:27 AM